
Redboost
-
Posts
1,018 -
Joined
-
Last visited
-
Days Won
4
11 Followers


About Redboost

Recent Profile Visitors
14,084 profile views


Redboost's Achievements
")
Very Obsessed Member (5/9)
7.1k
Reputation
-

1/72 - Clear Prop Messerschmitt Bf.109E/T Emil (new tool)
Redboost replied to LansVVS's topic in The Rumourmonger
They said either Eday (late June) or autumn… -
Arma Hobby 1/72 Messerschmitt Me 262A, release in March 2026
Redboost replied to TheKinksFan's topic in The Rumourmonger
On my build the fit of the nose to the fuselage is fine, you just need to dry fit everything first. In fact, I haven't used any filler except few drops of CA glue to address some fine sink marks on top of the exhaust part of nacelles. For less skilled I would recommend the Hobbyboss offering. Cheers Libor -
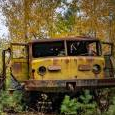
Hi Patrick, the sign on the Czechoslovak plane is a symbol of a town in which the fighter unit was located (a small city close to Plzeň/Pilsen). However, it is not confirmed that this plane wore this symbol during its service or if was applied later when it was placed as an exhibit at the aviators' memorial in this city. Btw, such symbols could be occasionally seen on CzAF planes, especially in late 1960's. After the Soviet invasion in 1968 and and the subsequent tightening of the communist regime, such symbols were severely punished. The inscription on the Soviet plane means "Excellent" and it was usually applied on an aircraft whose crew has achieved a high level of operational excellence. Cheers Libor
-
Grumman F-14A Tomcat IRIAF 1/72 Academy
Redboost replied to Redboost's topic in Ready for Inspection - Aircraft
Thanks all for kind comments! Eddy: for the Asia Minor scheme I'm using Mr.Hobby H27 Tan, H37 Wood Brown and H309 Green for upper sides and mix (50:50) of H311 Grey and H417 RLM76 for undersides. The colors could be slightly distorted due to photo editing in Photoshop; however, at the moment I'm not able to take new ones on natural light. The left-hand side walkways is actually visible on a photo I had (Avions Hors Series No.19, page 36) , while on many others seems not there... But I trusted to the Wolfpack Design decal instructions and applied it. Cheers Libor -
Hello everyone, the Academy F-14A in the 'gentleman scale' is well known and lovely kit, so I presume the recent announcement of the Ali-cat reboxing would be very welcome. This is my take on the same topic, using one of the previous kit's release converted with Wolfpack decals and refueling probe, Reskit exhaust nozzles, some Eduard etched, plus little scratch building. Built as example from 81.TFS (BuNo160322; 3-6024) which was credited with several kills during the Iraqi-Iran war, including Mirage F1 EQ. Airbrushed with Gunze Mr.Hobby color mixes. Cheers Libor
- 22 replies
-
- 90
-

-

-

-

-
1/72 - Fairey Battle Mk.I by FRROM & Special Hobby - released
Redboost replied to Homebee's topic in The Rumourmonger
Got the chance to review the new etched from Marabu, looks very nice. Should be on offer within a month or so. Cheers Libor- 733 replies
-
- 10
-
-
-
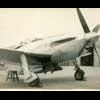
Hi everyone, one of my recent builds where I combined the Arma Hobby Mustang Mk.III kit with Eduard 3D printed engine compartment. Since the engine set was in fact designed for their own P-51D kit there was some surgery needed to convert it into B version. This mostly comprised revision of the bottom engine compartment and omission or replacement of some items. Decals from the kit were used for markings of Wing Commander Stanisław Skalski, 133 Fighter Wing, RAF Coolham, Great Britain, Spring 1944. Cheers Libor
- 22 replies
-
- 80
-
-
-
-
-
1/72 - MiG-21F-13 by Kovozávody Prostějov - new tool 2025- released
Redboost replied to matford's topic in The Rumourmonger
A modified RV tooling is confirmed… -
Hi Dima, would be the kits ready for Moson show next month? Cheers Libor
-
Grumman A-6A Intruder 1/72 Trumpeter
Redboost replied to Redboost's topic in Ready for Inspection - Aircraft
Hello Dennis, looks pretty much OK for me, but I admit I never had an eye for the smallest shape deviations so I could miss something. For me it usually work the first feelings, if something is bothering me or not. Well, I have no clue about Fujimi or Italeri and in fact I got this kit really very cheap so it was an obvious choice for my collection (at least I could invest in some aftermarkets)... Cheers Libor -
Grumman A-6A Intruder 1/72 Trumpeter
Redboost replied to Redboost's topic in Ready for Inspection - Aircraft
Hi Colin, yes, it did for most of the airframe. Only for the moveable parts (folded wings, air brakes etc.) the fit is little bit tricky in case you want to install them in fixed position. Here are few I recall: - drilling out the air brakes - adding the refueling light - removing the "strip-type" side lights - omitting some of the air vents - adding antennas on the nose gear doors and fuselage - some items related to electronic equipment (AN/APQ) at the wing tips and below fuselage may vary - the front part of the main gear doors are molded closed -
Hi everyone, despite my initial intention to approach this mixed bag kit as a "weekend project" I eventually ended up trying to address some of the kit's issues. However, some were beyond my abilities and for some it was too late as I started the mods whilst the kit was already partially painted, so it is still far from being a perfect A-6A. The breaking point for me came with purchasing the AOA decal sheet that provides many fundamental information on the individual airframes depicted. I also used some aftermarkets as Eduard Space cockpit set, Eduard resin Mk.82's and MER's and Master pitot and refueling probe. Cheers & enjoy Libor
- 34 replies
-
- 125
-
-
-
-
-
1/72nd - Curtiss Hawk Model 75 by Arma Hobby - Due Feb 2025
Redboost replied to Tbolt's topic in The Rumourmonger
Let's see in how many moldings Arma would be willing to invest. To my knowledge the variations of armament, engines and other airframe features were perhaps small at first glance, but going deeply in detail it seems they would need either several separate wings/fuselages/cowlings, or cut-to-pieces Hasegawa-style molds to cover majority of production versions. In the first round I would bet for French/Finish versions, but hopefully we may also see less numerous versions... -
1/72 - de Havilland Mosquito (two-stage variants) by Special Hobby
Redboost replied to 172flogger's topic in The Rumourmonger
In a recent youtube interview Mr.Riedel informed about a halve of all moulds is done and at the best circumstances they could be finalized by end of this year. At the same time he stated the 3D data were provided to Eduard who are working on their 1/48 scale kits. EDIT: Link for the interiew HERE, the Mosquito topics start at about 36:20 min. -
Hi Roman, another nice looking kit, those yellow markings are superb and eye-catching! Cheers Libor
