
Norman
-
Posts
1,580 -
Joined
-
Last visited
-
Days Won
2
1 Follower
About Norman

- Birthday 04/05/1952
Recent Profile Visitors
5,176 profile views


Norman's Achievements
")
Very Obsessed Member (5/9)
1.2k
Reputation
-
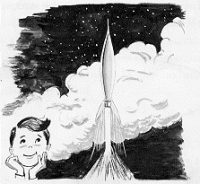
Being obsessed with all things Space i was delighted when both Revell and Airfix announced new tools , i waited a little while until i saw some reviews and couldn't decide which one to buy, both have points in their favour, in the end i leaned toward the Revell kit due to the way the parts were laid out and because the decal sheet was much larger and incorporated more items, but the Airfix kit was by no means a lesser kit , it wasn't an easy decision , the Revell kit is cleanly moulded in an off white colored plastic in Poland , it said on the box , plastic is easy to work with and takes Revell and Tamiya glues well, Here are a few pics of the assembly of the main components , one thing Airfix did was have the external piping all moulded separately whereas Revell have the smaller pipe moulded on the surface of the main tank, it wont be easy to paint it when the time comes, anyway i seperated all the parts ,cleaned them up where gates had been and began assembling them, all goes well and anyone with rocket or airliner experience will have no problem, i was a little rushed and clumsy when sanding the seam on the main tank and had to punch out some thin plasticard into 1/8 round pieces using a RP tools set to replace some fairings i destroyed , the remainder all goes together well, i am now at the painting stage and have mixed my own orange shade(s) but have run out of colours i need so getting it finished will have to wait, i have applied Tamiya LP-2 Gloss White thinned heavily with Mr Colour levelling thinner and applied in light coats, i now await a parcel with paint in it, more soon . http://IMG_4716 by Norman Long, on Flickr There is an addendum sheet included in the instruction book http://IMG_4718 by Norman Long, on Flickr I drilled out the nozzles on the escape tower rockets IMG_4717 by Norman Long, on Flickr IMG_4719 by Norman Long, on Flickr Inserting internal bracing IMG_4721 by Norman Long, on Flickr Sanding the main tank seam IMG_4725 by Norman Long, on Flickr Main central core parts attached together , no glue yet on sub assemblys IMG_4729 by Norman Long, on Flickr Standing next to my Revell 1/144 Saturn V i am soon to mask and paint IMG_4722 by Norman Long, on Flickr White undercoat going on IMG_4739 by Norman Long, on Flickr Experimenting with Orange shades and applying gloss white to boosters etc IMG_4744 by Norman Long, on Flickr
- 1 reply
-
- 7
-

-

Saturn V F-1 Engine 3D Print build
Norman replied to Norman's topic in Ready for Inspection - SF & RealSpace
Thanks everyone for your very kind comments , credit must go to my friend who printed the parts and advised me the proper way to seperate the parts from supports and prepare them for assembly and painting, preparation really is the key to achieving a great finish im no genius modeller but i do love the hobby and with 3D printing evolving its expanded my horizons greatly with subjects like this i never thought it would be possible to create. -
Hi All here is my 3D resin Saturn V engine model, it is around 1/24 scale i believe, a friend purchased and downloaded the files then printed it for me, there are many parts that took quite some time to remove from their supports and sand to prepare for assembly and painting, i kept all parts separate and undercoated with Mr Hobby gloss black and after being happy ( eventually ) that i had removed blemishes i gave all parts a coat of AK Extreme metal aluminium and began assembly , from then on i used the entire range of their shades as the build progressed, i used the basic instructions that come with the download and pics of the real thing as a guide but i felt like i needed six hands at times !, using my own artistic licence i finished it as to how i think a new production model would appear, as i say its MY view, the assembly of the main 4 parts of the engine bell was relatively easy but the piping, flanges and other 'bit' proved a bit of a challenge and took quite some time , i will display this with my 1/144 Saturn V i have in the works , cheers http://IMG_4440 by Norman Long, on Flickr http://IMG_4449 by Norman
- 23 replies
-
- 35
-
-

-

-
WRESAT on Redstone Sparta, 1/72, Horizon
Norman replied to hakkikt's topic in Ready for Inspection - SF & RealSpace
Nice job ! -
Looks great mate
-
Lovely work !
-
Looking very nice indeed !
-
Great progress ! looking really good, i like the rock base too
-
Thats coming along really well , looking forward to it progressing , id love one of those kits but they are very difficult to find !
-
Well done that man ! Huzzah Hazzzzzzzzaaaaaahhhhhh
-
1/144 NewWare Titan II Launch Vehicle - FINISHED
Norman replied to SasaU.'s topic in Work In Progress - SF & RealSpace
Nice build ! -
FW-190D-9 “blue 12” hasegawa 1/32
Norman replied to Kov1985's topic in Ready for Inspection - Aircraft
Amazing work love it ! -
Australian coaster Blythe Star - 1973 - 3D print - 1/100
Norman replied to Iceman 29's topic in Work in Progress - Maritime
Amazing craftsmanship !- 152 replies
-
- 1
-
-
- Blythe Star
- 1:100
- (and 1 more)
-
Nice build, Magna did a resin 1/48 kit back in the day....... i built one and heres some pics as i love the subject , cheers
-
Very nice !

