Search the Community
Showing results for tags '1:72'.
-
Here are a few mediocre shots of my recently completed 1/72 Flyhawk SBD-2 Dauntless. I finished it as an aircraft from the USS Lexington at the Battle of Coral Sea. The Flyhawk kit is pretty nice, and fit fairly well. Some of the small parts are very fine and break easily. I broke the arrestor hook, one of the small bomb sway braces (somehow didn't break the large bomb harness) and a few other bits. I painted my model with Gunze Mr. Color paints thinned with MLT. A bit of weathering was done with oil colors. These photos don't capture it especially well. I used the kit decals, which were excellent! The kit also came with resin wheels, and included a very nice set of tape masks for the canopy parts. Overall, a very nice kit, with a few points off for the fragile plastic and the less than stellar instructions. A-
-
 Hi Gents ! , Arma Hobby , once again , provides us with a new little gem . Ok , it's japanese , and it's 1/72nd ! 😄. Anyway I've been waiting for years to get such a nice kit of one of my favorite planes the KI-43 II in my scale . So Thanks to the Arma hobby team for this so beautiful kit ! 🙏 Many reviews on the net for it, so I won't add much things on this . Arma Hobby tried to reflect the specific lines of the original plane, and they did well! just one point for me Why did they omit the separation line on the nose air intake ? just a detail indeed.. I Always dreamed of a "blue" Ki-43 since I've brought the " profile book on Ki-43 " my first Doc indeed, such a long time ago ...😄 After, so many discussions about " blue or not blue Ki-43 did they really exist ???" on the net, I got the "pacific Profiles volume one " about Japanese Army fighters New Guinea & the Solomons 1942-1944 from Michael John Claringbould ( I encourage the ones interested in these points ( Japanese aircrafts/WWII :SWPA ) to buy this book 😉, don't have any financial interest..) And in this book there is a true evidence of blue paint on a KI-43 ! ( page 41 ) So adding to that : the main aera of operation , I can believe" blue " could have been used 😉 Paints used : To get as closed as possible ( following my feelings of course ) I chose to paint my plane with a mix of 90% Gunze Hooby Colors H322 and 10% Gunze H55 . intrados painted with a mix of Alclad paints ( aluminum /white aluminium /dark aluminium ) For the first time I used a silhouette printer to make masks for Hinomarus !!! so I used MRP-411 for the red MRP-308 for the white , MRP-419 for the yellow. Regarding the fin white markings, I decided to paint them freehand. The operational conditions on this theater of operations were so harsh on Japanese side that I doubt they had a " silhouette" to paint their markings , but this just a point of view; each modeler his own view and model of course . So let's go for pics ! And to stay as a kid anywhere ... Hope you liked it !! Thanks for seeing !! Cheers !! And happy modeling !!
- 16 replies
-
- 48
-

-

-
- Arma Hobby
- Ki-43 Oscar
- (and 1 more)
-
Whilst struggling with the canopy on my PR XVI I’ve been looking at other possibilities. And having seen so many builds on the go using them as a basis I had a question to answer. OK, so what is all this about the Tamiya Mosquito kits? (As mentioned before soemwhere, I've never built a Tamiya kit of any sort so probabaly rank as some sort of modelling eccentric! ) They are continually held up as examples of modelling kit excellence. I’m not usually swayed by majority opinion so feel I have to investigate for myself, although this is most definitely not a kit review. Evidence that I have taken the bait ….. Of course, this is going to provide a challenge for myself as the end date for this STGB is less than 30 days away. Just to add an extra frisson of excitement (for me if not for you, dear reader) is the need for a little scratch building that would seem to be almost within my grasp. This is because of the choice of finish. I said in @John’s wip here that I fancied the EDSG over Sky finish – so Banff it is!! The picture that came most easily to hand was the 143 sq NE – D / RS625 linked (here). What I hadn't realised was that when I opened the Tamiya box and looked at all that wrapped loveliness, the decals in the box have this aircraft as one of the 3 supplied. That save's a bit of decal printing. However, the need for the aforementioned scratching about is evident when you see a 100gal drop-tank with 2-tier missile mounting outboard on each wing. BM as usual is a good source of info, so I have drawings of the mounting system and the guard rails added to protect the rockets when the tank was jettisoned. I think I can carefully modify the kit rockets into 2-tier configuration. I’ll just have to have a go at the guard rails. The kit includes the smaller (50 gal?) drop-tanks, so these will have to be replaced if possible as well. Whilst there is quite a lot of detail moulded-in on the kit, I rather like the Eduard 3-d decals I used in my PR XVI cockpit. Replacement of exhausts and wheels/tyres with resin examples is becoming fairly frequent on my builds. Then I remembered that Charlie @Johnson had pointed out to someone a combined Eduard set (with all these elements) was due for release about now. Success! E’en now it is hurtling this way courtesy of Royal Mail. Hence the kit list with extras looks like this: - Tamiya 1:72 Mosquito FB Mk. VI/ NF Mk. II - new Eduard set for this kit (Cockpit IP 3-d painted decal, canopy masks, exhausts, wheels) - Blackbird Models resin 100 gal Mosquito tanks – on order - Bits ‘n pieces of plastruct or brass wire for the guard rails. So off we go. I have downloaded the 143 sqn ORB entries for March, April and May 1945. A quick peruse of the March entries (it's all I've had time for so far) shows that aircraft “D” is in regular use. I’m assuming that the photo is of the right period and hence that the records are indeed about RS625. As time is short, I won’t dig too much further just now but if someone can confirm my assumption that the ORB and the photo are talking about the same aircraft, I would be grateful. Before finally committing to this scheme, I decided to try adapting the kit rockets into “double-deckers” and also have a go at the guard rails. The rockets have come out like this …. ..... Still some painting to finish off, but almost there. Black warheads and fins, dark green missile bodies, aluminium rails. The mounting straps need to be "picked out" in black or alu. I believe there's a white painted ring around the noses as well. IF I have time I might look at the wiring at the back of the rockets (it is just about visible) but seeing as I've compromised a bit on the guard rails the wires might be omitted to aid completion For the guard rail, I first tried bits of plastic strip and rod. Those of finer dimensions could barely support their own weight and sagged at the first opportunity. After deciding against the thicker bits, which were structurally ok, because they were far too clunky I decided to attempt using brass rod. After quickly establishing that I couldn’t use CA, I’ve attempted soldering for the first time. [I seem to set myself challenges ..... ] This is the result …. A lot better than the plastic versions but still a bit blobby where I couldn’t get the solder off!!! But I’m going with these as they are just about ok and will be sandwiched between the rockets and the 100 gal tanks and hence not so obvious. [Needle in pin-vice shown for scale.] So I have some slightly agricultural guard rails and some 2-tier rockets; all I need is the ordered resin 100 gal tanks to arrive. So I will go with this and the next instalment will start on the main build. Comments and advice always welcome. Thanks for looking Rob
-
This will be a challenging build of a not very well known prototype. The Fleet Air Arm converted a number of Firefly T7s into drones for target practice. There’s no mainstream, or even short run versions of the late Marks of the Firefly and Magna are the only game in town. I think they also do a T7 as well which is probably the same as this as one of the options given is a T7 chase plane. The majority of the airframe and some detail parts are in resin. Not many parts but there is a fair amount of flash, massive Magna style pouring lugs, while the finish is a little on the rough side. Though a canvas that can both be improved upon and will scrub up well. A bundle of white metal, again needing a fair amount of cleaning up. There’s two sets of vacuum moulded clear parts, which are crystal clear. The control column and undercarriage jacks are missing but I can probably sort something out on them. There’s also duplicated resin and white metal undercarriage doors. Several pages of instructions including colour call outs and some what not to do’s. Liveries for three aircraft suggested but not transfers. I’ll have to dive into the stash for that but they are pretty straightforward. Two are for U8s at RAE Llanbedr, and a T7 chase plane. They also give information for an U8 at RNAS Hal Far. It’ll be a little while before I get started as we go away on holiday tomorrow. But I’ll dive in on return.
-
Looking for something else I found this in the stash and thought it ideal for this GB. There are multiple options for the SHAR Mk1 in the 80s. The original Extra Dark Sea Grey over White, the Falkland’s liveries and post war variations. It is one on Matchbox’s simpler kits with relatively nice detail and an absence of trenches. No Aden gun packs or external fuel tanks but overall not at all bad. Two grey coloured sprues and a cockpit canopy on a clear one. Straightforward late style Matchbox instructions and call outs for two aircraft and a nice transfer sheet. Colour call outs are Revell equivalents and mixes but I think I’ve got enough Xtracrylix shades to get the correct ones. Not sure whether to go for the colourful 800 NAS option or the camouflage Falklands 809 NAS version. Anyway that’s a decision for a little later. Now to get some paint on the internals and get started.
-
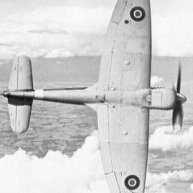
My first foray will be this SMER Spitfire that has been languishing in the stash for a while. SMER first released this around 1986 and according to Scalemates it was first moulded by Heller in the mid 70s. This boxing is from 2004. There are 4 grey sprues though 2 are half sprues. Considering the age the plastic is pretty good with reasonable detail and next to no flash. I must have dragged it out of the box at one time as there’s some grey green paint on the interior parts. There’s a clear sprue with a tiny set of separate parts for the canopy and a pretty comprehensive transfer sheet for two RAAF and an RAF versions. Reasonable straightforward instructions. Roll on Saturday.
-
 My 8th Harrier in 1:72 is finished - this time BAe Harrier GR.7A, ZD404, 33A "Lucy", Harrier Detachment, Kandahar 2006. Airfix kit + Pavla resin cockpit, exhausts and ailerons + Eduard TIALD pod + some scratch. Bombs are from Revell's Tornado and TACTS pod is from Hasegawa set. And here is an image of "Lucy" and "Michelle" Harriers in Kandahar. From the markings of the completed missions I guessed that these planes flew their missions in pair, with "Lucy" carrying guided bombs, while "Michelle" carried unguided weapons. I don't know if my conclusion is correct, but that was the reason why I decided on this weapon configuration for my "Lucy". And here is actress and model Lucy Pinder, after whom Harrier ZD404 was named in Afghanistan: 😎 Thanks for watching!
- 25 replies
-
- 83
-
-
-

-

-
Hello all, I've never posted a build but enjoy looking at some of the wonderful work carried out on here! Based on time spend with my dad at the crash gates of Binbrook in the 80's I've always had a soft spot for anything Lightning. Work and family life can make my ability to build a kit in a timely fashion difficult but with the kids being a bit older I have decided to get building a few of my kits, the intention is to build cold war jets that I have seen (or potentially could have done) from Binbrook, Conningsby and Waddington 80/90s era. I build at the dining room table so space (and tiding away) is important (to the wife anyway). I recently had a eye test and the resulting prescription has made me a new man with actually being able to see (old age it's a creeper!) and is the prompt to get back building. Building at the table limits me to brush painting but I tried some HATAKA acrylics on a recent Airfix Bucc 1:72 (RN build, long story) and wow compared to the Humbrol enamels from my youth they are very forgiving, no smells and easy brush cleaning. So enough about me, Sword kit, I've read that these can be a bit if a challenge with a lack of location pins, needing a bit of filler. Cannot be any worse than the kits from my youth. Plan is to build up in a T.5 Binbrook jet, colour scheme will be LTF (unsure of an all grey or camo yet). Hopefully I can share with you a straight forward table top build with basic modelling tools . I want something that looks like a Lightning but I'm not going to get hung up with too many details trying to achieve a nice quality build to display is the priority. Made a start on the nose and the cockpit, sorry for the iphone pics, hard to get a clear focus (I'm sure this will improve) started with a bit of the photo etch bits (this is the absolute limit for me even with the new glasses) I was unsure on what glue to use but settled with a strong PVA, I had this in the shed and it drys clear and has decent grab properties so worked ok but I'll reserve judgement until tonight when fully dry (I'll post a pic of the glue type if results are good). Next jobs for tonight are to carry on with the PE and get a bit of paint on the fuselage interior while on the sprue. Thanks for having me and any comments welcome.
-
I've been saving this one! Hasegawa RAAF F-111C kits are increasingly rare and are starting to fetch decent money. But not long after returning to modelling, my brother gifted me this precious one from his stash. Since then I've been waiting for the right time to build this, but with this GB I think that time has come! Along the way over the last few years I've picked up a few bits of aftermarket to add to what already is an excellent kit, by all accounts. In particular I have the Reskit cockpit module, plus seamless intakes from Hobartville Hobbies. No excuses not to make a decent model with that lot - hopefully I'll get the @trickyrich tick of approval! As for markings and decals, I'm planning to build A8-125, the first F-111C to land in Australia on delivery in June 1973, and the last F-111 to land at the type's retirement ceremony in December 2010 - making it the last F-111 flying anywhere in the world. (-125 is now in the safe hands of the RAAF Museum at Point Cook.) I'll be building -125 in its post Avionics Upgrade Program (AUP) configuration with the Reskit cockpit, and in the all-over gunship grey scheme. But for its tail markings I'm not 100% sure yet. With two Hasegawa decal sheets (I picked up one on Ebay) I have a few options, including the retirement scheme as well as the 6 Squadron 90th anniversary scheme with the red rudder and the standing kangaroo, which I'm leaning towards at this stage. That decision will be a ways off, given my current build rate, and I'm still finishing off my F-16. In time though, I'll take a decent swing at this. Thanks Bro! Gerard
-
Special Hobby? No. Legato? No. Eduard re-box? No. A Smer rebox of a Kovozávody Semily kit? Correct! It's the little box in the middle. I found this older pic of my P-40 kits. The Kittyhawk in front was actually just built in the ANZAC II GB. The Merlin Warhawks are still waiting for their day to come, but now it's time to build the SMÉR née Kovozávody Semily short tail P-40K kit. Look at that legacy! Kovozávody Semily passed these molds to Vista, who then subcontracted them to Revell, after which they were handed over to Smér, and the latest incarnation was by the notorius MisterCraft... who can top that? The reviews of the kit have not been that bad, though. Very appropriate for a kit of its time. Like this: https://modelkitsreview.blogspot.com/2016/02/revell-172-p40k.html and this https://modelingmadness.com/scott/allies/us/rp40kpreview.htm The Smér boxing comes with three decal options, which are (once again) an RAF 112 Sqn Sharkmouth Kittyhawk from the North Africa, a Soviet 436 IAP Lend-Leaser and an USAAF post-Op. Torch 57 FG Warhawk also from the North Africa. I believe I will go for the USAAF option, but maybe use the leftover decals from the Special Hobby P-40K kit. They are from the same FS, same FG, so thanks for the variety, model industry Yet I'm happy to get to build this soon V-P
- 3 replies
-
- 10
-
-
- Kovozávody Semily
- 1:72
- (and 1 more)
-
 Allright. doin a quicky here, and yes all PE parts will be used, hmmm obsession after my ship build eh, waiting for few AM part to my Arado build, so meanwhile doin this,...5h later, this will do just fine for me, all the instrument got glasses aswell... so enjoy. Here is the kit, got it cheap second hand, unbuilt and sealed in bags...as usual, usually never buy new...money saver, spend big bucks on quality tools and material instead.
- 56 replies
-
- 22
-
-
Hello All My Potez 361 will be going into the spray booth for priming in the near future. This requires a bit of reconfiguring of my office area, so I thought that before I do that I'd throw another entry into this GB as I think I will be able to also get it over the line before June 8th. So without further ado here is the rather battered box that it came in. Sprues Though the supplied schemes are quite pretty the decals are completely shot and possibly even mouldy. So therefore I will be using these lovely DP Casper decals, specifically the 21 Esq F84 with the green wingtip tanks. Now where did I leave my sprue cutter... Até logo.
-
Now this is going to be a real challenge but the two main components have been sitting in the stash for a long time. The Magna conversion kit is designed for the Matchbox kit but I think the Airfix kit will suffice. It also has a set of four bladed props which means I won’t need to use the resin spinners and white metal blades from the Magna set. The paint job will be the final challenge. The Mossie is a bundle of grey parts which I think come originally from a 1970s boxing, with one white sprue with props and a night fighter nose which comes from 1995. The original parts are a bit ‘soapy’ and have some flash and ejection pins while the newer parts are a bit better defined. The Magna set has a new nose, bulged bomb bay, fuselage strakes and spinners from resin, prop blades and a camera from white metal, a piece of plastic card to make the cupola support, and new vac formed transparencies for the nose, cockpit and cupola. Instructions and colour call outs for 4 aircraft. No transfers though. The Mossie has a nice transfer sheet which I won’t be using though. And a nice canopy again surplus t requirements. Instructions typical Airfix of the era. Now to get some paint on
- 11 replies
-
- 12
-
-
 Since long time I was waiting for Zvezda's new Su-27UB kit (7294) for one of my ongoing Flanker projects namely Su-35UB. The main idea is to merge Zvezda's Su-33 and Su-27UB kits. Next I will add some pictures of my work in progress. Regards, Serkan
 -
Hello. Here is my Italeri 1:72 Junkers Ju 188A-2 U5+KH, of 1./KG2, Luftwaffe, based at Bron, Lyon, France, autumn 1944. I completed this kit in 2005. The cockpit was incorrect so I scratchbuilt a new one. The top turret interior was also modified as that of the kit was more correct for the Ju 188E/F variant. The exhaust flame dampeners came from a scrapped Dragon He 219, if I recall correctly. Several other details were added. The main scheme was painted with an airbrush. Decals came from a Begemot sheet. Thanks for looking and, as always, all comments are welcome Miguel
- 22 replies
-
- 63
-
-
-
Hi Gents ! , Arma Hobby , once again , provides us with a new little gem . Ok , it's japanese , and it's 1/72nd ! 😄. Anyway I've been waiting for years to get such a nice kit of one of my favorite planes the KI-43 II in my scale . So Thanks to the Arma hobby team for this so beautiful kit ! 🙏 Many reviews on the net for it, so I won't add much things on this . Arma Hobby tried to reflect the specific lines of the original plane, and they did well! just one point for me Why did they omit the separation line on the nose air intake ? just a detail indeed.. I Always dreamed of a "blue" Ki-43 since I've brought the " profile book on Ki-43 " my first Doc indeed, such a long time ago ...😄 After, so many discussions about " blue or not blue Ki-43 did they really exist ???" on the net, I got the "pacific Profiles volume one " about Japanese Army fighters New Guinea & the Solomons 1942-1944 from Michael John Claringbould ( I encourage the ones interested in these points ( Japanese aircrafts/WWII :SWPA ) to buy this book 😉, don't have any financial interest..) And in this book there is a true evidence of blue paint on a KI-43 ! ( page 41 ) So adding to that : the main aer
- 2 replies
-
- 1
-
-
- Arma Hobby
- Ki-43 Oscar
- (and 1 more)
-
Another model on the workshop this time it is a Fairey Gannet AEW.3 in 1:72 scale from the company ‘Sword’. In the box, in addition to the frames, we have resin parts, a sheet of film and a mask, that is the model with extras. The decal sheet includes markings for two machines, the model to be built will be in box camouflage with HMS ‘Ark Royal’.
-
I bought this kit just this morning, part of a very big stash cull. My initial plan was to replace one of two Smer reboxes in my own stash with this kit, to avail of better decals and paint scheme options. While I will be offloading one of the Smer boxes as planned, I have decided to build this kit straight away, I didn't realise that no-one else (as yet) is building it. I have never built this kit before. This boxing is from the 1990s, but of course there have been others before and since: Parts: Instructions and decals: The two subjects. The box artwork is at odds with the instructions in showing the wheel covers fitted to the camouflaged subject (which is what I will be building: First task: Pick the best colour matches. The instructions for the "current" release (which Scalemates has mistakenly linked to this) have different paint recommendations to this release. I'm not convinced by either. I will be building another aircraft with this scheme, so at least I only need to research this once. If memory serves, the observer's gun mount is overly crude and/or thick, but I won't get to that for a few days.
- 13 replies
-
- 9
-
-
- mureaux 117
- heller
- (and 1 more)
-
This model spent about 15 years in the basement, already painted grey/blue, still masked, waiting for decals. Three days ago I re-discovered it and decided to repaint it in an antarctic scheme. Meanwhile I had bought nice decal sheet by Draw. I think, Fujimi has modelled the nose spot on and I am trying to figure out how to correct the wrong shape of the Italeri 212/412. I replaced the main rotor assembly with the one from the old ESCI UH-1D kit, which is the best, in my opinion. A new pitot tube had to be made from 0,4mm lead wire. For the antarctic mission, the aircraft was equipped with a HF-radio system, so the prominent wire antenna had to be added. For the colour scheme I mixed 10 parts Revell 30 "Orange" with 6 parts Revell 31 "Feuerrot". Don't be afraid of mixing Revell colours. Hope you like it. More UH-1s will follow. cheers, Norbert
-
Good evening All, I'm joining this GB with Yet Another Harrier, the Airfix 1:72 boxing of BAe SEA Harrier FRS.1 from the Falklands war. This is going to be a straight out-of-the-box build, and I'm leaning towards alternative B, XZ458/007 from the HMS Invincible Air Group. Here's the box and, as you can see, the sprues still in their bag: Tomorrow can't come soon enough! /Jari
-
1:72 Special Hobby, RIAF PT-26 Cornell
Linescriber posted a topic in Ready for Inspection - Aircraft
With the rapid expansion of the war in the CBI, it was decided to shorten pilot training by replacing the Tigermoth with the Canadian PT-26 Cornell monoplane. The first Cornells were trialled at the SFTS (I) Ambala in June 44 and then issued in increasing numbers to Nos.1 (Begumpet) & 2 EFTS (Jodhpur) for familiarisation of Instructors. Reports were favourable but the type was criticised as considerably underpowered. The general opinion was that the new type should enable the school to turn out better pilots in a shorter time. A shortage of Glider pilots in the South East Asia theatre possibly meant that the training program in India remained under pressure longer. training continued in fits and starts due to defects in the Ranger engine exhausts, spar shrinkage and cracks in the front and rear spars of the Centre Section and Mainplanes. As a result, the replacement by Tiger Moths began immediately in Nov 46 and was completed by December 46, by which time all 30 of the remaining Cornell's were unserviceable. Ironically, the Cornell was replaced by the Tiger Moth, an aircraft it was meant to replace!! This is the 1/72 Special Hobby version, I think, also the only game in town. A straightforward build except that it didn't mention anything about the Pitot head. I painted it in Vallejo colours and in the markings of the ACSEA Mar 46 scheme of high-speed silver dope and India Blue roundels. I've also posed it in front of HH the Maharaja of Jodhpur's hangar at Jodhpur. Serials are from the Tally Ho series, with each numeral separately attached.- 2 replies
-
- 9
-
-
-
- 1:72
- Indian Air force
- (and 1 more)
-
For long I intended to build the “Analog” but the current project was started by the small disappointment caused after seeing the Modelsvit kit parts “in plastic”. As an Eduard MIG-21 MF was queueing for another conversion - less radical – the plan was changed on-the-fly… Eduard kit will provide all but the specific wings and those are supposed to be drop-in replacement from Modelsvit offering… not really, as the resulting main landing gear track was far smaller than “suppose to be”… more on that after the first batch of images (far more interesting than my story telling abilites)
- 15 replies
-
- 13
-
-
Revell 1:72 F-105D : Started in Sept '24 but came to a halt when the thirty-seven year old kit decals and forty-five year old Microscale decals both turned into molecule sized fragments the moment they hit the water. Now here is Memphis Belle II in all her pigeon-toed, knock-kneed glory - there's just no fixing the stance without investing in a brass, white metal or rigid resin replacement set. Other than the loadout and new AM decals from Kits-at-War, this is straight from the (1988) box. Mr Color lacquers for the camo, didn't even try to add a wash or weathering as it's only ever going to live in the cabinet. 'Owt much else to say. great nostalgia build. Cheers from NZ.
- 14 replies
-
- 46
-
-
-
-
Hi I will enter an Eduard Weekend kit to be built in one of these two options.
-
 Here's an oldie. I was after a couple of quick builds to get my mojo mojoing again and I picked up a few golden oldies from a local trader. This one is the original 1:72 Airfix SEPECAT Jaguar, straight out of the box. I brush paint my models now, too. The camo will be a nice challenge. These kits are so simple, and you get a result really fast. It's a nice change from the complex trucks I have been doing lately.
- 16 replies
-
- 14
-
-