Search the Community
Showing results for tags 'resin'.
-
 Hey everyone With my 1/48 Tempest build coming to an end and my Harrier coming along nicely, I’ve decided that to keep my interest (in the Harrier) from waining I’ll build another Tempest Mk.V as the one from Eduard has really wetted my appetite for this rugged but rather handsome airplane. This one will be the 1/32 Hi-Tech offering from Special Hobby. As I seem to have more money than sense I’ll be adding some after market in the way of… And.. And.. And.. And.. And for some reason.. Plus all the resin and etch that you get in the standard kit. As ever I’ll be creating and spraying all codes and markings (not sure which yet), hopefully once completed I should have a fine replica of the real thing. Cheers all Iain
- 27 replies
-
- 12
-

-
- Napier Sabre
- 1/32
- (and 1 more)
-
-For the newcomers...I made a W.I.P of this kit lost somewhere in the depth of this forum....I m afraid the photos have desapeared
-
Finally got my hands on a 1/350 HMS Brave which I've been wanting since I got back in to modelling. This project is another of personal significance as my Dad was posted to Brave when I was born and I was the first person christened on the ship. Life at the minute means this one is probably going to sit on the shelf for a little while longer, but I'm so excited to have my return to modelling lined up after a bit of a hiatus starting a business.
- 6 replies
-
- 13
-
-
- royal navy
- atlantic models
- (and 1 more)
-
 Years ago, the Hawkeye Designs 1/72 Me-109G-10 was considered by some as the definitive Me-109 kit in that scale. I have little interest in the 109 so I can't comment on the accuracy of the kit. I don't build 109's so take it easy on me. This project was begun so long ago that I have only a film record of the beginning. I thought this multi-media kit would be an interesting challenge. This project is one of those plagued by mistakes and misfortune, many repairs of broken parts, lost parts, bad paint job, splashed with CA, badly warped wings when left in a hot car, and more. The model was stored for a long time. I am determined to finish the model, hopefully with good luck. Don
 -
I started this project in a Group Build of French aircraft in a German Flugzeugforum and today it is finished. The Nord 262 is a small commuter Aircraft which entered service in 1964. The kit is a typical Resin kit by F-RSIN with not much detail and some sanding and filling work required. Antennae, rudder levers and the typical pitot tubes had to be scratch built. Two Decal versions are provided and as I found both of them attractive, I attached both. In reality these are TWO aircraft. I hope you like this little french aircraft in service with a french airline. Thanks for watching! Norbert
-
a.thumb.jpg.58d92d116b0315dc55d352fd191d65e4.jpg) I would like to show you my recently finished model. The XB-70 was capable of flying Mach 3. Only two were built, one was destroyed after a collision with a Chase F-104. The other one is on exhibit in the USAF Museum in Dayton. The kit is qualitywise on the lower part of the scale. It is a has a lot of air bubbles, some of them on the edges, so it is hard to correct them. But it is the only game in town. Typical for the XB-70 on the ground is the position of the ailerons. The are not aligned but all in a different position hanging down. Also the colour of the tyres is unique, as they have to withstand the high temperatures at high speeds. The landing gear doors were too thick and I replaced them with thin plastic sheet. No big deal. hope you enjoy this white beauty!
I would like to show you my recently finished model. The XB-70 was capable of flying Mach 3. Only two were built, one was destroyed after a collision with a Chase F-104. The other one is on exhibit in the USAF Museum in Dayton. The kit is qualitywise on the lower part of the scale. It is a has a lot of air bubbles, some of them on the edges, so it is hard to correct them. But it is the only game in town. Typical for the XB-70 on the ground is the position of the ailerons. The are not aligned but all in a different position hanging down. Also the colour of the tyres is unique, as they have to withstand the high temperatures at high speeds. The landing gear doors were too thick and I replaced them with thin plastic sheet. No big deal. hope you enjoy this white beauty! -
I would like to show you my recently finished model. The XB-70 was capable of flying Mach 3. Only two were built, one was destroyed after a collision with a Chase F-104. The other one is on exhibit in the USAF Museum in Dayton. The kit is qualitywise on the lower part of the scale. It is a has a lot of air bubbles, some of them on the edges, so it is hard to correct them. But it is the only game in town. Typical for the XB-70 on the ground is the position of the ailerons. The are not aligned but all in a different position hanging down. Also the colour of the tyres is unique, as they have to withstand the high temperatures at high speeds. The landing gear doors were too thick and I replaced them with thin plastic sheet. No big deal. hope you enjoy this white beauty!
- 10 replies
-
- 20
-
-
 F-4B Phantom II Wheels (4423 for Tamiya) 1:48 CMK by Special Hobby Kit wheels are generally in two halves, which means you have the resultant joins to deal with, possible mould-slip issues on single part wheels, and sometimes less than stellar detail due to the moulding limitations of styrene injection technology, especially in the tread department. That's where replacement resin wheels come in, with their lack of seamline and superior detail making a compelling argument. They are also usually available at a reasonable price, and can be an easy introduction to aftermarket and resin handling, as they are usually a drop-in replacement. This set arrives in CMK’s usual yellow-themed clamshell box, and contains four wheels on two casting blocks that join the parts at the bottom contact patch of each tyre. They are a drop-in replacement for the kit parts once you have removed them from their pouring block, and all the wheels have a fine circumferential thread, while the main wheels also have brake detail on the rear face. There are no manufacturer’s details or tyre specification detail found on the sidewalls but the detail on the hubs more than makes up for it, with a extremely subtle weighting to the bottom of the tyres to give the impression of the airframe pressing down on the highly compressed air in the tyres. Highly recommended. Review sample courtesy of
 -
Westland Whirlwind Mk.I Gun Barrels (Q32395 for Special Hobby) 1:32 CMK by Special Hobby There were lots of happy faces when the new Special Hobby 1:32 Westland Whirlwind arrived, although a few people might have been sad that it wasn’t a helicopter. We reviewed the kit here, and some nice resin wheels & canopy masks here. Now we have the gun barrels to look at, which were well-detailed in the kit, but could always do with a little more crispness that resin offers. The set arrives in a green-themed CMK Quick & Easy shallow clamshell box, with simple instructions between the resin and backing card. Inside are two pairs of resin gun barrels on their own casting blocks, which are drop-in replacements for the kit parts once you’ve liberated them from their blocks. There’s an advert for the CMK razor saw on the instructions, and one of those is the ideal solution to getting them separated, so consider picking one up if you don’t already have one. The detail is better than the styrene parts when compared against each other, and the muzzles are hollow, so you don’t need to drill anything out. Highly recommended. Review sample courtesy of
-
Piaggio PC.7 Pegna, resin miniature by SBS Model. Painted with Gunze Super Italian Red and Vallejo Liquid Gold. It was my first purchase from this company and I am positively surprised by the quality. The cast is sharp with amazing detail and excellent fit, on part with Tamiya and Finemolds plastic sets. The crude wooden trestle is scratch built, as they didn't have the SBS ones at my usual hobby shop
-
Not wishing to go the expense of buying a 3d printer what is a cheap alternative to produce replacement parts like wheels and simple items like axles/railings etc thanks
-
German Infantryman Carried on a Hetzer (F35370) CMK by Special Hobby Walking into battle was never really much fun (I'd imagine), as it meant that you arrived tired and could be tramping across the countryside for hours, although arriving after the battle probably wasn’t all that despised. Grabbing a ride on a tank would be the ultimate perk for the infantryman, as you’re travelling on a mobile blockhouse with a big gun that is also a useful source of cover if the shooting starts. This figure from CMK arrives in a shallow blister pack with a yellow-themed header card and the instructions sandwiched between. Inside are six resin parts on three casting blocks, the largest containing the majority of the figure, minus head, one arm, one hand and one of the jacket panels between the rear vent and the left side seam. He is sat on the angled deck of a Hetzer with one leg straight and the other brought up under his haunches. The right arm is attached over a set of ammo pouches round his waist, and the hand has a grab-handle moulded into it, which marks his location as on the rear left quarter of the vehicle, as confirmed by a small photo on the instructions. The left hand is cradling a late-war STG-44/MP-44, the successor to the ubiquitous MP40, and grandfather of the AK-47. The final part is the jacket-tail, which mounts to the rear of the figure on a block and socket, having the mess-kit and water-bottle moulded-in. Finally, the head is sculpted with a long, deeply socketed neck, and moulded-in helmet with the strap crisply moulded into the chin. Sculpting is excellent, and the helpful photo will assist with the posing of the completed figure on the rear of the Hetzer, but he’ll need some mud splattered on his legs if he’s been sat there for any length of time. Highly recommended. Review sample courtesy of
-
 This build was done for the 'Anything but Injection' Group build but for those members who don't venture so far down the page I thought I'd post it here as it was an interesting challenge. This is a resin kit of a famous New Zealndtop dressing aircraft, the Flecther FU24. After WW11 top dressing land with fertiliser was big in New Zealand and huge numbers of war surplus Tiger Moths were used for the task with hoppers of Super Phosphate fitted into the front cockpit. As the Moths began to expire in the early 1950's, an alternative was needed. In typical Kiwi spirit, a group of farmers decided to build their own plane for the task and this was the result. Some were built in the US and assembled in NZ but most of the 300 eventually built were made in NZ. Some are still flying today 40 Years later. Here are the kit components. Note the poor quality resin parts, broken propeller and tiny seats for the cockpit. Unusually for a fixed under carriage model, the kit comes with wheel wells! Instructions are a 3 view drawing. Quite a bit of Milliput needed to correct the shape of the fuselage and fill those wheel wells. The nose and rear fuselage were hollowed out with a power tool to reduce the weight at the rear and make space for lots of lead in the nose. Basic structure completed Final paint scheme completed and passing the nose weight test. The kit supplied main undercarriage was under scale, inaccurate and far too weak for the weight of the model. A new one was made from brass wire with wheels from the spares bin. Ribs have been made for the flaps and the vacform canopy fitted over the scratch built interior. Decals were made on my home printer. Finished article. View showing scratch built hopper with exhaust pipes, nose grear leg and leading edge mirrors added. Full build log and more pictures can be found on this link Colin
- 12 replies
-
- 27
-
-
I picked this up about 10 years ago just in a plastic bag with no clue of the manufacturer. A quick look on Scalemates shows it to be by Musasiya from Japan who mostly do figures. The instructions are all in Japanese, but the pictures are in English! The parts are fairly decent with only a few bubbles, that I've put some filler into already, metal detail parts and pilot figure. The vacform canopies aren't very clear and are too big so I'll be making a new one. I've also drawn and printed some decals as the kit didn't come with any. For anyone who isn't sure what this is, or just likes purple wigs.... - https://www.facebook.com/GerryAndersonOfficial/videos/ufo-interceptors-immediate-launch/221768608763619/ Steve
-
Hi all. I've gone and done the unthinkable by doing a few commission builds for a work colleague. There are a lot of first (and lasts) with this build. I'll try to explain that in a bit. The kit has already been removed on numerous sites so I'll keep the summary brief. The kit is by Special Hobby that was released in association with Red Roo banner in 2016. Included are vacform canopies, photoetch details, white metal gear and a selection of five schemes./ Indications from other builds are the RAAF roundels are partly transparent. I might end up masking and painting theme. A CD with a comprehensive gallery of flying warbirds, museum and historical period images tops off the extras. First up it's build the interior resin components on the floor of the pit. The floor is integral with the top of the wing centre section. Very handy. The suggested green is very vibrant and doesn't match the provided reference photos. I've ended up mixing a 50:50 brew of the suggested green with Gunze interior green. It look much better than the first attempt. The fire bottle is the integrally molded part painted up in red. The same colour for the floor and section members was applied to the side walls followed with detail painting using Vallejo's acrylics and some enamel washes. Once done, I shot the lot of it with Mr Color flat clear which gives it a nice dull finish. When it comes to assembling the parts I found that joining the rear fuselage seams was the best method. I came back 24 hours later and cleaned up the seam with a mix of CA and talc. By taking this assembly route I could position the fuselage around the lugs on the floor and then join the forward seam across the firewall and small forward fuselage section ahead of the windscreen. I didn't get a photo of it but I put a section of square tube behind the instrument panel to reinforce this area as it was only strength in the CA tha twas holding the part together. In the meantime I made a start on the engine, prop and separating the vac canopy. I managed to separate it cleanly without needing to revert to the second one. This was one of my firsts...ie playing with vac canopies. This isn't something I want to do regularly!!! That'll do for now. I should be along in a few days with the next round of updates. Cheers, Mick
- 17 replies
-
- 14
-
-
Here is my latest kit: the MiG-31 Firefox of the 1982 Clint Eastwood film. It's the Anigrand 1:144 resin kit. Keeping in mind the discrepancies between the full-scale film prop and the "flying models", the kit has some inaccuracies, namely around the undercarriage. The nosewheel should have twin wheels and the bays and doors are wrong but I left well alone and only cut the nose bay door in a way that made it closer to what we see in the film. My only other modifications were replacing the WW2-type seat with one from a Revell/Mark I F-104 kit (chopped down a bit in height to fit) and adding a landing light to the nose u/c leg. One of the major discrepancies is the finish. The full scale prop was a dark grey colour whereas the flying models had a highly glossy or metallic) blue-grey tone. I found a comment of the prop designer in internet that stated that Clint Eastwood wanted the plane to be very shiny and that the plane was a dark blue-grey colour. I tried to get somewhere in between. I made some mixes and the final one was Tamiya Gun Metal with Medium Blue and Gloss Black (+ Vallejo Black when the latter ran out). I got a nice pearly dark blue-grey colour. The kit was fully painted by brush. The kit's painting instructions were fictitious so I tried to follow what I could make out from the film. The leading edge panels were painted Vallejo Natural Steel. The kit's decals were oversized so I used some from a Mark I red stars sheet and I placed them according to what I could make out in the ice floe scene. I applied a slightly gloss satin varnish (mixed from Vallejo varnishes) since a high-gloss sheen would look awful. Thanks for looking and all comments are welcome as usual. Miguel
-
I'm going to build a CA-28 Ceres. This was a development of the Wirraway, built using some Wirraway components (although not a lot was used without modification), and saw quite extensive use as a crop duster in Australia. I've been wanting to build one of these since I first saw the one at the Moorabbin air museum near Melbourne, finally got round to buying one - this is the LiftHere! resin kit in 1/72. Here's what you get in the box: Nicely cast resin, vacform canopy (and a spare), and a simple but good-looking decal sheet for the one option shown on the box. I'll probably make a start on this tomorrow. In the meantime here's my photo from the Moorabbin air museum: cheers Julian
- 26 replies
-
- 14
-
-
Continuing my pattern of a resin alongside a vacform in this GB, the plan is to do this - photo from https://www.dgualdo.it/regs7/getpi.htm copyright Graeme Lovell & used only for reference. The kit is from Scaleworx and is intended as the LUH version as used by the South African AF Lots of parts cast in a pale blue resin and virtually bubble free, the vacform transparencies are nice and clear I shall have to have a good look at the instructions to figure out what all the parts are for, but I'm guessing some of them are for the military equipment that I won't need. I've drawn and printed the ETPS decals already and managed to find some blue backed decal paper so the white can actually be seen - makes it a lot easier to cut out rather than white on white! Probably be a couple of days before I get started on this one due to work getting in the way. Steve
- 15 replies
-
- 10
-
-
ESK 2000B Gun Camera (4417 & 5133) 1:48 & 1:32 CMK by Special Hobby During WWII it was helpful to all combatants to be able to verify claimed kills in order to obtain accurate numbers on enemy attrition, which helped immensely with strategic planning. They were also used during training to help the novice pilots understand where they were going wrong, and could be strapped to airframes that otherwise couldn’t be used. The Germans used such devices, which could be mounted internally where there was space, or externally on smaller airframes. These sets depict the Zeiss ESK 2000B camera, which was mounted in an aerodynamic bullet fairing, and attached to the airframe by a mounting plate. Due to the limited space available only a small amount of film could be stored in a cartridge within the fairing, so the operation of the mechanism was synchronised with the pilot’s thumb on the trigger in an attempt to catch the action, which didn’t always work out 100% due to the erratic movements in dog-fighting - even in training. Both sets arrive in the CMK/Special Hobby yellow themed blister pack, with a header card and instructions behind, completing the package. In the 1:32 set are six resin parts, and in the 1:48 set there are five due to the differences in moulding the two scales. You will also need some fine wire to lead off into the airframe on an external mounting. Construction is a piece of cake with the bullet fairing mounting onto the base, and the three tiny parts inserted into their sockets moulded into the sides of the camera. You can find the location for many of the aircraft that used it with a quick Google, but CMK have included a drawing for the Bf.109E on the instructions for both sets, even down to the location where the control wire enters the wing at a nearby maintenance hatchway. 1:48 ESK 2000B Gun Camera (4417) 1:32 ESK 2000B Gun Camera (5133) Conclusion An unusual and interesting addition to any WWII German fighter that is incredibly well-detailed, and starts to add a back-story to your latest project. Highly recommended. Review sample courtesy of
-
I just discovered this GB, so I hope it's ok to join in on the fun since its already started. I have a Planet Models 1/48 XF-10F-1 resin kit It's not a bad little kit, but will definitely be in need of some extra parts and work to make it shine like a new penny.
- 55 replies
-
- 6
-
-
- PlanetModels 1/48
- XF10F-1
- (and 1 more)
-
Here is the other Miles Magister Mk.I of Heroes Models in 1:144 scale that I finished this week. It represents R1918 of 312 (Czechoslovak) Sqn, RAF, UK, 1941. This is a delightful resin kit with the windscreens made from thin plastic sheet and the exhaust pipe from plastic rod. Obviously some work is involved and for more information see my WIP in the Kampfgruppe144 forum: http://www.kampfgruppe144.com/phpBB3/viewtopic.php?f=66&t=7326. As with the other kit, it was built OOB with my only addition being the underwing pitot. I'm aware the main legs are in the extended position but I realised too late. The kit was fully painted and varnished with brush. Thanks for looking and, as always, all comments are welcome. Miguel
- 5 replies
-
- 14
-
-

-
- Heroes Models
- 1:144
- (and 1 more)
-
Here is one of a pair of kits I finished this week. It's a Miles Magister Mk.I of Heroes Models in 1:144 scale. It represents 1208 of the Força Aérea Portuguesa, at Base Aérea Nº 2, Ota, Portugal, in 1952. Portugal received 10 Magisters in 1946 serving under the Aeronáutica Militar. When this merged with the Aviação Naval to form the Força Aérea Portuguesa in July 1952, 10 new serial numbers were allocated even though several had been withdrawn form service. The Magister was officially withdrawn from service that same year although there are reports of one still being used from Ota in 1956. These aircraft were painted aluminium overall. This is a delightful resin kit with the windscreens made from thin plastic sheet and the exhaust pipe from plastic rod. Obviously some work is involved and for more information see my WIP in the Kampfgruppe144 forum: http://www.kampfgruppe144.com/phpBB3/viewtopic.php?f=66&t=7326 The kit was built OOB with my only additions being the oleo links of the main legs and the underwing pitot. I'm aware the main legs are in the extended position but I realised too late and they were too delicate to modify. The kit was fully painted and varnished with brush. Thanks for looking and, as always, all comments are welcome. Miguel
- 2 replies
-
- 8
-
-
- Heroes Models
- 1:144
- (and 1 more)
-
This came from out of the blue for me - a nice spring surprise. Print scale has issued a resin kit, the boxes have been sent to Hannants already according to their FB page: https://m.facebook.com/printscale/ To be issued in 1/48 and 1/144 too
-
 My first time joining a Group Build.... I’m going to build the Whirlybirds 1/72 Sikorsky HH-52A Sea Guard helicopter in USCG colors. It is my first resin kit, too! I figure a helicopter is a good way to start- build the fuselage, and you’re nearly finished!😁 The kit looks nice, and fills an important gap in my collection of US Coast Guard subjects in 1/72. The HH-52 has never been kitted in injected plastic- the closest kit was a 1/48 scale kit of the Sikorsky S-62, the civilian version of the HH-52, by ITC in late 1950s. Tonight I opened up the kit and cut the main fuselage parts free from the pour blocks. So I have officially started!
- 29 replies
-
- 12
-
-
- Whirlybird
- USCG
- (and 1 more)
-
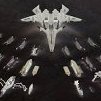
Star Wars Star Destroyer Engine Bells & Shield Generators (10120-1/5000 for Bandai) 1:5000 GreenStrawberry Star Destroyers. It’s just occurred to me that despite their name, they can’t even destroy planets, which was why the Death Star was created - as Alderaan found out to their cost. Still, it’s a cool name. Apart from Tantive IV, known at the Blockade Runner in the olden days, the Star Destroyer was the first ship to hit the screen at the beginning of Star Wars: Episode IV. Bandai have the Far Eastern kit rights to the Star Wars franchise, but those kits are so nice that they keep finding their way to our shores here in the West. GreenStrawberry are big Sci-Fi fans, and have a ton of sets for these kits and many others to improve the detail and accuracy of these kits. This set is intended for the recent Bandai 1:5000 Star Destroyer kit, which although quite a bit larger than the usual 1:72 kits of fighters and so on, can still be improved upon. The set arrives in a small dark-themed box, and inside are five resin parts and a fret of Photo-Etch (PE). The three larger parts are the replacement engine bells without the thick fluted lips of the kit parts. They still have holes in the centre for the lighting kit if you’re lucky enough to have that variant (Brag: I do!), and the three surrounding baffles that are visible at the very tip of the engine bells are supplied on the PE sheet together with a more in-scale fluted section of the engine bell that should be rolled to match the size of the bells and is attached on a tiny dropped lip inside the edge - you can just see that in the picture below. The other two resin parts are the shield generator “golf balls” that sit atop either side of the bridge superstructure. They are moulded on small casting blocks with a central support section, around which the visible PE structure is fitted. The PE part has the support shape etched-in, so that you can glue the resin ball in place before you begin to fold it to shape. Before the outer struts are folded up, the inner ladder-like supports are folded up and glued in place on the etched squares that gives them a good contact patch. With those fitted, and there are 12 for each generator, the outer legs are folded up to touch the underside of the faceted spherical skin. The completed generators are glued into the space left by removing the chunky kit supports, after which the tiny little antennae are glued to the top at the intersection of the facets, as per the accompanying diagram. A scrap diagram shows how the supports should look from the side to assist in placement. As an aside, you can see some holes in the model that have been drilled to accept fibre-optics later in the build in these pictures. Conclusion Another great set from GreenStrawberry. A little delicate folding will be needed to do it justice, and those tiny antennae are best left off until the end. Highly recommended. Review sample courtesy of