
Simon
-
Posts
1,237 -
Joined
-
Last visited
-
Days Won
3


Simon's Achievements
")
Very Obsessed Member (5/9)
2.6k
Reputation
-

Bomber Command Raid on Stettin around 20/2/43 (date edit)
Simon replied to iainpeden's topic in Aircraft WWII
The Ex-P.o.W. Questionnaire which he completed on May 11th 1945 is on ancestry.co.uk: 168699 F/O KING Charles Alastair 51 Sqn Born July 12th 1923 Enlisted September 2nd 1941 Civlian trade or Profession: Clerk Address: 9 Roxborough Street, Glasgow W2 Captured near Stendal Feb. 20th 1944 Stalag Luft 3, Sagan, March 2nd 1944 to January 27th 1945 Stalag Marlag, Tarmstedt (Bremen) February 6th 1945 to April 10th 1945 Interrogated at Dulag Luft Oberursel 27th February 1944 - five days isolation and personal questioning. Simon -
Modifications to Operation Chastise Lancasters used on S.O.E. Ops by 617 Sqn?
Simon replied to Simon's topic in Aircraft WWII
Thank to you both for your very helpful replies - interesting stuff! I did wonder about how reversible the Type 464 Provisioning modifications were, so thanks for explaining. I must admit the bit quoted about them flying S.O.E. drops without bomb bay doors seemed a bit strange, so I wonder where that came from. Cheers Simon -
Modifications to Operation Chastise Lancasters used on S.O.E. Ops by 617 Sqn?
Simon replied to Simon's topic in Aircraft WWII
No idea, to be honest. I'm guessing because they had they were available and serviceable? https://dambustersblog.com/2019/10/18/what-happened-to-the-dams-raid-lancasters-a-definitive-list/ "Over the following six months some of the aircraft were used on occasional operations, as well as for training and other trials. On 10 December 1943, on an operation to drop supplies to members of the SOE, ED825 and ED886 were both lost. The crews were skippered by Wrt Off G Bull and Flg Off Gordon Weeden. Weeden and all his crew were killed, but Bull and four of his crew managed to bale out and were captured. The final wartime loss of a Dams Raid Lancaster occurred on 20 January 1944 when ED918 crashed on a night training flight near Snettisham in Norfolk. The pilot, Flt Lt Thomas O’Shaughnessy, was killed along with his bomb aimer." I've just found this website below which records that ED825 and ED866 were "Converted back to near standard" but no idea to what extent "near standard' refers to. It also refers to aircraft "used by 617 Squadron or other units, without bomb bay doors, for trials or training, some on bombing operations or SOE (Special Operations Executive) drops." https://pleszak.blog/2019/08/20/what-happened-to-the-lancasters-used-on-the-dambuster-raid/ Simon -
Hello I've been away from my modelling bench for a few months due to various things, but I'm trying to ease myself back in with a couple of projects. I've got a question about the use of ex-Chastise Type 464 (Provisioning) Lancasters by 617 for S.O.E. supply drops. One example is Lancaster ED886 lost on December 10th 1943 from an arms drop to the French Resistance. There's an account of the loss of ED886 here: https://gmic.co.uk/topic/56542-small...comment=583887 "617 was requested to supply 4 aircraft and crews, and of course, everybody wanted to go to break the monotony of our daily training. We were lucky to be sent along with (pilots names) - FIt. Lt. McCarthy (American), FIt. Lt. O’Shaughnessy, W/O Weeden, and of course us. We flew down to Tempsford, on I think, the 8th December, 1943, arriving late afternoon. Our job was going to be to drop canisters at low level to a designated field in France, near I believe, Tournon. Because Halifax aircraft were normally used to drop these canisters, we had to wait whilst our Lancasters were modified." I'm wondering how the Lancaster actually carried the supply canisters, bearing in mind the modifications to the bomb bay and the cradles and mechanism for the bouncing bombs, which I assume were removed? Thanks Simon
-
Co-incidentally I saw one this afternoon while I was out, heading in the opposite direction. I could smell two-stroke oil for the next half mile or so!
-
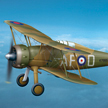
This one from the Flight archive, labelled as a Hart Trainer is currently on Ebay: https://www.ebay.co.uk/itm/204243857946 Not the clearest of photos, though...
-
Thanks Joachim. The Martinet isn't a glamorous aircraft by any stretch of the imagination, but it does have a certain charm about it. As you say, it played an important part in the training of Air Gunners. I've been doing some research into 4 A.G.S. at Morpeth, and so far I've found 51 Air Gunners who trained there who received either the D.F.C. or the D.F.M., or indeed both. One of the more well-known is Wallace McIntosh, who was awarded the D.F.C. twice as well as the D.F.M. Over 4,000 trainee Air Gunners went through 4 A.G.S. at Morpeth during the war. Sadly a fair number of them didn't survive to see V.E. Day. Regards Simon
-
For some reason the photos in my first post look a bit dark (I used my rather ancient 2007 Panasonic FZ8), so here are a few more, taken with my more up-to-date Sony DSC-H400:
-
A bit of an understatement! Worth all the hard work in the end though.
-
Thank you everyone for the kind words. As I mentioned in my post, this one got relegated back to the stash very quickly. I'd not done a 'short run' kit before and it was bit daunting, but now I've got some experience under my belt it seemed a good time to come back to it. I've been collecting references for it over the years, mostly to do with the towing gear and the cockpit. The Museum of Berkshire Aviation has some useful (if small) photos of their Martinet restoration on their website. One consequence was that it took some finding tucked away in the stash. I kept opening boxes full of unbuilt kits, and thinking "am I actually ever going to build these?" to which the answer was usually "no." So the stash underwent a serious and pretty ruthless cull, and some 140 kits went off to Kingkit, who were very helpful and gave me what I considered a good price. So the stash is now about 20% of what it was, and the loft is considerably emptier, much to the pleasure of my other half! Cheers Simon
-
Hello everyone It's been a while since I've posted on here, for various reasons, but here's my Pavla 1/72 Martinet all done and dusted. It's been a long, frustrating build, but it's finally ready. I started this some 14 or so years ago(!), and got so fed up with it (I think mainly due to my lack of experience back then ) that it very quickly got consigned back to the stash in the loft. After a very unsuccessful build of another kit (no names, no pack drill...), I girded my loins and decided to rescue the Martinet from obscurity and ignominy. I've done it as HP131 '21' of No. 4 Air Gunners School at R.A.F. Morpeth in 1942. It was written off on December 24th 1943 when it lost its prop and crash-landed at what was then Stannington Mental Hospital, a mile or so south east of the airfield. The pilot, 1346912 Sgt. David Anderson and the T.T.O. (Target Towing Operator) 1477294 Aircraftman Thomas Welsh escaped with a few cuts and bruises. I've amended and added a few things to the kit, which makes a good basis for a Martinet, but I think needs some updates. 1. The kit cockpit is pretty much all wrong. I used the kit's instrument panel, joystick and throttle boxes, but made a new seat for the pilot, and a new fold-up seat for the T.T.O. In between them is a sort of shelf, on which sits the Type B Winch, which needed scratch-building. Behind the pilot is a roll bar, with a plate with a headrest, which I also scratch-built. 2. The kit engine is good, but I took off the cooling gills from the kit's cowling and replaced them with open ones taken from a spare set from the recent Airfix Blenheim. 3. The kit's prop rotates the wrong way? Looking at it from the front I'm sure it should rotate clockwise, not anti-clockwise, so I cut down and reprofiled some blades from a spare prop from an Airfix Mitchell, and made a new hub from plastic rod. 4. Cut out the wingtip lights and replaced them with clear sprue. 5. The vac-form canopy (my first go at one ever...) needed quite a bit of blending in to the fuselage, so I thought I'd add a thin panel of plastic card to cover up the unsightly joint. The real aircraft has a cockpit 'pod' that looks a bit like that anyway. 6. The propeller arm for the winch is too short, and the resin prop too spindly with wrongly-shaped blades, so I made a new arm from sprue, and a new prop from plastic strip with better shaped blades. 7. The kit's cable guide under the fuselage isn't right - should have two arms, so that was scratch-built. 8. The kit undercarriage, both main and tail, aren't quite correct. The rear arms of the main gear should be longer, the main legs don't have the scissor links and the rear one has a distinctive kink. 9. I added towing cable anti-fouling wires to the horizontal tail, as well as an anti-foul guard to the tailwheel. The aerial wire, like the tail wires, is 0.1mm Albion Alloys Nickel Silver rod. That's about it, so here are the pics: There are a few 'Work in Prgress' photos on the Martinet album on Flickr showing the cockpit and few other bits, if anyone's interested: https://www.flickr.com/photos/wwrsimon/albums/72177720306773989/with/52750795557/ It's not perfect by any means, but it looks a lot like a Martinet, which will do for me. Cheers Simon
-
Academy/Minicraft 1:72 B-24J Liberator Dragon & His Tail
Simon replied to PatG's topic in Aircraft WWII
I did one a few years back, and it needs some work on the interior as well the turrets which are too small and were replaced with Hasegawa ones. I also replaced the engines. WIP here: Cheers Simon -
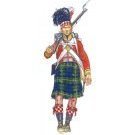
Three 1/72 RAF pilots and ground crew, resin (3D printed?) sets on Etsy
Simon replied to Pete57's topic in The Rumourmonger
Nice figures, but £26.65 delivery is a bit eye-watering... Plus £8.62 tax, so it goes from £16.44 to £51.71. Simon -
Preliminary inquiry - correction for Academy Catalina.
Simon replied to Admiral Puff's topic in Aircraft WWII
I'm in - one set for me please... Simon -
Depending on what you're looking for, you could try the RAF Commands Forum as well: http://www.rafcommands.com/forum/forumdisplay.php?1-General-Category Simon

