
CJP
-
Posts
2,286 -
Joined
-
Last visited
-
Days Won
3


CJP's Achievements
")
Very Obsessed Member (5/9)
4k
Reputation
-
Thanks Navy Elephant, I am very happy with the Sword AEW3 Gannet too - I thought it would have been a very popular kit, but I have only heard of a couple of builds here on BM including yours.
-
1:48 Italeri Westland Wessex - RFI
CJP replied to shortCummins's topic in Ready for Inspection - Aircraft
Hi John - your Wessex really turned out well, very neatly painted too not to mention your victory over the blade fold set! Chris -
I have added results of my efforts to my AEW3 WIP Chris
-
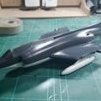
Hi, another quick update - I decided I would make a ladder for the radar operators compartment so soldered one up from Albion Alloys brass tube - I added a pin to the top of the ladder that will be glued into a hole drilled into the fuselage - once in place it should help the arrester hook in holding up the rear of the fuselage. I had a play around in Microsoft Paint & made some shapes to represent the black lines outlining the de-icing areas on the finlets - these were printed onto Testors clear decal sheet & sprayed with a lacquer rattle can to seal the lines in - I have applied some of these homemade decals to the outside of the port finlet & while not perfect, they will do with a bit of manipulation - one thing I noticed is that the outline shapes differ between the inside & outside of the finlet - it would be nice if they were included on a aftermarket AEW3 sheet in 1/48 scale. I also started adding the kit decals on the left side fuselage & under the wings - I had trouble getting the finlet stripes to bed down so I painted the finlets red & might try adding black decal strip stripes - I replaced the fuselage roundel with a roundel from an old Model decal sheet which scaled out at 33 inches & looked a lot better to me than the 36 inch roundel on the kit decal sheet. The rest of the kit decals are quite thin & the ones I have done so far have bedded down nicely. I toned down the black de-icing lines by brushing on a very thin coat of Tamiya Sky I have used the kit serials to model XL471/263 V when on HMS VICTORIOUS with 849's A flight- the V came from an old Modeldecal sheet of serial letters & I had to cut the "V" and spread the top slightly to make it like the photo I was referencing. there are a lot of stencils so it will probably take another couple of days to finish decalling depending on how motivated I get. Unfortunately the kit decals do not include the A flight logo for the fin. That's it for now Chris
-
Hi John - a job well done getting the main rotor blade fold set together - a challenging task but worth all the angst! Chris
-
Hi David can you explain what you mean by "carpet bombing with MLT' & what result you get from it? Chris
-
It is really coming to life with all those fiddly bits you are adding - I think the Wessex will be very satisfying addition to your display case. Chris
-
Westland Lynx - Royal Netherlands Navy
CJP replied to Rob K.'s topic in Ready for Inspection - Aircraft
Enjoyed your WIP Rob and the finished model looks fabulous Chris -
Nice work Shaun, looks good in that scheme Chris
-
Hi John Looking very neat so far, you are handling a very fiddly job well - I agree with you re using @hendies support frame method assembly for a future build - I suggest a test fit of the blades once clicked into the hub & slotted into the blade holder to check the alignment before adding the CA🤞 Chris
-
Thanks Navy Elephant - I'm currently playing around with Microsoft Paint & have drawn some shapes up to print on clear decal sheet - I will keep your suggestion in mind if what I'm fiddling with does not work out - it would be nice if a decal sheet maker made a 1/48 sheet for the AEW3 that included these de-icing area markings. Chris
-
Another nice model from you Russ - good job Chris
-
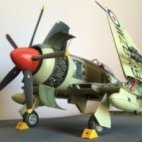
Great Phantom & the freehand camo is excellent Chris
-
Hi John, @hendie posted his technique for the scale Warship blade fold set on my Wessex build - page 8 - bottom of page https://www.britmodeller.com/forums/index.php?/topic/235135314-ran-wessex-has31b/page/8/ Chris
-
I'm looking at 1/48 Fairey Gannet decals & there does not seem to be any sheets in 1/48 scale that include the decals that delineate the de-icing areas on the tailplane finlets - I'm wondering about how I could make these - anyone have any ideas? Chris

