JakeEaton Posted February 2, 2010 Posted February 2, 2010 Very neat preshade you have there. Looking forward to more
starflyer Posted February 3, 2010 Author Posted February 3, 2010 (edited) Nice to see you again and comments from you, next step is done. The grey shade by Humbrol 5 correct by a very small amount of blue and strongly lightnend at the end by white......... See you soon for the next step. Edited February 3, 2010 by starflyer
gcn Posted February 3, 2010 Posted February 3, 2010 freehand camo I like your style, it certainly cuts down on some tedious masking. Did you use a faint pencil line as a guide
starflyer Posted February 3, 2010 Author Posted February 3, 2010 freehand camo I like your style, it certainly cuts down on some tedious masking. Did you use a faint pencil line as a guide Thank you gcn this time I draw a light line by pencil to have idea where apply the grey shade, but often I do it totally free. Ciao
Alain De Loor Posted February 4, 2010 Posted February 4, 2010 A beautiful build, and I'm paying very close attention to your painting details. -Al
timbo33 Posted February 5, 2010 Posted February 5, 2010 This is like 24 - I can't wait for the next installment A lovely, lovely build - I am in awe of your work
Davec_24 Posted February 5, 2010 Posted February 5, 2010 Wow, I'd missed this one until today. She's looking lovely, I do like a Mk. Vb in particular! If it's of any use, I always found Humbrol 90 to be a good match for "Sky type S" - Humbrol 23 is just way too light and bluey in my opinion.
starflyer Posted February 6, 2010 Author Posted February 6, 2010 (edited) Wow, I'd missed this one until today. She's looking lovely, I do like a Mk. Vb in particular! If it's of any use, I always found Humbrol 90 to be a good match for "Sky type S" - Humbrol 23 is just way too light and bluey in my opinion. Thank you Davec for the suggestion, I will check the Humbrol 90. At the momento I paint the green shade and spotted lightened with basic green plus yellow and white. I clean out the salt from the model to discover chipped surface. Absolutely fantastic, I like very much the effect obtained by this technique, we can see the aluminimu comes out under the camo paint.....lovely effect. I will work more on the weathering effect of surfaces to simlate dirt from walking and leakage of fluid.....but first cocade and marks by Sky colour.... See you soon. Edited February 8, 2010 by starflyer
pacificmustang Posted February 6, 2010 Posted February 6, 2010 looks fantastic, that has to be some of the neatest pre shading I have seen. was it ordinary table salt that you used, would like to give this a go as I like the result Bruce
spitfire23bc Posted February 6, 2010 Posted February 6, 2010 That paint chipping looks great, starflyer. I think I might have to have a go on my current Spitfire build. Dan
gishuk Posted February 6, 2010 Posted February 6, 2010 that looks amazing ive seen some of your other builds as well, i wish i had your skill with the airbrush, some of the best ive ever seen
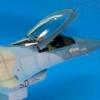
starflyer Posted February 16, 2010 Author Posted February 16, 2010 Thank you for comments Today I share the masking experience.....since decal sheet was lost I decide to paint as much I can.......pics explain better than words.
shamael Posted February 16, 2010 Posted February 16, 2010 And once again: Bravo. How did you cut roundels? or better... would you be so kind to explain the whole process? I hate decals!!! :-) Ciao e grazie
starflyer Posted February 16, 2010 Author Posted February 16, 2010 At the end....I choose the correcto color for Sky....following your suggestion I use the Xtracolor that is the best match with the original.... About the walway lines I painted it at the end also upon the cocade.....but I was in doubt if is correct..... Later friend of mine supply me the 303° Sqdn patch decal and stencils so I can go on (only the Fact. Number is missing at the moment).... In the Italian forum we discuss lot about the walkway lines.....if it must be over or under the cocade....many photos shows spifire with walk lines hide from cocade, but I see also many modellers paint it over the cocade......confusion......but at the end lot of modeller sugget and prove me walk way lines are hide.....so more modification on my painting....to hide again. Now I am searching for Fact. number.......see you soon.
Phil Podmore Posted February 16, 2010 Posted February 16, 2010 Phenomenal work! I just wish that I knew how to do the salt technique, if anyone is willing to help me out on that one I would much appreciate it! And the sprayed on roundels are stunning too, the same goes for that, if anyone wants to help my brain get around the best way of spraying details like that (ie masking techniques) it would be much appreciated! I have a lot to learn! 1
starflyer Posted February 26, 2010 Author Posted February 26, 2010 I am at "the end", tomorrow the model will partecipate to a local model competition, so I will keep my finger cross. Some pictures of the completed model, I hope you will like. 1
spitfire23bc Posted February 26, 2010 Posted February 26, 2010 I like it a lot! In fact, it's putting me off making any progress on my Vb because I know it won't turn out as lovely..! Good luck in the competition. Dan
starflyer Posted February 26, 2010 Author Posted February 26, 2010 Few macro details....... Sorry fo the big amount of photos....... 1 1
Sidders Posted February 26, 2010 Posted February 26, 2010 Absolutely beautiful work! I aspire to building a Spifire that good. Good luck in your model competition tomorrow. Let us know how you got on. Cheers, Mark
avro683 Posted February 26, 2010 Posted February 26, 2010 My favourite 1/48 Spitfire kit! Great work there. Tony
Recommended Posts
Create an account or sign in to comment
You need to be a member in order to leave a comment
Create an account
Sign up for a new account in our community. It's easy!
Register a new accountSign in
Already have an account? Sign in here.
Sign In Now