NIK122 Posted March 23 Share Posted March 23 1 hour ago, APA said: 100% 😁 Triumph 3HW 1/9 aftermarket business in the offing!? APADesign.......🤪 1 Link to comment Share on other sites More sharing options...
APA Posted March 24 Author Share Posted March 24 A good weekend with the back of the pillion seat broken. The kit one, as usual, doesn't bare any relation to a real one. Pasticard cover. Still needs shaping but I'm happy so far. Couple of springs and bolts for the rear which will be put in place once everything is fettled. Cheers all Andrew 11 Link to comment Share on other sites More sharing options...
APA Posted April 1 Author Share Posted April 1 Finally!! Starting to see the end of the tunnel. Bit the bullet and powered through the front forks. All dry fitted for now. Actually starting to look like a motorbike now 😊 Started on a couple of cables Replaced the kit handlebar grips with more appropriate ones including the accelerator thingy. Also thinned out the brake and clutch handles. Cit version for comparison. The real things are quite long. New headlight blackout visor. The small round hole will have a white acrylic lens in it. Had a go ate weighting the tyres and it seems to have worked. I Proxxon'd out the solid inside and slipped in a piece of plasticard to spread the side out. And flattened the tyre bottom. Subtle but does the job I hope. Not a great deal to do now. I think it's just the wiring loom and cables. I need to put everything together just to make sure they all fit !! 🙄. Wish me luck!! 🤞🏻 Cheers all Andrew 18 Link to comment Share on other sites More sharing options...
Gogser1 Posted April 1 Share Posted April 1 Superb work, I continue to be amazed by it 😊 Link to comment Share on other sites More sharing options...
Stef N. Posted April 2 Share Posted April 2 Fantastic work and a massive thumbs up for the tyre. Looks spot on to me. 👍👍 Link to comment Share on other sites More sharing options...
APA Posted April 4 Author Share Posted April 4 On 4/1/2024 at 10:37 PM, Gogser1 said: Superb work, I continue to be amazed by it 😊 Thanks Gogser. Really glad your enjoying it 😁👍 On 4/2/2024 at 1:20 PM, Stef N. said: Fantastic work and a massive thumbs up for the tyre. Looks spot on to me. 👍👍 Cheers Stef, much appreciated and thanks for following along 😀👍 Cheers all Andrew 1 Link to comment Share on other sites More sharing options...
Keeff Posted April 5 Share Posted April 5 There is some very impressive work going on here! It goes to show how inaccurate the kit is ... The tyre looks great .... just enough 'bulge' in the walls 👌 Keith 😁 Link to comment Share on other sites More sharing options...
APA Posted April 5 Author Share Posted April 5 13 hours ago, Keeff said: There is some very impressive work going on here! It goes to show how inaccurate the kit is ... The tyre looks great .... just enough 'bulge' in the walls 👌 Keith 😁 Cheers keith. There's not a lot of it left 😂 Andrew Link to comment Share on other sites More sharing options...
fikolo Posted April 5 Share Posted April 5 (edited) very nice .😃 Edited April 5 by fikolo Link to comment Share on other sites More sharing options...
Farmerboy Posted April 5 Share Posted April 5 This has become a ‘tour de force’ of modelling, brilliant work. Link to comment Share on other sites More sharing options...
Bullbasket Posted April 6 Share Posted April 6 I don't think that Italeri ever envisaged this kit turning out like this. Brilliant work Andrew. John. 1 Link to comment Share on other sites More sharing options...
echen Posted April 6 Share Posted April 6 3 hours ago, Bullbasket said: I don't think that Italeri ever envisaged this kit turning out like this. Brilliant work Andrew. If Italeri put this much fabulous detail in you'd need a mortgage to buy one! 1 Link to comment Share on other sites More sharing options...
robgizlu Posted April 7 Share Posted April 7 Agree with everyone else - you’re taking this to another level, only wish you’d been around to help out when I had my old Trail bike! Andrew, what did you use for the grips? I’m looking for something similar for a project……..Thanks Rob Link to comment Share on other sites More sharing options...
APA Posted April 7 Author Share Posted April 7 On 4/5/2024 at 9:06 PM, fikolo said: very nice .😃 Thank you fikolo On 4/5/2024 at 9:38 PM, Farmerboy said: This has become a ‘tour de force’ of modelling, brilliant work. Ha ha! appreciated FB On 4/6/2024 at 6:43 AM, Bullbasket said: I don't think that Italeri ever envisaged this kit turning out like this. Brilliant work Andrew. John. Hi John, no I doubt it too. They gave it a half assed shot back in '72 😂 On 4/6/2024 at 9:50 AM, echen said: If Italeri put this much fabulous detail in you'd need a mortgage to buy one! I agree echen. Imagine if Gecko, Riich or Miniart tried their hand. Now that I would definitely buy 😉 9 hours ago, robgizlu said: Agree with everyone else - you’re taking this to another level, only wish you’d been around to help out when I had my old Trail bike! Andrew, what did you use for the grips? I’m looking for something similar for a project……..Thanks Rob Thanks Rob. I wouldn't know one end from another on a real one 🤡 My big brother, on the other hand, used to have a couple of Trials Bikes back in the day. A lime green Kawasaki with a diamond shaped tank springs to mind but I was about 12 at the time 😊 The grips are wrapped with some random material I've picked up along the way. It's very elastic. I suggest you go rooting through Mrs robgizlu's sideboard draws with a pair of scissors for inspiration 😉😎😜 Cheers All Andrew 4 1 Link to comment Share on other sites More sharing options...
APA Posted April 7 Author Share Posted April 7 Big day today. First full dry fit of almost everything. Suffice to say, and you won't be suprised, there are a lot of fit issues. I'm going to have a lot of problems with this and it may turn out a bit bent! I wrapped the seats with some tin foil from an easter egg which had some very subtle texture which hopefully will look a little like the leatherette type material used. I also added a bit of sag to the main seat. (See above pic) Apologies for the gratuitous knee 😳 Still got a few kit parts to add and a few scratch bits before I start painting. Probably more than I think 🫣 Cheers all Andrew 17 Link to comment Share on other sites More sharing options...
robgizlu Posted April 7 Share Posted April 7 35 minutes ago, APA said: Thanks Rob. I wouldn't know one end from another on a real one 🤡 My big brother, on the other hand, used to have a couple of Trials Bikes back in the day. A lime green Kawasaki with a diamond shaped tank springs to mind but I was about 12 at the time 😊 The grips are wrapped with some random material I've picked up along the way. It's very elastic. I suggest you go rooting through Mrs robgizlu's sideboard draws with a pair of scissors for inspiration 😉😎😜 Cheers All Andrew Thanks Andrew - when she finds me - I will of course quote you! Looks interesting fabric Rob 1 1 Link to comment Share on other sites More sharing options...
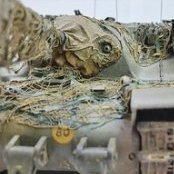
APA Posted April 14 Author Share Posted April 14 Wiring and a few odds and sods this weekend. Done the loom and all the wiring I can do without the engine in place. Horn cable Seat springs and brackets sorted (Springs just placed hence wonkyness) Cable for rear light First cable to the regulator and the dangling cable is for the battery positive. Also added a rubber boot on the alternator. All the restored versions have bare wires going in but they originally had this boot. Loom and additional wiring coming out of the headlight where most of the electrics are. I do believe that the next step is to crack out the airbrush!! 🫣 Cheers all Andrew 16 Link to comment Share on other sites More sharing options...
edjbartos Posted April 14 Share Posted April 14 That looks tremendous, unbelievable detail work, I keep looking back at what you have done, just superb... Ed Link to comment Share on other sites More sharing options...
Keeff Posted April 14 Share Posted April 14 Outstanding work! This just keeps getting better and better ..... Keith 😁 Link to comment Share on other sites More sharing options...
APA Posted April 18 Author Share Posted April 18 On 4/14/2024 at 9:37 PM, edjbartos said: That looks tremendous, unbelievable detail work, I keep looking back at what you have done, just superb... Ed Thanks Ed really glad your liking the build 👍 On 4/14/2024 at 9:54 PM, Keeff said: Outstanding work! This just keeps getting better and better ..... Keith 😁 Cheers Keith 😀 still plenty to go wrong 😂 Cheers all Andrew 2 Link to comment Share on other sites More sharing options...
Gogser1 Posted April 18 Share Posted April 18 I have to agree with the others, fabulous work which I, personally, have found mesmerising 😎. Link to comment Share on other sites More sharing options...
APA Posted 22 hours ago Author Share Posted 22 hours ago On 4/18/2024 at 10:48 PM, Gogser1 said: I have to agree with the others, fabulous work which I, personally, have found mesmerising 😎. Thank you very much Gogser 😁 Look into the Triumph, not around the Triumph.......😵💫 A 1 Link to comment Share on other sites More sharing options...
APA Posted 22 hours ago Author Share Posted 22 hours ago Finally put on all the extra nuts and bolts. I was going to add some grease nipples and then I had a stern word with myself 🙄 All finished All Primed. I was wondering about pre shading and then decided that apart from the tank there isn't really anything to pre shade! Base coat and basic colours done with a few bits of detail here and there. I haven't actually used any Vallejo for the main colours. They are all AK and because I don't like the Vallejo varnishes I got some VMS. I tried blending the Satin and Matte to get a soft sheen but it just went Matte so I sprayed the Satin as is. These are an excellent varnish. Sprays straight out of the bottle. Doesn't block or build up on the tip and goes down very even. I'm a fan 😁. Only thing is they are very fast drying and so are almost useless for brush. I'm liking the sheen. Early bikes and vehicles had white tips on extremities when black out visors was introduced so for a bit of bling I've added some on the mudguards.. I didn't want to use the kit decals and was going to use rub down transfers but I didn't have the right size. The kit ones worked excellently with no silvering and you can't see the edges now the varnish is on. Only issue is the tide mark where the microsol was which is annoying but not a major as I can blend it as weathering. Oh and this is supposed to be SSC2. Out the bottle the AK did look very close to Mike Starmer's swatch but once on it's a dead ringer for Kahki Green G3 I can now actually assemble the thing all bar the wheels!! Cheers all Andrew 4 Link to comment Share on other sites More sharing options...
robgizlu Posted 4 hours ago Share Posted 4 hours ago Schmoking! Rob Link to comment Share on other sites More sharing options...

Recommended Posts
Create an account or sign in to comment
You need to be a member in order to leave a comment
Create an account
Sign up for a new account in our community. It's easy!
Register a new accountSign in
Already have an account? Sign in here.
Sign In Now