Search the Community
Showing results for tags 'Aires'.
-
A couple of years back I built a Dutch F-104G from the old ESCI kit. It looks the part & I liked it. I really wanted to get the Kinetic kit and build a Luftwaffe or Marine version that I remember seeing (and hearing!) at airshows in the 80s. Then a second ESCI kit popped up cheap with no decals. So I thought why not use the left over Italian decals from the first ESCI kit? Over time I picked a couple of underwing resin fuel tanks. Originally these were going to go on the Dutch G model, but why not include them on the Italian S model? I also picked up an Aires resin & etch cockpit. Of course this is not intended to fit in an ESCI kit (designed for Hasegawa I think). So what could possibly go wrong? Not a lot as it turned out! So F-104S of 51 Stormo 22 Gr (quoting the instructions, I have no real knowledge of Italian squadrons). As the S model had the gun plated over to allow for the Aim-7 control systems I built a plug and sealed up the gun door. The cockpit and seat were all replaced and the fit was pretty good! Wheel wells had some scratch embellishments and the slats & flaps were positioned. The cockpit glazing is closed on the kit so I had to cut it in order to open it and I got a 3D printed access ladder too. Paints were Hataka (camo) and Vallejo (steel underside) and kit decals. So this is the result. Cockpit & seat before fitting And with siblings Thanks for looking!
- 11 replies
-
- 40
-

-

-

-

-
Time to start something new. Something a bit more demanding than those kits that I have been working on recently. So I have chosen Revell's fantastic 1/32 Tornado GR1 with lots of lovely aftermarket as follows:- Flightpath UK's Tornado Detail and Conversion Set, Flightpath UK's Flaps, Slats and Spoilers set, Aires resin Afterburners, Aires resin Cockpit, Flightpath's LGBs and AIM-9s, Master Probes, SAC's metal undercarriage, including the supplementary set, and Eduard's canopy mask set. So, without further ado, the obligatory box shot:- And the aftermarket:-
- 177 replies
-
- 4
-
-
- Flightpath
- Aires
- (and 1 more)
-
Hi to all sorry if it’s in the wrong area but the other areas are not available to me and perhaps it has been asked before sorry. Aftermarket resin parts come with blocks of extra resin moulded to parts like ejection seats or clock cluster and I was wondering how do other model builders separate this from the useable part. What knives or saws or procedure is best practice. Thanks in advance.
-
EA-6B Prowler VAQ-138 , Carrier Air Wing 3 on the Saratoga, 1977 1/72 Hasegawa kit with Aires cockpit and Reskit wheels Superscale decals Not a lot to say about this one, except that I bought the kit soon after it was first released (early 80s?) and has been in storage up to a few months ago. The decals were also of a similar age but still quite usable. The kit cockpits are very basic by current standards so I fitted the Aires version which is an intricate work of art in resin and photoetch. I must admit I didn't use all the resin and brass as it became just too tiny and fiddly. The resin wheels were nice but not significantly different from the kit offerings, though needed less clean up.
-
 To borrow from a previous Phantom build, I have a confession to make: I hate all-grey schemes on jets. Really. But I like pointy planes that go fast. What to do? Find colourful prototype, retirement or anniversary schemes and just say no to low viz! Besides, it's my favourite subject in my favourite scale and my favourite scheme. Of course it's a Phantom and of course its Raspberry Ripple. Yee-ha! The build process is detailed in the WIP thread here. Project: McDonnell Douglas FG.1 Phantom II Kit: Fujimi Kit No. 34001 Royal Collection Scale: 1:72 (as revealed in scripture) Decals: Xtradecal X72296 (kit decals were "unusable due to age", an expression I hear often from wifey) Resin: CMK cockpit set no. 7441; Aires exhaust no. 7179; ResKit wheel set no. RS72-0067 Photoetch: From the kit for canopy details and gear door actuators; from the CMK cockpit set for HUD, instrument panels, and cockpit details Canopy Masks: Made by hand! With a pencil and a pair of scissors! Paint: MRP 183 Oxford Blue, 184 Signal Red, 125 Super Clear Semigloss, 048 Super Clear Gloss; Gunze H11 Flat White, H12 Flat Black, H20 Flat Clear, H77 Tire Black, H90 Clear Red, H94 Clear Green, H317 FS36231 Dark Gull Gray; Tamiya XF-69 NATO Black; Alclad ALC101 Aluminum, ALC103 Dark Aluminum, ALC111 Magnesium Weathering: I hate weathering. Improvements/Corrections Scratchbuilt intake FOD covers decorated with decals printed on inkjet at home Replaced kit cockpit and ejection seats with CMK resin set Instrument panels, rudder pedals and HUD detailed with CMK photoetch Cockpit sidewalls, canopies, mirrors, and canopy sills detailed with kit photoetch Replaced vertical fin pitot probes with hypo needles With a great deal of effort, replaced kit exhausts with resin set from Aires Replaced kit tyres with ResKit resin wheel set How about some photos? Here is what the cockpit looks like (hard to get a good picture after assembly): This CMK cockpit set is designed for the new tool Airfix kit, but works well in the old Fujimi kit with minor modifications to the kit plastic. Good to know, because... ...I have another Fujimi kit in my stash - and the Xtradecal sheet for Alcock & Brown. Should it be a future project? Vote early and vote often! Cheers, Bill
- 42 replies
-
- 77
-
-

-
-
Tamiya kit with lots of after market parts.
- 19 replies
-
- 76
-
-
-
 Exdraken is going to do a Draken! wow! Surprising myself here. and an Austrian on on top I is going to be the very first one touching down in Vienna Schwechat Airport in 1988 story unfortunately in German: https://www.bundesheer.at/cms/artikel.php?ID=2512 https://www.bundesheer.at/pool/img/draken_1988.jpg those Austrian Draken were actually refurbished Swedish J35D models with the more modern 2 piece canopy from the F/J, but retaining the 2 30mm Aden cannons from the D have a close look: extra fuel tanks usually only seen on Swedisch Recce Draken (as far as I know at least!) no Mk.2 modifications as of yet, I think also no large dayglo numbers (the MK.2 mod essentially where RWR and chaff/ flre dispensers inhereited from retired Danish Drakens in the late 1990s) I am going to use Eduards Limited Edition boxing, because it has all it needs. Maybe I add some additional things later on... a month to go... seems do-able optimism rules!
- 48 replies
-
- 10
-
-
 This little GB is guilty of a lot of things. Initially I had plans of joining up with just this with some decals from this set since I wasn't that much "into" Tornados but then Eduard released their Desert Babe boxing which _I just had to have. So then the plan changed.... But after a lot of chat with @Aigoreabout what kind of AM stuff to add to that one something strange happened. The German Tornado came back on track, since who cannot like a green mean machine? Yes, the Norm-83 wraparound colors does really scream Cold War doesn't it? But a mean looking machine must also have mean looking weapons. Enter the MW-1 dispenser pod. https://de.wikipedia.org/wiki/MW-1 Hundreds, even thousands of bomblets and mines to be dropped on top of Warzaw Pact troops, armour, runways, ships and other military targets. Naturally, there was no MW-1 available (let's not mention the Hobbyboss version) so I had no choice but to make my own. See here how that went Since the little project really kicked my brain into Luft-88 mode (or what do you call Cold War in West Germany nowadays) there was no turning back. This needs to be built, it needs to have a MW-1 under the belly and it must be loaded over the cockpit sills with resin and other stuff. So, a hopefully @trickyrich approved amount of candy is here. First the big parts: And then some of the smaller stuff: I also have a sets of those fabled wing seals from Shaun of the Tornado SIG coming, and I might still need to get a Brassin BOZ-pod and some HaHen-walkway decals, but other than that I think I've got everything that I need. Let's get this show started!
 -
I'm not a big fan of low-viz grey schemes on modern jets. But when the USN celebrated their 100th anniversary back in 2011, they had the brilliant idea to paint a variety of their current aircraft in retro schemes from throughout their history. TwoBobs issued several decal sheets covering these schemes, and I really took a fancy to the three-tone scheme applied to one of the Hornets of VFA-122 "Flying Eagles." Does this scheme look familiar? It sure does to me, although I couldn't tell you which squadron in WWII used these markings. My brain tries to tell me it was on a Hellcat, but it could have been a Corsair. Or something else, I'm afraid my brain is a bit addled. Looking through my stash, it seems I have enough stuff to model this baby. First, the Hasegawa F/A-18C Hornet: I'm sure you are all familiar with this venerable kit. If not, here are the sprues: The "Chippy Ho" scheme, even though there seems to be an eagle on the tail, is actually on a bird from VFA-195 "Dambusters." It's even a bit too gaudy for me! Now, it wouldn't be a Navy Bird build if I didn't leave well enough alone and try to finagle a bunch of aftermarket stuff into the model. Let's see, I have a resin, photoetch, and film cockpit from Aires: And some highly detailed gear bays, also from Aires (lots of pipes in there!): Quickboost provide new intakes and jet engine faces. Of course, the trunking is nowhere near long enough to properly represent the Hornet's intakes, but it's better than what Hasegawa provide. The real intake trunks have to slither their way around the main gear bays - I probably should try harder to find seamless intakes from XMM, but my initial search was fruitless. Ah, what the heck I have these parts from Quickboost so let's use them. And, of course, the decal sheet from TwoBobs printed by Microscale (hey, I remember those guys! Krasel Industries, anyone?). If I recall correctly, TwoBobs put all of their USN Centennial decal sheets into one package, along with a CD full of photos, so you could make all of these cool retro schemes. Too bad the USN had already retired the Tomcat as I think it would have looked very cool in overall Glossy Sea Blue. Or even better, in Blue Angel regalia. I still need to determine if the vertical tails had the reinforcements and the stiffener plates. I believe I have these in the stash, I just don't know if I need to use them. And there is always the possibility that I may want to pose flaps, slats, and elevators. There may be more resin in my future! I've started removing the resin bits from their casting blocks. I have to remove Hasegawa's gear bays, and getting the nose gear bay out of there looks like it will be a bit tricky. Wish me luck! So that's my new project. Unless someone changes my other mind, then it will be something else. Cheers, Bill
- 169 replies
-
- 24
-
-
- Quickboost
- TwoBobs
- (and 1 more)
-
 Hi everyone After 10 months I finally managed to finish a model (ok I still need to add the Skyflash missiles and tail hook) the model in question is the Revell / Hasagawa 1/48 Phantom FGR.2. Brilliant kit, absolutely loved it OOB it would build into a very pleasing replica of the real thing but with a little bit of AM it really shines. For this one I added the Quickboost Martin Baker Mk.7 ejector seats, Aires wheels and Airways cockpit upgrade set. She was finished with Tamiya paints and the kit decals. I enjoyed it so much that I have bought another and I'm going to throw as much AM at it as I can find (which by the way is quite a-lot - I'd appreciate it if you didn't tell the wife!) WIP can be found here So here she is, as ever any thoughts, observations (good or bad) are welcome. Iain.
 -
Hello, it has been a long time since my last post on this great forum, but life is sometimes just too hectic to build models. But I've managed to finish this one off in under 7 months. Tamiya F-16C block 25/32 kit, with some extras: Aires F-16C/D wheel bays 4439, F-16C cockpit set 4364 and F-16c block 25/32 exhaust nozzle. Wheels are resin ones from wheeliant, armament and bombs are brassin items. I added Master pitot tube and angle of attack probes and HGW RBF tags. Model was painted with MRPaint colors, weathered with ammo products. Enough blabbering, here are the photos.
- 34 replies
-
- 46
-
-
-
Latest effort - a car door Typhoon. I like the Typhoon, big ugly brute that it is, and for some reason the car door version really grabs me - don't know why - just like the idea of the car door complete with window wind down. I'm sure the pilots didn't like it much. Still - box Contents And a few extras I've decided to add to it. Starting with the cockpit I started by painting the cockpit internals black primer, and then sprayed individual areas with interior green, so as to leave some darker areas around details and try and lend some depth. After that I picked out details using dry brushing techniques, as well as making use of prismacolor pencils, which make highlighting knobs and switches quite straightforward. Gradually moving towards a more complete cockpit. The instrument panel is made up of a resin casting, and three separate etch metal bezels, which are laid on top of three instrument transparencies for dials. I must say I'm pretty happy with how this has turned out so far. I still have to finish seat belts and add those, bit dry fitting shows that this assembly will fit very nicely into the fuselage.
- 47 replies
-
- 12
-
-
Hello, Thought I'd start building something a bit more relaxing after the Flanker, so at the Moson show in Hungary I've bought this beautiful eduard's kit - with all the extras. I am planning to build it as opened as possible - engine, cockpit, radio, gunbays, misc. panels and so on. So, starting with the cutting, cleaning and thinning all the resin bits and pieces and dryfitting them over and over again. So, this is my Moson show loot, most of the parts here are for Spit. Too much of them really... So, brassin radio compartment with Aires cockpit test fitted... brassin parts just slot into the position, they fit the eduard kit perfectly. And Aires gunbays (just dryfitted, not glued yet) I think I will thin the plastic a bit more...
- 19 replies
-
- 11
-
-

1:48 Phantom FGR 2 92Sqn XV408 Special Scheme
RMCS posted a topic in Ready for Inspection - Aircraft
I loved building this as part of my model clubs group build: T101 (101 years of Tangmere Airfield). XV408 is currently resident at Tangmere Military Aircraft Museum, which is home to my club: Tangmere Sector Modellers IPMS. It is being lovingly restored to its most famous 'blue' scheme that 92Sqn had done in homage to the blue Hunters that the Squadron used for their display team. This is the Hasegawa 'blue special' kit with Aires resin cockpit, Radar, electronics bay, allycat seamless intakes, scratch built parachute compartment (and other bits). Painted with Vallejo Model Air insignia blue. 101 will be at Scale Model World, so please come and see us.- 30 replies
-
- 75
-
-
-
- Phantom FGR2
- Hasegawa
- (and 1 more)
-
Looking for more info based on a conversation at ARC. If the Academy kit nozzles fit onto the Monogram burner cans for the F-14A, would it be too far of a stretch to assume that the Aires set for Academy would fit the Monogram as well? Another ARC member figured out how to work it using the kit parts so I'm curious if any resin parts would work too.
-
Hi all, I will join this GB with Italeri's MiG-29A. I'll do a super-detailed build using Aires' resin cockpit, exhaust nozzles and air-brakes, Arma Hobby's resin nose and closed upper air intakes, and Master's brass pitot tube and static dischargers. I have already all the items, except the static dischargers, which should arrive next week. I'll build a soviet machine from the 1980's as displayed in the Farnborough Air Show. I'll use the kit's decals. Here's the box: IMAG4776 The sprues: IMAG4777 IMAG4778 The transparent parts, which look good enough, as I'll pose the canopy open: IMAG4779 The decals, which don't come with many stencils: IMAG4780 The resin cockpit, which also comes with a PE fret for the instrument panel and other details: IMAG4781 The resin exhaust nozzles, which also come with a small PE fret for the flame holders: IMAG4782 The resin air-brakes: IMAG4783 The resin nose cone and closed upper air intakes: IMAG4784 As I will display the aircraft in a parked position, with open canopy and air-brakes, should the main and upper intakes be all closed? Finally, the brass pitot tube: I will need some time to plan the build, especially regarding the insertion of the resin parts and the detailed painting of the cockpit, before I get back here with progress reports. Thanks for looking. Jaime
- 65 replies
-
- 7
-
-
- Aires
- Arma Hobby
- (and 1 more)
-
Hi Guys, it´s time for a new project. I will build the famous P-51D in 1/48 and will use the old Hasegawa kit. Also the Aires wheel bay and the True details cockpit. I will not use the Kit decals..... but have not yet decided which decals I will use.... Maybe a blue nose? The True Details sidewalls fit perfect and are a 100% better than the Kit parts First steps of painting the interior. As always I use Revell Aqua Color. The Interior green is a mix of light green, sand and brown. The very nice detailed True Detail Seat, gun sight and instrument panel It was a bad decision to add the Aires wheel well into this kit. A lot of work will be needed to fix this.... Cheers Pete
- 7 replies
-
- 2
-
-
- Aires
- True Details
- (and 1 more)
-
I'm just doing the Aires exhausts for the Revell 1/32 Tornado. Looking online for photo references prior to paining, images seem to show the burner much closer to the tail end than they are in the resin set. Is this just an optical illusion in the images because of the more end on angle of the shot? The resin set are certainly comparable in length to the kit plastic, but not sure that tells me much. Any further information much appreciated Simon
-
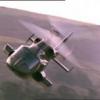
very long awaited decals came out last week! :) so had to start a Mirage 2000 immediately! basic Heller kit with hopefully all the necessary updates it will be posed as in flight, with engine in military power, and slats deployed. I will have to find a solution on how to mount it to a base! - suggestions welcome!!! anyone able to guess the paint scheme??
-
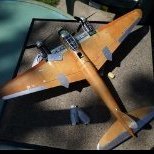
 Ok as host of this GB I guess I had better build something! Well I had it all planned before I went on holidays and I had hoped to buy stuff while I was away but couldn't find what I wanted so just ordered online. My cunning plan fell to pieces once I got home and started looking at the references I had, I wanted to build a Latin American P-47D. The decals I got were for D-30s and higher, where as the model I was building was a D-25. I then though about modifying the model I had to suit (not a really hard mod to do) until I found the perfect decal set! So now I’m building Brazilian P-47D-25 of 1°GAvCA used in Italy from October 1944. The decals are from a super rare AeroMaster Thunderbolts Galore set. Plus I will be throwing in a bit of AM stuff as well. I only have the model at the moment, the AM stuff is stock photos. no need for sprue shots for this one... Aires Wheel Wells…I know the Tamiya ones are nice but these are resin…….. Eduard detail set (plus canopy masking set too) Master gun barrel set… I blame Arnold for this…. AeroMaster decal…rare as hens teeth…..hope I don’t stuff them up! And this is what I’ll be building….have already found an issue with the decals, the a/c serial number is wrong for the aircraft ID number! Will sort that out when I get to it. I won’t get a chance to start this now until next week, go back to work on Wednesday, plus the AM bits haven’t arrived yet. In the mean time I’m working on “Gold Member”.
- 107 replies
-
- 7
-
-
- P-47D
- Thunderbolt
- (and 4 more)
-
Hi there! I know You are all waiting for my flanker, but I've decided to get this build done after 4 years that spent in the box. So here we go. Aires c-pit still looks ok after 4 years... There was some extensive filling, sanding, regraving and riveting done, especially on the nose section. Tailbooms ready Wheelbays done. There are still some minor bits missing Almost ready for black primer.
- 26 replies
-
- 13
-
-
- 1/48 Hasegawa
- Aires
- (and 1 more)
-
as I wrote myself into trouble accepting 2 different group-builds at more or less the same time here the other one I am working on in parallel.....; http://www.britmodeller.com/forums/index.php?/topic/234982350-s-75-dwina-sa-2-guideline-sam-egypt-148/ but as I liked the idea of a tribute Tornado build, breaking the gb calendar planing just as the reason for the gb came unplanned,,,, I will try to to my best keeping the deadlines... apart from that, the cause of the gb also help me in tackling this rather not up to date kit.... I will try to put in quite some Aftermarket designed for other, more modern kits... so lets see the newer, not necessarily better version of Airfix's F3 rendition: too good to be thrown away? lets see AM: AIres landing gear bays and SAC metal landing gears both for the Hobbyboss kit so they fit each other, I will hopefully get a nicely detailed and sturdy landing gear out of this combo! hope it will be fitable ! Aires ejection seats: should fit without mayor problems Paragon exhausts and wing seals: for the Italeri kit I think Eduard PE for the F3 from Hobbyboss: this should lead to a more or less detailed and correct cockpit (for the year 2000 also????) WILL FIT! Master pitot: obligatory Decals from better days of Model Alliance.... the red is a bit dark.... I think I will also need some new wheels... (are the ones from Eduard any good?, other suggestions?) upper and lower fuselage taped togther: in length they fit well, in width no so much... upper one with recessed panel lines, lower fuselage with thin raised ones.... for comparison see here; the older, more consistent upper fuselage jumps your eye hopefully http://www.britmodeller.com/forums/index.php?/topic/234983159-tornado-f3-148-airfix-update-2-14-6-2015/ some nice inspiration for everybody: http://www.fightercontrol.co.uk/forum/viewtopic.php?f=18&t=43209&start=40 http://www.airliners.net/photo/UK---Air/Panavia-Tornado-F3/0208205/L/ https://www.flickr.com/photos/corkspotter/16779793000/ https://www.flickr.com/photos/corkspotter/16781066619/ http://www.abpic.co.uk/photo/1261068/ http://s230.photobucket.com/user/harry_tranter/media/ZE339AV_.jpg.html thanks for watching and your opinions! let the fun begin! Cheers, Werner
- 65 replies
-
- 5
-
-
- Airfix
- Model Alliance
- (and 4 more)
-
Hi everyone This was one of those projects stretched out to the max over the years. Back then there was no GWH 29s and the Academy MiG was the only game in town. To make it a 9-13 version - the humpback I used a Neomega conversion (cockpit and the spine). In terms of accuracy it is debatable as the hump is not quite correct. Well nevertheless it is OK imho.. If any of you did the Academy 29 you all know it's quite a pain. The kit itself is nice, but needs some add ons to look better (exhausts, nose cone, armament). I had to cut the original spine and replace it with the resin one. Tons of putty were used in the process...Also there was some panel scribing and riveting.. I've used Fru Fru R-27 R and Eduard MiG-21's R-60. I really wouldn't know if that is accurate but I guess it looks good. I have a few photos of the red 24 and in some it appears to lack the front LG mud guard, yet on some other photos it is there... Decals are Begemot and the paints used are by Akan shades for Fulcrum I hope you like it.... Thanks for watching, please check my blog for more photos and info cheers
-
 F/A-18F Super Hornet Cockpit Set for Hasegawa Kit 1:72 Aires Hasegawa’s family of second generation F/A-18E/F/Gs are generally regarded as being at the top of the tree when it comes to 1:72 scale Hornets. Although the engineering of the kits is quite complex, they are generally very accurate in shape and the level of detail is very good. Whilst the cockpit is by no means as spartan as some of Hasegawa’s other kits, it can still be improved upon. Enter Aires, purveyors of resin finery from the Czech Republic, with a complete replacement cockpit. Inside the sturdy plastic blister pack are fourteen resin parts, a small fret of photo etched metal parts and a small piece of printed plastic film. The Martin Baker SJU-17 ejection seats are beautifully cast, with crisp, fine details and nicely textured seat padding. Fine details such as the harnesses and firing handles are represented with photo etched metal parts. The cockpit tub is equally nice. The side consoles have excellent detail cast in place and there is enough in the way of wiring and other details to give the whole thing a suitably busy appearance. The pilot’s control column and other control handles are cast as separate parts, as are the photo etched rudder pedals. The instrument panels look excellent and can be enhanced further with the film and photo etched parts. A replacement coaming is included, but you’ll need to cut away the kit part in order to use it. I would suggest that the extra work is worth it, particularly if you elect to use the photo etched HUD unit as well. More resin and photo etched parts have been included in order to bring the canopy up to scratch. I’d recommend treated the canopy itself to a dip in some Klear (assuming you have some) before using these though as otherwise the CA glue you’ll need to use to fix the extra parts in place could fog the clear plastic parts. Overall, this excellent set includes everything you could possibly want in order to upgrade your Hasegawa Super Hornet. The level of detail is outstanding and the casting is superb. Highly recommended. Review samples courtesy of distributed in the UK by Hannants Ltd.
 -
It just so happens I started in on a Phantom over the weekend, so I decided to join in here. OY 463 is an F-4D that was piloted by Steve Ritchie (the first U.S. Air Force ace of the Vietnam war) during his 1st and 5th kills. This particular airplane also shot down four other Migs during it's tour making it the most prolific Mig killer of the conflict. This is kinda my holy grail build. I've wanted to build this airframe in all out mode since I was a kid. I have a decal sheet from Microscale that I've been hoarding for several years waiting for both a new tooled F-4C/D kit and my skills to progress. I feel like I'm there, so here we go. The kit: The aftermarket: Aires cockpit, Eduard Brassin exhaust, wheels and weapons sets, Eduard fabric belts and masks, DEF Models FOD covers, and Steel Beach slime lights.