Search the Community
Showing results for tags 'beaufighter'.
-
 I have a few partially completed kits sitting on the shelf, but I am having a few problems getting up the enthusiasm to finish them off. So I thought I would turn to a very recent arrival in my stash, the second boxing of the new Airfix 1/72 Beaufighter. I enjoyed my first go the first boxing of these back in June ( see here), so I hoped this would help me get my mojo back. I am a bit rusty, so the paintwork is not as good as I would like. I also made a couple of daft mistakes, but still I enjoyed it and feel I am in a better place to start on some more challenging kits. Brush painted with Tamiya Acrylics as per usual. Build thread can be found here. The model was completed straight out of the box with the rather smart grey and black TF10 from 45 Squadron RAF based in Kuala Lumpur in what was then Malaya in 1949. Thanks for looking. And here it is with the SEAC Beaufighter I made earlier this year.
- 23 replies
-
- 37
-

-
I have a few partially completed kits sitting on the shelf, but I am having a few problems getting up the enthusiasm to finish them off. So I thought I would turn to a very recent arrival in my stash, the second boxing of the new Airfix 1/72 Beaufighter. I enjoyed my first go the first boxing of these back in June ( see here), so I hope this will help me get my mojo back in time for the long stint of leave coming up. Box top: I will be building this colour scheme - I love the combination of black and medium grey: As far as the extra parts are concerned they are all on one new sprue:
- 35 replies
-
- 11
-
-
- Beaufighter
- Airfix
- (and 1 more)
-
Hi! I've just finished Airfix' Beaufighter as a machine belonging to 404 sqn. This particular machine was flown by the Sqn. Leader on "Black Friday" - 9th february 1945. The model is painted using Xtracrylix and Vallejo colors. Weathering is Flory wash and pigments. Regards Rune Haugen Norway
-
 Beaufighter TF Mk.10 Upgrade set + Landing Flaps 1:72 Eduard for Airfix kit The set contains a nickel fret and a brass fret. The sets provide many parts for use in the cockpit; flap leavers, throttle levers, instrument panels, side panels and seat belts. There is an ammunition belt for the observers gun, along with the rear radio sets, and seat mountings. At the rear of the aircraft there tail control linkages. The gear doors have extra parts. There are firewalls for the engine nacelles along with other interior parts. There are parts for the engine fronts and the landing gear. You get new frames for the landing lights, and new intake grill covers. Finally there are parts to improve the torpedo and firing lines for the rockets. If the modeller does not want the full airframe set then the nickel fret is available on its own. The landing flap set is just what it says on the packet in that they provide a full set of landing flaps. They are cleverly made in that all the ribs just need to be twisted up into place. There is some kit surgery needed to get them in. Conclusion The new tool Airfix Beaufighter is a good kit, however their are limitations in plastic which photo-etch can readdress. Recommended. Review sample courtesy of
 -
A few weeks ago we had a long weekend here in Western Australia, so I thought I might have a go at a quick build. I had been itching to do the new Airfix Beaufighter I picked up before Christmas last year. It was an absolute joy to build. Brush painted Italeri Acryl acrylics for the top side camouflage, Tamiya Acrylics for the rest. WIP thread can be found here. Apologies for the rather dark photos, not much sun in the yard this late in the afternoon. Thanks for looking. Even though its winter time here this little fella came out for a look.
-
Its a long weekend here in Western Australia, so I thought I might have a go at a quick build. I have been itching to do the new Airfix Beaufighter I picked up before Christmas last year. They have been as rare as rocking horse droppings in the local hobby shops, but I managed to pick this one up while visiting Melbourne. I rather fancy the SEAC colours. So to work this Friday evening. The kit is such that you can actually glue quite a few bits together without any painting. In no time at all I had the main cockpit components sorted and the wing constructed. First coat of paint, brush painted Tamiya acrylics, XF71 for the interior, XF69 NATO black for the tyres and props, X1 gloss black for the engines, XF16 flat aluminium for the wheel hubs That's it for this evening!
-
RAAF Beaufighter WW2 & Post-War Observer's Canopies 1:72 Red Roo Models These are a pair of vacuum formed observer canopies for the Hasegawa Mk.21 Beaufighter. The set features a WWII style canopy, and a later post war style canopy. Conclusion This is a quality vac formed canopy set for those who like the more realistic thickness of these. Recommended. Review sample courtesy of
-
Evening, Final bits n pieces fitted this afternoon, and I'm calling this done. Built straight out the box, decals and all. Only additions were some tape seat belts, oh and I cheated on the canopy masking with an Eduard set. Flory models panel line wash and weathered further with pastels. I have already noticed a couple of omissions, the gear doors are a tad too clean. Given their location aft of the the lower side of the engine, I suspect these would be far from clean! I have left the wire antenna off just now as the mast had not set when I took the pics. Lessons learnt.......again, must fit, blend and polish the nav lights way before we get to the painting stage! Fortunately the fit wasn't too bad but it's still really noticeable that these have been fitted at the end. Anyway here's a few pics taken in the sun this afternoon, yes, sun again, no snow today just hail earlier! Hope you like her Had to do a wee bit of taxiing and marshalling to find her a wee spot on the shelf though! Thanks, Eng
- 18 replies
-
- 54
-
-
- Beaufighter
- Airfix
- (and 5 more)
-
 Hope it's not considered cheating to chuck up pics of the painting stage of a build and state it's a work in progress! I started this ages ago when the kit was first released but as with many of my builds something else bigger and shinier came along and it's been sat on the bench for a few months now. Cue a couple of days off, all my chores done, and kids at school, it seemed a good opportunity to roll out the airbrush and see if I could push this on a bit. I think it may have been the thought of masking those invasion stripes that stalled this, no decals for this! I work solely with Tamiya paints for airbrushing these days as they spray absolutely beautifully in conjunction with there own thinners. Matt White, no problem, covers superbly. I couldn't help myself from unpeeling the middle sections of masking to see how it looked, there would be tears and tantrums if after completing all the painting the lines were not quite straight! After recovering the stripes it was on to the lower surfaces, I used a mix of Tamiya XF21 Sky, XF20 Medium grey, and XF80 Royal light grey in a ratio of 4:11:2. I stumbled across a great phone app called iModelKit which has a superb set of paint charts and a paint matching calculator and its indispensable. A couple of hours to mask up the lower surfaces and a mix of XF24 Dark grey and XF2 White (16:2) and on with the upper surfaces. I misjudged how much paint to mix for the uppers but always try and paint in symmetrical sections, and blocks of panels just in case I do run short, this helped as any slight variations in mix aren't as obvious. I lightened the base coat slightly and went back over random panels to break up a potentially bland finish. Here's how it looks just now. Coats of Klear next and decals! Comments and criticism all gratefully accepted, Rgds, Eng
- 11 replies
-
- 12
-
-
- Beaufighter
- Airfix
- (and 4 more)
-
I bought the Airfix 1/72 Beaufighter TF.X kit last week. On one long side of the box is this; The pictures are of the 1/72 kit ~ its what is written. Is this a hint of things to come? Is it just a typo from bad copy & paste of the box artwork?
- 15 replies
-
- 1
-
-
- beaufighter
- airfix
- (and 1 more)
-
Right gang, after much dithering I've finally come to a decision, the Tamiya Bristol Beaufighter will be my subject for this GB. I've two kits in the stash, one a Mk. X and the other a Mk. VI, what I want to produce is a Mk.Ic so that will take some minor converting. There's a story I'll share later that has served as inspiration for this one but it also adds another type to the range of subjects we have within this GB.
- 51 replies
-
- 4
-
-
- Tamiya
- Beaufighter
- (and 1 more)
-
So, I finished off the 1/700 Prince of Wales, and thought that the new Airfix Beaufighter would make a good subject. But first, a short story... Last year, my local IPMS chapter decided to run group builds on their Facebook page, in addition to the themes and group builds run within the club. Our first was a P-47 GB - as per the Britmodeller one being run this year. So far, nothing much to see here, but... Our first meeting for this year had a "Best of British' theme. Adding to that, two of our three IPMS yearly GBs have British subjects - the Airifx new release Beaufighter and the Takom Chieftain. So of course, I come over here and....hmmm It gets better. Helicopter GB scheduled for mid-Feb? - my clubs version started in Jan. "Red Storm Rising"? not far from our Russian Jets GB that ran from October last year. So - should I worry about the Britmodeller spy in my club, or just pass them this year's calendar to make it easier for them Anyway - enough Tinfoil. Given the Beau will satisfy two group builds, it made an obvious choice. Plus I love Beaufighters - I have this, plus a Matchbox TF.X, a 1/72 Hasegawa RAAF kit and the Tamiya 1/48 Mk.VI. So far I've kicked off with some interior green for the first asemblies. Our club group build specifies that it must be OOB apart from decals, so that's what it will be. Hopefully this fuselage will fit together a little better than the new Blenheim did...
-
 Hello all My second posting of the day. We've been lucky enough to have some beautiful sunshine here this morning, which has given me a chance to take some half decent photos of this build that I completed about a year ago. This is Tamiya's Beaufighter MkX in 1/48 in a Coastal Command scheme, another great kit of theirs that goes together like a dream - a real pleasure from start to finish. This was built out of the box apart from a Montex Mini Mask for the canopy, and a bit of EZ Line for the antenna wire, and was painted with Tamiya acrylics throughout. This was my first bash at doing invasion stripes, quite happy with how they've come out. Thanks for looking Adam
- 10 replies
-
- 22
-
-
- Tamiya
- Beaufighter
- (and 2 more)
-
 Bristol Beaufighter Mk.1F MarkI. Models 1:144 The Bristol Beaufighter owes much of the design to its predecessor, the Bristol Beaufort with enhancements for fixed cannon arrangements. This upgraded designed, originating in 1939, was initially referred to as the "Beaufort-Fighter". An unusual concept of the design was in the installation of wing-mounted machine-guns, in that the allocation was four guns were fitted in the starboard wing but only two in the port wing. This offset was due mainly to the impedence of the landing light position in the port wing. The first operational aircraft were not deployed until mid-1940 and were allocated to No.25 Squadron based at Martlesham. The Beaufighter could undertake many roles, with the fighter-role being primary; however, this heavy armed, twin-engined fighter would make a good night fighter as it had room for a radar fit and additional radar operator additional to the existing crew. The night-fighter version was to prove its worth in November 1940 when a Beaufighter of No.219 Squadron used a radar intercept to shoot down a Junkers Ju.88 during a night sortie. The Kit Mark1 Models has actually produced three Beaufighter kits: The Mk.1F which can be completed as the nightfighter, as in the image above; plus a Mk.1C and a Mk.VI as in the images below. The kit comes in a small card box, with end opening flaps, and has a colour painted image of a Beaufighter Night Fighter as the box-art. On the rear of the box are four side profiles of different Beaufighter Mk.1F aircraft, any one of which can be built and finished using the enclosed decal sheet. Although the title of this kit implies a night fighter variant, any of the Mk.1F's can be built and the colours and markings showing types from No.68 Sqn (detached to RAF Valley, Anglesey); No.60 Sqn, RAF Middle Wallop; No.89 Sqn, RAF Abu Sueir airfield, Egypt; or No.252 Sqn, RAF El Magrun airfield, Libya. There are, currently, three separate Beaufighter kits issued by MarkI. models; MKM14434 (this kit) which is a Mk.1F; MKM14435 represents a Mk.1C; and MKM14436 is the Mk.VI variant. The sprues that come with this kit are common across all three kits; some parts being used on one version but not another etc. and in conjuction with the associated decals within each kit box. There are two main sprues with this kit, each sprue being of rigid, but not brittle, grey plastic. The first sprue holds the two fuselage halves and the first thing to note is that there are no locating pins or holes in these part, although this should not be a major issue on such a small item. Panel lines on the fuselage are very finely recessed. Internal detail consists of a long floor piece, instrument panel, control stick and two seats - one for the pilot and one for the rear gunner/observer. Other parts on this sprue are the propellers and the undercarriage, of which the wheel flaps are nicely detailed. The second sprue has the pieces to make the main wings, engine cylinders and cowlings. Here, again, there are no locating pins on the wing units but the lower wing section has an overlap which, when the two wing halves are assembled, allow for a good register when fitting to the fuselage. This reverse view shows the lack of locating pins and holes to line up the relevant parts. Care will need to be taken during assembly just to ensure that the pieces do not slip out of position whilst the glue is drying. The detailing of the clear parts is crisp and contains the pilot's canopy, observer/gunner canopy and wing-lights etc. INSTRUCTIONS AND COLOUR DETAILS An eight page A5 sized paper booklet is supplied and this contains a single page of parts breakdown, followed by three pages of assembly diagrams. The remaining four pages shows colour details of the four aircraft camouflage patterns that can be used for this kit. The back of the kit box also has colour details of the various aircraft and help to identify decal placements. The same type of colour details are also present on the Mk.1C and Mk.VI kits which means that three kits could give you twelve variants/theatres of operations from the sets of decals. DECALS The decal sheet is nicely produced by Mark1 Models and the detail is clear and the registration looks good. CONCLUSION There may not be many parts for this kit but, at 1:144 scale, the parts are nice and well detailed and should allow for a good build of this popular type of WW2 heavy fighter. As mentioned previously, care should be taken whilst glueing the various components as there are no locating pins on the parts; however, having done a dry-fit test, I found that the way the parts are moulded help to hold the components in place quite easily. I'm looking forward to getting more of these little gems. Recommended. Review sample courtesy of
 -
 I'm thinking using a guitar string, probably wrapped in masking tape, to replicate the heating pipe. I use .48 e-strings on my electric guitars (a Mustang, Tele and Strat, for those who are interested), .52 flatwounds on my Jag and, .54 on a Martin. All of them are due a string-change so I'll have plenty spare. (I also have a bass but, like Bernard Edwards, never change the strings.) Which gauge do people think would be best?
 -
 Hello gents, Here are my two Airfix Beaufighters from the recently-released new-tool kit; the first uses one of the kit-supplied markings schemes and the second uses markings from one of the Cutting Edge transfer sets which are, I think, long out of print. The kits went together extremely well; I used the Eduard masking set purely because I am lazy and will almost always take the path of least resistance even if it means shelling out several pounds for some pre-cut pieces of masking tape. The aircraft were painted in Phoenix Precision Paints Extra Dark Sea Grey over Sky, the invasion stripes were painted in various acrylic shades of light and dark grey to give a worn appearance. As the schemes were monocolour on the upper and lower surfaces I tried pre-shading the model and I'm quite pleased with how that came out (though it isn't really noticeable unless you know it is there) and I think it was probably worth the effort and the time it took. Anyway here are the models; first NE829 PLoJ of 144 Squadron RAF, which served in the famous Banff Strike Wing based in Aberdeenshire: ... and the second, NE548, UBoE of 455 Squadron RAAF which flew as part of the ANZAC Strike Wing based at RAF Langham in Norfolk from April 1944 before moving to RAF Dallachy in Aberdeenshire in October 1944: The first kit was built OOB and the second almost so, apart from the markings and the replacement of the 60lb rocket heads with the solid-shot semi-armour-piercing 25lb heads from a Tamiya Mosquito - I have read that the 60lb R/Ps were used for flak suppression so the kit-supplied ones are not necessarily incorrect but the 25lb version were more commonly used for anti-shipping raids. I also filled the cannon-ports on both aircraft and painted them with WEM Dull Roundel Red to represent the doped-fabric covers often seen on Beaus - mine representing the 'tidy' end of the scale, not all were so neatly applied... ... and finally, if you will permit me the indulgence, this is how I intended them to be displayed:
- 37 replies
-
- 64
-
-
I'm building the new Airfix Beaufighter in the box's Coastal Command scheme. I've noticed that while the instructions have a painting guide for the scheme's torpedo, they don't indicate a colour for the torpedo's monoplane air tail (MAT) - the bit that attached onto the end of the torpedo. I dimly recall that the build in AMW may have painted this a bronzey colour but as MATs were made from plywood this seems a bit unlikely. The picture about halfway down this page suggests that its MAT is a light colour, possibly the same colour as the Beaufighter's belly (so presumably Sky). Does anyone know if that's the case?
-
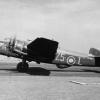
Bristol Beaufighter Mk.X - 1/72 Hasegawa
bombernut posted a topic in Ready for Inspection - Aircraft
Afternoon all (at least in Canberra that is!), Despite all the justifiable clamour and accolades for the Airfix Beaufighter, the relatively old Hasegawa Beaufighter still isn't too bad. This is my latest completed model, completed about 45 minutes ago. It comes from the D-Day boxing partnered with the Spitfire IX and depicts MB-T (NT950) from 236 Squadron in July 1944. The only addition was the Aeries resin cockpit set, which greatly enhanced an otherwise uninspiring office. Oh, and I substituted the Tamiya Mosquito A/P rockets for the Hasegawa H/E rockets. Again, I must get better lighting, as the top surface weathering is quite pronounced - you just can't see it here. Enjoy.... Matt -
 Hi everyone. Just finished my recent project of the new tooled Airfix 1/72 Beaufighter. The kit was a pure joy, no fit issues and only an issue with the painting instructions that Airfix provided being the only issue with the kit. I chose to build the kit OOB and also had a 1/72 Hurricane with the same markings in the stash, So chose to build them together. WIP can be found here http://www.britmodeller.com/forums/index.php?/topic/234987066-airfix-beaufighter-new-tool-and-hurricane-mkiic-seac-172/ Any comments, positive or negative are welcome. Thanks all
 -
All, Looks like Franta has been busy once again with the development of three new 1/72 Beaufighter sheets. http://www.dkdecals.cz These seem to tie in with the new Airfix kit, however the decal sheet covers would suggest quite a few early Mk.1, IV's and RAAF XXI's are going to be provided as well. Full details are still not known, however the artwork will probably follow in a few weeks / month or so. There's also a RAAF Liberator sheet in 1/72 as well. Cheers... Dave.
- 1 reply
-
- 5
-
-
- Airfix
- Beaufighter
- (and 1 more)
-
Hey everyone, need some help please. I'm building Airfix's Beaufighter TF.X in the 144 Squadron colours (Coastal Command I think) which is armed with a torpedo. The wings have shell ejection chutes on the undersides but no gun muzzle holes in the leading edge. I have found out that the wing guns were omitted from some Mk.X's and probably had the muzzle holes blanked. But does anyone know if the shell ejection chutes were blanked as well? I have looked at period photos but it's very difficult to tell. Any guidance would be much appreciated. Thanks. Regards Andy
-
 Photo Etch detail sets for Airfix Beaufighter Mk.X 1:72 Eduard With the resurgent Airfix apparently going from strength to strength, fans of British aircraft types have, as Harold Wilson said, never had is so good. Things are about to get even better however, with the imminent release of the new Shackleton, Whitley and Beaufighter kits. It is the latter with which we are concerned here, as although the kit hasn't quite reached the shelves of the model shops yet, Eduard have already prepared several sets of goodies to satisfy the appetites of detail-hungry modellers. So far we have a set of photo etched parts for detailing the airframe inside and out, a 'Zoom' set which is dedicated purely to the interior, a set of landing flaps and a set of pre-cut masks. Resin replacement wheels and exhausts are just around the corner. Beaufighter Mk.X SA 1:72 Eduard Although we haven't had a chance to fondle the plastic ourselves just yet, if the Beaufighter lives up to the rest of Airfix's recent output then it will be pretty good. Nevertheless, Eduard have managed to cook up a few extras with this set of parts. Included is a new multi-layered instrument panel, parts for the throttle and a whole host of parts for the cockpit sidewalls. The rudders and control yoke benefit from some extra parts and there are pre-painted harnesses for the crew seats. Turning to the rest of the airframe (and the second fret), Eduard have provided replacement details for the rudder and elevator actuators, as well as a whole host of fine details for the landing gear, including detailed linings for the landing gear bays, brake lines and structural details for the main landing gear legs. The kit's 60lb rockets gain ignition wires, while the torpedo also acquires a few details. Details for the landing light and mesh for the air intakes round the package off. Beaufighter Mk.X Interior 1:72 Eduard This set contains the pre-painted fret from the more extensive set reviewed above. In other words, if your priority is to add detail to the interior and you're happy with the rest of the kit the way it is, then this is probably the set for you. Beaufighter Mk.X Landing Flaps 1:72 Eduard In typical Eduard style, these flaps make extensive use of folds rather than lots of parts, which helps make construction relatively painless. You'll need to pay close attention to the instructions though, particularly when it comes to cutting away the corresponding parts of the kit's wings. Unlike some other Eduard flaps, no wire or plastic rod is needed in order to finish them off. Beaufighter Mk.X Pre-Cut Masks 1:72 Eduard In keeping with their other pre-cut mask sets, this set contains masks for all of the transparent parts, as well as the tail wheel (no masks are needed for the main wheels as the tyres and hubs are moulded as separate parts). For a model with a fair amount of glazing like the Beaufighter, they are a great time (and stress) saver. Conclusion Although Airfix's Beaufighter is, at the time of writing, an unknown quantity in terms of the fit and finish of parts, there was always going to be demand for aftermarket upgrades. Eduard have been first to market - even beating the kit onto the shelves of model emporiums - and with this handful of items they have provided pretty much everything you need to finish the kit to a high standard. Recommended. Review sample courtesy of
 -
Ignore all those who say this kit will not be available until September, the new-tool Airfix 1/72 Beaufighter TF.x is in stock now at Wonderland Models usual bargain price. The kit has options for 1. NE829/PL-J of 144 Sqn at Banff in October 1944 for which Airfix provide a torpedo armament. 2. RD367/H of 27 Sqn in Burma June 1945 for which Airfix provide 8 x rocket armament https://www.wonderlandmodels.com/products/airfix-172-bristol-beaufighter-mkx/
-
 All, Just noticed that the Airfix website is now displaying the paint guides for the following new tools - (some with new boxart as well) AW Whitley - http://www.airfix.com/uk-en/shop/new-for-2015/armstrong-whitworth-whitley-mk-v.html Beaufighter - http://www.airfix.com/uk-en/shop/new-for-2015/bristol-beaufighter-mk-x.html Heinkel He111 - http://www.airfix.com/uk-en/shop/new-for-2015/heinkel-he-iii-p2.html F4F Wildcat - http://www.airfix.com/uk-en/shop/new-for-2015/grumman-wildcat-f4f-4.html Battle of Britain Set - http://www.airfix.com/uk-en/shop/new-for-2015/battle-of-britain-75th-anniversary-gift-set.html This should start off a few new discussions one would think!! Cheers.. Dave.
 -
Recently completed Frog Beau as a night fighter, wanted it to look well used! A few changes/additions; -nacelles; tried some resin ones, very disappointing, the gills were underscale and ended up shattering the front ring. in the end I wrapped the kit item in plasticard and made the gills from a thin strip. Still under sized but a big improvement. -antenna to wings made from thin wire -landing lights added to wing tips -used the decals supplied even though some broke up but note the serials as they are grey not red and seem to be the wrong number. Will add some when I have enough need to buy a sheet. Quite please with how it turned out considering the age of the kit. Trying to keep one step ahead of Airfix releases so Kinetic Whitley next!
- 15 replies
-
- 18
-