Search the Community
Showing results for tags '1/32'.
-
 Hi all, I have been wanting to do this one for a while now and so started this one a month or so ago. I have other builds on the go at the same time which is why progress is a bit slow. The cockpit has gone together well and am enjoying so far. I have used Kits World IP and adapted it to a later IP just need to make up a gun camera device for the bottom of the IP. I have added an extra armour plate to the rear lower part of the seat although wish I had done that a bit better. Here are some of the cockpit components laid out. Still got lots to do in the cockpit including some additions and weathering etc. I want to do an Op Starkey machine, I did this in 48th scale using the Classic Airframes kit and painted the upper wing surface with just the white stripes and didn't extend the black to these. So this will be rectified when I paint this one. The others will be some Spitfires in the same scale hopefully although a 48th scale one might creep in. The Whirlwind is a nice kit so far. Thanks for looking Chris
- 267 replies
-
- 16
-

-

-
- Special Hobby
- Kotare
- (and 1 more)
-
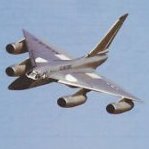
I don't usually do WIPs, but decided for some reason that I'd make the effort with this one, as it's an unusual subject, not least that it's a helicopter in a proper aviation scale. I bought the Revell kit at a show last year for a good price. The kit is in Revell's new box and style, and it was only later I discovered that it was first issued in 1996. This is not a problem, it will just need some work. The box has some colourful options, but I settled on going off-piste and doing a British one. The Army Air Corps bought 16 or thereabouts in the late 1950s/early 1960s to fill a capability gap until the Westland Scout was available. I'll be doing XR385 (c/n 1645) as it appeared at the Middle Wallop Army Air Day in 1975. So on with the show. First the box, illustrating how I deal with those end-opening boxes: cut the top out and tape up the ends. It's a simple kit. Three grey sprues, one clear sprue, instructions, decals, and safety info slip At the moment I can't find any aftermarket for it, any suggestions welcome. (Edit: just found some Eduard Etch - we'll see.) I'll add a set of generic seat belts and some home-cut masks for the markings, otherwise it's from the box all the way. Back later with (hopefully) some actual work accomplished.
- 28 replies
-
- 6
-
-
- Army Air Corps
- 1/32
- (and 1 more)
-
Hi everyone, I'm not sure if I should be posting this topic here or in the Cold War section, so please indulge me a little if you feel I have posted it im the wrong place. I am looking for decals in 1/72, 1/32 and 1/24 for early Indian Air Force roundels, notably, the 'chakra' symbol of a blue spinning wheel on a white circle as seen in the centre of the Indian tricolour. Does anyone know of any decals out there that fit th bill? Cheers, and thank you all very much for any help and for taking the time to read this thread, Viv
-
Revell's boxing of Dragon's kit, not the easiest build due to the instructions being a bit ambiguous in some places. Engines are meant to be posed either cowled or uncowled, but I don't think they are detailed enough to be shown off without a lot of additional work and the cowls don't fit properly over them (might have been builder error to be fair). Easier to leave the engines off and blank off the cowl openings before fixing in place. Only other major issue was the multi-piece canopy which required a bit of minor surgery to fit (again, could have been my fault). Still, it builds into a quite imposing model which sits nicely alongside my Tamiya Mosquito: Thanks for looking, J.A.
-
Well... If you were reading the WIP 2 years ago, I left you all hanging with the news that nerve damage in my neck had severely impaired the motor control in my right hand. Well, it hasn't got any better, but I am learning how to adapt by going left handed in some places, and buying a Gaahleri trigger action airbrush (excellent value, BTW) so that I can use my right hand for painting. I restarted the P-40 about 3 months ago, and got it to a place where I am reasonably happy with it. Here are just a few pictures taken with my camera phone. The kit is a staggering piece of engineering, the hoses moulded for the engine have to be seen to be believed. Even more astonishingly, they survived being removed from the frames - a big shout out to DSPIAE nippers! I painted on the insignia and codes - as delivered it comes with decals for the AVG, but I wanted to do something different. I can't remember where I got the sharkmouth masks, but it is painted, too. In fact, thinking about it the only decals transfers are the stencils on the propellor blades. A general view, including the engine. In theory, one can attach either the cowled nose -or- the engine onto the body; too much for me! Rear quarter: Invisible inside here somewhere is a finely honed dashboard This was a diversion from building Sydney Camm's Hawker piston engined fighters, for my next trick I will be moving on to a Fisher Model and Pattern Sea Fury that I purchased for an obscene amount of money from some chap in New Zealand, thus triggering DBMK's manufacture of an injection moulded version. 🙂
-
This is my attempt at Tamiya's 1/32 F-15E "with bunker buster"..... or two bunker busters in my case. The kit is buit out of the box except for a Red Fox 3D cockpit set and some Eduard seat belts. The Red Fox cockpit set is really nice and is a worthwhile investment for a 1/32 scale model. The kit is excellent with no real fit issues at all that i came across, and i would highly recommended it. She's a big bird, so builds into an impressive display piece. The only fit issue I had, that wasn't self-inflicted, was a small gap between the fuselage and wings....this was easily sorted with some filler and a bit of rescribing. The kit offers the ability to build and display a detailed radar in the nose cone and an electronics bay in the front fuselage. It also comes with two crew. However I just wanted to build mine with clean lines as if it were just ready to undergo a mission. I bought my kit second hand and sadly the decals must have got damp since they absolutely refused to part with the backing paper without tearing, so I bought a replacement set through the official Tamiya UK route for a very reasonable price...the service I received was excellent and the replacements arrived quickly. I've seen pictures of F-15Es in both very clean and fairly heavily weathered states....I wanted to go with the latter....but have i overdone it? All in all, this is an great kit and I really enjoyed building it...highly recommended! Thanks for looking! P.S. whilst taking the photos I've noticed I've forgotten to attach the main gear doors...I've fixed that now.
- 12 replies
-
- 46
-
-
-

-
Hi all This is finish number 3 this year, the Special Hobby 32nd scale Westland Whirlwind. What a cracking kit. I was so excited when this one was announced. I got the first kit release and was wondering what option to build when I saw a link to Op Starkey, posted in the Rumourmonger thread for the re released 72nd Special Hobby Whirlwind kit, by @brewerjerry. Thanks Jerry the photo showing the scheme made me want to have another go at this scheme to try to get it right this time. I previously built the Classic Airframes 48th scale kit, but used the profiles which were not right. The SH 32nd kit is fantastic and gives the correct undercarriage and main wing trailing edge inboard of the radiator flaps. I added a few extra bits here and there using the Kits World 3d decals for the seatbelts and IP and some extra details such as wiring, rudder pedals etc brake and Hydraulic lines. I also cut off the moulded fuselage aerial mount and scratched a new one in the offset to port slightly as it is incorrectly moulded on top of the spine in the kit. Here is the link to the build thread The model was brush painted, using Humbrol enamels and weathered using oils and weathering powders Extra levers and gun camera panel control added Folding cowl sides made from post it note paper ID stripes have raggedy edges as does the nose I really enjoyed this kit, it looks impressive on the shelf even though it's a small aircraft, not much difference in length to a Spitfire and Hurricane really , what a fantastic beast this must have been, shame tge change of props from the prototypes let it down . Thanks to all those that have followed and offered support and encouragement along the way. Chris
-
Here in his own right, the Pilot figure from my Kotare Mk I (early) 1/32 Spitfire. Mostly from ICM 32105, with his arms from Aerobonus 32059. The seatbelt is from HGW 132639 and audio leads, 02 hose etc. from scratch. Painted with Vallejo Air.
-
Over the course of this last year I've managed to build both the Airfix Mini and the Airfix Maxi. I thoroughly enjoyed them, so I thought I'd take this opportunity to complete the Airfix set of BMC front wheel drivers. Cheers
- 60 replies
-
- 39
-
-
-
This model is a perfect example for how sometimes the best plans fail, only to give nice, if different results. My stash elimination project consists of 66 kits collected between 25 and 30 years ago, some boxes with third party detail sets and decals, and a some-time-past-middle-aged man with the firm motivation to build all these kits before failing eyesight and tremor makes this impossible. Currently, I am standing at #14 of the 66 kits completed. These two to three decades ago, I planned to make some kind of a display dedicated to two of my favourite aircraft, the Starfighter and the Phantom, both consisting of several small 1/72 models and one big in 1/32. With the four 1/72 F-104 kits being completed (more or less, this is a different story), I was eager to draw the big Revell Starfighter box from the stash. Since I acquired the F-104G kit in special Italian AF livery, I had not given it more than a most superficial inspection, and was looking forward to build it as an early bare metal -G of the Belgian airforce. For that, I had this wonderful and huge decal sheet released by Danny Coremans, former crew chief of the Belgian AF under his Daco label. However, upon closer look I grew increasingly frustrated with what I found in the box: Revell released this kit in 1980, five years after the Hasegawa 1/32 Starfighter. The latter is full of detail, not everything correct, but really a nice kit. The more astonished I was to find the Revell to be very crudely, even toy-like "detailed", something noone would expect from a major manufacturer, especially not in that large scale. There are no separate control surfaces or airbrakes, no provision for an open cockpit, fuselage vents either closed or entirely ignored, not a single external antenna or sensor except the pitot tube. The cockpit parts and the pathetic seat remind of 1960s Matchbox kits. It may suffice to say that the small Revell 1/72 kit nearly has twice as much parts. To make things worse, it is impossible to build any version of the Starfighter out of the box without significant errors or omissions. Upon original release, the Revell F-104G featured four underwing stations, which only the Italian F-104S (and later ASA) version had. For that, Revell never released matching decals. Also, all -S Starfighters had the Martin Baker GQ-7 seat, which is so different from the old Lockheed C-2 seat supplied in the kit, that it is evident even through the barely transparent canopy. Since the -G variant received wider wheels and strengthened landing gear, it needed gear doors with prominent bulges, which also are missing from the kit. That the -S had no internal gun with the muzzle faired over, was also ignored by the kit designers. If the -S is impossible, what about the -G? It is a bit better, because not all operators opted for the MB ejection seat, so my planned Belgian AF plane would have been correct in this respect. Remain the wrong gear doors, the outer hardpoints that would have to be sanded down and filled, and of course the various aerials. Many kit parts are dedicated to the ordnance, some of that rather weird and more or less impossible: Four M117 Vietnam-era bombs, of which the Starfighter never carried more than two, four AIM-9B Sidewinders, which also is two too much, and two AIM-7 Sparrows, which were only carried by the Italian -S, which, as stated, was never part of the Revell 1/32 lineup. On the other hand, the extremely often used underwing fuel tanks are missing. After being increasingly frustrated, I noticed that the kit included some of the most important parts for the early F-104C: the short fin and the air refuelling probe. Together with the non-bulged gear doors, which also were present only on the -C, this made me searching for a decal sheet for this model. So Hannants came to rescue and I obtained a sheet made by Caracal, dedicated to the F-104Cs deployed to Udorn in Thailand in 1966. While I am not a fan of camouflaged aircraft, I thought that the SEA paint scheme, together with the interesting nose art make this jet colourful in its own right. These Starfighters were often used in the strike role, so the M117 bombs came handy. Back when I purchased the kit I also acquired the resin detail sets for cockpit and the Vulcan gun by by KMC, which were made for the Hasegawa kit. But with some cutting and sanding I was able to fit them into the Revell. These details sets, espcially the C-2 seat are works of art, and it is a pity that the cockpit detail is barely visible through the thick canopy. But cutting it open would have meant to scratch-build the prominent anti-haze piping of the canopy frame, so I left the canopy as is. After all, I am quite happy with the outcome, even if it is completely different from what I had envisaged before. Marcus
- 14 replies
-
- 38
-
-
-
Hello fellow modellers, welcome to my first WIP! The kit I’m working on is a Revell 1/32 Mirage III: This was a surprise Christmas present from my wife, I hadn’t built a single model for over 30 years! So, I was to build this shiny Mirage, but to be honest it didn’t quite appeal to me. Of course, its livery is splendid… …but I never saw this particular jet ‘in the wild’. The decal set offered two alternatives, an Australian version… …and a French Mirage IIIRD: In 1984 I visited Gilze-Rijen airbase to witness the NATO Tactical Air Meet, which was an impressive event with masses of different aircraft types and numbers, like Canadian Starfighters, RAF Jaguars and Phantoms, USAFE F-4s and F-15s, Belgian F-16s and Mirages, German F-4s, and French Jaguars and... Mirage IIIRDs! One of these Mirages was Mirage IIIRD 368/33-TQ: To keep the memory of this exercise alive I decided to build this particular reconnaissance jet. I joined britmodeller.com in January 2021, but I never intended to start a WIP because I was quite intimidated by the high skills and superb results by most of you lot. However, @The Spadgent appeared to build a similar kit, check... ...and he and @81-er encouraged me to show some of my progress, too. So, here I go! First an overview of my desk, with the supplies spread out to give you an idea: Documentation (the upper photo was taken during TAM 1984 too, by a good friend of mine): Aftermarket stuff: And what I've done so far. The manual warns for the danger of tail sitting for the E and O version, but to be safe I added a redundant nut to avoid this for the RD version too. The 'inside job': My box with preliminary stuff: And for the final result, I decided to add the pilot as well. Meet Jean-Claude: He is supervising my progress: That's it for now. I hope I can entertain you with upcoming posts, and feel free to comment! Cheers, Rob
- 33 replies
-
- 21
-
-
- mirage III
- 1/32
- (and 1 more)
-
Spitfire L1070. XT-A, 603 (City of Edinburgh) Squadron, somewhere over the Firth of Forth, 16 October 1939… After about a year on-and-off I finally called her finished, appropriately it was on St Andrew’s Day! Stickleback is the first half of my 1/32 ‘Dogfight Double’. See link: https://www.britmodeller.com/forums/index.php?/topic/235027828-ju88-dora-heinrich/ …but there’s one GLARING omission, something missing from L1070, which I hope fellow Britmodeller Members’ may help rectify. Please see below* But first - the Spitty piccys!
- 10 replies
-
- 28
-
-

-
-
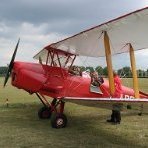
Afternoon All, I have had this kit in my stash for over 50 years. The price on the box is, I think is 6/9, that is six shillings and nine pence, or about 34p in modern money. I bought this before decimalisation in Feb 1971. Anyway, here's the box top: It has been in part completion for some time, so here are the current images of the build: I think this is painted with Halfords automotive paints. I started this long before I discovered Zero paints! The floor pan. The front seats and engine and gubbins. I think that I may have lost the exhaust manifold and exhaust system... I guess that I will have to fabricate those from plastic rod and scraps. Thanks for looking, Cheers, Alan.
-
 Howdy Fine Folk Welcome to The RDR Hun Hunter / Texas figure build. Just left the Old Barn n starting some taxidermy on a Mustang riding Gunslinger for this RDR Build. Herz the work so far just poured the molasses on the Old Boy. Thats it for now Cheers -HH Here's the Link for the Full Build in the "Aircraft Work in Progress" section
 -
I have already built three 1/32 racers for the collection so I’ve decided to add a few more as part of this GB probably a Caudron and maybe a Supermarine but I thought I’d start with the Vervile Packard R1. It’s quite a natty little biplane about the same size as an me109 as happens. Time to hit the CAD Solidworks for makers is my preferred app. I completed the drawing sometime ago. Although I still need to do some prop blades. Printed. The fuselage split was intended to have it fit on the printer bed. The segmented wings are because I was down to bits and scraps of PLA filament and I let it run out twice (doh) but it’s nothing a bit of brass rod and some filler can’t fix. Next step, cleanup the components. Some assembly and lots (and lots) of filling and sanding😀🤪 But of course I won’t start any of that till Sunday. Now I’m torn as to the next project I think I’ll start modelling the Caudron next but I’m very inclined to knock out a quick model if the nose and tail for the Lancastrian conversion. Although both are moot atm as I’m out of action with a pretty bad dose of flu…
-
 Had this one for a while, and thought I would run it up so I could practice an NMF before tackling a more serious build, the Hasegawa Ki-61 (which I have failed to take many pictures of, so no WiP there). Only AM additions are belts and some QuickBoost radio boxes, though tbh you could add some wires to the kit versions and they would look pretty much as good So bear with me on this one...as with all kits there are two basic elements to the manufacture, the design and the mould-making. On the former, Revell have done, I think a fine job; the designer (Radu Brinzan?) has done some really clever stuff with the internals to ensure a good level of detail with no ambiguity in the fit, and each section locks into the other with no simple butt joins to spoil things with their sloppy fit. So Revell played a blinder in the first half. Where it goes wrong is with the mould itself. I would be fairly sure that Revell contract out the mould-making, and my advice - find another company. The similarities with Airfix of a couple of years ago here are notable, nice design but slightly rough moulds coupled with soft plastic result in a slightly disappointing build given the initial promise of the parts. Recently, Airfix have taken steps to resolve this - I don't know if they have changed their mould-maker (though they definitely did for the 1/24th Spit as the moulds were done in the UK not India) but the plastic in recent kits is definitely harder resulting in crisper detail. And this is where Revell have their problem: the detail has been designed in, but comes out rather soft, and there are prominent mould lines everywhere, and some small amounts of flash. Joining edges can be a bit rough and need a light pass just to improve the fit, indeed every part needs a bit of fettle, and after a while this becomes a bit wearing, not to mention the amount of plastic dust and scrapings being generated. Some examples: - soft detail and mould seams on the side consoles (I have already scraped the seams off the tops of the knobs in this photo) - seams on the gear legs - soft detail on the pedals and steps inside the frames - and after clean-up This is not say everything does not go together well - it does, it paints up nicely, and Revell have provided plenty of decals for the cockpit to spice things up (albeit they are a bit bright); as mentioned I only added belts and the radio boxes, and the odd wiring loom. Pleased with the wood effect I must say. Now the instrument panel; I did buy the Eduard LOOK panel, but the white elements were really not well printed and the whole thing did not look good as a result, so I used the kit part with decal, and after a fair amount of setting solution and careful touching up it looked OK - better than the LOOK panel anyway. Then it's on to construction - no impossibly major issues here just some fettling. I did opt to add the tail sections to their respective fuselage halves to try and reduce the step that is apparent here, but it will need some sanding out. There is also a step between the intake lips and the main cowling, and the red glazing putty comes into it own here. Some shims reduce the step for the cowing underside I opted to paint the framing in the wheel well i zinc chromate as per some references And I decided to commit fully and do some rivetting (not on the wings you will be pleased to hear) I do think rivets add something to a model, even if you then choose not to highlight them too much in the painting and weathering; just compare the unrivetted and rivetted fuselage sides to see how it is brought to life Yes the wash (so I could see where I had done) does help, but when there are a few layers of silver on there it will look less blank than would otherwise be the case. Now the wings and the tail feathers are on it is ready for priming; I will be likely doing the box art scheme Lou IV, or maybe Jolie Helene if I can pick up some decals. I am afraid I do not subscribe to the "blue camo" theory arising from the famous colour picture, rather as a former printer I see an old Kodachrome transparency where the dyes have deteriorated unevenly. Classically in older transparencies certain dyes will deteriorate ahead of others, usually greens followed by reds; as any colour in the picture comprises more than one dye, the remaining colour then dominates. I think what we are looking at is a bronze green, possibly a dark green, in which the green dyes have faded leaving a more blue appearance. Hence also the olive drab doesn't really look right, and the landscape below is blue not green, the yellows are a bit washed out, and even the red of the nose art is a bit dull. So I will be doing a bronze green/olive drab mix on the upper fuselage, and dark green/olive drab on the wings/tailplanes.
 -
Hi folks. I've finished this today having started it on the 19th June. It's OOB with the exception of a couple of wires here and there and mesh for the open apertures around the boom area. The seats were give sheep skin effect by using a sponge when it was tackle. A fire extinguisher from the spares box for the rear of the RHS. I edged the cabin wooden flooring with tamiya clear red, which worked quite well. I didn't want to load up the aircraft with a full load, so just chose the gun option only as I quite like the clean look. I scraped out the ammo box holder so it looked more like the real thing and opened up the moulded flash eliminator on the barrel. The stretched wire is a EZI line alternative. It's a single piece and with my razor saw I cut a groove and ran the wire through those antennas and filled the fillet afterwards. Now those pesky intakes. The kit clear parts are the best they could do I suppose with the budget. I tried mesh but it still looked way oversize to thee real thing. Which unless you're up close it melts away. So I've used a cut up tea bag, yep you read right. Up close it does have the holes. Now I know it's going to be marmite but unless I take the notion to make paper machè for guards, it'll do. The rear wheels were set at 27.5 degrees. The blades are correct as I used to overhaul them so have done both variations of the colours and stripes etc.... Not overly weathered. Tamiya paints for the main colours and kleared halfords primer for the darker/shiney head. Followed by a Windsor & Newton Matt varnish. I used Tamiya clear blue for the tints and tonned it down with smoke, but I think it could go darker. The blades are correct and I've done the 2 main differences as they went out of Bay maintenance. The biggest gripe is the instructions. They refer to different number on the sprue, but picture the bit to be assembled and would have you try to fit the orange crop parts on opposite ends to where they should be. So if you have the kit dry fit and check references!. So during this build one of our labradors (Finlay) lost his life to liver cancer aged 8. He'd lie down beside my modelling chair every time waiting for me to move. So he was alive when I started but gone at the end. The modelling was a bit of medicine whilst my wife and I adjusted but equally its not my usual standard as at times I couldn't be bottomed. So a few photo's. This last photo is on my Boscombe Down base. Both the sandy and grey are to 1/32 scale. Steve.
- 14 replies
-
- 44
-
-

-

1/32 Crow’s Nest Mercury Spacecraft
bapowell posted a topic in Ready for Inspection - SF & RealSpace
This is the 1/32-scale Mercury Spacecraft by Crow’s Nest, supplemented with some 3D-printed improvements from Accurate Models. This is a resin kit with PE and craft wire; the original kit used white metal for the launch escape tower, but Accurate Models later produced a 3D-printed tower that I was able to acquire. It builds the Freedom 7 Alan Shepard mission. Lots of interior detail sadly gets locked away when we close everything up: Painted with Tamiya and Alclad. Weathering with enamel panel liner. Thanks for looking! -
First serious bit of modelling I've attempted in about forty years – so guess that makes me a newbie! My first experience of photoetch, acrylics, airbrush... you name it. So I wanted to do a subject I felt a connection to, and something that would stretch me to the max. So it's Revell's 1/32 Schnellbomber which will assume the guise of 4D+DH 'Dora Heinrich' of 1.KG30. This Ju 88A-1 fell to the guns of 603 (City of Edinburgh) Squadron on 16/10/39 during a Luftwaffe raid on RN ships in the Firth of Forth. 'Dora' was the first enemy bomber downed by the RAF over the British mainland in WWII, and was on the receiving end of the first ever Spitfire victory. I was born by the Forth, and have lived half my life on its banks, my family have worked for generations on its waters and in its docks and I live just a few miles from where 'Dora' ditched almost eighty years ago. So I thought I'd make her the first half of a 1/32 'Dogfight Double'. Eventually I'll get around to tackling her nemesis – XT-A 'Stickleback' a MkI Spit of 603 Squadron. Over a year in, having too much fun, here's some (unfinished) pit shots. Apologise for quality – taken with an iPhone4 Cockpit side walls, still needs wiring/some piping added Eduard PE, Aims and homemade decals Floor and curtains printed on inkjet Pilot seat, control column and BZG2 Bombsight
- 57 replies
-
- 30
-
-
Hi all This is my most recent finish, the cracking ICM Sea Gladiator kit. I built the kit using the AIMS PE sets and Resin Engine and cowling replacement set. I added a few additions to the cockpit as well. The PE set really does make the cockpit superb. The AIMS Engine set is wonderful and really enhances the front end no end The kit only provides the 2 blade Watts and 3 blade Fairey Reed Props, however all the Malta Gladiators received Blenheim Props which improved their climb rate, by the time period this one was modelled from. So I put a wanted add out on BM for 32nd Props and @Pete in Lincs came to the rescue with three P38 props do I thinned and reshaped the blades of one and cut the boss down on another and made a new prop adding the ribs between blades new centre and balance weights from padticard and brass, very pleased with the result The model was otherwise built as per the kit, but I deflected the elevators and rigged with Prym Knitting in Elastic and invisible thread. The model was brush painted using Humbrol and Colourcoats enamels. I modelled N5524 as best as I could in January 1941 as I only had the image showing it in TonyOT's wonderful book, No Place For Beginners, which was the inspiration behind the build, so thank you Tony. Also I came across the Silverwings profiles online although this is showing as Dark Earth, Dark Green and as Tony suggests in his book more likey repainted in Royal Navy colours down the sides of the Fuselage, which I would think is correct as the aircraft had been recently taken over by the Royal Navy . Decals are a mixture of Kit, AIMS and Xtradecal for the Codes and Serial numbers. Anyway here is the model. Thanks to everyone who has offered support and encouragement along the way. Thanks for looking in Chris
- 65 replies
-
- 86
-
-
-
-
-
Nice simple kit, low parts count but accurate enough given the absence (as far as i'm aware) of any other mainstream manufacturer in this scale. Thanks for looking, J.A.
-
 I'll leave this here as a placeholder for me to start in the next week or so once I've had a big clean up of the bench. The kit was originally released in 1969 with Roy Cross artwork, but this is a later rebox from 2015 with different boxing and artwork. Don't worry, I'm not going down the hairy stick route with the horrible supplied paint pots. Shouldn't take long as its pretty basic, he says optimistically 🤣 Ian
- 27 replies
-
- 13
-
-
Another one from my 1/32 collection. Built out of the box with the only aftermarket detail being the ejection seats from exta boost. From memory the kit went together ok but the nose of the aircraft needed a fair bit of filler, however this may have just been builder error. Painted in tamiya acrylics via an airbrush. Let me know your thoughts. Thanks Rob
-
Not the most accurate kit from what I've read, some of the pylons look a bit iffy in comparison to the real thing. However the kit went together very well and I really enjoyed making this one. Very much just out of the box with the exception of the sniper targeting pod from eduard being the only aftermarket detail. This is what I thought makes it a GR9 visually but could be wrong? Painted with tamiya acrylic paints via an airbrush. Let me know what you think? Thanks Rob
-
Last of my 1/32 builds. The Trumpeter kit went together reasonably well with one exception. With all the internal lift fan and air intake structures built and housed within the fuselage, fitting became an issue. Especially where the intakes joined. Lots of Tamiya tape, poly cement and filler needed but other than that the kit went together surprisingly well! As with the 1/32 Harrier by trumpeter I had read and heard that the accuracy of the kit wasn't really there. So with that in mind I used a bit of artistic licence with the loadout. For a stealthy aircraft the loadout is a bit much but she has 2 Meteor missiles and 8 Brimstone 2 missiles in the internal weapons bay. I'm fairly sure that the F35-B has not, nor will not be qualified to use the Brimstones, but will use Spear 3 AGM's that look similar. I couldn't find any Spear 3's in 1/32 so went with the brimstones instead. On the wings she has 2 Stormshadow cruise missiles (I think these will be used on the F35's), 2 LGBU's (I cant remember the model number but I don't think they are used by the RAF) and a pair of ASSRAM missiles. Painted with Mission models have glass grey and a Flory wash. The only issue I had with these two was that I didn't prime the model initially and the paint seemed to peel off quite easily plus the colour just wasn't right to my eye. Primed the model with tamiya XF1 and re-sprayed and the colour looked pretty spot on. The Flory model wash highlighted the hazing/cracking of the gloss coat. This affected the missiles and the white elements most. After market extras used: Resin ejection seat from legend production Eduard Brimstone 2 missiles Eduard LGBU's Eduard ASSRAM missiles Thanks Rob