Search the Community
Showing results for tags 'Fury'.
-
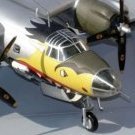
.thumb.jpg.cfc129272ffec824439b15e6013d5952.jpg) This will be my second 1/72 Sword Fury kit, after the FJ-2 I did many moons ago. That one had open speed brakes, lowered hook and ammunition door/step as well as folded wings but this one will be a bit more OOB, but not entirely. The build will be based on the 'FJ-3M' kit issue but mildly converted into an FJ-3D2 drone controller. These are the main kit parts (photos courtesy Hobby Search): I'm sure I also got a photoetch sheet in the FJ-2 kit but this FJ-3M issue doesn't have one I'd have liked the prominent wing fence in PE and the seat belts would have been nice too. But I shall overcome those omissions. I'll be using Caracal's decal sheet CD72076 "FJ-3 Fury Part 1": And my subject will be BuAer number 135867, an aircraft which served with VU-3 from July 1959 at Brown Field, San Diego and North Island until May 1962. It therefore just missed the late '62 redesignation of FJ-3D2s to become DF-1Ds. There is a note in the instructions regarding colour interpretation too: And here I shall be deviating from the Caracal scheme. It's possible that this aircraft did wear the scheme shown by Caracal, but the variant of the aircraft I want to model is of it with dayglo fin and wing bands (more on drone controller colours later). So it will look more like this: The dayglo areas are not particularly evident on this photo, but the unmistakeable degradation of this type of paint can be seen particularly on the vertical tail. Also less visible is that the inner halves of the drop tanks were usually painted the fuselage colour on their forward halves (an alternate scheme saw the front top surface painted in this way to reduce glare). Paint will be Mr Color 339 for the fuselage and wing walkways (Engine Gray FS 16081); Mr Color 329 for the wings and aft fuselage (Yellow FS 13538) and Tamiya dayglo for the fin and wing bands. Cockpit colour is a moot point. FJ-3s left the factory with Interior Bronze-Green interiors and it's possible that 'my' aircraft was repainted mid-grey during Overhaul & Repair for drone control conversion (prior to conversion it had served with VF-33 (March 1955 to September 1956) and VMF-333 (February 1957 to December 1958)). I'm undecided as yet; I have some MRP Interior Bronze-Green (MRP-132) on hand and will do some thinking on it. More in a bit!
This will be my second 1/72 Sword Fury kit, after the FJ-2 I did many moons ago. That one had open speed brakes, lowered hook and ammunition door/step as well as folded wings but this one will be a bit more OOB, but not entirely. The build will be based on the 'FJ-3M' kit issue but mildly converted into an FJ-3D2 drone controller. These are the main kit parts (photos courtesy Hobby Search): I'm sure I also got a photoetch sheet in the FJ-2 kit but this FJ-3M issue doesn't have one I'd have liked the prominent wing fence in PE and the seat belts would have been nice too. But I shall overcome those omissions. I'll be using Caracal's decal sheet CD72076 "FJ-3 Fury Part 1": And my subject will be BuAer number 135867, an aircraft which served with VU-3 from July 1959 at Brown Field, San Diego and North Island until May 1962. It therefore just missed the late '62 redesignation of FJ-3D2s to become DF-1Ds. There is a note in the instructions regarding colour interpretation too: And here I shall be deviating from the Caracal scheme. It's possible that this aircraft did wear the scheme shown by Caracal, but the variant of the aircraft I want to model is of it with dayglo fin and wing bands (more on drone controller colours later). So it will look more like this: The dayglo areas are not particularly evident on this photo, but the unmistakeable degradation of this type of paint can be seen particularly on the vertical tail. Also less visible is that the inner halves of the drop tanks were usually painted the fuselage colour on their forward halves (an alternate scheme saw the front top surface painted in this way to reduce glare). Paint will be Mr Color 339 for the fuselage and wing walkways (Engine Gray FS 16081); Mr Color 329 for the wings and aft fuselage (Yellow FS 13538) and Tamiya dayglo for the fin and wing bands. Cockpit colour is a moot point. FJ-3s left the factory with Interior Bronze-Green interiors and it's possible that 'my' aircraft was repainted mid-grey during Overhaul & Repair for drone control conversion (prior to conversion it had served with VF-33 (March 1955 to September 1956) and VMF-333 (February 1957 to December 1958)). I'm undecided as yet; I have some MRP Interior Bronze-Green (MRP-132) on hand and will do some thinking on it. More in a bit!- 50 replies
-
- 15
-

-

-
 KittyHawk is working on a 1/48th North American FJ-2(?)/3/3M Fury kit - ref. KH80155 Source: https://www.facebook.com/song.wang.5076/posts/1917304511861498?pnref=story V.P.
 -
 Well, after a very kind offer from Giorgio @Giorgio N to complete the drawings, and agreement to print them by Mika at Arctic Decals, I can declare my 1/72 North American FJ-3D2 as my initial entry for this STGB. She will be built using the Caracal set and will be a machine used a the China Lake test centre. The kit will, of course, be from Sword. I will set up a more comprehensive introduction soon. Martin
 -
 No it's not an Avenger, more on that later, but it is Czech Models FJ-1 Fury. I always did have a soft spot for early straight wing jets. So here we go.
- 28 replies
-
- 7
-
-
- Czech Models 1/48
- FJ-1
- (and 1 more)
-
 Howdy y'all! Happy holidays! After the Ukrainian "Fury" build I went to see the 2014 movie "Fury" on YouTube and was impressed by the final fight scene. So impressed that I decided to recreate this scene with my stashed kits. Andy's HHQ did a splendid job recreating the M4A3E8 Sherman. It's not an exact match (2014 movie used an M4A2E8, which is very unlikely historically speaking because it's diesel-powered and mostly lent-leased to the British and Soviets) but close enough. The last scene of the movie Fury, where the infantry battalion protected by the "Fury" crew goes past the knocked-out tank. Took me quite a while to get the exact track that "Fury" used. I scavenged a set of metal T84 tracks on eBay from Hooben, a brand that mainly manufactures RC tanks. Historically speaking this is impossible though, given that Goodyear started making these rubber-fused tracks on April 16th-17th, 1945, two weeks before Mr. Fuhrer did a favor to the entire world. The "Fury" crew put a body found at the abandoned Nazi medical station, dressed him as a US tank crew, doused him in gasoline, and lit fire to fake their death, allowing for a successful ambush of the German convoy. I was initially hunting for the perfect 1/16 resin figure until I saw the sprue figure provided by Andy's kit itself. The US tank crew figure's pose, which is supposed to be a tank commander sticking out of the cupola with one arm resting on the hatch, and another arm reaching out for the microphone, kind of resembles the prayers effect of a burnt human body. Therefore I used Tamiya's basic putty (which forms a thick paste once thinned with Tamiya's airbrush cleaner) to disfigure the body, painted it roughly and applied tons of pigment onto it. The empty 1/16 .50 cal shells are from Master, a Polish brand. The Thompson is also scavenged, from a set of very old ww2 US Army small arms resin toys, and of course, repainted. RIP Boyd "Bible" Swan. Super Italian Red for Ferraris and Tamiya clear red were the only red paints I had in stock, but the blood effect they created seems good enough to me. RIP Don "Wardaddy" Collier. The only slot available on my shelf for now. A bit of a weird combination indeed.
- 6 replies
-
- 9
-
-

-
- Sherman
- Andys Hobby Headquarters
- (and 1 more)
-
I’ve actually finished this build, but because we are discouraged from posting in progress pics in the Ready for Inspection area, I’ll create a build post here. 🙂 Who hasn’t built at least one Matchbox kit? They were cheerful well-engineered, beautifully packaged and colourful (colorful on this side of the pond). I’d also say they were cheap, but in the states, they were a little pricier than their alternatives from Revell and MPC (American made Airfix). In my experience, the earliest Matchbox kits ALWAYS fit beautifully, and built up well. Later ones… well… some were better than others. Depending on the range, Matchbox would offer two or three sets of markings and parts. As a kid, I was flabbergasted by the Hawker Tempest… the engine options allowed for what appeared to be two completely different aircraft! I also like that Matchbox released some pretty esoteric subjects. Saab Tunan, Vickers Wellesley, Supermarine Stranraer, anyone? Detail was generally pretty basic, but no worse than their contemporaries. And there were some releases that still hold their own, including the subject of my post, the first Matchbox plastic kit, the Hawker Fury (PK-1). Yeah, okay… I like their Lysander, too.
-
Hello all, Today I've started on a new set of builds to add to my British collection while I wait for parts and paints to arrive for the Stranraer and a few other builds I have yet to post. Among others, I have a Persian Fury, Avro 504, and P-47 in the works. The classic Matchbox kits are some of my favorites, as they can produce a great model with little work, or can be upgraded as the builder wishes. The Siskin, Gladiator, and Fury have to be my favorites, and so armed with one each of the Gladiator and Fury and 2 of the Siskin, I've set out on a Triple Build. Additionally, I spent an embarrassing amount of money to obtain a copy of ModelDecal Sheet 31 to obtain decals for all 3. Having just built the Heller Gladiator in Chinese markings, I will be starting with the Fury and Siskin. That's all for the moment, Stay safe, Tweener
-
Sword is to release a family of 1/72nd North American FJ-2/3 Fury kits. - ref. SW72107 - North American FJ-2 Fury Source: http://swordmodels.cz/en/coming-soon/125-sw72107-fj-2fury.html - ref. SW72108 - North American FJ-3 Fury Source: http://swordmodels.cz/en/coming-soon/127-sw72108-fj-3-fury.html - ref.SW72109 - North American FJ-3M Fury Source: http://swordmodels.cz/en/coming-soon/127-sw72108-fj-3-fury.html V.P.
-
.thumb.jpg.3d6eff3e2f6cc042679bca864bcb2b1a.jpg) Good evening all, Today I have for your viewing another of the venerable Matchbox Hawker Fury's, built as the kit provided option of a Royal Yugoslavian Air Force machine. As typical of the kit, it built well. My only additions were some internal framing that is no longer particularly visible, and a fuselage number 81 as seen on a Kora decal sheet. Without an actual photo, it's accuracy is unknown, but I wanted to break up the flat silver finish. And yes, the Matchbox kit is accurate with these markings. While most Yugoslav Fury's had a different radiator and landing gear, the first 6 were standard machines, the same as those used by the Royal Air Force. Right then. The model: Overall, this build was a nice distraction from the ongoing Stranraer project, which has hit a bit of a wall until I can source some belts, depth charges, and new Pegasus engines. Next up is finishing a Percival Proctor from FROG, final detail painting on a second FROG DH.60G, and I have an Airfix Bristol Bulldog in the mail, which will be finished with the included Swedish Air Force markings. Wish me luck. Thanks all, Stay safe, Tweener
Good evening all, Today I have for your viewing another of the venerable Matchbox Hawker Fury's, built as the kit provided option of a Royal Yugoslavian Air Force machine. As typical of the kit, it built well. My only additions were some internal framing that is no longer particularly visible, and a fuselage number 81 as seen on a Kora decal sheet. Without an actual photo, it's accuracy is unknown, but I wanted to break up the flat silver finish. And yes, the Matchbox kit is accurate with these markings. While most Yugoslav Fury's had a different radiator and landing gear, the first 6 were standard machines, the same as those used by the Royal Air Force. Right then. The model: Overall, this build was a nice distraction from the ongoing Stranraer project, which has hit a bit of a wall until I can source some belts, depth charges, and new Pegasus engines. Next up is finishing a Percival Proctor from FROG, final detail painting on a second FROG DH.60G, and I have an Airfix Bristol Bulldog in the mail, which will be finished with the included Swedish Air Force markings. Wish me luck. Thanks all, Stay safe, Tweener- 11 replies
-
- 18
-
-
 FJ-2 Fury Upgrade Set & Seatbelts (for KittyHawk kit) 1:48 Eduard The new FJ-2 Fury from Kitty Hawk is the first one in this scale, now Eduard are along with an update set and seatbelts for the kit. Update Set (491076) This set comprises two sheets of PE, one of which is nickel-plated and painted, the other bare brass. The first item is a complete make over for the kit seat with a new seat pan, foot rests, head area and various fittingsm, as well as new rails for the seat to sit on. There is also a new instrument panel, side consoles, and canopy mirror for the cockpit. At the rear of the cockpit there is a new part for the area behind the seat. There are new ammunition feed chutes for the cannons, and interior for the arrestor hook well. Seatbelts (FE1077) These belts are Photo-Etch (PE) steel, and because of their strength they can be etched from thinner material, which improves realism and flexibility in one sitting. Coupled with the new painting method that adds perceived extra depth to the buckles and other furniture by shading, they are more realistic looking and will drape better than regular brass PE. Conclusion The detail added with these sets will doubtless set your model apart from the rest, and you can get any or all sets depending on your area of focus. Highly recommended. Review sample courtesy of
 -
Hi, does anyone know if Iraqi Sea Furys carried underwing armament (RPs or bombs)? Perhaps unsurprisingly I am finding it difficult to find pics. Thanks
-
Hi Chaps I dislike individual tracks on kits. Could I use the tracks off the 1/35 italeri fury on the Dragon Firefly because as I see it they are both the extended length tracks. The Fury kit has 2 sets of tracks so both kits can be built if I rob one set for the Firefly. Many thanks in advance Rodders
-
Corrected & improved HobbyBoss kit with Aires cockpit, Eduard Bullpups and EagleStrike decals. Hope you like it Best regards from Czech. Andrew
- 32 replies
-
- 72
-
-
Hawker Fury and Nimrod Warpaint No.116 Guideline Publications Developed from the Hawker F.20/27 prototype the Fighter Fury would use the same Rolls-Royce Kestrel as fitted to the light Bomber the Hart. It was initially called the Hornet and was purchased by the Air Ministry in 1930, the later production aircraft would be called the Fury as the Air Ministry wanted aircraft names which reflected ferocity! Due to the depression only small numbers were ordered at first. The Fury was to be the first RAF Fighter to exceed 200mph in level flight. The aircraft was very agile with sensitive control which made it popular for the RAF Aerobatic teams of the day, indeed 19 teams would use it between 1931 & 1938. Interestingly a monoplane version of the Fury was designed. though not built it would form the basis of the prototype Hurricane. In 1926 the Air Ministry issued a specification to replace the Fairey Flycatcher in Naval Service. Given the work with the Fury Hawkers designer Sidney Camm insisted the new design not be that different apart from any specialised Naval Equipment that was needed. Like the Fury was originally the Hornet, the Nimrod was originally the Sea Hornet. The book looks at the development of both aircraft. The Fury in service with the RAF, and foreign Air Arms. The use of the Nimrod by the Navy, and again foreign Air Arms. The 56 pages include a lot of useful pictures with informative captions, as well as details of the squadrons that operated the types, technical details, lists of RAF & RN Squadrons with colour profiles of some. and a centre section with technical drawings. Conclusion The Warpaint series always gets a thumbs-up due to their inability to produce a dud! They are always well written and informative with a wealth of picture and profiles. Very highly recommended. Review sample courtesy of
-
Why build this? Basically it’s @Sabrejet fault because he asked 'why there were so few builds of the FJ-2, FJ-3 Furies' after all the hullabaloo, and my eyes got drawn towards the stash. Not a FJ-2 or -3 or a -3M but this: The plastic sprue was virtually free of any flash, had fine engraved panel lines and exquisite recessed riveting, I only hope I can keep the paint layers fine enough to see this detail. The PE is for the cockpit detail and parts of the undercarriage, and looks pretty good. The resin parts are the intake/ front wheel well combo, main wheel wells, wheels, undercarriage and other little bits. Glasing options are for both open and shut canopies. Decals are for two NARW aircraft and look quite good, time will tell. After seeing what some of you guys do, I thought I’d get a feel for the kits accuracy and downloaded some drawings for the FJ-1 and scaled them down. As we can see, the fuselage comes out as being 2mm short but everything of importance seems to be in the right place. All look good to me, well chuffed. Not sure when the next update will be as I need to get some US Navy paints. Thanks for looking. Stuart
-
Started to gather drawings and data for this a/c. The kit gives you the option for a canopy open but I read somewhere that some detail is missing with the rear of the canopy? Can anybody help? Does anybody any decals for the a/c as the kit I've got is a reserve unit and I would an operational unit? Thanks. Stuart
-
Hi Guys, today a recent Build of this nice little Bird which was a real Pleasure to build. Superb Decals and a nice colourful Version Revell offered. Paints are Agama Silver and Alu from Model Master, done by Brush as allways. I hope you like this Bird. Kind Regards Stefan
-
Any sign of one being produced? I don't really fancy starting my Falcon vacform .......Then again, maybe I should! It might urge somebody to produce one! It is the only member of the Sabre/Fury family not offered :(. Martin
-
 Hi all, It's been a while since I was last here posting, although I have been lurking. Life got in the way as is often the case, but thought I'd try and reinvigorate my interest in the hobby stuff with the Italeri M4A3E8 Sherman "Fury". Now, I've been thinking of doing a Sherman for sometime, but as my other armour has all been Op Telic British stuff and more recently the fantastic Tamiya MkI Male kit, I had wanted to do a British Sherman Firefly. However, one day in my local store I saw this kit, and in the absence of anything British I bought it. No research, nothing. Man, do I regret that spur of the moment decision! The kit itself seems quite detailed out of the box, but my one was badly moulded with most of the sprue looking as though the moulds had come out of alignment leaving a lot of cleaning up to do. I don't usually mind this, but for a newish kit I was quite disappointed by all the circles on panels (release pins?) Just not a good example of a modern moulding, and this coupled with my lack of enthusiasm for the subject made the whole thing a bit of an ordeal. I have used it as a test of using plaster with powders mixed into a paste and then blown off a brush using my airbrush to create the mud effect. It's come out OK, and I learnt a lot about the technique, so not a complete loss. Anyway, enough babbling. Here's the 'finished' piece. Any advice, recommendations etc are always welcome. I know there's a few unpainted details, but I just got bored to be honest and wanted it off the bench, but any comments on techniques etc are most welcome. edit: Looking back over the pics I've also just realised I didn't attach the aerials or the MGs for the photo.
 -
 OK it's time for one of "those" builds The NA FJ-3 Fury has long been a fave of mine - I mean effectively its a Navalised F-86, but it's got Gloss Sea Blue on it - so what is not to like??? Now when I say, "effectively it's a Navalised F-86", that's a little understatement, because actually there's a fair bit of work to do on Esci's 1980s era model to make it look right. Before I go further, I'm going to say this straight off: Without the excellent blog site of Tommy Thomason ( Tailspin Turtle on BM) this project would be a non-starter. Tommy provides free, modeller friendly info which enable anyone to find out a multitude of things about USN aircraft. The drawings you will see in some of the pics are from his blog, and are invaluable. http://tailspintopics.blogspot.co.uk/2009/10/fj-fury.html will be a good starting point, as will http://tailhooktopics.blogspot.co.uk/2015/04/esci-148th-fj-23.html ( which follows on from my thread in Cold war aircraft on here - and is a testament to his willingness to assist). Basically Esci took their F-86 kit and sort of semi "Furied" it i.e. made changes that didn't require a substantial re tool. So you get an F-86 fuselage with the cut out for the tailhook, new 2 cannon gun panels, modified undercart, and a new windscreen & canopy with matched canopy sill modifications on the fuselage. Wings are slatted and have the wing fold join added. However in boxing the kit as an FJ-2 or 3 this presents some serious issues shape wise, as both the -2 & -3 had fuselages that were different from the F-86, and different from each other. Work to bring the model up to something that looks like an FJ-3 concentrates on 3 main areas then: Nose; cockpit & canopy, and fin/tailpane. So, ship mates, razor saw in hand, here we go..... First up - the Nose. The FJ-3 used a more powerful Wright J65 turbojet - which meant a larger nose intake was required to cope with the added airflow needed. This means the nose area is deeper. Heres a pic of the stock fuselage: Note the lovely navy blue plastic, which is brittle but pretty easy to work with !! Effectively this is a simple case of removing the lower forward fuselage and re-attaching to provided the added depth. The gap is backed with plasticard, and then filled in and made good. Next the cannon panels need to be modified: Esci provide these as inserts instead of the Sabre's 6 x 50 cal MG panels. However on the Fury the cannon ports are further forward than the Sabres MG ports, ( the upper front one is almost at the intake lip) and the ports have a characteristic down angle when viewed from the side on. Its pretty easy to reposition the gunport panels to achieve this, and then back fill in the gaps. On my model this is achieved using some plastic card spacers inside the panels to pack out the internal void, and then its all back filled with CA/talc filler. Which gets you here. Note the angled down gun panel, with muzzles further forward, and the lowered lower nose profile - which is also evident here: The kit intake lip part is now cut, with the plan being to splice in a section from a spare F-86 nose ring to deepen it. I've also cut out a section of the nose intake side to cope with the more forward location of the gunport panel. Now one side is done, I will repeat this for the other side. Finally - ever wonder what happens when you try to gently bend some warp out of a large brittle lower wing moulding from a 30 year old bit of plastic? Fortunately its a clean break right long a very obvious stress flow line!! ( you can see the one on the other side as a dark line pretty much in the same place!) But there was a moment last night when the words "Oh deary me!" were uttered a few times More to come. Jonners
 -
 Hi Everyone, So today I'm starting my project log for my Fury inspired diorama build. This will be my first build in over 20 years so please go easy with me . I started the Sherman a few weeks ago and as such I have no photos from the start of the build, all I have is from the stages before primer and top coat, however the Tiger 1 only arrived today so hopefully I can give a build log for that at least. Anyways without further delay, onto the build log. So the two kits that I am using for this are as follows: Italeri M4A3E8 Sherman "Fury" - Kit #6529 Rye Field Model Tiger 1 (Early Production) - Kit #RM-5003 Both nice kits, the Sherman went together a breeze minus a few mistakes that I made in the assembly process, which I am going to put down to 20 years away from the hobby and not fully reading the instructions. Here is some shots of my build before primer coat: And after primer coat: And then today I went out and purchased a good quality compressor and a new airbrush as my old one died on me some time ago, I have now given the Sherman its first coat of Olive Drab: This is shortly after painting but I am hoping the paint goes to a Matt finish, failing that I will have to look at some alternate paint for it. Anyway, that's it for today and I will post up again tomorrow as I start the Tiger 1 kit. Please let me know any thoughts you may have but as I said don't forget this is my first build in 20 years Chris
 -
Hi all, As quick post of my completed Fury. It has taken me a while and has been a pig to build, as those of you who have tried it will know. It is so fragile in places! But, of course, it is the only option in gentlemen's scale. I got the markings from a small shot of her in Steve Ginter's book and home printed them. I added a Pavla cockpit set and tail pipe. The only other addition was a set of canopy rails from Plastruct square rod.I started by attempting the machine depicted in the Print Scale set but gave up as they are atrocious and too large. So I went for a sister ship that had a slight different dayglo pattern on the wings. So she is a machine that was based at Glynco. I had to scribe the panels - my first attempt ever! Weathered with Flory Dirt. All paints are Humbrol enamel. Words of warning? 1. if you go for the Pavla set the canopy is out of scale and too large. I kept the front end from the kit and added the rear sliding portion from the Pavla. Not the best but hey ho! 2. the undercarriage legs are so, so fragile. For the nose gear I set the leg in a small block of sprue and then added the supporting strut from Plastruct round .8mm rod. 3. the wheels are from a F-86H (Special Hobby). Not completely accurate but better than the flimsy kit option. 4. change the nosewheel light within the door to the opposite side and at the bottom 5. open up the intake fully. I then used a modified inlet duct from a Heller F-86 to give it depth. Not my best. Martin
- 32 replies
-
- 37
-
-
Hi all, An appeal to any builders of this kit to ask for any advice before I start the build. I have the Pavla cockpit set as well as the resin tail pipe. My area of concern is really the wheels. Is there an alternative? Has anyone found anything similar from another kit that could work? My first job is rescribing so I have time to pull together as much guidance as you can offer. thanks in advance. Martin Building Sabres one by one!
-
Hi all, After my current set of builds I want to add a Fury to the collection of Sabres. I have just invested in the Falcon vacform kit to go with a Fujimi F-86F-30 (short 6-3 wing) but having received it I am tempted to try and blend the key parts to the Fujimi fuselage rather than simply using the entire vacform one. Any thoughts? It looks like the rear end at least of the FJ-3 was pretty much an F-86F? I'd appreciate your thoughts. Thanks. Martin
-
Hi, Over the past few weeks I've put this little collection of 1/72 scale 1930's fighters of the RAF together. They are a mixed bag of Airfix and Matchbox kits, some old, and some new. I must admit, they have all been a pleasure to build. Some of the kit decals couldn't be rescued owing to their +40 years age, but on the whole they went on ok. Additional decals came from friends half-used sheets. Thank you John and Chris. These aircraft certainly add a little colour to the display shelf. I have a couple more to build, but so far the collection includes: Airfix - Demon, Bulldog, Gladiator, and a Gauntlet (converted from a Gladiator) Matchbox - Siskin, and Fury. I am in great admiration of those who can add the bracing wires.... you will see that I didn't. Life's too short, and well beyond my skill! ;-) Thanks for looking,
- 32 replies
-
- 33
-
-
- Bi-planes
- Silver wings
- (and 6 more)