SecurityCodeRed Posted March 10 Share Posted March 10 (edited) Lets see how this goes........ The kit does not have the side camera window... i am wondering if i'm brave enough to drill a hole and give it a go ..... Anyway started ... with a few other things... lights under the wing. painted silver apart from the centre. Filled that with ""Looks like Glass" ..seems to look like a bulb a drop of "Looks like Glass" on the front. Part II soon...... Edited March 10 by SecurityCodeRed 17 Link to comment Share on other sites More sharing options...
bigbadbadge Posted March 10 Share Posted March 10 Nice start,got a few Mossiesin the stash so will tag along. Chris Link to comment Share on other sites More sharing options...
SecurityCodeRed Posted March 13 Author Share Posted March 13 Had an experiment with drilling and filling a hole with some "Looks Like Glass" .... Gave me more confidence drilling a hole in the kit and making that extra camera window. 14 Link to comment Share on other sites More sharing options...
javlin Posted March 13 Share Posted March 13 These Tamy kits build up real Nice I built HK last summer. Link to comment Share on other sites More sharing options...
SecurityCodeRed Posted March 14 Author Share Posted March 14 After trying to put the decal on the cockpit display panel ...and failing miserably ! I decided to paint it instead.... a little dry brush silver and to the naked eye looks ok...not sure now much I going to see anyway ...I am installing the Pilot and Navigator Added a little cabling to the back... not sure where to finish it ... trying to find some nice photos of Mosquito PR interiors..with all the cabling A little play with a few other bits..... That will have to do for now........... 20 Link to comment Share on other sites More sharing options...
Thom216 Posted March 14 Share Posted March 14 Nice work on the small detals! Link to comment Share on other sites More sharing options...
bigbadbadge Posted March 14 Share Posted March 14 Cockpit details look fantastic. Chris Link to comment Share on other sites More sharing options...
SecurityCodeRed Posted March 24 Author Share Posted March 24 Coming together.... Added camera lenses using a little looks like glass... i have found this so very useful. Added crew.... and drawn a line on added extras.....how far does one go ... not going to see 99% of them anyway. Then I saw this on the decal sheet...so ..thought I better add a first aid kit ... least I know its there! Found some old spitfire PE spare seatbelts, with a little bit of persuasion managed to get them to twist how i wanted. and added a little bit more detailing.... Two halfs ready to fit together.... Hatchway and bomb bay doors added That will have do for now...... next time wings and things............. 18 Link to comment Share on other sites More sharing options...
wellsprop Posted March 24 Share Posted March 24 Looking great so far! Link to comment Share on other sites More sharing options...
Back in the Saddle Posted March 24 Share Posted March 24 I had huge issues building this kit - I hope yours goes together better than mine! Link to comment Share on other sites More sharing options...
SecurityCodeRed Posted March 24 Author Share Posted March 24 (edited) 7 minutes ago, Back in the Saddle said: I had huge issues building this kit - I hope yours goes together better than mine! Going together a treat ...... unlike a Revell 1:48 Mosquito I made last year, that one fought me all the way ... still turned out ...Ok (ish) Wanted to make this Tamiya PR with a little more detail and attention to detail ..but every model is a learning process. Edited March 24 by SecurityCodeRed 5 Link to comment Share on other sites More sharing options...
Back in the Saddle Posted March 24 Share Posted March 24 My bad - it was the Revell kit I tried to make. The Tamiya version looks far better! Link to comment Share on other sites More sharing options...
Cklasse Posted March 25 Share Posted March 25 What is this “look like glass” thingy? 1 Link to comment Share on other sites More sharing options...
SecurityCodeRed Posted March 25 Author Share Posted March 25 (edited) 8 hours ago, Cklasse said: What is this “look like glass” thingy? Was recomended it at a local model shop because i could not find any Micro Kristal Klear, and that seems to be getting as rare as hens teeth. I've used it for dipping canopys ...makes them gleam.. (even used it on a totally fogged up canopy that had been stuck with super glue) and as a clear part adhesive, take its time to dry but ...clear as you would expect. Easier to give you a link..... Looks like Glass Edited March 25 by SecurityCodeRed 1 Link to comment Share on other sites More sharing options...
SecurityCodeRed Posted April 11 Author Share Posted April 11 a bit further along....... 9 Link to comment Share on other sites More sharing options...
SecurityCodeRed Posted April 11 Author Share Posted April 11 ok now onto the PRU Blue... I see this is a debatable issue. 😊 As you can see even an angle of light changes the look quite a lot Seen plenty of models that are quite dark, but some that are quite light , i am sure there was a bit of variation of colour ..even on the same aircraft, if panels where swapped etc... and i think i will bleach out the upper surface of the aircraft a little more than the underside anyway. After mixing and looking at plenty of RL and other model Photos... think this mix is the most pleasing. - this is over a black undercoat. 1part - XF18, 2 parts - XF23, 2 parts - X14 7 Link to comment Share on other sites More sharing options...
2996 Victor Posted April 11 Share Posted April 11 Just caught up with this: your work on the interior is amazing! The cockpit is splendid, very convincing, and the instrument panel with the cabling is a masterclass in detailing. Thanks for the link to the Delux Looks Like Glass - that looks like a brilliant product. Their adhesives are excellent, so I'll be giving that a go! Looking forward to seeing the PRU Blue go on. Cheers, Mark 1 Link to comment Share on other sites More sharing options...
SecurityCodeRed Posted April 12 Author Share Posted April 12 (edited) 22 hours ago, 2996 Victor said: Looking forward to seeing the PRU Blue go on. Well, lets give it a coat of surfacer first. One of my most favorite things... masking ! 😣 and generally stuffing holes with foam. Top surface a coat of Mr. Finishing Surfacer 1500 grey A little pre-shading, hopefully will make a visual difference to the top coat Underside a coat of Mr. Surfacer 1500 Black Edited April 12 by SecurityCodeRed 6 Link to comment Share on other sites More sharing options...
Rando Posted April 13 Share Posted April 13 Beautiful, I just finished an NF version of the Tamiya kit. You did amazing work on the interior. Looking forward to seeing the finished product. 1 Link to comment Share on other sites More sharing options...
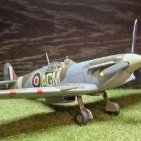
SecurityCodeRed Posted April 13 Author Share Posted April 13 (edited) 19 hours ago, Rando said: Beautiful, I just finished an NF version of the Tamiya kit. You did amazing work on the interior. Looking forward to seeing the finished product. Thanks! i am trying my best ... love detailing the cockpits... airbrushing is another skill I am picking up... only been doing it 6 months..learning as i go ... Mr Blue Sky .... 😏 Lets temporarily add the propellers.....so it looks like a plane! Thats it for now, thank you every one for words of encouragement... does help! Till next time...... Edited April 13 by SecurityCodeRed 9 Link to comment Share on other sites More sharing options...
2996 Victor Posted April 13 Share Posted April 13 Looks great - I love the shade and the variations you've worked in to what could be monotonal. Fantastic stuff! Cheers, Mark Link to comment Share on other sites More sharing options...
Rando Posted April 13 Share Posted April 13 1 hour ago, SecurityCodeRed said: Thanks! i am tyrying my best ... love detailing the cockpits... airbrushing is another skill I am picking up... only been doing it 6 months..learning as i go ... Mr Blue Sky .... 😏 Lets temporarily add the propellers.....so it looks like a plane! Thats it for now, thank you every one for words of encouragement... does help! Till next time...... Wow could have fooled me! You build like a pro. Link to comment Share on other sites More sharing options...
Keeff Posted April 13 Share Posted April 13 I've just read through your build and the work you've done is fantastic! The cockpit is great, and the final colour is looking spot on! 👌 Keith 😁 Link to comment Share on other sites More sharing options...
SecurityCodeRed Posted April 13 Author Share Posted April 13 1 hour ago, 2996 Victor said: Looks great - I love the shade and the variations you've worked in to what could be monotonal. Fantastic stuff! Cheers, Mark 1 hour ago, Keeff said: The cockpit is great, and the final colour is looking spot on! 👌 Thanks Guys Appreciate your input. my guess is that these aircraft would have been above the clouds for hours and hours in all that lovely unfiltered UV light ...... so the upper surfaces would have been quite faded. so i'm trying to show that at least. I might give the upper surfaces another little go over in a more bleached tint... i am still learning the weathering techniques! Wondering if i should risk painting the upper roundels in a more faint colour as well, since the ones in the box are quite bright and Tamiya decals and I have a love hate relationship! Pete 2 Link to comment Share on other sites More sharing options...
2996 Victor Posted April 13 Share Posted April 13 33 minutes ago, SecurityCodeRed said: Wondering if i should risk painting the upper roundels in a more faint colour as well Hi Pete, I'd say that's a great idea - the fading doesn't need to be by much but I think it would work really well against the faded PRU Blue. Cheers, Mark P.S. Tamiya decals have a bit of a reputation but *apparently* can be made to work very well. As I understand it, they need hot water and the right softener and setter. I've got a link on my laptop to a how-to here on BM which I'll attach in the morning. 1 Link to comment Share on other sites More sharing options...

Recommended Posts
Create an account or sign in to comment
You need to be a member in order to leave a comment
Create an account
Sign up for a new account in our community. It's easy!
Register a new accountSign in
Already have an account? Sign in here.
Sign In Now