Search the Community
Showing results for tags 'junkers'.
-
 Trumpeter is to release a 1/24th Junkers Ju-87A Stuka kit - ref. 02420 A test build was on display at the All Japan Model & Hobby Show 2016. Sources: https://www.facebook.com/INTERALLIED/photos/pcb.1577157062310657/1577157032310660/?type=3&theater https://www.facebook.com/TrumpeterModel/photos/pcb.666914713467125/666914590133804/?type=3&theater Kit ref. number 02420 was originally announced as a 1/24th Ju-87D-3 in the Trumpeter's catalog 2016-2017. (http://scalemodels.ru/modules/news/img_9587_1449140881_2.jpg.html) V.P.
 -
Dear Fellow Modellers, This is my rendition of Revell's 1/72 Ju 88A-4, in the scheme used in Sicily, in 1941. It was my entry to the Ju 88 STGB. Unfortunately I didn't managed to finish it in time, even after an additional week was given to finish the GB. The WIP thread is here. Anyway, it was finished last night and here are a few notes, before the pictures: It's my first two-engined bomber model and my most complex model until now It was super-detailed using Eduard's BIG PE set, with details for the interior, exterior and surface panels The kit's engine exhausts were replaced by Quickboost's resin exhausts, much better detailed I scratch built the inner ribbing structure of the tail section, using strips of plasticard, and the instrument boxes and wiring on the back of the instrument panel, using pieces of plasticard rods and very thin copper wire Masking of the transparent parts was done using the pre-cut masks in Eduard's BIG set The kit has a few important fit problems: the join of cockpit underside and top parts, the join of the front fuselage and nose glazing, the join of the wing tips with the rest of the wings, the insertion of wings in the fuselage and the join of the the wings' leading edges and fuselage Painting was done mainly with Gunze acrylics and a few Tamiya, all airbrushed. Alclad Aluminium was used for a few NMF parts Alclad's Aqua Gloss was used as clear coat before decaling and the wash, and Alclad's Flat Klear was used as finishing coat Weathering was done with Vallejo's washes and pigments using period photos as references Now, the pictures of the finished model. 1. General views IMAG4282 IMAG4283 IMAG4284 IMAG4285 IMAG4286 IMAG4287 IMAG4288 IMAG4289 IMAG4290 IMAG4291 IMAG4292 IMAG4297 2. Engine detail IMAG4293 3. Kill markings and aerial IMAG4278 4..Cockpit and canopy views IMAG4294 IMAG4295 IMAG4296 5. Cockpit before being closed IMAG3971 IMAG3975 IMAG4001 IMAG4060 6. Instrument panel and the detailing of its back IMAG3979 IMAG3978 7. Installation of machine guns and ammo belts IMAG4045 IMAG4051 8. Internal ribbing of the tail section IMAG3815 IMAG3816 IMAG3817 IMAG3818 9. Details of bombs and access hatch IMAG4298 10. Landing gear: IMAG4299 IMAG4300 11. Oil, fuel and exhaust stains on the wing IMAG4301 12. With the other German "cousins" in the display shelf. IMAG4302 Thanks for looking. All comments, suggestions and criticism are welcome. Cheers Jaime EDIT: picture of kill markings and aerial added
- 78 replies
-
- 67
-

-
Ok the idea for this build is a bit of a mash up of a couple of builds I have wanted to do, but didn’t the time or the motivation for at the time. One has been running around in one form or another in my mind for quite a while now. I have come close a couple of times to starting it, (a Ho-229 was to be the base for one) and I sort of did with the Turbo-Prop Arado, but it still wasn’t quite what I had in mind. I have two similar projects on the go but they're on the back burner for a bit. The second was that I have a Planet Models Ju-388J nightfighter (Jumo 213 version) sitting in the stash that I have been dying to build and have never had the excuse to. So after seeing the Ju-88 STGB I finally had the idea of how to killer two birds with one stone and bring these two ideas together! So the plan is…… If the war had stretched into 1946 we would have seen some interesting aircraft and technologies in service, especially so with radar technology advancing as quick as is was. By the end of the war we were already seeing the next generation of radar systems which operated in the Centimetre band, like the RAF’s H2S and US H2X radars and the German FuG-240 (Berlin) & FuG-244 (Bremen) units. A few of the Ju-88’s were fitted with the FuG-240 and it was found they recovered their original speed which had been lost with the earlier radar units and their large antennas/antlers! It would have been only to be a matter of time before the use of the FuG-240 (and later versions) would have been more widespread, with it being fitted to newer aircraft models as they became available. With the venerable Ju-88 reaching it’s peak in the Ju-388 family this aircraft would have been a prime candidate for the new radar system. Well that’s the plan, chop the nose off a 388 and fit a new nose, simple really, but……….. I want it to be as believable as possible and not too whiffy which will make it a bit harder. So this will be the base, Planet Models Ju-388J-3 with Jumo 213 engines, of cause I reserve the right to add lots of other stuff as I go along, it wouldn’t a normal build if I didn’t throw in heaps of extras! The 388 is actually quite a nice model the only thing that may give me issues is the wings, they are very slightly warped and getting the dihedral right will be fun! The nose is just a resin cast of the long radome version, it looks a bit better in my opinion than the shorter version. Well best to start by cutting off the nose, luckily there is a very convenient panel line to follow for this. Strangely enough this happens to be almost perfectly round which will make life much easier as we go to fit the nose. Ok first fit, it doesn’t look all the great, I’ll need to move it forward a bit. That’s looking a bit better, so I’m going to have to add a bit to get the profiles right, I have a plan for that! First I’ll make a ring using plastic card, working with plastic will make this part so much easier! Next to fill the gap I’m going to use plastic strip like so. I just keep adding rings till I get the right diameter. Then add a disk at the back the size I require and the first part is done, only a small amount of filler required for shaping. Ignoring the joint gap for the moment I now have to decide how I want the new nose to sit, sort of inline with the horizontal axis or a bit dropped down? I like the inline one as it looks good, but I have to remember the flying attitude of the 388 (and 88 for that matter) was slightly nose up, they didn’t fly truly level! So I may need to have it slightly drooped down so the antenna face would be lined up to the vertical axis. Have a look at how the antennas were mounted on 88’s and you’ll see what I mean. Well I’ve made a start, there’s only a couple of hours work (I needed a brake from the Ta-152 as I was getting annoyed with it!) and the project is a goer. I’ve actually done the filling of the nose now as well and it’s looking good! This won’t be a full time project, just something to work on when my other builds frustrate me and I need a break from them. I can’t promise I’ll be finished by Xmas either as I’m bound to do other mods on this as I go along. This should be an interesting build!
- 14 replies
-
- 11
-
-
The Junkers F13 was based on the experiences of the Junkers J12. The outside appearance of both aircraft is very similar, but the F 13 or J 13, as it was called during its development, got a larger fuselage and a complete new wing design. Instead of the three passengers of the J12 design, the J13 was able to accommodate up to 4 passengers plus two pilots. Between January 1919 and June 1919 about 9000 developmental hours were invested into the project. On June 25, 1919 Junkers pilot Emil Monz flew the first F 13. The first F13 was s/n 533 and it was named "Annelise" after Hugo Junkers daughter Annelise Junkers. A second aircraft (s/n 531) became available three weeks later and was used for type certification in July 1919. The F 13 design of Reuter was fully satisfying the demands. It became the world's first all metal airliner and it seems to be the first aircraft, which was fully designed as a passenger aircraft. About the aircraft modeled: In 1924 Junkers sent two F 13 W floatplanes, D 217 (Flamingo, s/n 637) and D218 (Kauz, s/n 638) on a South America Sales Tour. D 217 crashed during this tour, killing a son of Hugo Junkers. Crew was performing some flights in South America to promote the sale of the Junkers F.13 to local operators. Aircraft left Albina Airport, in Suriname, bound to Macapá, in Brazil. Just after passing the border between French Guyana and Brazil, crew encountered very bad weather conditions and elected to make an emergency landing on the Oyapock River, off Oiapoque, State of Amapá. In unknown circumstances, aircraft crashed into the river and was damaged beyond repair. While the pilot Drewsky was injured, the mechanic Thill, Hugo Junkers son was killed. I memory of Thill, I have decided to build D 217 Cheers Pat
-
 Dear Fellow Modellers, Finally I'm starting my thread on this much anticipated GB. I'm building Revell's 1/72 A-4 version and will be using Quickboost's resin exhausts and Eduard's BIGED PE and mask set. I'll be building scheme A, as shown in the box, for an aircraft based in Sicily, Italy, June 1941: As usual, here are pictures of the sprues. The clear parts are good, very transparent, without defects: The plastic is beautifully detailed, neither too soft nor too hard: This is the decal sheet, which looks good: I'll have to use swastikas from an xtradecal sheet. There's a total of 125 parts. But I just can't build anything out of the box, so here are the resin exhausts: The following are the several PE sets that come in the BIGED set. The interior PE parts (2 frets): The exterior PE set: The surface panels set: And the canopy masks, which are a must for these German bombers: Building starts with the cockpit. This is the first part: The moulded detail was removed, to be latter replaced by PE: The second part: The levers on the left hand side were also removed, as they will be replaced by metal levers: The two parts were glued together. Fit is very good: These two parts, complete the cockpit base. The level of detail out of the box is superb: The cockpit base was assembled: The control column was also removed from the sprue: It will be glued in place after painting. Now starts the PE odyssey. First, I assembled the levers. This metal part, already bent, will hold one of them: Here are the levers, ready for installation: The levers were glued in place of the plastic ones that had been removed: The next step is building the pedals, their mechanisms and supporting beams: However, all plastic in this step will be replaced by PE, as shown in the PE instructions: I started with the supporting beams. Here we can see one ready and the other just removed from the fret: The same here for the mechanisms: These parts were glued together: For comparison, here are the replaced plastic parts: The enhanced level of detail provided by the PE parts is readily apparent. Here we can see the pedals: one ready, the other just out of the fret: For comparison, here is a plastic pedal and a PE pedal, side by side: I think the increased effort of preparing and assembling the PE parts is fully compensated by the enhanced realism achieved. Moving on to the cockpit walls, here is the port wall: Some detail was removed, to be latter replaced by pre-painted PE, and the unpainted PE detail was glued in place: The starboard side wall. The moulded detail is superb: but some must be removed: I'll post more progress tomorrow, as this post is quite big already. Thanks for looking. Cheers Jaime
- 397 replies
-
- 11
-
-
 For my second build which i will be doing consecutively with my Ju88 s-3 to enable painting to take place at same time (to save time ) i have chosen another 88 from low down in the stash pile ,the oldish Dragon Ju88 G-6 . I understand that this can be a tricky kit to build but i feel forwarned ! I will be using the Aims decal sheet Ju88 G-6 , mistel collection. I have chosen this one as i have a built Hasegawa Morgenstern and hope to have a more typical G-6 later in the coming months. have assembled a small selection of resin I have some CMK seats and Quickboost exhausts to come. I have made use of the "less than 25% built rule" to do some pre preparation on the kit prior to the start on the 7th may. basically iv removed and cleaned up some of the larger parts , suprising how long this can take The rest of the parts Now only the main course to get on the table
- 114 replies
-
- 8
-
-
- Berlin FuG240
- Junkers
- (and 2 more)
-
Hello Finally I had some time to continue the work on my Ost-Front scene. I've finished the models some time ago: Ju 87G-2 Stuka 'Kanonen Vogel' and Heinkel He 111 H-6. Both in 1:72 scale. Now it's the time to build the diorama for them. The plan is something like that: So, here is what I've done so far: Ju 87G-2 Stuka 'Kanonen Vogel' from Academy Heinkel He 111 H-6 from Revell Perspex box base with both of them arranged: Some SC250 bombs from Czech Masters (6) and one left from Messerschmitt Bf-109 kit: Some SC1000 bombs. Four again from Czech Masters and two from the Heinkel kit. They are a little bit bigger. Not sure which are in correct scale but I've decided to use all of them. The sledges to transport the bombs I've made from matches. Cut, glued, filed, airbrushed, drybrushed and finally weathered with washes. Here is how they look with the bombs: And finally Kettenkrad to tow the sledges and Kubelwagen for pilots (who are not ready yet). Both from Academy kit. The diorama will have some boxes, barrels etc. plus of course ground crew servicing the planes and the pilots resting and waiting for the mission. Thanks for watching.
- 33 replies
-
- 17
-
-
- kubelwagen
- heinkel
- (and 8 more)
-
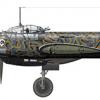
 Hello Chaps, It's been a long haul build- 8 weeks in total, but that is because my wife and I are actively involved with contractors working on our new home that we will be moving to in mid-April....sorting out kitchen design, wood flooring, carpeting, tiles for kitchen and bathrooms, shower designs, paint colors for every room, new faucets for all sinks, choosing granite countertops and sinks for kitchen and bathrooms, new light fixtures and door handles etc etc....I hope this is the last time we have to move now, moving is a stressful and tiring event! Anyway, enough of the waffle and lets get on with sharing photos of my completed build, which is built straight from the box, no after market additions, only using 1.010" fine black EZ-Line for the antenna cables. I hope you like.... Regarding what I think of this kit: It's a great kit that goes together well, has some nice features such as a highly detailed cockpit, pose-able ailerons, flaps, elevators, rudder and air-brakes, recessed panel lines and other surface detail. The parts were all molded very well, with minimal flash and/or parting line miss-match that required clean up before painting. It offers two sets of markings, I chose to do this version that was active in the "Battle of Britain", and the decals are excellent- they go down very well on a gloss clear coat with no silvering, and once the finishing matt clear coat was applied, they look painted on. I did come across two issues during the build: 1) When fitting the engine nacelles to the undersides of the wings, I had a considerable gap between the mating areas of the front and rear nacelles. This is discussed in my "Final Reveal" video and can be seen in my "WIP" thread....links below: 2) When fitting the wheels onto their axles, both axles sheared off very easily and remained inside the wheel mating holes. I drilled these out of the wheels and drilled corresponding holes into the wheel struts and fitted steel pins. I then took a black rubber Tamiya propeller bushing and cut it down the middle to create two thinner bushings. I slid these over the new steel axles and super glued them into place. These then provided some surface area for the wheel hubs to glue to. Again, I used CA glue to fit the wheels in place and it worked a treat, providing me with a very rigid and stronger undercarriage. WIP thread link: http://www.britmodeller.com/forums/index.php?/topic/234996419-revell-pro-modeler-132-junkers-ju-88a-1-bomber-build-update-5-31516/ My YouTube "Final Reveal" video link: This kit would be superb if it came with two completely detailed Jumo 211B-1 engines, external bomb pylons and bombs and an open bomb bay with internal bomb racks and bombs!! That would make it super eye candy and a fabulous kit to work on.....I can dream! Thanks in advance for taking a look at this RFI and for any comments left, they are greatly appreciated! In the meantime, and until the start of my next build which won't be until we have moved and settled into our new home-probably the end of April, happy modeling and have fun! Cheers Martin
- 38 replies
-
- 51
-
-
- Revell
- 1/32 Scale
- (and 8 more)
-
Ju 87 G-2, Werk Nr. 494083 at The RAF Museum, Hendon. Pics mine. This is a later, ground-attack variant; it was captured by British forces at Eggebek, Schleswig-Holstein in May 1945. It is thought to have been built in 19431944 as a D-5 before being rebuilt as a G-2 variant, possibly by fitting G-2 outer wings to a D-5 airframe. The wings have the hard-points for Bordkanone BK 3,7 gun-pods, but these are not fitted. It was one of 12 captured German aircraft selected by the British for museum preservation.
-
 The latest new release from Airfix is now on the shelves at Wonderland Models. It is their new-tool A03087 1/72 Junkers Ju 87B-1 kit. The kit has optional markings for 2 machines 1. 9./Sturzkampfgeschwader 51 based in France in August 1940 2. Kampfgruppe 88 Condor Legion based in Spain in 1938
 -
- 41 replies
-
- 55
-
-
Hi everyone. Just wanted to show you recently finished model. A Hasegawa 1/48th scale Stuka bomber. As usual couple words about the kit first. It was quite old kit, but as you can expect from this manufacturer still nicely moulded and detailed. One downside was the decals. They were yellowish after all those years. I didn't pay any attention to it until I reached the level when I had to put them on.. Followed the advices online, I left them in the window for couple days, in the nights for couple hours left them in the UVB light. Still a bit yellowish I was desperate to finish it, so put them on and.. well, most of the yellow tint disappeared! MAGIC:) Seatbelts homemade with masking tape and a bit of wire. Used only Eduard masks and swastikas by ExtraDecals. Build was going fine until the very last things to do.. While matt-varnishing it, Stuka Diving (important word) Bomber took his first dive into the ground, The pilot didn't manage to pull up and the aircraft crashed quite badly.. Fortunately I found all the pieces and left the german engineers do the work and there it is two days later: Enjoy! Thanks! Bart
- 15 replies
-
- 21
-
-
After the 1/32nd - ref. 03213 - Junkers Ju-87A - http://www.britmodeller.com/forums/index.php?/topic/234960465-132-junker-ju-87a-stuka-by-trumpeter-released/ - ref. 03215 - Junkers Ju-87B-2/U4 - http://www.britmodeller.com/forums/index.php?/topic/234944403-132-junkers-ju-87b-2u4-stuka-by-trumpeter-released/, - ref. 03218 - Junkers Ju-87G-2 - http://www.britmodeller.com/forums/index.php?/topic/234977636-132-junkers-ju-87g-2-stuka-new-variant-by-trumpeter-released/ Trumpeter is to release a 1/32nd Junkers Ju-87D Stuka - ref.03217. Release is expected late December 2015 Source: http://www.trumpeter.cn/index.php?g=home&m=article&a=show&id=61&l=en Box art V.P.
-
Hello all One of my recent builds - Italeri's Stuka in 1/48. Built out of the box, with just a Montex mask to assist with the canopy (which would have driven me nuts to do myself with tape) and a bit of EZ line for the aerial. Generally happy with the result, although I had a couple of issues, more down to my limited skills than the kit I suspect. I was originally planning to pose it with the engine partially exposed, as the kit had a decent looking engine included, but just couldn't get it lined up properly to have the engine cowls on one side, so ended up covering it up completely. Also, had a bit of trouble with the bomb release mechanism, so the main bomb is just stuck on... Painted with Tamiya acrylics, weathered with a Flory dark dirt wash and a flattened finish with Vallejo Matte Medium. Anyhow, to the pictures. Thanks for looking. Adam
- 17 replies
-
- 13
-
-
Another tribute to all who were fighting over Great Britain. This time I'm presenting Ju 88 A-4 crashed at Blackbrook. Whole story You can find here: http://www.dorkingmuseum.org.uk/the-blackbrook-bomber/ Thanks to Mr Nick my profile of Ju 88 is at Dorking Museum.
-
After the Ju-87B-2/U4 - ref. 03215 (http://www.britmodeller.com/forums/index.php?/topic/234944403-132-junkers-ju-87b-2u4-stuka-by-trumpeter-released/) and the Ju-87A - ref.03213 (http://www.britmodeller.com/forums/index.php?/topic/234960465-132-junker-ju-87a-stuka-by-trumpeter-released/) Trumpeter is to release a 1/32nd Junkers Ju-87G-2 Stuka kit in late April 2015 - ref.03218 Source: http://trumpeter-china.com/index.php?g=home&m=article&a=show&id=42&l=en Box art V.P.
-
As already announced in a ICM general thread ( http://www.britmodeller.com/forums/index.php?/topic/234974439-icm-148-junkers-ju-88a5dornier-do-17z/), the Ukrainian brand is to release a new tool 1/48th Junkers Ju-88A-5 kit in 2015 - ref.48232. Source - ICM 2015 catalogue : http://www.icm.com.ua/katalog/ Box art V.P.
-
Hi all, I'm very keen to (one day) complete a model of the JU188 in the scheme which the Matchbox kit originally came in during my formative years! But I've bought the Hasegawa kit rather than struggle with Matchbox's old offering, as awesome as it looked back in the day! It's 8H+OH, a JU188 D-1 from GR.33 St. Martin, France in 1944 and has wide stripes of RLM76 applied over 70/71/65, I believe. I've been scouring the internet and I cannot find a single photo of this aircraft - I assume they must exist, as the scheme is relatively popular... can anyone please assist and point me towards (or post) a piccie of this machine? Thanks very much, Ian
-
AIMS (http://www.aimsmodels.co.uk/index.html) is to release a 1/32nd Junkers Ju-388 L-1 conversion set for the Revell's Junkers Ju-88 kit. Source: http://www.aimsmodels.co.uk/Coming-soon/coming-soon.html V.P.
-
Announced new in the Zvezda 2015 catalogue introduction page??? http://www.britmodeller.com/forums/index.php?/topic/234973092-catalogue-zvezda-2015/?p=1833400 Zvezda is to release in 2015 a 1/72nd Junkers Ju-88G-6 kit - ref.7269 Source: http://scalemodels.ru/news/8359-katalog-zvezda-2015.html V.P.
-
G`day Chaps: I`m trying to convince my Loved One (and myself) that I`m still a modeller and not a collector, So here you have it, the second model I finish this year! JU-88G-6 1/48 Dragon. I bought this kit partially build on Trademe (local ebay) at a good price, It was painted with Vallejo and weathered with dry pastels. It has been a model of firsts, as I had never done a mottling before (need more practise) and had never tried dry pastels. Very nice kit. The only problem I had were the decals, they disintegrated so I had a go at DIY decals (need more practice too). Hope you like it. 7 by adrianmunozm, on Flickr 1 by adrianmunozm, on Flickr 2 by adrianmunozm, on Flickr 3 by adrianmunozm, on Flickr 5 by adrianmunozm, on Flickr 4 by adrianmunozm, on Flickr 6 by adrianmunozm, on Flickr 8 by adrianmunozm, on Flickr Adrian
- 22 replies
-
- 22
-
-
 Good afternoon I represent you my new model. Simple Zvezda model + 3 * MG15 New World + Begemot decal Ju88. production a method - is many masks Акan RLM70-71-65 + RLM76 willenmuster 1/Kg26 Norway, Bardurfoss 1944 Процесс ... ENJOY
- 25 replies
-
- 17
-
-
Hi Fellow modellers, This will be summer holiday build. Let see when this will be ready. OH-ALL was Junkers Ju-52 that was used by Aero (Now Finnair) in Finland. There were some modifications in airframe during time, so I need to think if I will make it early state or later state. Definitely it will be with floats. Kit that I will use is this: And decals are from Antti Lappalainen who was kind to make these. Thanks Antti ! More pictures later today.
-
Junkers Ju 52, pics thanks to Steve.
-
 The Junkers Ju287 first flew in August 1944. It was built as a ‘Technology demonstrator’ to test the swept forward wing. In order to get a working prototype into the air as quickly as possible the new wing was fitted to the fuselage of a Heinkel 177, the tailplane and rudder came from a Ju188 and 388 and the fixed undercarriage was taken from a captured B24! The basic model went together quite well, aided by Huma’s technique of moulding tongues on to the wing roots which join together to ensure that the dihedral is correct. Problems start when adding the ancillary bits. The fuselage mounted engines have two problems. The a/c engines are ‘toed in’ slightly, presumably to keep the exhaust away from the fuselage side but the model’s engines are not and need correction. There is also a fairing between the engine and fuselage which needs adding to the model. The u/c legs supplied with the model are simple struts but need fitting with fairings. A hole needs to made in the rear end of the fuselage to represent the housing for the tail parachute. About 15gm of nose weight is needed. I added this after assembly by putting it through the access door on the underside followed by a dollop of Milliput to keep it quiet. The legs for the nose gear are very weak. I managed to break them off where they exit the ‘trouser’ fairing and had to rebuild using brass tube. A strut connecting the rear of the fairings needs to be added. This confers some extra stiffness to the assembly. I could not get the RATO units to fit using the parts supplied, nor could I work out just what the supporting structure looked like so something was cooked up using brass tubes. Having fitted the units I then discovered that it was impossible to paint the supporting structure! There is a strange pattern on the side of the a/c which, apparently, uses sensitive paint to detect the temperature increase due to the engine exhaust impinging on the fuselage. I have not been able to determine whether this appeared on both sides, or just one. I went for just one and made a decal to represent it, the colour of which is totally spurious as nobody knows what the real thing looked like. When applying the fuselage decals I decided to try using ‘Kleer’ to hide the carrier film and failed miserably. Any ideas on why it went wrong? One last point. A book on the Ju287 published by Ian Allan contains some very nice looking coloured drawings purporting to represent the a/c at the time of its first flight. Unfortunately the colour scheme is not consistent from view to view and does not seem to match the photos. I discovered that one of the authors runs the ‘Luftwaffe Experten’ website so I attempted to discuss the matter with him via a PM but he refused to answer and ended the conversation. Hmmm! Ju287V1_2014_05_06_28 by johnrieley, on Flickr Ju287V1_2014_05_06_36 by johnrieley, on Flickr Ju287V1_2014_05_06_34 by johnrieley, on Flickr Late addition This what the RATO unit and its support should look like - picture taken at Cosford RATO unit by johnrieley, on Flickr Photo is courtesy of Richard Griffiths at Griffiths Models and Books. His site is worth a look as there are lots of photos https://www.facebook...fithModelsBooks Here are a couple of other pictures that I had forgotten about (on my wife's camera) This shows the adjustment to the engines to get the correct thrustline Engine toe in by johnrieley, on Flickr The second shows the cockpit interior - most of which is invisible when the front section is added. I had thought with all that transparency much more would be visible. Ju287 cockpit by johnrieley, on Flickr John
- 27 replies
-
- 29
-