Search the Community
Showing results for tags 'icm'.
-
 After what seems like a long time (because it has been) I've completed my ICM Bf109 F4 as a Jabo of JG53 using Montex Masks and decals, painted using Mr Hobby acrylics. The kit includes an engine however I didn't have a lot of luck getting it to all line up so made it closed up. I used a colour profile in Kagero's Monograph Series Bf109F Vol 2 as the basis for the paint job. My first attempt at using Montex masks for the Balkan crosses, I didn't fancy using the supplied Swastikas though. I'm not sure I'd bother with the masks if I was to do it again. I replaced the kit's wheels with spares from an Eduard bf109 and that supplied the bomb and rack too. I hope you like it. Duncan B
- 16 replies
-
- 23
-

-
Photoetching reproduces wheelwells of P-51D Mustang, with the exception of some of the bulk items. Designed for Tamiya/ICM, but no problems coming to Hasegawa.
-
Set consist of correct details to make wartime modifications from P-51D-5 to D-25 SCR-522 radio equipped. Have unique instrument panel for D-5 model as well as different electric, armament, switch panels, AN/APS-13 panel and antennas with field modification reinforcement plates, details for N-9 gunsight and other small parts. Designed for Tamiya/ICM models.
-
Spitfire Mk.XVI Revell 1:48 The Spitfire Mk.IX was a major step forwards in the spitfire story, yet was initially conceived as a stop gap to the Mk.VIII that was being developed to counteract the threat imposed by the FW190A. The aim of the Mk.IX was to fit the more powerful Merlin 61 to the Mk.V airframe with as few modifications as possible and history shows that this concept was a damn fine idea. Compared to the Mk.V, it was 40mph faster at 28,000ft and service ceiling was increased by over 5000ft. The improved performance came from the engines two stage supercharger which necessitated a longer nose to fit it all in. In the end, the Mk.IX was one of the most numerous marks, seconded only by the Mk.V. Due to the demand for Merlin engines, Packard started to supply US built engines to maintain the demand for the war in Europe. The Mk.XVI was essentially a Mk.IX, but all being produced with the Packard two stage supercharged powerplant. Such was the constant evolution in aircraft design during this period, many modifications and variations on the Mk.IX/XVI flew. Initially, the 'C' wing was used housing 20mm cannon and .303 machine guns, but later variants used the 'E' wing with the noticeable difference of using the larger calibre 0.5in gun. All 1053 of this variant produced were built at the Castle Bromwich plant where the mating took place. Whilst the engine was based on the Merlin, one key noticeable difference was that the Packard was built to metric specs unlike the imperial spec Merlin. Further variations included clipped wing tips to improve roll rate at low level and some aircraft having low blown superchargers to give their best performance in the low level window of combat. As is represented here by Revell, the biggest visual difference on most later variants was the bubble canopy significantly improving all round visibility. The kit So here we have the kit formerly produced by ICM. In its new form, it comes packed in the familiar Revell format; end opening blue framed box with all the parts wrapped in a single bag except for the clear parts. The instructions are quite a busy affair due to the amount of detail that's provided in the kit. Having read previous reviews on the ICM kit, the summary I was expecting was a kit with quite accurate shape but suffers from sink marks and flash in areas. The plastic is moulded in a medium grey colour with a matt finish to the surface. I'm pleased to say that in this kit, the flash is very minimal, certainly better than I was expecting so quality control at Revell is clearly having a positive effect. There are indeed some sink marks worth noting. Key places where I can see them are the top wings around the ailerons and wing tips, lower wings where the interior gun bays are moulded, the cockpit sides on the fuselage and strangely on the tail planes near the roots. Are these going to be a problem ? Well I'd rather they weren't there obviously, but with a few dabs of filler and some experience of handling sink marks, they shouldn't be beyond most people to remove. Surface detailing in the kit is very nice. Recessed panel lines are controlled, deep enough to get a good panel wash into, but shallow enough not to look out of place. One of the things that hits you about the kit when you open it is the shear amount of detail that is crammed onto the sprues. Clipped wing tips, normal tips, HF wing tips, different chins, bombs, rockets, different cannon arrangements, two types of tailplane and a huge slipper tank are included, so the possibilities are quite spectacular. And then there's the engine. I've counted 33 parts that make the engine assembly up excluding the engine mounts ! If you do decide to fit the engine, I recommend plenty of dry fitting to ensure that alignment between the engine, engine mounts and fuselage works out well as there is some intricate parts here. If having the engine on show isn't your thing, then you probably won't be surprised that you can choose to have the covers assembled. Looking at built images of the kit, it appears to capture the quite complex shape of the Mk.IX/XVI nose well. Just as with the open option, I suspect care will be needed to align the covers if you have them closed. Moving into the office, the detail in there has received the same attention as the engine and is probably one of the best detailed Spitfire cockpits on the market that aren't made of resin or etch. All the key parts are nicely produced with sharp detail. The only thing missing is some seatbelts. The prop has individually moulded blades that sandwich between a hub and cone with a bush to secure it in place whilst allowing it to turn. Another option is the choice of having the cannon bays open or closed. The guns and ammo feeds are finely reproduced, although if you choose to have the bays open, only one configuration with four cannons appears to be available. If you close them, two cannon fairing options are up for grabs for either the two or four cannon variants. The bomb racks in the kit are a miniature work of art. Very fine parts will need some careful handling, but the results should be quite gratifying. The bombs themselves get this same treatment too. There are lots of extra parts in the kit that aren't included in the instructions, some being obvious such as the slipper tank, other small parts not so obvious, however I'm still impressed with the detailing on them ! You'll end up with plenty of parts for the spares box whatever variant you make, that's for sure. The clear parts can often make or break a kit as the cockpit usually gets a lot of extra detailing attention. To then lose it all under a distorted over thick canopy can be frustrating. Fortunately, the canopy in the kit is quite good. There is a slight distortion on the canopy due to the curved profile, but certainly nothing to dissappoint and the windscreen is very well produced. Two decal options are included: No.421 Royal Canadian Airforce Germany 1945 - using the yellow ringed roundels No. 612 Squadron, Royal Auxiliary Airforce, Dyce, 1949 - using the later style roundels As per Revell's recent offerings, the decals look excellent, vivid colours and well registered. There is enough stencils to add interest, but not enough to bore you to death applying them ! If painting the cockpit panel isn't your preferred choice, you can sand the detail off and apply the decal. With so many options available in the kit plastic, you may want to investigate the after market decal options too. Conclusion Revell have taken a kit that whilst isn't without flaws, is quite a versatile option in the Spitfire range and probably the best Mk.XVI in 1/48. Yes, it suffers from some sink marks that will need attention, but the options and detail combined with revell pricing make this a great choice for anyone who likes spitfires (that probably covers 80% of modellers !!). I've always had a soft spot for the bubble top spits since my father made one when I was a wee nipper using what ever blue paint we had at the time, so I'm really looking forwards to building this one. Revell model kits are available from all good toy and model retailers. For further information visit
-
 New(?) Ukrainian brand Aviatrak is to release a 1/72nd Tupolev Tu-2T "Bat" kit - ref.7201 Source: http://hobbyterra.com/product/tu-2t-soviet-torpedo-bomber-aviatrak-7201.html The complete set includes: - 5 frames with details, main plastic parts from ICM Tupolev Tu-2 - decal (sticker) - photoetched - 1 frame is made of transparent plastic (canopy) - scheme for painting model - detailed instructions in English V.P.
 -
We've got a few new kits from ICM and IBG in stock now, including two trucks, a figure set and one aircraft. IBG have one model for us: A 1/35 scale WWII Era US Chevrolet C60S Petrol Tanker, whereas ICM have 3 offerings: a 1/35 German KHD S3000 Army Truck, a 1/35 Italian Infantry WWI Era Model Figures Kit and last but not least a 1/48 RAF Beechcraft C18S Expeditor II C45F model kit. For full details, please see our newsletter here.
-
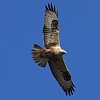
 The fair and the brave and the good must die. -- Lord Huron, "The World Ender" And they worshiped the dragon, for he had given his authority to the beast, and they worshiped the beast, saying, “Who is like the beast, and who can fight against it?” -- Revelations 13:4 (ESV) "Captain [Helmut] Wick gave the impression that fighting the British Air Force was an extremely simple matter...the flier declared that the present quality of British pilots was 'laughable'." -- "NAZI FLYER LAUGHS AT BRITISH AIRMEN", New York Times, October 13, 1940 'Summon up your reserves of courage, be a spearman now and a warrior brave. There is no escape from me, and soon Athene will bring you down with my spear. Now pay the price for all my grief, for all my friends you’ve slaughtered with your blade.' -- The Iliad, Book XXII For the Axis side of my builds, I'm going to start out with two Bf109Es -- an ICM 109E-4 to be built as Wn. 1082/Yellow 4 of Oberleutnant Helmut Rau, Staffelkapitan of III/JG3's machine, and an Airfix 109E-4 to be built as Yellow 2 of III/JG2, the machine of Staffelkapitan Helmut Wick in August of 1940. Our own Enz Matrix has written an excellent capsule bio of Rau, published here on FalkeEins' blog; suffice it to say that in Yellow 4, Rau ran afoul of Ronald "Ras" Berry, who wrote: "As I had no oxygen, I had to leave the squadron at 22,000 feet and waited below in the sun for straggling enemy aircraft. After patrolling for 30 minutes, I saw a Me109 proceeding very fast. To overhaul him I had to press the emergency boost - indicated speed - 345. I caught the enemy aircraft off Shoeburyness. I opened fire at close range and fired all my ammunition until the enemy aircraft streamed with smoke and pancaked on the mud at Shoeburyness." Adorned with an eye-catching serpent, Rau's aircraft was salvaged for public display, somewhat the worse for wear: Helmut Wick is rather more famous than Rau, being at the end of the Battle, the Luftwaffe's top-scoring ace, with fifty-six claims. He died shortly after its conclusion, drowning in the Channel after being shot down by Flight Lieutenant John Dundas (himself killed moments later), the brother of Hugh "Cocky" Dundas, who would go on to later distinction. I will not be building the aircraft Wick met his fate in, as it falls outside of the scope of this GB, but rather the aircraft he was flying in August: As you can see, both Wick and Rau's aircraft show heavy use of the field-expedient camouflage adopted by the Luftwaffe as the Battle intensified. I had wished to also do an aircraft with the earlier 70/71 scheme and high demarcation, but I only have two 109Es and converting a 109E-1 seemed like a bit of a bother.
- 104 replies
-
- 13
-
-
- Battle of Britain Group Build
- 1/72
- (and 4 more)
-
Thanks to Eduard, we have now a up-to-date 1/48 Mk.XVI kit, but the "old" ICM kit isn´t bad either as you can see here. Built by my dad oob, only added seatbelts and whip antenna. Model shows the aircraft of Karol Pniak, RAF 308 Sqn, 1944/45
-
Here is my Yak-9T in 1/48. Aircraft no. 38 of 1st Lt. Alexander Vybornov, 728 IAP, Poland, Autumn 1944. I`ve made it last year for special order. It`s a simple model kit with few errors, but it looks like Yak-9 to me. Part`s PE set and Print Scale`s decals were used.
- 13 replies
-
- 23
-
-
Dear Fellow Modellers Here is the new ICM Renault AHN truck. Possibly their best to date with great fit and engineering. I did succumb to Blast wheels and following a photo on the internet assembled various decals to provide markings for 5th SS Panzergrenadier Division Wiking. In Summer 1942 (Operation Blau) they led the charge down to the Caucasus and the oil fields at Maikop. I suspect not that many of their Renault AHN trucks made it back from the retreat when Stalingrad was encircled and the Army Group pulled out. Hope you like it? Andrew
-
I spot something in the Hasegawa's Nuremberg pictures from Thomas Voigt. Two 1/48th kits announced for March-June 2015: a Lavochkin La-7 "156.IAP" and a LaGG-3 "Finnish Air Force". Hasegawa being now more a decals editor than a 1/48th aircraft new tool producer these must be repop. Origin of these two kits? Source: http://www.primeportal.net/models/thomas_voigt9/hasegawa/index.php?Page=2 V.P.
-
Hi all this is my last creature: ICM 1/35th ZIL-131 truck in the UN version. Scene elements (street lamp, bins, barrels, etc...) from Migproductions. Painted and weathered with Tamiya, AK interacive, Ammo, Vallejo and Model Color. Hope you like it. Cheers Nacho
-
Dornier Do215B-5 ICM 1:48 The Do 215B-5 Kauz III followed the lead of the Do 17Z-10 "Kauz II", with a streamlined solid nose that housed 4 x 7.9mm MG17 machine guns and a single 20mm MG FF cannon (some sources state two cannons). An infra-red sensor was also fitted, part of the Spanner-Anlage system that was intended to pick up the hot exhausts of enemy bombers, with a small Q-Rohr display screen installed in the cockpit. In practice, the device proved to be of very limited value, as it was very unreliable and could not differentiate between friend and foe. The Do 215B-5 entered service with 4./NJG 1 in early 1941, with around 20 aircraft eventually being modified to carried the FuG 202 Lichtenstein B/C radar system. While the clumsy aerial array knocked around 15 mph off the aircraft's top speed, the first "kill" was claimed in August 1941, with additional victories soon following. The Do 215B-5 soldiered on in limited numbers until 1944, with its original armament augmented by an additional pair of cannon mounted side-by-side in a pack under the nose. The model The kit arrives in a very attractive flip top box with an artists impression of the aircraft in its natural nocturnal environment. On opening, all the standard sprues are contained in a single poly bag with only the clear parts separately packed in their own bag. The five sprues of medium grey styrene are very nicely moulded, with no sign of flash and only a few moulding pips. Whilst the details such as the panel lines are very finely done there are quite a few flow marks in the plastic, although these should disappear under a coat of primer. The clear parts though are blemish free and remarkably clear which is a good job as there is quite a bit of detail within the cockpit area, in fact the whole kit is well stocked with detail. Construction begins with the fitting of the lower side console in the port fuselage part, followed by the throttle box, a panel full of levers and the radio panel. The two part instrument panel is then fitted, decals being provided for the instruments, along with a large trim wheel attached to a tripod structure. The pilots seating section is made up of the floor, two rudder pedals, each made up of two parts, the control column with separate yoke and the floor support frame. The assembly is completed with the fitting of the seat and compass housing, before the whole assembly is fitted to the fuselage side. The lower rear longeron structure is then fitted, as is the rear side window. In the starboard fuselage more switch panels, a map case, and auxiliary instrument panels are attached, along with the front and rear lower longeron structures. The three piece co-pilots seat is then assembled and glued into position. There are three bulkheads to be fitted to one of the fuselage sides and the tail wheel before the fuselage can be closed up. The rear gunners seat is then assembled and attached to the two support frames in the fuselage. A fourth bulkhead is slid into position just aft of the rear cockpit bulkhead, whilst the panels underside of the cockpit are also attached, the clear section having an optional cut out panel replaced with one that doesn’t have a machine gun opening, probably a legacy part from the previous bomber version. The large fuselage mounted fuel tank is then assembled and slid between the the front two bulkheads. Moving onto the wings; the two lower sections are fitted with two part radiators and fairings, before being glued to the single piece upper wing, followed by the separate ailerons and landing lamp cover. The wing assembly is then attached to the fuselage and the aircraft begins to really take shape. The kit comes with complete with two complete engines, which whilst not the most detailed, certainly give the modeller a good starting point for some super detailing. Each engine is made up of a five piece block, separate rocker covers, inlet manifold and a three piece turbocharger. The engines are then fitted with the two engine bearers and put to one side whilst the nacelles are constructed. Each nacelle comes in two halves and are fitted out with the engine mounting bulkhead, radiator, radiator inlet and outlet doors, main gear bay rear bulkhead, exhaust stubs, gear retraction jacks and linkages plus the upper and lower cowlings, which can be left loose once the engines have ben attached to their respective bulkheads. Each main landing gear is made up of two part wheels/tyres, the two oleos, complete with crossbraces are provided as a single part and fitted with the mudguard and its associated mounting beam. The completed units are then slid in to the front of the gear bays and connected to the retraction actuators. The completed nacelles are then attached to the wings and fitted with the two part propellers. Meanwhile the bomb racks are fitted into the still open bomb-bay and the rear machine gun for the cockpit is assembled from the gun, ammunition drums and spent cartridge bag. The machine gun is then fitted to the rear of the canopy, whilst on top, the aerial, DF dome and armoured windshield, which has an option of being enclosed, or with an opening for an external “telescopic?” gunsight are attached. The canopy can then be fitted to the airframe along with the underside rear cupola glazing. The solid nose cone is fitted out with the machine gun and cannon barrels, as well as the extreme nose panel. On the underside the bomb-bay doors can be posed open or closed and just aft of the bomb-bay the HF aerial rail is attached. The horizontal and vertical tailplanes are each made up of two halves to which the single piece rudders and elevators are attached along with the elevator control arms. The vertical tailplanes/rudders are then attached to the horizontal tailplanes and each assembly attached to the rear fuselage. To complete the build the aerials for the Fug 202 radar are carefully assembled from four aerial masts to which four dipoles are attached to each and fitted to the nose cone. Although injection moulded the aerials are quite slender, but for those who wish to have some that are more to scale Owl models do an etched set that can be used instead. Decals The medium sized decal sheet, designed by ICM themselves appears to be well printed and in good register, there is minimal carrier film although the decals are quite matt. The national markings, minus any form of swastika, are accompanied by a nice selection of stencils as well as markings for two aircraft:- Dornier Do-215B-5, R4+DC of Stab II/NJG 2, based at Leeuwarden in the spring of 1942 Dornier Do-215B-5, R4+SN, flown by Obit. P. Gildner of Stab II/NJG 2, based at Giltze-Rijen in the Autumn 1941 Conclusion Although I have bought and built a fair few of ICM’s 1/35 scale vehicles, this is my first contact with one of their aircraft, and to be honest I’m happily impressed. The kit is pretty well detailed straight out of the box, but yet gives the super detailers a great base to work their magic on. It will certainly make an interesting addition to anyones collection. Very highly recommended. Review sample courtesy of
-
1/48 - Henschel Hs 126A-1 (new variant) by ICM - released
Homebee posted a topic in The Rumourmonger
ICM is to re-release its Hs 126 1/48th kit as Henschel Hs126A-1 with bomb rack, Condor Legion Reconnaissance Plane - ref.48213 Source: http://www.icm.com.ua/news/383-hs-126a-1-with-bomb-rack-condor-legion.html Box art V.P. -
Hi, here's the latest completion built for the Lesser Built Air Forces GB http://www.britmodeller.com/forums/index.php?/topic/234974484-libyan-mig-25pd-172-icm-completed-14th-feb/ Not the easiest build, but enjoyable. Thanks for looking. FF
-
 Hi all, here's what I intend to build. No aftermarket (unless I can find a seat). Wish me luck! FF
 -
Hi there, A few months ago I started losing my mojo a bit with wingy things, so i found a car kit that I brought very cheaply a few years ago, a 1/24 Hasegawa Lamborgini Mura, within 5 minutes of starting it I was hooked, and although never being a car freak in any way, I had entered the dark side, and before too long was scouring the net for my next project. Looking through the fairly comprehensive range of 1/24 cars that my usual supplier had to offer I just kept on coming back to this model I dont know why, just something about it that I found attractive and interesting. Unfortunately the car has a bit of an infamous history as it was the chosen staff car of Hitler and his cronies, and very few survived the war, but it got me thinking if it was painted some other colour than the drab RLM grey and do away with a few other nasties then this could become a very attractive car. So I hope you enjoy watching what happens, as already mentioned I am no auto expert, so all help and advise will be much appreciated. The box is jam pack full with parts,some of the mouldings have got some quite exquisite detail on them. But the instructions seem to have been drawn by a spider after a night on the tiles, certainly give Revell ones a run for their money I had an idea in my head for the colour scheme of either dark green or blue and creamy beige or off white, I did try some Tamiya pearl white against their dark blue but it wasn't quite what I was after, while looking in a DIY store I came across an aerosol of the cream I was after, so before there would be any tears on my model checked it out on a plastic bottle first., being new to airbrushing lacquers I always check them out first, god job I did, look what happens when its sprayed on top of humbrol enamel
-
ICM is to release a new tool 1/48th Polikarpov I-16 Ichak type 24 kit in 2015 - ref. 48097 Source - ICM 2015 catalogue : http://www.icm.com.ua/katalog/ Box art V.P.
-
 Hi Guys, This will be my build for the GB. It will be a straight from the box one as I think I will not have much time as a co-host. It's the Revell (nah ICM) 1/48 Mustang III. This is a almost copy of the Tamiya version so it won't be to hard to build. The only different thing about this build will be that I will be painting it in 122 Squadron colours of the American volunteer P/O J.N. Thorne that still surved the RAF at that period. I will bee painting the model as the plane he flew when he shot down 2 Fw-190's and damaged one on July the 26th 1944. He was at that time flying from the temporarily airfield B12 in Normandy with the rest of the Sqn. His Mustang (FB180)was that day Struck of Charge after a belly landing on a emergency landing strip. It is also very likely that he shot down a top gun ace (Ernst Wilhelm Reinert) on the 17th of June near Evreux in France. I have been researching him for a while now and I have a sort of band with the man. It was his plane that crashed into the house of my grandparrents neighbours on september the 10th 1944 in the small town of Velp near Arnhem (the Netherlands). He is still burried at the Moscowa cemmitary in Arnhem. I will try to honour him in this way. Cheers,
 -
Just wondered if anyone else had spotted these about. I have a couple of Eduard Mk IXs with lots of extras in the stash, but before I set too on these, I wanted to have a play around with a simple spit. Saw these on Ebay, and thought at that price must be worth ago, especially with the added figures and diorama details included, £12.99 posted. (also comes without figures even cheaper) http://www.ebay.co.uk/itm/291229848738?ssPageName=STRK:MEWNX:IT&_trksid=p3984.m1497.l2649 Arrived yesterday, and after a quick look through the box, was pretty impressed. I didnt get the Eduard out for a comparison but think we all know the standard of that kit. Detail in the ICM box is pretty good, the engine bay is built up of several parts and the panels can be cut from the main body to display it. Likewise the cockpit too is pretty nice. There is some sprue around, but not too much, and there is on mine at leat, a lack of ejector pin marks. One issue I did not though was quite a bit of shrinkage/sinkage on several part. The propellor roots inparticular stand outm but where detail has been molded onto one side of a part, there is often a little sinkage on the other side. OK, so with a bit of work this is 'easily' addressed, but I dont think it dtracts from the kit given the price bracket - certainly in my opinion anyway, worth a bash as a trial piece. Decals are minimal, but look a great colour and are well printed.
-
I have just stated this kit. Having done the engine and the Frame. I am a little stumped. Instructions say to remove the side panes for an open engine display. I would presume that this will take some patience with a sharp scalpel. Further than that I am at a loss at the best way forward from an assembly point of view. I see this as then having a very week front end to contend with while still getting everything else glued and painted. Does anyone have any suggestions and advice with this kit?
-
This is the ICM 1/72 Nakajima Ki-27b 'Nate' built for the Less Than a Tenner Group Build, painted to represent the aircraft of Lieutentant Hyoe Yonage, 24th Sentai 2 Chutai, stationed at either the Philippines or China in December 1941: The kit was built out of the box but the decals used were from a Print Scale sheet on the Ki-27. This particular camouflage scheme was available as part of the kit decals, but they were not very good. The kit was painted with Humbrol and Revell enamels, and Lifecolor Acrylics. The three-colour scheme for the Nate, especially the indigo caught my eye and chose the colours based on this blog post by Nick Millman: http://www.aviationo...sen-part-7.html Consensus holds this kit to be the most accurate Nate in outline, with fine-too fine for a brush-painter like me-surface detail and some unusual engineering choices for assembly. These can be best characterized as 'interesting' and must have worked like a dream for the first release of the kit. Here it is compared to a 1/144 model of the same subject from FE Resin I built last year: For the record, the kit cost me 6 pounds 50 from Hannants. More information on the build (and what I thought of some of the engineering choices) can be found on the progress thread here: http://www.britmodeller.com/forums/index.php?/topic/234955850-icm-172-ki-27-finished/ Thanks for looking! Comments are welcome.
-
Hello, As my Draken project is not progressing I decided to show you one of my older kit - the Polikarpov I-5 (late design). The kit is from ICM and was a pleasure to built, despite the small size. Hope someday they will scale it up to 48; I'm getting older and small biplanes aren't good for my eyesight. The color scheme is not 100% authentic; I was inspired by a b/w photo from an old book (you know, an aeroplane book from the childhood). Painted with Agama acrilics. Hopefully the other version – with individual cowlings for the cylinders “a la Bristol Bulldog” also kitted by ICM – will find the way to my workbench. Feel free to comment.
-
I have completed MiG-31 "Export" in 1:72 from ICM kit using Extratech etched parts, Begemot decals, NeOmega seats and Elf wheels. I started with main wheel bays
-
Good afternoon colleagues. again early Luftwaffe