
Search the Community
Showing results for tags 'Special Hobby'.
-
Hi All, This will be my second entry in the Southern Europe Group Build: Special Hobby's 1/48-scale Breda Ba.65A-80 two-seat ground attack aircraft. The model will be finished in the colours of the Portuguese Aeronáutica Militar, who purchased ten aircraft in 1937. The Aeronáutica Militar allocated the aircraft to Grupo No.4 at Sintra airbase where they were apparently quite unpopular, being fairly difficult to fly and with mechanical reliability problems. On the 15th February 1941, however, the Grupo's prayers were answered when an exceptionally heavy storm destroyed the hangar where all the Bredas were parked, the whole force being damaged beyond repair. The boxing is the "Aviazione Legionaria" edition, which is for a single-seat Spanish Civil War. However, the parts for the two-seat versions, including the Breda Type M turret, are included, and the instructions can be downloaded from Scalemates The Portuguese national markings and aircraft numbers may be a sticking point, which will require a bit of thought, but I may be able to cobble them together from other sheets. As I've hurt my shoulder I won't be cutting plastic for a day or two, so I'll do the usual box and sprue photos then. Thanks for looking in! Cheers, Mark
-
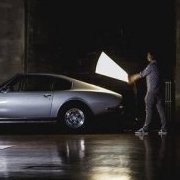 Good evening gals and gents, today I'd like to present to you a gift for a good friend of mine. As he is a huge fan of Bugatti, mostly of the Veyron, I decided to get him a Bugatti he hasn't in his collection yet. Small wonder. Most people associate the name Ettore Bugatti with racing cars and luxury automobiles but only a few probably know the story of the Bugatti Model 100, sometimes called the Bugatti-De Monge 100P. In 1937 Bugatti decided to get back at the Germans and to win the prestigious Deutsch de la Meurthe Cup Race. He teamed up with Belgian engineer Louis de Monge and they were on course to enter the 1939 race, but to do so they needed to get their aircraft completed by September and we all know what happened in September of 1939. They missed the deadline and so the Model 100 never took to the skies and when in 1940 the Germans were approaching Paris, the still incomplete plane was moved to the French countryside where it was hidden in a barn for the next almost 30 years. It was sold a couple of times, among other to an American automotive aficionado who bought the Model 100 for its two Bugatti Type 50P Straight 8 4.9L engines, which were used for restoration works of Bugatti cars. In 1996 the airframe was donated to the EAA Aviation Museum in Oshkosh where it was restored and is now on display. But the story doesn't end there. While Ettore Bugatti never saw the plane fly, it finally did in 2015 - at least a replica did. It was built by a group of enthusiasts using the original plans. Some materials originally used by Bugatti and de Monge were changed for safety reasons and the plane was powered by two Suzuki Hayabusa engines. Nicknamed Blue Dream, the plane was slightly damaged during an landing incident on the first flight, but was repaired and did another successful flight. Almost exactly one year after its inaugural flight, Blue Dream took to the skies for a third and last time. Unfortunately it crashed right after take-off, tragically killing the pilot and initiator of the re-creation of the Model 100, Scotty Wilson. Even more tragic - this was to be the aircrafts final flight anyway as the team behind the project planned to donate it to a museum afterwards. So while these enthusiasts proved the Bugatti Model 100 could fly, neither them, nor Ettore Bugatti and Louis de Monge themselves could prove that this might have been the fastest, most advanced racer in its time. At least it looks absolutely stunning! So...after a long brainstorm what to get that guy for his birthday ("I don't want anything!") I got back to the most obvious but I didn't want to get him another 1/18 scale Bugatti Veyron, even when I entertained the idea of getting one, remove the paint and spec it individually, I finally settled on the Special Hobby 1/48th scale kit of the Model 100. It's compact enough so he can add it to his collection without any problems, which was the main reason I didn't go for another Veyron or the 1/32nd variant of this kit. The build was quite enjoyable. The bulk of the parts is used in the cockpit and the fitment of the small parts amazingly is not bad at all. The airframe on the other hand didn't go together so easily, there was quite a gap in the front of the fuselage, but with the help of putty it wasn't that big of a deal. What I couldn't get rid of is the visible step between the fuselage and the wings at the rear. The fuselage seems to sit way lower than it should or the wings are to thick, don't really know where the mistake was made and unfortunately I'm not that skilled with sculpturing and rescribing to get it done with putty. But it bugs me so much, I even consider to keep that one for myself and build another one and approach the attachment of the wings differently and hoping it will look better. Anyway, the rest was easy going, except I had to write to Special Hobby because one of the resin parts was missing from my kit. But one mail and two days later I got the part in my mailbox, free of charge. Kudos for that service, thank you Special Hobby team! With everything in place the kit was primed with Tamiya white primer from a spray can and sprayed with Tamiya French Blue. For the cockpit, canopy, landing gear and propellers Vallejo and Revell acrylics were used, I kept the weathering to a minimum, just suggesting a bit the plane might have been raced once or twice and yeah, Bob's your uncle. Except for the problem with the wings, I'm quite pleased with the result and it certainly looks sexy in blue next to all the mostly grey and huge military jets on my shelf, as I still haven't decided if I should give it another go or if this actually is worthy as a gift. Either way sooner or later I will add this little beauty to my collection. That at least is decided Thanks for reading and watching!
- 4 replies
-
- 26
-

-
- Special Hobby
- Bugatti
- (and 1 more)
-
 Hi Guys, To follow on with my little P-40's series in 1:72 scale. This time the very well known "44" 3Lulu Belle" of Lt Philip S Adair. My purpose here is to illustrate : -another style of "Unit nose art" as seen on this group during their P-40 use. Each skull was different, - this typical camouflage of Olive drab ( second type) and Medium green 42. - star with white band only a national markings. I Chose this specific plane as it had its tires highlighted in white. Not for sun heating protection purpose , as seen on some Me 109 in North Africa , but as special personnel deco from P.S.Adair. He was car salesman on its civilian activities prior the war, and at that time many US cars had their tires decorated this way, A kind of remembrance for him I suppose. Now, As regard of external load, one of the main mission of 80th FG was to support "Merrill's Marauders" in their way through the jungle landscape of this theater of operations. For these missions they decided to use Depth Charges Mk XVII from the US Navy ( The only group to do that. ??) . I guess that the blast effect of these charges was very efficient in Jungle both to clear drop zones for resupply ground troops, and also may be to smashed Japanese buildings made out of wood and bamboo trees. As these charges went of US navy stocks, some were olive drab other navy light grey, depending on availability .. I chose grey 😊 Now my little bird : Tried to represent wire mesh that was frequently used there in replacement of more standard PSP ones Hope you'll like it !! cheers !!
 -
Grumman AF-2 Guardian ‘Fire Bomber’ (SH48225) 1:48 Special Hobby The Grumman AF Guardian was designed from outset to be an anti-submarine warfare aircraft, although the airframe began life as a heavy torpedo bomber, taking numerous forms and using two engines to give it enough power to lift a larger load. The penultimate design included a jet engine in the tail and a Pratt & Whitney Double Wasp radial engine in the nose, but as the jet engine never lived up to its promise, it was dropped and the type reverted to tried and true prop power to lift it from an Essex-class carrier, which was to be its usual home. The size of the airframe and its choice of power plant made it the largest propeller engine aircraft to have flown regularly to and from carriers. There were two sub-types when in US Navy service, the hunter, which had two extra crew to operate the belly-mounted radome and electronic countermeasure equipment, but it had nothing to defend itself with other than the capabilities of the ECM fit and harsh language from the crew. The other sub-type was the killer, carrying two flight crew and an additional radar/searchlight operator, with an array of weaponry in the internal bomb bay. Fewer than 400 were built overall, and it entered service in the early 50s in time to serve in the Korean War, where it garnered a reputation for being a difficult aircraft to fly thanks to its lack of power and heavy controls that led to a high attrition rate due mainly to accidents. There was an attempt to combine both roles in a single Guardian-based airframe, but it was soon cancelled. Despite some improvements in the shape of the AF-3, it was retired from active service in 1955 but remained in reserve until 1957, replaced by the S-2 Tracker, also from the Grumman stable. Remaining airframes were scrapped, with just five receiving a stay of execution to be used as fire bombers in California until their retirement in 1978 after many years of sterling service where their drawbacks weren’t such an issue. The Kit This is a reboxing of a 2014 tooling from Special Hobby that has been upgraded with additional parts to portray its fire-bombing incarnation. It arrives in a blue-themed top-opening box, and inside are seven sprues of grey styrene, a clear sprue, a bag of thirty-six resin grey parts, a large decal sheet, a fret of Photo-Etch (PE) parts, a sheet of pre-cut masking material for one of the decal options, and of course the instruction booklet, which is printed on glossy paper in colour, with profiles of the decal options on the rear pages for when the time comes. Detail is good, and the large size of the aircraft is noticeable when you first open the box. The engine uses up most of the resin parts, and it should result in an excellent rendition of this powerful radial motor that was sadly not sufficient to propel this monster as well as it deserved. Because this is a civilian version of the aircraft, there are several unused parts that are picked out on the sprue diagrams with large red Xs. Be aware that many of the larger parts have large raised ejector turrets on their inner faces, some of which will require removal to avoid fit issues, so it’s an idea to take your nippers to them wholesale before you begin to build. Wear glasses to avoid getting a scratched cornea or worse if one pings in your direction. Construction begins with the instrument panel, which is wide even though there’s only a single pilot sat at the controls. The styrene panel has PE rudder and other pedals attached from behind, or you can simplify the rudders slightly by using plastic supports with just the pedals applied from the PE sheet. Decals are applied to the instrument panel and a resin part is fixed to the starboard side, adding the coaming and another detailed part over the top of it. Three seats are made up, one on a rail with headrest and four-point PE seatbelts added, with two more simple seats that have just lap belts to hold the crew in place. The main cockpit has a narrow space for the pilot and two side consoles that are detailed with three decals, adding two folded PE document pockets to the sides of the starboard console, the seat slots into two holes in the floor, plus the control column in front of it. The rear bulkhead fits to the back of the floor on a pair of rails, joining the two elements together with a palette of equipment. The other two seats are placed on small sections of floor that have bulkheads added into grooves in the front, and are used to locate them against a couple of raised lines inside the fuselage, as is the main cockpit, plus a bulkhead in the nose with a hole in the centre. A small section of the bomb bay is removed for the first decal option, and the bottom half of another raised line is removed from the starboard nose at the base of a depression to ensure a good fit. The tail-wheel bay slips into the tail along with a small bulkhead, and on the sides of the fuselage a couple of windows need adding so the rest of the crew can see out. The engine must be made up next before being inserted into the open front of the nose. The whole assembly is resin apart from the push-rods, which you must make eighteen of from 0.5mm wire that is 5mm long, adding them to the front bank of pistons once they have been inserted into the holes in the central block, taking care to use the correct parts in each bank, and adding the ancillaries to the reduction housing at the front, plus the wiring harness, which you can improve by wiring up all the plugs with some fine wire from your stock. Once it is painted, the rear is inserted into the bulkhead in the nose, and the cowling lip is detailed with two internal parts to make up the intakes before gluing it to the nose around the engine. Resin exhaust stubs are inserted at the base of the depressions in the side of the nose, covering their bases with a separate section of cowling, and adding a resin intake and PE grille to each side along with two more cowling panels over the upper outlets. The canopy is in two parts like the real thing, but without seriously messing about with the parts, I can’t say whether you can depict the canopy opened. If not, the brave amongst us could cut the canopy in half and add a small fillet to give it the requisite width. The enormous elevators are each made from top and bottom halves, sliding the mini-stabilisers into the grooves in the leading edges, and then cutting them off and making good for the first scheme, as they aren’t fitted. The first scheme also has an extended bomb bay that contains additional firefighting water, while the other two options still have the original flush-fitting bay doors that are each a single part. The lower wings have the leading-edge slat bays fitted to the outer panel, then the gear bays are inserted, made from three parts each, completed by lowering the upper wing halves onto them, which have some ribbing detail moulded into them that will be the roof of the bay once installed. There’s a landing light inserted into the starboard wing lower, after which the wings slot into the grooves in the fuselage sides, setting them aside to cure at the correct dihedral. The tail has the arrestor hook inserted through the bulkhead, and two lights above it, one clear the other red, adding another red light just behind the cockpit. Two little T-aerials are glued under the elevators later in the build. With the model inverted, the flaps are detailed with PE hinges, adding an L-shaped pitot on the starboard side. The main gear legs are shown being built up in isolation with their bays hovering in space to make the process clearer, taking the main strut and adding two retraction jacks, a PE scissor-link and the captive bay door to each side. The wheels are each made from two halves and are slotted onto the axles at the bottom of the legs, referring to a scrap diagram that shows the correct angle for the legs and wheels, which are canted slightly outboard. The tail wheel bay is also shown in isolation, adding the twin wheels to the yokes, a V-shaped retraction jack, and two-part bay doors that are captive to the leg. A small resin peg is added to the rear of the strut to finish it off. A pair of wingtip lights are inserted in the gaps in the wing, the prop is made up from the central boss and four separate square-tipped blades, then a forward-raked antenna is placed 15mm back from the rear of the canopy, with a blunt antenna behind it, and another on a short post behind that, adding a pair of whiskers trailing behind with the airflow, again from your own stock – toothbrush bristles are quite good for that. Markings There are three decal options on the sheet, one bright orange and white, the other two aluminium with an orange fuselage band. From the box you can build one of the following: BuNo.123088, ex-US Navy, Rebuilt as a firefighter. In 1962 is flew with civil registration N3142G with code 30E on its cowl, operated by the Aero Union Corporation in Choco, California. NoNo.126792, ex-US Navy, a firefighting aircraft with civil registration N9995Z, operated by the Aero Union Corporation in Choco, California. BuNo. 126759, ex-US Navy, flew with civil registration N3144G, operated by the Aero Union Corporation in Choco, California. During service it flew with several different variations, at one point with an orange engine cowling and 30E on the nose. The decals appear to be printed using the same digital processes as Eduard are now using, and have good registration, sharpness, and colour density, with a thin gloss carrier film cut loosely around the printed areas. I mention Eduard because from 2021, the carrier film on their decals can be coaxed away from the printed part of the decal after they have been applied, effectively rendering them carrier film free, making the completed decals much thinner and more realistic, and obviating the need to apply successive coats of clear varnish to hide the edges of the carrier film. It’s a great step further in realism from my point of view, and saves a good quantity of precious modelling time into the bargain. Conclusion It’s a big, ungainly aircraft with a certain appeal beyond its prodigious size. Sure, it wasn’t very good at its job in the military, but it made a great fire truck, and this model depicts that well, with plenty of detail and a gorgeous resin engine. The decals are very colourful too. Highly recommended. Review sample courtesy of
-
Hello Today that is exactly 56 years ago the IDF/AF started what was called the Six Day War. During these days one aircraft type got aerial superiority, and it is the right opportunity to show you my last build with this 1/72 Special Hobby Dassault Mirage IIICJ aka Shahak. This plane #784 was from No119 Squadron and was famous when his pilot Ran Rosen on November 13, 1966 shot down a Jordanian Hunter after a hard fought air battle. I chose to put a couple of bombs under the belly as a typical interdiction mission. I avoided the Shafrir 1 missiles because they were often discarded due to their poor efficiency. The paint is Alclad Duraluminium with some darker aluminium added somewhere to get different shades. It is an easy kit to build and I am looking forward to adding a French Mirage IIIC later as this the subject of the new Special Hobby box. Patrick
-
Latest finish is Special Hobby's re-box of the Tarangus kit in 1/72, this is the air superiority version. A lovely kit with some nice moulded detail but as many have found care needs to be taken with the forward fuselage and the intake joins. I adjusted the some of paints indicated in the instructions as 3 of the upper colours didn't look right when sprayed, masked with my own hand cut masks by laying tape over a up-sized laminated photo copy of the painting guide and carefully cutting with a sharp knife before transferring onto the kit. Built OOB less the AIM9's (Airfix) and Skyflash (Resikit) both mounted on LAU's taken from an old Hasegawa F4E kit. Painted with usual mix Mr Hobby Colour and Tamiya acrylics. All comments welcome. Here a link to the WIP
-
Once I’ve finished off a few other things I’ll be joining in with this DH beauty. Though I suspect the kit will take a bit of work to get there. Three grey plastic runners, much of the moulding is nice and fine, if not totally crisp. The detailing is relatively restrained, but there are a lot of injection pins that’ll need removing. A fair bit of resin and a small injection moulded transparency runner, with the canopy and camera ports. Typical SH instructions and some etch as well. Markings for two F20s, one High Speed Silver and one in Extra Dark Sea Grey over Sky, and for a PR22.
-
Hi Guys !! , I'm currently working on a series of P-40 aircraft. The Curtiss fighter family interests me greatly, both from a historical and modeling perspective. For me, the two go hand in hand. The P-40 has a number of unique characteristics that set it apart in many ways: -It is the only fighters series whose various models/versions were used on all continents and also on all fronts of World War II. -It is the only aircraft that was flown by almost all the belligerent nations of World War II (with the exception, I believe, of Italy, Denmark, Belgium, Hungary, Romania, and Bulgaria), not counting the Baltic countries, but that's still quite a lot of nations. -It is the only aircraft that carried both all the camouflage patterns and national markings used by USAAF fighters during the war. All these aspects make it very interesting for modelers I think. Furthermore, many American P-40 units (or associated units like Chennault's Flying Tigers under Chinese colors) systematically applied unit "nose art" to their aircraft, especially in North Africa/Italy and the CBI theater of operations. Not to mention the individual nose decorations applied mainly in the South Pacific (Solomon Islands, etc.). With all of this, I believe there's a lot of fun available for a modeler . I plan to combine various interesting offerings from different manufacturers (model kits, decals, accessories like wheels, external stores, etc.) to cover a part of this series. So, to start , I present to you a P-40E used by the 11th Fighter Squadron of the 343rd Fighter Group in the Aleutian Islands. This unit was initially, for a brief period, commanded by Lt. Col. John Chennault, the son of General Claire Lee Chennault, the initiator of the Flying Tigers in China. Like all children (I have 3...), he "teaches" their parents about Life. Consequently, he told his dad, "Your Flying Tigers' nose art is lousy! They're not tigers, they're sharks!" (Inspired by the British shark mouth of desert AF.) "Seriously!!!" (I can only imagine...😈) And he chose this decoration... which actually represents a Chinese tiger...😆 As for the model ,finally!!! ( I know, was a little bit too long , as most of you guys knew that already I'm sure ..Sorry for that 🤭) The kit is from Special Hobby, Aeromaster decals, and the paints are Tamiya OD 41 (the first version from Tamiya), which I believe is the most suitable color, the same for the NG. Also, an Aeromaster US orange yellow for the prop hub to match the yellow of the tiger head .Build some years ago 😊 This one as : External stores :the first belly tank used by P-40 and diamond threads wheels . Now on to the pics . Hope you'll like it 😉 This one to "kill" the legend (in my opinion) of these planes wearing a lone white star without blue background (As presented on the Aeromaster decal sheet). ...Plant line discussion " Guys !, no blue left ! let's go for white stars only !!😄 . But if I'm wrong would be really pleased to learn about it really. Now the undies of the lady ..😊 I tried to represent muzzle shoot stains as they looked on pictures, oily ones, linked I think to barrel cleaning with oil ( I cleaned some guns and in fact 0,50 during my military period ( last century☺️ ) ) closed canopy Then tried to represent the "volcanic " landscape of this forgotten area of operations ; That's all folks ! Thanks for watching ! Take care .. and happy modelling! Cheers !!
- 15 replies
-
- 40
-
-

-
 Big, you say? Well okay. It's almost the biggest model in my stash, the Special Hobby Westland Whirlwind Mk.I. It's big: And it's been unstarted for too long: Did I mention that it's big? While waiting in the stash it has accumulated quite a bit of aftermarket; a set of seatbelts: Some resin wheels and cannons - I'm not that comfortable with the idea of the resin cannons which I think would be more vulnerable to breakage than the kit's plastic ones, but if they look much better I would probably go with them: ... and finally, canopy and camouflage masks. What can I say? I'm lazy and I'm prepared to pay any company that offers to indulge my laziness So I'm set. See you at the start line gents Cheers, Stew P.S. It's big
- 84 replies
-
- 16
-
-

-
- Special Hobby
- 1/32
- (and 1 more)
-
My build for this GB will be the 1/32 Special Hobby Tempest II. This is the Hi-Tech boxing with lots of resin and other goodies. There are lots of things to show in the box, so I will do it in stages.
-
 Here is my latest completed model - 1:72 CASA C-212-100 Aviocar, no 16507, 502 Squadron "Elefantes" of Portuguese Air Force, Sintra 2005. Special Hobby 72376 kit "out of the box" with a few additions made from scratch. Painted with Mr. Hobby C. Thanks for watching!
- 15 replies
-
- 60
-
-
-
- CASA C-212
- 1:72
- (and 1 more)
-
Overall, good kit, main issues were with decals (terrible print quality and crumbling/folding) and bad fit. Really nice details though and I still enjoyed making it. Glad I'm finished with it however. Thanks for looking!
- 14 replies
-
- 39
-
-
-
- Special Hobby
- Meteor
- (and 1 more)
-
After the A-11 (link) Special Hobby is to release a 1/72nd Aero A-12 (early and late) kit - ref. 72466 Source: https://www.specialhobby.net/2023/04/sh72466-aero-12-172-v-priprave.html V.P.
-
 Hi Guys, This time you can check my Vautour IIB from Special Hobby. Set was made over decade a go and actually fit and accuracy of plastic parts aren't well. Making it ready for metal finish is very challenging and engage lot of work and determination. Anyhow if you wish to have on a shelf this pretty french jet bomber there is no other way. You can check my struggle with it on https://www.kfs-miniatures.com/1-72-vautour-iib-french-jet-bomber-budowa/
 -
 Special Hobby is to reissue its Mojave kit in 2023 with a new tanks sprue - ref. SH72172 - Sikorsky CH-37 Deuce - USMC Source: https://www.specialhobby.net/2023/03/navrat-monstra-chystame-reedici.html Box art, schemes & new sprue pictures V.P.
 -
 A French design of the 1950's, the Magister trainer is immediately recognisable by the 'butterfly' tail. If anyone knows the correct aeronautical term for the angled tailplane/elevator I'd be glad to hear from you! Why this build? My wife is Belgian, so any kit I come across with a Belgian marking option is up for consideration, plus I rather like a colourful training aircraft. Two boxes ticked then. The kit is from Special Hobby, comprising five sets of sprues that are a very tight fit in the side opening box (a few small parts were broken in mine). The parts are very nicely detailed, far better than I honestly expected. I did have some fit issues along the way; the cockpit floor/seats/IP assembly was too wide for the fuselage halves, and took a lot of carving and whittling to make all fit. The long clear canopy is made up of no-less than six parts, and was a trial in itself... fine if you want to pose the pilot and/or instructor canopies open, but a right fiddle if you prefer the clean lines from having them all closed. I deviated from the kit scheme of a BAF example from the Congo in 1960. I opted not to fit the two nose-mounted guns and instead went for a standard trainer fit from the mid '60s, based on photos from the web (the Belgian Wings website is the go-to place). This also meant I would have to modify the rearmost part of the canopy, because by then BAF Magisters had a white painted finish and acquired a pair of air scoop 'ears', two blisters and a group of three louvres. Pictures:- The improvements I tried to make were:- Filling in most of the panel lines on the wings, tail, and forward fuselage. I think this makes it look much more realistic. My preferred method is gluing in lengths of stretched sprue which sand down easily when dry. The most worthwhile thing I did!! Cockpit; detailed with homemade belts, IP wires, hoses, etc. I also detailed the periscope for the instructor in the rear seat. I thought all this would be worth the time and trouble as there's a lot of clear glass, but alas, as it's nearly all painted black you can't really see anything... Rear canopy; blisters were crash-moulded, the scoops are scratched from strip, and thin strips of black decal were used for the louvres and the prominent rubber seal around the white-painted area. Jet pipes; from plastic tube, reamed out to make the edges more in-scale, and fitted so that they protruded slightly from the exhaust fairings. Aerials; three blades with their mounting plates from strip. Underwing lamp and tail light from clear sprue Pitot tubes (?) directly in front of the windshield were scratched from strip and rod Hydraulic lines added to undercarriage legs, from wire (practically invisible...) Aileron trim tab actuators are supplied in the kit, but are a bit chunky, so were replaced with strip and sprue. Thanks for looking!
 -
A-17/DB-8 Masks (M72045) 1:72 Special Mask We reviewed the kit that this is intended for last week at time of writing, and you can see that here, as well as a little about the brave Dutch pilots that went to war in them, despite them being unsuitable to the task they were given. This set of masks will help cover the greenhouse canopy sections, plus the lower window in the scabbed-on hump below the gunner’s position, and also for the wheels, both main and tail, allowing you to cut the demarcation perfectly with little effort. The instructions are straight forward, showing numbers for each section corresponding with the individual panes, and the three wheels, for which you get masks for both sides that just need the outer edges curving over and any remaining spaces filling with some spare tape to prevent any over-spray. Masks are a great time-saver when they fit, which is pretty much guaranteed from providers such as Special Hobby, due to careful testing. Highly recommended. Review sample courtesy of
-
 PT Boat Weapon Set #1 Mk.4 20mm Oerlikon Cannon (N72030 for Revell) 1:72 CMK Navy Series by Special Hobby The American PT boat series were fast, agile and well-armed to deal with the Japanese enemy in the Pacific theatre for the most part. Revell’s kits of these famous sea-borne warriors are quite old now, so upgrades to the level of detail to modern standards is a worthwhile proposition. This set is number one of a series of sets that are now available for the basic kit, and it depicts the much-used Swiss developed Mk.4 Oerlikon 20mm cannon that saw extensive use both at sea and in the air during WWII, ironically based on a WWI German design. They were often seen mounted on the foredeck of PT boats, and in a circular ‘band-stand’ installation on the British MTBs amongst many other uses. The set arrives in a white cardboard box with a captive top flap and sticker showing the contents. Inside are three bags of resin parts, the traditional cast resin in grey, and the 3D printed parts in a light orange colour. Additionally, a small fret of Photo-Etch (PE) provides more parts, and all this is protected by the instruction sheet and an additional glossy sheet that advertises some of Special Hobby’s other maritime upgrade sets. Construction begins with creating the conical mount, which starts with a flat circular base onto which the riser fits, adding a 3D printed adjustment wheel and the trunnion on a circular base that holds the cannon in position. A 3D printed magazine and twin shoulder rests finish the cannon, adding the two-part PE ring and bead sight on a tapering mount between the magazine and rear of the breech. There is also an upgraded rectangular locker included in the box to replace the kit part with additional detail. The detail that resin and 3D printed parts bring to the installation will be a huge improvement over the original. Highly recommended. Review sample courtesy of
 -
Special Hobby reissue expected in May 2023 - ref. SH72480 - Saab J/A-21R Source: https://www.specialhobby.net/2023/03/sh72480-saab-ja-21r-first-swedish-made.html Box art V.P.
-
PT Boat Weapon Set #4 (N72040 for Revell) 1:72 CMK Navy Series by Special Hobby The American PT boat series were fast, agile and well-armed to deal with the Japanese enemy in the Pacific theatre for the most part. Revell’s kits of these famous sea-borne warriors are quite old now, so upgrades to the level of detail to modern standards is a worthwhile proposition. This set is number four of a series of sets that are now available for the basic kit, and it depicts the Mk.50 Rocket Launcher that was fitted on the deck of a PT boat to give it the capability to fire a barrage of 5” eight rockets from each mount at the enemy, punching well above their weight. The set arrives in a white cardboard box with a captive top flap and sticker showing the contents. Inside are two bags of parts, one containing three casting blocks with ten parts, the other a small fret of Photo-Etch (PE). The base of the assembly is a single part that has a long beam projecting from one side, onto which five perforated PE strips are fitted to separate the four barrels that are mounted above and below the pivot, moulded as four per part for your ease. The rocket tubes have the curved rocket noses moulded into the front, the flat back of the rocket and the ignition lugs at the rear. There are also cross-members at the front that support and suspend the rocket tubes, and these slot into grooves in the front of the PE separators, although the rear will be free-floating, so make sure you keep them aligned until the glue has set. Highly recommended. Review sample courtesy of
-
2,000lb Bomb AN-M66A2 w/Conical Fin Assembly M130 x 2 (4459) 1:48 CMK by Special Hobby The AN-M66A2 bomb was a US made 2,000lb air-dropped bomb that could be fitted with different fin assemblies for various applications, and although it was a WWII era design, it carried on in service long after. The M130 tail assembly was conical type, extending the length of the completed bomb and increasing stability during flight. As usual they were fitted with two lugs at 30” centres, plus another on the underside that was positioned at the centre of mass. This set includes two such bombs as a combination of traditional resin casting and 3D printed parts. The main bodies where the explosive component resides as cast in grey resin, while the tail assemblies are 3D printed in light orange, attached to their printing base by several thin tendril-like support fingers that are easy to cut off and sand smooth. The bombs are attached to their casting blocks at the rear, so the cutting point will be hidden within the tail, so you don’t need to be too fussy with your razor saw. A tiny Photo-Etch (PE) fuse spinner is supplied with a spare on one tiny fret of PE, and these should be glued to the raised turret on the nose, and once the glue is dry, the blades should be tilted with your tweezers to give it the correct shape. Once basic painting is done in olive green, the stencils on the small decal sheet, and the yellow bands for the nose cone are applied, and as these decals have the same removable carrier film as Eduard’s, you should be able to peel it away once it is dry. How much weathering and scratching of the paint you do is then up to you. Conclusion No more than a few minutes’ work to put them together, and very nicely detailed ordnance to hang from your latest model. Highly recommended. Review sample courtesy of
-
MG3 Machine Gun Vehicle Mounted Variant x 2 (P35008) 1:35 Special Hobby This set from Special Hobby is part of a new range that is using direct 3D printing using light-cured resins, which is a technique that is rapidly becoming suitable for making realistic models, even at the budget level. These sets are being produced on more high-end machines, and no layers were visible to my eyes, even with magnification! It arrives in a standard blister pack with orange branding, and lots of foam within to keep the parts safe during transport. The instructions are in the rear, sandwiched between the blister and the card header. Inside is a single printed block of parts that are printed in a light orange resin with what appears to be a lot fewer support struts ensuring that the freshly printed parts don’t sag under their own weight before they are properly cured. The shape of the support block is designed to protect the two machine guns inside, as they are very delicate due to the finesse of the printed parts. Cutting them free must be done carefully, and they should be handled with great care once free. There are two types of vehicle-mounted weapons, one with a stock to be operated by a crew member, the other without, perhaps on a fixed mount or within a casemate. The detail on both weapons is superb, with all the shapes rendered to perfection, showing its MG42 heritage, including the tubular cocking handle, front and rear sights that are so fine that they could easily be knocked off. Ask me how I know. With careful handling and painting though, the results will be phenomenally realistic, even down to the twin slots in the muzzle and cooling cut-outs on the barrel jackets that are hollow, just like the real thing. Very highly recommended. Review sample courtesy of
-
P-40D Warhawk/Kittyhawk Mk.I ‘Four Guns’ (SH72367) 1:72 Special Hobby First flying before the outbreak of WWII, the Warhawk was a development of the P-36 Hawk, and although it was never the fastest fighter in the sky, it was a sturdy one that took part in the whole of WWII in American and Allied hands, with large numbers used by Soviet pilots in their battles on the Eastern front. The various marks garnered different names such as Tomahawk and Kittyhawk, so it can get a mite confusing if you're not familiar with the type. It was unable to keep pace with the supercharged Bf.109, but was used to great effect in the Far East and Africa, which may have assisted in the feeling that it was a second-string aircraft of inferior design, when this actually wasn't the case – certainly not to the extent inferred. It was robust, cheap to make, and easy to repair, although its high-altitude performance dropped off somewhat. The early marks were under-armed with just two .50 guns firing through the prop from the top of the engine cowling and a pair of .303s in the wings, but later models benefited from improved armament. The B model was a revision of the initial airframe with lessons learned from early production, self-sealing fuel tanks and armour in critical parts of the airframe, although this extra weight did have an impact on performance. The -D was a partial re-design, eliminating the nose guns, narrowing the fuselage and improving the cockpit layout and canopy. In British service it was known as the Kittyhawk Mk.I, but only a small number were made before the -E replaced it with a more powerful Allison engine, and an extra pair of .50cl machine guns in the wings bringing the total to six, but even that wasn’t sufficient to let it keep up with the opposition. It wasn't until the –F model that the Allison engine was replaced by a license built Merlin that gave it better high altitude performance and a sleeker chin. The Kit This is a rebox of a recent tooling from Special Hobby with new parts to depict this variant, and it arrives in a red/white/grey themed top-opening box with a painting of the subject after a brief but successful tangle with an Italian Macchi that has since developed a smoking habit. Inside the box are two sprues in grey styrene, a clear sprue that’s separately bagged, a tiny bag of two 3D printed parts, decal sheet with a small fret of PE in the same bag, and the A5 portrait instruction booklet printed on glossy paper in colour. Detail is good, with finely engraved panel lines, raised and recessed details around the airframe and a few spare parts that can stay on the sprues, which are marked with a red X on the sprue diagram. Construction begins with the pilot’s seat, which is mounted on a frame, then attached to the bulkhead and given a set of four-point decal seatbelts, after which it is set aside for a few steps. The fuselage sides are fitted with sidewall inserts, with sections further forward painted silver as they form part of the intake pathway, adding the core with three circular intakes inside, and the intake lip in front once the fuselage halves are together. The rear bulkhead with seat and the instrument panel with two decals for the dials are trapped between the two halves of the fuselage as it is closed, and for one decal option, the intake on the top of the cowling is shortened and the resultant hole should be filled with styrene strip or your filler of choice. A small triangular shape on the cockpit side is removed and smoothed over at this stage too. Moving on to the wings, the full-span lower has the perimeter around the bay openings painted, as are the side-walls that are glued in the recesses, and the roof that is moulded into the upper wing half. The cockpit floor is moulded into the centre of the upper wing, and that is also painted the same colour, so quite convenient while you have the paint out. The control column and another lever are inserted into the floor, then the wings can be joined to the fuselage, taking care not to ping the stick off as you do so. The wing-mounted machine guns will need some adjustment to correctly match the guns carried by the decal options, with three scrap diagrams showing the mixture of removal and/or addition that you will need to carry out for accuracy’s sake. The PE sheet will also see some action at this stage too, as it is used in the removal and reinstatement of a panel line in a different place to extend the gun bay panel lines. The elevators are each a single part that affix with the usual slot and tab method, with a separate rudder that can be posed deflected if you wish. The exhaust stubs are supplied as three paired inserts per side, and are far too small to drill out unless you have the world’s steadiest hands. There is more adjustment needed under the wing, filling the panel lines and spent brass chutes marked in red, and using another side of the template to scribe new panel lines as marked in blue. A raised section behind the ejection ports is sanded away and replaced by the 3D printed parts, but the adaptations don’t end there. There is a choice of two styles of pitot probe, the kit part used for just one, the other three requiring some alteration of the part. The end is cut away and a new L-shaped section is fabricated according to the measurements given in the scrap diagram, with all options inserted into the port wingtip. The last option is straight forward and involves selecting open or closed cooling gills behind the radiator housing. The main gear struts have an additional bracing leg fixed at the top, then the tripod arrangement is inserted into the sockets in the bay, adding the two doors to each side of the bays, and another two with a cross-brace in the tail bay and a single part strut/wheel to complete the undercarriage. You then have a choice of three loads under the centre of the fuselage, consisting of two types of fuel tank, or a bomb for ground-attack operations. Each option is made from two halves plus four braces for the fuel tanks, and two for the bomb. Flipping the model over allows the last step to be completed, fitting the coaming and gunsight into the cockpit and adding the windscreen with optional rear-view mirror, and the two side windows into the scalloped sections behind the canopy, which can be posed open or closed as you like it. Markings There are four options available on the decal sheet, two of which are British desert standard schemes, the other two are out of the ordinary. From the box you can build one of the following: Kittyhawk Mk.I AK578/GA-V, No.112 Sqn. RAF, North Africa, January 1942 Kittyhawk Mk.I AK51/CV-J, No.3 Sqn. RAF, North Africa, January 1942 P-40D Warhawk, Captured by the Japanese Army at Malaybalay base, Mindanao Island, Philippines, 1942 P-40D Warhawk, 79th Pursuit Sqn., 20th Pursuit Group, Hamilton Field, USA, Autumn 1941 in temporary wargames markings. The decals appear to be printed by the same process that Eduard use, and are in good registration, sharpness, and colour density, with a thin gloss carrier film cut close to the printed areas. I mention Eduard because from 2021, the carrier film on their decals can be coaxed away from the printed part of the decal after they have been applied, effectively rendering them carrier film free, making the completed decals much thinner and more realistic, and obviating the need to apply successive coats of clear varnish to hide the edges of the carrier film. It’s a great step further in realism from my point of view, and saves a good quantity of precious modelling time into the bargain. Conclusion The P-40 is an interesting aircraft, and played some important parts in WWII, as evidenced by the number of notable pilots that gained their reputation in this doughty fighter. This is a well-detailed kit of a short-lived variant, and has some interesting decal options that make it an appealing prospect, bearing in mind that for improved accuracy, you’ll need to make a few minor amendments to the plastic. Highly recommended. Review sample courtesy of
-
DB-8A/3N ‘Outnumbered and Fearless’ (SH72465) 1:72 Special Hobby Designed and developed by Northrop as the A-17, the aircraft was a ground-attack type that initially had fixed gear, but was later given more modern retractable undercarriage to improve aerodynamics. Powered by a Pratt & Whitney Twin Wasp engine, it had a crew of two and could carry up to a ton of bombs in a small vertical bomb bay, and on a pair of racks under the centre wing section. They were built in small numbers for various customers, with fewer than 400 made in total, the US Army Air Corps. taking delivery of the initial batch, and a number of foreign operators including the French, although their airframes were diverted to other customers after the fall of France. By this time Northrop had been taken over by Douglas, hence the D at the beginning of the aircraft’s designation. The Netherlands took delivery of eighteen airframes that were designated DB-8A/3N with a more powerful 1,100hp R-1830 engine, but the British assessment of the type as “obsolete” was pretty much on the mark. In Dutch service they were pressed into service as a fighter aircraft despite being poorly suited to that role, but in the absence of better options, the pilots were forced to make the best of it, fighting bravely against the Nazi invaders. When the invasion began, a squadron were on duty, and all but one managed to get off the ground to face the enemy. Most of them were shot down by the more agile Bf.110s and Bf.109s, although they did manage to shoot down a few transport aircraft of the enemy before a few returned to base, where the remaining aircraft were rendered unusable by further attacks by the enemy. Their numbers were effectively reduced to zero by the end of the first day, with the Netherlands being completely over-run a few days later, on the 14th of May 1940. The Germans took an airworthy airframe, probably from the stored aircraft, repainted it with German markings and assessed it after transporting it back to their homeland. The very last A-17 was struck off charge in the US in 1945, after a short career as a coastal patrol hack. The Kit This is a reboxing of a kit from the Special Hobby stable from the early 2000s, as is evidenced by the shiny surface area of the external parts, and time has been kind to the moulds, with little in the way of flash, and two pairs of fuselage halves, engines and cowlings showing that there have been other versions in previous boxings, although the fixed, spatted wheels of the initial A-17A aren’t present. The kit arrives in a top-opening, blue/white/grey themed box, and inside are two sprues of grey styrene, a clear sprue in a separate Ziploc bag, a large resin belly insert in another Ziploc bag, the decals and Photo-Etch (PE) in a re-sealable clear foil bag, and the instruction booklet, printed in colour on glossy paper in portrait A5 format, stapled down the spine. The sprue diagrams on the inner front cover have red Xs on parts that aren’t used in this boxing, although the two fuselage halves aren’t even present on the diagram, possibly due to a lack of space on the page. Construction begins with the cockpit, starting with the seat, which has an inverted-U support added to the rear, and PE seatbelts over the pilot’s lap. The front cockpit is separated from the rear, and this flat rectangular part has a rear bulkhead, control column and a small instrument package on the floor in front of it. The rear cockpit consists of a tapering floor, and a trough in the rear of the area with half bulkhead and a rack of boxes fitted to the front. This and another box are inserted into the rear cockpit and are joined by the rear gun on a semi-circular pivot, showing the correct orientation that includes the instrument panel with decal at the front, all from the side with arrows showing their part numbers. The gunner’s seat also has a pair of lap belts, and it is dropped into position in the rear, separated from the pilot by a curved cowling, which is installed as the fuselage halves are joined together, creating two separate openings for the crew. Once the glue has cured and the seams are dealt with, the centre section of the lower wing with its smoothly dished wheel bays and perforated dive flaps moulded-in. The open space between these features is covered over with the resin insert that depicts the bomb racks and aerodynamic fairing that extends around the rear of the gear bay cut-outs. The upper wings are full-span, and fix to the visible portion of the centre lower section, and are completed by the outer lower panel, giving a strong, overlapping joint to the wings. The elevators however, are butt-joints and would benefit from being pinned in position with some brass rod, which should be relatively easy because each elevator is a single part. A small square insert slots into the leading edges of the root once the glue has cured. The engine is next to be installed, having been built up earlier in the instructions. The Twin Wasp engine is moulded as a single, well-detailed part that depicts the front of the engine, and is trapped on a ledge in between the two cowling halves after painting the interior aluminium. It plugs directly into the tapered flat front of the fuselage, and has an intake added to the top of the cowling as it rolls down toward the lip. The canopy is a single part, and is glued over the two crew stations and the separating fairing, adding a tubular gun sight on the deck in front of the cockpit, and a tall aerial is later fixed to the centre of the canopy. Under the fuselage, two exhaust stacks project from the cowling sides, and an intake is added into the gap between the gear bays. Further back, the bomb racks each have eight triangular shackles fitted into shallow grooves in the resin, then it is time to build the landing gear. The main struts are inserted into holes in the outer end of the bays, and the two-part wheels are fitted to the short axles perpendicular to the strut, while the tail wheel is attached to the yoke in the rear, with a single wheel part slotting onto the axle. While the model is inverted, the clear window and fairing under the gunner’s area is attached to the fuselage, leaving the centre section clear, but it would be sensible to paint the interior with the blackest black you have to hide the fact that the window goes nowhere. The last job is to fit the three-blade prop that is moulded as one part, with the optional spinner that is used on three of the four decal options, the four gun barrels in the leading edge of both wings, and the pitot probe in the port wingtip. A tiny part is also fitted to the starboard fuselage side behind the engine cowling. A rigging diagram shows three wires in total, two of which lead to the wings just in front of the ailerons, and a third that leads from the starboard wire to the base of the aerial mast, leading back to the radio in the cockpit. Markings There are four options on the decal sheet, three in service of the Dutch Air Force, one in captivity following the fall of the Netherlands. From the box you can build one of the following: No.390 (C/N 540), 3_V-2 Luchtvaart Regiment, Militaire Luchtvaart, 1940, responsible for shooting down two Ju-52 transports before being shot down. No.382 (C/N 532), 3-V-2 Luchtvaart Regiment, Militaire Luchtvaart, 1939 No.382 (C/N 532), 3-V-2 Luchtvaart Regiment, Militaire Luchtvaart, 1940, responsible for shooting down a Ju-52 transport before being shot down. KK+UI ex-No.394 (C/N 544) Captured by the Nazis & tested at Erprobungsstelle Reichlin, Germany in June 1940. The Orange Triangles with black outlines were painted after delivery to indicate that the Dutch machines were neutral, as the original roundels that were applied by Douglas at the factory could have been mistaken for British or French roundels. Not that the Nazis cared in the end. The decals appear to be printed by Eduard and are in good registration, sharpness, and colour density, with a thin gloss carrier film cut close to the printed areas. I mention Eduard because from 2021, the carrier film on their decals can be coaxed away from the printed part of the decal after they have been applied, effectively rendering them carrier film free, making the completed decals much thinner and more realistic, and obviating the need to apply successive coats of clear varnish to hide the edges of the carrier film. It’s a great step further in realism from my point of view, and saves a good quantity of precious modelling time into the bargain. Conclusion Not a well-known aircraft type, but this boxing pays homage to the brave Dutch pilots that took to the air knowing they were both outnumbered and flying an out-dated machine, probably to their doom. Outnumbered and Fearless sums it up well. Detail is good, and the application of some modelling skill should result in an attractive replica of this aircraft. Highly recommended. Review sample courtesy of
-
Messerschmitt Bf.109E-1/B ‘Hit & Run Raiders’ (SH72474) 1:72 Special Hobby With almost 34,000 examples manufactured over a 10-year period, the Messerschmitt Bf.109 is one of the most widely produced aircraft in history and it saw active service in every theatre in which German armed forces were engaged. Initially designed in the mid-1930s, the Bf.109 shared a similar general arrangement with the Spitfire, employing monocoque construction and a V12 engine, albeit an inverted V with fuel injection rather than the carburettor used in the Spitfire. Initially designed as a lightweight interceptor, like many German types during WWII, the Bf.109 evolved beyond its original brief into a bomber escort, fighter bomber, night fighter, ground-attack and reconnaissance platform. The E variant, or Emil as it was more affectionately known was the first major revision of the original design, including an uprated engine and the attendant strengthening of the airframe that was required. It first saw service in the Legion Condor fighting in the Spanish civil war on the side of Nationalist forces of Military Dictator Franco, and then in the Battle of Britain where it came up against its nemeses the Supermarine Spitfire and Hawker Hurricane during the critical fight for the survival of the RAF and Britain, which was key to halting Operation Seelöwe, the invasion of Britain by the Nazis. Like the Spitfire it fought against, it was improved incrementally through different marks, the Emil was similarly tweaked to keep pace, with later variants having additional long-range tankage, plus structural improvements and a simpler squared-off canopy with clear frontal armour, but apart from various field modifications and a few low-volume sub-variants, it had reached the end of its tenure, and was phased out in favour of the Friedrich and later the Gustav. The Kit This is a reboxing of a recent kit in collaboration with Eduard in your favourite scale of 1:72. It arrives in a modest top-opening box that has the usual red/white/grey theme, and inside are two sprues of grey styrene, a clear sprue, a bag of resin parts, decal sheet and the instruction booklet printed in colour on glossy paper, with profiles for the decal options on the rear pages. Detail is excellent, especially for the scale, and includes a lot of engraved panel lines and rivets in various thickness and depths, as well as all the other recessed and raised details, plus engine and gun bays that you can expose as we’ve come to expect from Eduard and Special Hobby. Construction begins with the cockpit floor, adding a bulkhead at the front along with the rudder pedals. The sloped aft bulkhead is attached to the rear, and a box is made up in front of the bulkhead from three parts with details moulded on the sides. The seat and decal belts are slotted into the rear of the cockpit, and the instrument panel is made from a detailed styrene backing part, which receives two dial decals to finish it off. It is then glued to the nose gun bay floor, which is painted up and attached to the front of the cockpit on top of the boxed in area. You can use a pair of barrel stubs on a cross-bar for the closed bay, or the full guns with breeches if you intend to leave the bay open. The engine is built around two halves, adding the serial decal and removing a small block of styrene from the rear before you add the ancillaries, supercharger and bell housing with horseshoe oil tank at the front, plus the two mounts and their braces on the sides. Before closing the fuselage halves, the cockpit interior sides are detailed with styrene extras, painting things as you go along, then a pair of inserts are positioned in the cowling behind the exhausts, the exhausts are inserted through their openings, and the engine, cockpit and tail-wheel are all trapped between them. If you plan on closing all the bays, the main and gun bay cowlings can be glued in place along with the filter for the supercharger. At the rear, the rudder, elevators and their support struts are all installed on tabs and pins into their respective holes to ensure they are oriented correctly. The lower wings are full span, and the gear bay wall and roof surfaces are painted RLM02, also painting, then installing the radiators and ducting of the chin intake. The upper wings are brought in and glued over the lowers, and the three-section flying surfaces are installed on each trailing edge, with radiator fairings added after painting the interior and adding decals to the front and rear faces of the radiators to depict the matrices. The fuselage and wings are brought together, adding the leading-edge slats, which should be deployed under their own weight when parked. The canopy can be posed open or closed, consisting of a fixed windscreen and rear section that accepts the antenna, then the canopy opener is prepared by inserting a choice of two styles of head armour inside, and deciding whether to glue it closed or open to the starboard side, held in place by a retaining strap of your own making if you feel adventurous. The prop blades are moulded as one, and are sandwiched between the spinner and back-plate and inserted on the axle at the front of the fuselage, then all that is left to create are the main gear legs. Each leg is a single strut, adding the captive bay door, and of course the wheel onto the short cross-axle. Another scrap diagram shows the correct orientation of the assemblies once complete. Fitting a pair of horn balances on the ailerons, and an L-shaped pitot probe under the port wing completes the plastic wrangling, leaving the resin palette and four bombs that each have four “screamers” fixed to the fins before they are glued to the underside of the fuselage with the assistance of a grey outline on the final diagram. Markings There are three options included on the decal sheet with variations on the early war high demarcation scheme, having custom mottle or overspray pattern differentiating them. From the box you can build one of the following: Black 8, 5./JG77, Pilot Uffz. Heinrich Brunsmann, Almyros Airfield, Mainland Greece, April 1941 Yellow 10, II./JG54, occupied France, October 1940 Black Triangle+G, 2./JG27, occupied France, November 1940 The decals appear to be printed by Eduard and are in good registration, sharpness, and colour density, with a thin gloss carrier film cut close to the printed areas. I mention Eduard because from 2021, the carrier film on their decals can be coaxed away from the printed part of the decal after they have been applied, effectively rendering them carrier film free, making the completed decals much thinner and more realistic, and obviating the need to apply successive coats of clear varnish to hide the edges of the carrier film. It’s a great step further in realism from my point of view, and saves a good quantity of precious modelling time into the bargain. Conclusion A great collaboration, and the additional resin makes for an interesting model. You don’t see too many 109s carrying bombs. Did I mention the detail is excellent? Highly recommended. Review sample courtesy of


