Search the Community
Showing results for tags 'Italeri'.
-
I seldom do another entry, and actually was planning to join the A-10 GB next door, but I still have problem on my research for the subject I want to build. But right when digging up my stash, I found this; As you can see, the box was mangled and at first I suspect some of it's part missing... But when I took out the content, everything looks complete Seems like this one is a survivor Being it's an Italeri, I check whether it depicting Vietnam era airplane, which it is... So this would be my second entry. Cheers, Mario
-
Introduction This thread was started intending to unite those interested in building the Fiat 806 based on thorough research and photogrammetry. See also the great Fiat 806 Gangshow build album. In the current thread there will be (at least I hope people will post) extensive research on the original car, photographs, drawings, literature and archives. Beside that the thread will feature scratchbuilding progress based on the findings. Perhaps in the future there could be exchanges of resin molded scratch parts, just like Vontrips kindly did with the tyres (for example: body panels / grille?) Index To start off I have gone through all of the Gangshow topic and I indexed all knowhow (see end of this post). Best way to use it: click a link, go back and click the next link etc. Or open the links in a separate browser tab. Each link represents one post only, so it's better to only read that post, come back to the index and click the next link. The index was created having in mind those who are about to work on a certain subject, such as the steering wheel. For the index, see end of this opening post. Visual reference material First a legal disclaimer. All images are used for educational and referential purposes. Copyrights lie with the copyright holders. Centro Storico Fiat is probably the original copyright holder of many of these images. Centro Storico's website can be accessed here and here. It has a Facebook page here. Be sure to have a look at their great collection of photos of classic Fiat and Lancia cars. Centro Storico also has frequent Twitter updates featuring photographs, see here. Drawing 6 was found here. All copyrights of the photos / screenshots 10-19 lie with Cinecitta Luce. My presentation of the low-definition photos on this forum is just for reference and educational purposes, for the purpose of a hobby. I do not have a corporate license for the use of these images. If at any point in time Cinecitta Luce wishes these pictures removed I will remove them upon first request. The pictures are not to be reproduced on another website or another written work. Please, all, respect Cinecitta Luce's copyrights. Their website is to be found here. All rights to Photo 9 lie with Fotogeca Gilardi, see here. There you can inquire about the cost to purchase a license of a full-scale version of Photo 9. Important: some pictures, such as Photo 1, Photo 2, Drawing 2, Drawing 3 and Drawing 6, are larger than shown here. To enlarge, right-click on the picture and choose 'open new tab', then click on the picture on the new tab. Update 31 July 2018: there are now so many pictures in this post that it's very difficult to navigate. To restore overview I left out several images that are less important. 28 out of 67 images remain. All images are still available for download here. Photo 1AAA Photo 2 Photo 3 Photo 28A Photo 4B Photo 6B Photo 7F Photo 8B Photo 9 Photo 10 Photo 12 Photo 17 Photo 21 Photo 23B Photo 24 Photo 25 Documentary These are the contents of the documentary (references in this overview), insofar most relevant for the Fiat 806. A full transcription, with correct chronology, is to be found here. 01:01 - Fiat 806 (#15), front view, being cleaned. Grille shape, car width, front wheel camber, steer linkage, tyre width, manual crank opening position, suspension position, metal wind shield are shown. No number '15' visible on radiator or bonnets. No dent (compare photo 9) visible. There is symmetry in bonnet bulges. 03:14 - Fiat 806 (#15) is pushed toward the start line, for the start of heat 2. All numbers '15' have been applied. There is no dent in the radiator housing. Moments after this video was filmed, Photos 4 and 10 were taken. 03:22 - Fiat 806 (#15) is seen from the left, close-up. The 'rear wheel louvres', exhaust pipe-to-body connector, steering wheel, seat (with rain cover?), gas cap, left hand body lining, glass window, mechanical windshield and rear number '15' are seen up close. 05:12 - Close-up of the Fiat 806 (#15). The left bonnet and part of the '5' is seen. There is a rain cover over the glass window. 05:15 - Low side view of the Fiat 806 (#15). This is the lowest view we have of this car to date, which makes it very valuable to assess the height of the wheels in comparison to that of the body. This is final proof that the body was indeed significantly lower than Drawing 1 and the kit would imply. Left to the Fiat, there is the Bugatti 35C (#24) driven by Aymo Maggi. Only one umbrella is up so there can't be too much rain at this point. 05:22 - The start of the final heat. The Fiat 806 is gloriously captured spurting away. Two days ago someone said in this thread 'what I'd give to have seen this care race'... probably this is as close as we're going to get at that. It is great to be able to witness this wonderful day in September 1927. For our research this scene is relevant mainly because Bordino steers his car a bit, so that it is seen from different views - in ONE camera shot. That is very fortunate. 05:41 - At Curva Sud, the Fiat 806 is seen in first position. 07:07 - Fiat 806 is seen up-close, from the right side this time. The glass screen is now very well seen. Also the tyre pattern, for example. The metallic windscreen is seen as well. Drawing 1A Drawing 2F.1 Drawing 2F.2 Drawing 3 Drawing 5 Drawing 6 Engine Drawing 1 Engine Drawing 2 Engine Drawing 3 Engine Drawing 4 Engine Drawing 5 Engine Drawing 6 The hereunder index is updated up to & including: November 10 2016 BODY AND GRILLE - Hood hinges, see also here and here and here and here and here - Replacing the louvres, see also here and here and here and here and here and here and here and here and here - Grille color, see also here - Body color, see also here CAR GENERAL SHAPE RESEARCH, INCLUDING PHOTOGRAMMETRY - General body shape photogrammetry, see also here and here and here and here and here and here and here and here and here and here and here and here and here and here and here and here - Comparing two photos, see also here - Body should be lower (and other changes), see also here and here and here and here and here and here and here and here and here and here and here and here and here and here - Grille changes, see also here and here and here and here and here and here and here and here and here and here and here and here and here and here and here and here and here and here and here and here and here and here and here and here and here and here - Cutaway drawing accuracy, see also here and here[ and here CHASSIS, FRAME AND SUSPENSION - Amending springs, see also here and here and here - Turning dampers, see also here and here GENERAL KNOWLEDGE ON CAR AND TECHNIQUES - Colors, steering wheel, windscreen - Engine, radiator, grille - Color of rails, see also here - Photos of pre-war race cars details, see also here - Article about vintage car paint, wired wheels et cetera - 3D-printing, see also here and here - Upcoming 1:1 Fiat 806 replica? ENGINE - General engine corrections, steering idler arm correction, see also here and here and here - New filler cap - Engine sump, see also here - Casting engine covers, see also here and here - Spark plugs, see also here and here and here and here - Plug leads and wiring, see also here and here and here and here and here and here and here and here - Fill certain gaps?, see also here and here and here and here - Correcting cylinder head ends - Correcting PVC tubes, see also here - Collector tubes?, see also here and here and here and here and here - Correct stand 121D - Valve springs EXHAUST - Exhaust issues - Color of exhaust INTERIOR, EXCEPT STEERING WHEEL - Gear shift - Instrument panel: turning gauge bezels, see also here and here and here STEERING WHEEL - Steering wheel boss replacement, 12 or 16 holes in wheel, see also here and here and here and here and here and here and here and here and here and here and here and here - New spokes - Transparent part, see also here and here and here and here and here and here and here and here and here and here and here and here and here - General steering wheel amendments, see also here Ignition timing lever and brodie knob, see also here and here and here and here and here and here - Steering column, see also here WHEELS AND DRUM BRAKES - Spoke count, see also here and here and here - Respoking and nipples, see also here and here and here and here and here and here and here and here and here - Spoke color - Drum size photogrammetry - Comparison Protar and Italeri wheels - Color of drum brakes and wheels - Creating a mold - Newly cast tyre, see also here and here - Replacement drums, see also here and here and here and here and here - Adding cooling vents to drums and here
-
 This build is of the Short Stirling MG-V W7445 based at RAF Oakington, that on Sunday 15th November 1941 eventually came to rest after just missing my Grandfather’s farm house at Westwick Farm, Westwick, with the wing then clipping another house close by leading to the Stirling crashing into the Orchard field on the opposite side of the road to the farm house. The two aircrew that my Grandfather rescued were Sgt A.J. Ansell R.A.F. and Sgt W.D. Topping and my Grandfather was awarded the British Empire Medal (Civil) for his heroic actions. My plan is to then create a Diorama with the Stirling backed by a LNER D16 locomotive and carriage that is captured in the photograph on the railway line between RAF Oakington and my Grandfathers farm. I'm 100% sure that W7445 was the first Stirling to be fitted with the Fraser Nash NN7A dorsal turret making it a Mk1 Series III. This isn't going to be Ia quick build😄👌 https://postimg.cc/CdpNHPSNI https://postimg.cc/T5QdSLZc https://postimg.cc/N2QGp7PM https://postimg.cc/YGKCmw6QII https://postimg.cc/nXmGv4XL https://postimg.cc/dD0RWPhp https://postimg.cc/kDD8QQZd
- 85 replies
-
- 11
-

-

-
- ShortStirling
- Italeri
- (and 1 more)
-
Bought this Tornado at a charity event. Thought I will build it out of the box, no pressure to detail, no PE, no fuss. Since my order for the pilots and decal are on the way from UK, I might as well start the build. The details of this old kit contrasted so much to newer ones like the Eduard desert babe in my stash. Building this kit brought back memories of those long long time ago days when I was still much younger. Simple cockpit assembly.
-
This purchase started out as a way to use the spare tyres from my MX5 project and escalated into being part of a set (maybe a diorama... ) along with the Aoshima Brian James Trailers A4 Transporter and the mystery side project that won't be getting a WiP. I've split this and the trailer into separate threads because, from conversations I've had on here and reading @Anteater's WiP, there are going to be some 'challenges'. The tyres I modelled for the MX5 are about 32" and so I'm going to need a 2" lift kit to get clearance on the Rangey. As the OOB chassis seems to be the cause of most of the problems, I'm going to model a new one that hopefully fixes the issues and has separate suspension components, so I can offer it as a 'fix kit' with standard or lifted ride height. So I've started this kit by doing the absolutely most important thing... WHEELS! The OOB ones are pretty rudimentary and probably 15in (might be 16in, I can't remember), which won't cut it as the MX5 tyres are for 17in wheels. I was thinking of what would be a sensible aftermarket wheel for an early 70s 4x4 and decided the only way to go is steel 8 spokes. So I knocked one up. Because the original Rangey wheel has a very pronounced centre, I did a bit of research into series 1 hubs. From what I can see, they're the same as Land Rover ones, which makes sense. The 8 spokes are flat at the fastening point, so I modelled front and rear hub 'protrusions' that can be added as appropriate. I also did separate tyre valves, 'cos they're really hard to paint. I left the wheel nuts as part of the main wheel because it makes for a stronger component overall. I had a bit of a revelation when I painted the wheels, because I used a black base instead of white, which is what I generally throw under silver to make it 'brighter'. This is ProScale Paints Z-Tune Silver (I think) and using the black really helps with definition in the finished wheel by making the shadows darker. Makes sense, really. Don't know why it hadn't occurred to me before. Here's a final photo of the new wheels and tyres against one of the OOB items. I will paint the wheel nuts and there will hopefully be all kinds of weathering going on by the end of this build. Thanks for looking! I'd probably give it a couple of months before coming back... although I might put the interior together... I need to do that so I can model the new chassis. It's not going to be a quick one, though. Cheers! Martin
- 62 replies
-
- 17
-
-
-
Hi all and dropping in the Danger Zone with this one, the classic 'black jet-AKA-bad-guys' Mig 28 from Top Gun. Will be OOB build of this one Italeri F-5F Tiger, - pictures (and more cheesy script) from the movie to follow later. Good luck with your builds. All the best, Dermot
- 12 replies
-
- 17
-
-
- Classified
- Top Gun
- (and 1 more)
-
 First Italeri's aircraft announcement for 2025. A reissue with new decals expected in late December 2024. - 1/72nd - ref. 1476 - Sikorsky HO4S-3 /HAS.7/H-19 Chickasaw Source: https://www.martola.com.pl/en1878/produkty118587/sikorsky_ho4s_3__has_7_h_19 V.P.
- 209 replies
-
- 18
-
-

-
-
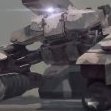
The TKS is almost finished, so it's time to start the next project. I've decided to work on the gun truck I got a few months ago. For more detail I got the resin/PE detailing kit made by Legend Productions: Sprues: Detailing kit: See you soon.
-
Evening folks! Now I know what everybody's thinking..... "What's Quack been up to?"🙂 "Where's Quack got to these days?" 🙂 No?? Oh dammit, I'll tell you anyway! Well my last posts here were a WIP on the 1/48 Canberra PR.9 but it got rather bogged down in a sad boggy sort of way, so it has been placed on the Naughty Shelf in the hope that some kindly shoemaker-type elves work their magic and sort the problems for me....or I get the mojo back, whichever is soonest. Instead, I was forced to beg Colin, the Lovecraftian Nightmare that guards the Stash Cellar here at Quack Towers, for a new project. He was surprisingly obliging .............(or probably just drunk - the stash is kept in the secure vaults along with Quack Towers' large supply of fine wines and Toilet Duck) and he lobbed me the Italeri 1/48 Hawk T1a. Now I recall this kit fondly. This was actually the first build I made when I restarted the hobby some years ago, and it won first prize in the "Point and Laugh" category when shown at our local Club. I thought I'd have another go at it - It's a kit with nostalgic memories, of a plane with yet more nostalgic memories. I used aftermarket decals for XX162 which was attached to the RAF School of Aviation Medicine, where I spent some time in the early 90's. Cockpit details are Eduard etch, salvaged from the earlier build, and it has a Master pitot. Seats are Quickboost (I think... ) Paints MRP with Aquagloss varnish. Base is the old one from Coastal Kits) and the unit badge came off my old flying attire. Anyway, enough of this nonsensical wittering, let's see some pictures...rubbishy pictures taken on my phone. Apologies. 20250525_105851 by Dr. Quack, on Flickr 20250525_105802 by Dr. Quack, on Flickr 20250525_105634 by Dr. Quack, on Flickr 20250525_105605 by Dr. Quack, on Flickr 20250525_105553 by Dr. Quack, on Flickr 20250525_105544 by Dr. Quack, on Flickr 20250525_105529 by Dr. Quack, on Flickr 20250525_105502 by Dr. Quack, on Flickr 20250525_105406 by Dr. Quack, on Flickr ........ and finally, on the shelf in Quack Towers. 20250525_110045 by Dr. Quack, on Flickr Oh and the access ladder is from Flightpath. Next on the bench is an Airfix EE Lightning F6 .......but don't worry - it'll be some time before it assaults your senses here. That's all from me - now move along to something interesting. Q Keep Calm and Mangle some Plastic.
- 7 replies
-
- 39
-
-
-

-
- Its A Hawk
- and its black
- (and 1 more)
-
Evening all. I'd like to join the fun with Italeri's reboxing of ESCI's little Cessna in the markings of D-ECJB. This was the rented 172P which, on 28th May 1987, took off from Helsinki piloted by Mathias Rust on his way across the Soviet Union to land in central Moscow and cause ripples throughout Soviet political and military circles. Not to mention the sensation his flight caused in worldwide media. Anyway, here's the kit. Its simple enough but I think the devil is in the surface detail with this one. I'll probably get rid of the overscale rivets and fill the Matchbox trench-type panel lines. There are a few other things I'd like to improve but we'll see how things go. Phil
-
 My first kit completed this year - AV-8S (VA-1) Matador, 1:72 Italeri (ex-ESCI). My 5th Harrier so far! Built out of the box (except for Pitot tube from Master, resin ejection seat from Pavla and some scratch). Italeri's kit is old and needs some work, but I'm quite happy with a result. Thanks for watching!
- 39 replies
-
- 119
-
-
-
-
Hello. Here is my Italeri 1:72 Junkers Ju 188A-2 U5+KH, of 1./KG2, Luftwaffe, based at Bron, Lyon, France, autumn 1944. I completed this kit in 2005. The cockpit was incorrect so I scratchbuilt a new one. The top turret interior was also modified as that of the kit was more correct for the Ju 188E/F variant. The exhaust flame dampeners came from a scrapped Dragon He 219, if I recall correctly. Several other details were added. The main scheme was painted with an airbrush. Decals came from a Begemot sheet. Thanks for looking and, as always, all comments are welcome Miguel
- 22 replies
-
- 63
-
-
-
 Just completed another in my current obsession for 1/9 scale racing motorcycle models. This is Italeri's version of Valentino Rossi's 2003 Valencia livery in 1/9 scale and is a superb kit. I don't know why they have discontinued it but they shouldn't have, and if you are a motorcycle modeller I would heartily recommend trying to get hold of this kit. If it didn't say Italeri on the box you'd suspect it was from Tamiya. Anyway, here it is, painted using Windsor and Newton acrylic with Golden airbrush medium (liberated from my wife's art stock!) as my paint box didn't have any luminous colours! Decals are by Cartograf and are very large and fragile, although any shortcomings are all mine and not the kit's fault.
 -
Italeri is to release a new tool 1/48th Lockheed-Martin F-35B Lightning II kit - ref. 2810 Not a bad news considering the only other available 1/48th F-35B kit is the Kitty Hawk one. Now we'll just need a better F-35C. Source: https://www.italeri.com/uploads/news/AY8p8Mc4VebT1GVJ5SVhR0wRFuvMlyG6nbu5dgSD.pdf Box art V.P.
-
Hello there. My latest build - an Italeri 1/32 F-104G from the Danish Air Force in the 70’s, build as my entry to the F-104 GB here on BM. And no, it’s not a post shading session gone wrong. The Danish fighters of that era weathered heavely due to fragile paint. It’s the Italeri kit build almost OOB except for a resin jet nozzle, a metal pitot tube and decals from Stoppel Decals. I closed everything up, as i think the weathered paint scheme is interesting in itself. It’s only my third 1/32 kit, but i really enjoy paint an weather on a larger surface. I’m quite happy how it turned out, so i hope you will find it interesting as well. Thanks for stopping by.
- 26 replies
-
- 73
-
-
-
-

-
-
Well, after totally ruining my 3 month build of the Italeri Alfa Romeo 8C 2300 Monza (see below), it's got hidden away in a box until I can pluck up the courage to look at it again without crying. I've decided instead to have a go at spoiling a different Alfa kit I have in my stash instead, an Alfa Romeo 179C. This next build will probably be of the 179C that was driven by either Mario Andretti or Bruno Giacomelli back in 1981. My original plan was to have an Alfa Romeo racing car from the early days and one from nearer to today. Unfortunately, due to my ham fistedness with an airbrush and unfortunate accident with a Q-tip (do NOT ask!), its now just going to be the later car! As per usual, I'll be totally ignoring the order of build as advised in the instructions and so will probably end up with lots of containers all awaiting detail painting! I'll be using Zero Paints to apply the finishing colours but first a lot of research has to be done as I'll probably be adding and amending parts as I go along if the 8C was anything to go by! Build progress photos to follow - when I actually do make some progress!
-
Fancied a change from my usual WW2 dioramas, and attempted a motorcycle model for the first time in years! Just finished this excellent 1/9 scale MV Agusta from Italeri. Probably a reboxed Protar offering from years back but very good nonetheless. The seat lacked texture and the real thing was quite a thick creased leather, so I added some tissue paper to replicate this. Most of the chrome was removed using bleach. All chassis parts/engine/wheels etc. were painted using AK's excellent Real Colour marker pens, which is more like colouring in than painting! Bodywork sprayed with Tamiya Italian Red and BMW met grey rattle cans. The fairing isn't attached yet so may look a bit 'droopy'.
- 10 replies
-
- 20
-
-
-
 Hello all, Here is my take at the Italeri Macchi C.205, which is quite a nice little kit. Typical Italeri material, in the sense that the plastic is rather soft (so easy to work with), fit is poor in places (requiring some filling and sanding) and the level of detail is average to pretty good. Construction was mostly out of the box, with just a few Eduard PE parts (designed for the Hasegawa kit) added in the cockpit and gear wells. Also added were a Quickboost air intake and vacform canopy/windscreen from Falcon. I wanted to build my Veltro in the original delivery scheme of "Nocciola Chiaro 4" over "Grigio Azzurro Chiaro 1", so I mixed some Tamiya paints to get the look I wanted. The black and white identification bands are also all airbrushed. Weathering was completed with oils and pigments. I used a set of Tigerhead decals for this build, not including this particular airframe though but an Egyptian aircraft in different livery. I am not convinced that the roundels are the correct size, especially those on the wings, and the arabic numbering is not entirely accurate either. The "K" characters are from the spares box. All in all, I am more than happy with the end result though. Credits background picture: Freepik https://www.freepik.com/free-photo/beautiful-hay-field-country-side_17240056.htm#page=2&query=open field distant mountains&position=5&from_view=search&track=ais Thanks for looking, comments always welcome! Cheers, Patrick
 -
I intended to build this kit box stock, as an antidote to having to scratch build everything. Here are the bits that aren't OOB.... I always try to make something out of the correct material, because there's no better way of getting the right colour and texture. for example aluminium. I hate painting leather, so this is the first change to the stock build... I found some thin, stretchy black leather Deepened the grooves in the seat and covered it with two pieces, glued incrementally into each crease with CA. I tested the CA on the leather first, as I have had it bleed through and ruin it. Here's the back side which will be hidden (thankfully) (Edit) And then I found this photo, with a different seat cushion. Ho hum. Next to fall victim were the brake drums. As they're round, I can turn them on a lathe AND use the right material (aluminium) Spot the new one! The exhaust tube walls are too thick, so I used brass tubing, first to make a collar to locate the new tube and then the end itself. Normally I'd replace the whole thing, but then this kit is being built box stock.... That'll do for now....
- 4 replies
-
- 8
-
-
-
- italeri
- Bugatti T35
- (and 1 more)
-
These are a few recent builds of 1/72 scale Typhoons. All carrying Centenary celebration schemes. 29(R) Squadron Centenary Typhoon FRG.4 ZK353. ZK353 was marked with Typhoon Display Team corporate logos as well as commemorating 100 years of 29(R) Squadron. The aircraft was flown throughout the 2015 display season 6 Squadron Centenary Typhoon FGR.4 ZK342. In 2015 ZK342 recieved a scheme to commemorate the centenary anniversary of 6 Squadron. The tail and spine were covered in a desert camo scheme representative of that worn by the unit when operating Hurricanes during WWll Xl(F) Squadron Centenary Typhoon FGR.4 ZJ925 In 2015 ZJ925 was painted in a scheme to commemorate the Centenary of XI(F) Squadron. The tail and spine was black with gold squadron Crest and carried the code DXI. The aircraft was used on normal operations and also deployed on exercise to Kenya and Turkey
- 10 replies
-
- 23
-
-
-
I don’t anticipate this being a very long or detailed thread, but not having built an Italeri kit for a few years I wonder what people’s views are on their quality and accuracy today? Please don’t assume that I am expecting such accuracy that a completed kit looks exactly like a reduced in size actual subject, I understand there are limitations posed by scale eg thickness of trailing edges, but are Italeri kits such that from a reasonable distance they pretty much look like the subject? The two kits I have are their F-35b and S-55 Chickasaw, the former a fairly recent tooling and the latter a 2000 kit reissued, presumably from the original tools. I intend to make the Chickasaw (Whirlwind in UK) in Austrian Air Force livery. I’m not afraid of a bit of sanding, filling, and cutting to correct gross errors!
-
Finally getting around to posting some photos of the completed Volvo FH-16 Globetrotter XL. The model has been completed as a fantasy truck for Subaru Rally Team Australia. A detailed wip thread can be found here for those that may not have seen it. The model is completed with Tamiya spray cans, has a resin right-hand dash and spare Tamiya Subaru Impreza WRC decals for the livery. This is my first truck build and I found it an enjoyable challenge. Lots of parts with aspirational fitment called out in at-times vague instructions. The end result was pretty much what I hoped for so very happy overall. The inspiration for the model was a photo of a transporter hauling a trailer-load of WRC rally cars. My ever-failing memory believes it was an M-Sport transporter full of Foucs WRCs off to Europe somewhere. Being a Subaru fan and Australian I decided to transpant the idea. It helped that Studio27 at one stage released decals sets for the Imprezas run by Subaru Rally Team Australia in the 2001Rally Australia, while Colorado-Carpena did generic door and rally plates for the same event. Add in a Revell Car Transporter and a few fantasy support vehicles and in the blink of a few short years you have:
- 14 replies
-
- 24
-
-
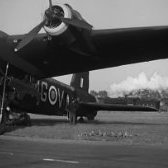
This is my first proper model build since the 1970s and with hindsight choosing the largest British aircraft of WW2 that I could think of was probably not my brightest idea! But, almost two years after starting, with a lot of lessons learned and I like to think some new model building friends acquired along the way, here we are. WiP, if anyone is interested: On 18th December 1941 Short Stirling L6086, named MacRobert's Reply and coded LS.F of XV Squadron, based at RAF Wyton, was loaded with four 2000lb AP bombs and a single 250lb GP bomb to mark their fall, for a daylight raid against the German warships Gneisenau and Prinz Eugen in the harbour at Brest. The crew were credited with a near miss on the Gneisenau and with downing a defending Bf109 fighter. For this the pilot, PO Peter Boggis, received the DFC. Here is my depiction of their aircraft about to be bombed up. Unfortunately the corner of the house with the least background clutter also has the worst light and my photographic skills are not great. But I could not resist... Thanks for looking. Onwards and Upwards! Murray
- 28 replies
-
- 81
-
-
-
Hi, My first build in 2025 is Italeris SBD-5 Dauntless in colours and markings of an SBD-3 from 1942. Watched "The Midway" and got urged to do an SBD-3, but only SBD-5 in 1:48 was available to me at the moment. Italeris plastic was terrible to work with... too soft, a lot of flash. Some large pieces were deformed and fitting was a nightmare. Instructions were mostly unusable. This was my third Italeri kit in the last year and all were made from terrible plastic. Made a mistake with the decals. First I applied decals that weren't good size and then I applied new decals over the first ones and they are a bit translucent in white areas so you can see the old ones. My laziness, no excuses. I might overdid the zinc-chromate chipping... it wasn't my original intention.
- 14 replies
-
- 56
-
-
-
-
 Having been lurking on this forum for quite a few months now, and occasionally adding my own ramblings to other people's topics, I have finally worked up the courage to start a WiP of my own. My main interest is the RAF in WW2, at the moment particularly the aircraft of Bomber Command. So having had a short break from model making, of almost half a century , earlier this year I acquired these: This first post is a bit of a test run to see if my 20th century brain can cope with the 21st century technology of photo-sharing. If it all works I have a back catalogue of photos taken over the last six months or so and I'll be sorting and posting from that, which might give the illusion of amazingly rapid progress. Once I've caught up I'm sure it will become apparent that we should be using the geological time scale to measure my work rate! No proper sprue shots in this thread. I think we all know what they look like and by the time I got myself organised a lot of mine looked like this: That's enough of my waffle, let's hit Submit Topic and see what happens!
- 617 replies
-
- 21
-
-

-
- Stirling Mk.I
- Italeri
- (and 1 more)


.thumb.jpg.185722f59f1fa4bdb30ac86c07b06d0d.jpg)