Theb Posted July 2, 2023 Author Share Posted July 2, 2023 (edited) 10 hours ago, 81-er said: I'm really impressed with how few air bubbles you're getting with those. Are you using a vacuum to remove the air, or are you just good at casting? It's something I've not attempted yet James Hi James. No on the vacuum. I slush cast in small areas of the edge part first and then work my way in. Talcum powder is a must before I start as this helps tons to suck the resin into the small areas and forces the air out a lot more than if I didnt powder the mold. to be sure, I get some bodgealls (new term to describe imperfections) but I try to clean these little things up before releasing as I don’t want any work to be had by the recipient other than the painting. Edited July 2, 2023 by Theb 1 Link to comment Share on other sites More sharing options...
Theb Posted July 10, 2023 Author Share Posted July 10, 2023 3 Link to comment Share on other sites More sharing options...
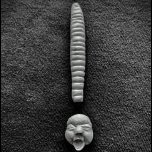
Mike Posted July 10, 2023 Share Posted July 10, 2023 This looks good… as usual that shape under the new bit looks like Skeletor’s mask upside down EDIT: it also looks a bit like the face of the human/alien hybrid at the end of Alien: Ressurection, now I think about it. 2 Link to comment Share on other sites More sharing options...
81-er Posted July 10, 2023 Share Posted July 10, 2023 I hadn't spotted either of those until I read your comment, Mike, but now I can't unsee them. And I concur, nice work Mr B James 1 Link to comment Share on other sites More sharing options...
Theb Posted July 11, 2023 Author Share Posted July 11, 2023 This is a 'pig' of a job! 3 Link to comment Share on other sites More sharing options...
Theb Posted July 11, 2023 Author Share Posted July 11, 2023 Pretty decent texture on the bottom part of the shaft of my hand drill tool thingy. Could end up as this...maybe! 2 Link to comment Share on other sites More sharing options...
Theb Posted July 12, 2023 Author Share Posted July 12, 2023 Little more working on the 'pig' bit. 12 Link to comment Share on other sites More sharing options...
Carts Posted July 12, 2023 Share Posted July 12, 2023 Absolutely sublime 👍 Link to comment Share on other sites More sharing options...
Theb Posted July 13, 2023 Author Share Posted July 13, 2023 Having to double up on the thickness of these strips. This is going to take a while. 8 Link to comment Share on other sites More sharing options...
Theb Posted July 19, 2023 Author Share Posted July 19, 2023 On 12/07/2023 at 11:55, Theb said: Sorry Mike. Haven’t forgotten about the stand revision. will send out sooner than you find your kit…promise🤪 Brian. 1 Link to comment Share on other sites More sharing options...
Theb Posted July 22, 2023 Author Share Posted July 22, 2023 (edited) Still working the jockey and in between looking at the back wall with regards to fixing it to the table top and then a flood of resin for the flooring. Eggs! to be or not to be as they may look a little 'tacky'! but will consider. Toying with the idea of using another food group on this for the floor effect around the turntable and extension. N.b. Not the Jockey final version. Needs a good clean as it's been on the floor in the bedroom/work room and is really dusty! Edited July 22, 2023 by Theb addition 7 Link to comment Share on other sites More sharing options...
Mike Posted July 22, 2023 Share Posted July 22, 2023 ... so do were admire your finished model or just cut a slice and eat it? 1 Link to comment Share on other sites More sharing options...
Theb Posted July 22, 2023 Author Share Posted July 22, 2023 5 minutes ago, Mike said: ... so do were admire your finished model or just cut a slice and eat it? Was considering the possibility of casting the complete thing in chocolate! yummy. 2 Link to comment Share on other sites More sharing options...
Theb Posted July 22, 2023 Author Share Posted July 22, 2023 (edited) Working on the strut area for a bit. Fixing the strut part to the nose part, I'm hoping, that I'll be able to shape both parts so that they fit together as near bang on as possible Edited July 24, 2023 by Theb 8 Link to comment Share on other sites More sharing options...
Theb Posted July 24, 2023 Author Share Posted July 24, 2023 Ok, so my guessing at this stage is that I'll break down the jockey differently from the original Halcyon when it comes to molding. The nose section I think I need to combine with the jockey seat so as to achieve a better merging of the two parts and then, maybe, attempt my very first two part mold (dreading). The strut part will be a separate section and the canon I'll combine with the 'viewer panel' part because there is a little bit of carry over piping that needs to be added to the top part of the join. The front struts that I was missing from my original Halcyon are in the process of being rebuilt and I'm thinking that it would be a better option to make the strut and the part that it affixes to on the strut part, a one piece and then remove the strut part. This is because of the way it looks in the pic below. And how the original model was done. New parts. And a couple of where I'm at comparison pics. 7 Link to comment Share on other sites More sharing options...
Theb Posted July 24, 2023 Author Share Posted July 24, 2023 Bit more of the tiny detailing in between the grooves. Needs cleaning up! 6 Link to comment Share on other sites More sharing options...
81-er Posted July 24, 2023 Share Posted July 24, 2023 That's a real night & day difference between the original and your improved version! James Link to comment Share on other sites More sharing options...
Theb Posted July 24, 2023 Author Share Posted July 24, 2023 (edited) 6 hours ago, 81-er said: That's a real night & day difference between the original and your improved version! Just trying to do justice to the original design and also enhance what is already a superb piece of sculpting. I did find a Facebook page dedicated to Halcyon so I’ve asked the question as to who the artist was for the space jockey so I can give them a nod. Edited July 24, 2023 by Theb 1 Link to comment Share on other sites More sharing options...
Theb Posted July 25, 2023 Author Share Posted July 25, 2023 Again I've discovered that having super glue readily available on the worktop is a good thing when stabbing your thumb with a mini chisel... Sooooo much blood! No pics... too screamish Yay! just discovered animated emoji's! 1 Link to comment Share on other sites More sharing options...
Theb Posted July 27, 2023 Author Share Posted July 27, 2023 Seems that I might be able to get the front strut to work with the plan of having it cut out of the middle strut. Bit of tweaking and I should be able to get it bang on postition. 6 Link to comment Share on other sites More sharing options...
Theb Posted July 29, 2023 Author Share Posted July 29, 2023 Added the last bits of detailing to the top of the floor extension. May add detailing to the sides even though they will hardly be seen... but I'll know they are there! Filling and sanding and clean up before the mold on this then I'll have to shower the whole thing off as it's covered in dust. N.B. Turntable pictured is one of the fallen and won't be used. 8 Link to comment Share on other sites More sharing options...
spruecutter96 Posted July 29, 2023 Share Posted July 29, 2023 Amazing, superlative, definitive work, here! Your skills are just astonishing. There is one thing.... Where did the light inside the jockey's cockpit actually come from? I think we can assume the Derelict had been on LV426 for decades (or even centuries), so did he not switch the ship's lights off, before he got such bad heart-burn? His leccy bill is going to be sky-high! Thanks for sharing your build with us. Cheers. Chris. 1 Link to comment Share on other sites More sharing options...
Pete in Lincs Posted July 29, 2023 Share Posted July 29, 2023 Well that was a rather stunning catch up. It's looking rather fabulous. Link to comment Share on other sites More sharing options...
Uncle Monty Posted July 30, 2023 Share Posted July 30, 2023 Excellent work and so much detailed stuff going into this. A very nice tribute to a classic movie Link to comment Share on other sites More sharing options...
Theb Posted July 30, 2023 Author Share Posted July 30, 2023 1 hour ago, Uncle Monty said: Excellent work and so much detailed stuff going into this. A very nice tribute to a classic movie Aiming for just that. A tribute. We lost a great in Mr Giger and forever will there be a place in weirdness for him... and my heart. Can't forgive Species 2 though! Sorry. B. Link to comment Share on other sites More sharing options...

Recommended Posts
Create an account or sign in to comment
You need to be a member in order to leave a comment
Create an account
Sign up for a new account in our community. It's easy!
Register a new accountSign in
Already have an account? Sign in here.
Sign In Now