2lefthands Posted January 21, 2023 Share Posted January 21, 2023 Lovely work all around! Can`t wait for the colouring... Link to comment Share on other sites More sharing options...
Theb Posted January 23, 2023 Author Share Posted January 23, 2023 (edited) Though I'd start work on the strap over bit (Can’t call a strap on for obvious reasons) for the pylon inbetween the turntable. Edited January 28, 2023 by Theb 8 Link to comment Share on other sites More sharing options...
Theb Posted January 24, 2023 Author Share Posted January 24, 2023 On 21/01/2023 at 14:21, 2lefthands said: Lovely work all around! Can`t wait for the colouring... Colour. What colour?. I’ve got a black n white T.V. and now your telling me this was in colour! 😜 To be honest…I’m looking forward to that part too but it’s difficult to gauge with all the images available online and stuff but we know the colour palette that mister G used so that’s a good starting point. 1 Link to comment Share on other sites More sharing options...
Theb Posted January 26, 2023 Author Share Posted January 26, 2023 5 Link to comment Share on other sites More sharing options...
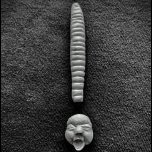
Theb Posted January 28, 2023 Author Share Posted January 28, 2023 So! using pi and based on the diameter of the turntable and the formula being C=πdor C=2πr C = π d or C = 2 π r where d is the diameter and r is the radius and then using the co-ordinates 51.5701° N, 0.0133° E and then using a little of the method of Kinetic energy combined with the liquid fuelled combustion engine first devised by the American George Brayton I find myself at McDonalds Leytonstone asking google how to calculate the circumference based on the diameter... Easy! I've set up a rough svg file so that I can get an accurate layout for the placement of my new favourite material... Spaghetti which to be fair was used in the production of the movie but notably as the internals of the character Ash. The idea as silly as it may sound is to be able to evenly place the spaghetti and to remove undercuts to create the cog effect on the edge... May change this but for now it seems to work. 7 Link to comment Share on other sites More sharing options...
Pete in Lincs Posted January 28, 2023 Share Posted January 28, 2023 20 minutes ago, Theb said: So! using pi and based on the diameter of the turntable and the formula being C=πdor C=2πr C = π d or C = 2 π r where d is the diameter and r is the radius and then using the co-ordinates 51.5701° N, 0.0133° E and then using a little of the method of Kinetic energy combined with the liquid fuelled combustion engine first devised by the American George Brayton I find myself at McDonalds Leytonstone asking google how to calculate the circumference based on the diameter... Easy! It's Saturday, so don't forget to ignore every third digit. Aside form that, Impressive stuff. I really must check out our stock of pasta.... Link to comment Share on other sites More sharing options...
Theb Posted January 29, 2023 Author Share Posted January 29, 2023 Damn fiddly little bits. Sorry Mike... maybe a little longer than the projected 3 weeks. Good news though. The cheap Silicone Rubber is back in stock. Yay! Still need to touch up a lot of stuff and make the organic bits more organic and sort out the centre. My biggest fear with the centre is sanding all the bits at the ends. Hind sight is telling me that I should have use the waste pipe in there in the first place to align all the elements to but there was an awful lot going on with this thing back then 5 Link to comment Share on other sites More sharing options...
Theb Posted January 29, 2023 Author Share Posted January 29, 2023 5 Link to comment Share on other sites More sharing options...
Mike Posted January 29, 2023 Share Posted January 29, 2023 spaghetti. Keep up the good work, chap Link to comment Share on other sites More sharing options...
Theb Posted January 30, 2023 Author Share Posted January 30, 2023 Ok so first up. Spaghetti is in the pan. Spag Boll for this stuff for now. Gear cog thingy is square so popped to the 4D Model Shop and picked up some 1mm styrene square rods instead. 3 Link to comment Share on other sites More sharing options...
Theb Posted January 30, 2023 Author Share Posted January 30, 2023 Second thingy. I've got a bit of a deli lama with the positioning of the Space man. I've used the pipe bit for the middle and it works a treat and had a devil of a time sanding around the perimeter and then positioning the pipe. I've come to a conclusion but not a decision as to whether it should be slightly raised above the line so as to enable the Jockey to revolve. I can see from images of the scene that the Jockey has a slightly deeper base cog thing which would've helped me a great deal if the Halcyon also had this but what the hey! Hopefully you can see the clearance that I have in this pic. and where I've raised the centre piece which I figure once painted would be near invisible anyways but your thoughts as to whether I have it like this or drop it down to conceal it which would mean that the jockey would have to lifted over the snotty struts if the position is to be changed. It only really shows at the end of the half pipes. 6 Link to comment Share on other sites More sharing options...
81-er Posted January 31, 2023 Share Posted January 31, 2023 Could you use some of your pasta engineering skills to use and dress the pipe to look like the cog over? Or take a mould of the cog Halcyon gave you, then cast a new extension? Fantastic work so far, it's quite a fun build to follow James Link to comment Share on other sites More sharing options...
Theb Posted January 31, 2023 Author Share Posted January 31, 2023 Hi James. was thinking of an extension ring but also hoping that I can get these done for people with the existing model and not too sure if I can match like for like. I’ll give it a go though🫣 Link to comment Share on other sites More sharing options...
Theb Posted February 1, 2023 Author Share Posted February 1, 2023 Cricut elements for the cog teeth that also act as a positional for the 1.5mm square styrene rods. Applied to a .5mm sheet of styrene and then intercut to give me the length required for the circumference. I could've save the pain of splicing 3 strips together but I didn't want to fork out for the longer cutting mat for the Cricut machine. And here's the really laborious bit. To get to this. Also don't think I bought enough of the square rods so will have to travel back to the store. 8 Link to comment Share on other sites More sharing options...
Jinxman Posted February 1, 2023 Share Posted February 1, 2023 Great work, can't be long before we see some paint on it? Link to comment Share on other sites More sharing options...
Theb Posted February 4, 2023 Author Share Posted February 4, 2023 OK. So after much contemplation and ummmming and errrrrrghing I've come to the conclusion for a number of reasons but mostly for the sake of accuracy (as much as is possible) to not raise the jockey but to reduce slightly the height of the organic strips (snotty bits) and then let the thing sit where it does originally. This pic shows the angled (ramp) pipe bits almost aligning themselves to the top of the gear part of the jockey and this is how I would like mine to look... I hope! I'll let you know if I change my mind...again! 1 Link to comment Share on other sites More sharing options...
Theb Posted February 4, 2023 Author Share Posted February 4, 2023 (edited) Epic! 2 days of glueing strips. Even the saint lost patience! Rough positioning and longer at the bottom prior to cutting down but you get the gist. Best part was that I'm out by around .5 of a mill on the circumference so easy to adjust overall. All I could think about whilst doing the strips was 'wouldn't it be a good idea to use on the body of a 6ft tall Saturn 5' Edited February 4, 2023 by Theb Typo 5 Link to comment Share on other sites More sharing options...
Theb Posted February 4, 2023 Author Share Posted February 4, 2023 Just had an idea that popped straight in there. How about a door bell that is a replica of the red eye thingy of the HAL 9000 computer, that when you push the 'eye' sings Daisy! Almost as good as my idea, me thinks, for the bell thats on the door for the headquarters of the International Table Tennis Federation... That one goes, Ping Pong! 👍 2 Link to comment Share on other sites More sharing options...
Theb Posted February 5, 2023 Author Share Posted February 5, 2023 Gear part trimmed and sanded. A bit more filling and sanding and touching up overall and reckoning I'll have it ready to mold in maybe a week! 6 Link to comment Share on other sites More sharing options...
Theb Posted February 8, 2023 Author Share Posted February 8, 2023 Having a real fun time with the wall dividers. Proving a little bit of a challenge to get them positioned corectly. May rethink to make it a little easier by adding a lip on both sides as per the original. 6 Link to comment Share on other sites More sharing options...
Theb Posted February 11, 2023 Author Share Posted February 11, 2023 So looking at it and thinking wasaaaaay to far ahead. this whole thing was at first, meant to sit an IKEA Lac table. It still fits, sort of as it does fall off a little at the sides. The thing about these tables is that they are great for stacking in to a shelf like thingy which brings me to the silly idea that I can have the space jockey up top and then adapt (which is how they did with the original set) the whole thing to have a tier underneath depicting the egg silo scene. Ambitious or what ! Silly or what? 1 Link to comment Share on other sites More sharing options...
Theb Posted February 12, 2023 Author Share Posted February 12, 2023 Strap over bit is currently in the mold stage so will know more tomorrow if this works. Still tweaking the turntable at the moment and still working out the centre bit! Should also start the illustrator file setup for the floor extension sometime this week. Would be good to have a complete model for my week off next month to then try and figure out the painting stuff. Link to comment Share on other sites More sharing options...
Mike Posted February 12, 2023 Share Posted February 12, 2023 Fableus I wish I had the room for the full monty, but I'll stick with one circle please Link to comment Share on other sites More sharing options...
Theb Posted February 12, 2023 Author Share Posted February 12, 2023 11 minutes ago, Mike said: Fableus I wish I had the room for the full monty, but I'll stick with one circle please That's pretty much the same problem I have with assembly on this thing... Not much room. Thinking that the idea of doing a similar scene with the big Neca version is out of the question... For now! Link to comment Share on other sites More sharing options...
81-er Posted February 13, 2023 Share Posted February 13, 2023 On 2/11/2023 at 11:09 PM, Theb said: So looking at it and thinking wasaaaaay to far ahead. this whole thing was at first, meant to sit an IKEA Lac table. It still fits, sort of as it does fall off a little at the sides. The thing about these tables is that they are great for stacking in to a shelf like thingy which brings me to the silly idea that I can have the space jockey up top and then adapt (which is how they did with the original set) the whole thing to have a tier underneath depicting the egg silo scene. Ambitious or what ! Silly or what? Brilliantly unhinged, I reckon you should do it! Any thoughts about following it up with the Queen in her egg chamber from the sequel? James Link to comment Share on other sites More sharing options...

Recommended Posts
Create an account or sign in to comment
You need to be a member in order to leave a comment
Create an account
Sign up for a new account in our community. It's easy!
Register a new accountSign in
Already have an account? Sign in here.
Sign In Now