
Search the Community
Showing results for tags 'Zvezda'.
-
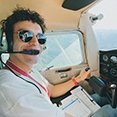
A change from my recent 1/48 fast jets, and this time a 1/72 heavy companion for the Victor and Vulcans. I love the two-tone brown scheme of the RAF’s early Hercs, especially with the white above the cockpit. I’m often slightly reticent to do these types of kits as there is so much detail to build and paint on the interior, but I’ve wanted to add a Herc for ages and have seen some brilliant builds on here. I’ve read good things about the Zvezda kit, so here we go … Obligatory aftermarket, including masks which I think will be invaluable with so many small windows. Slightly intimidating number of plastic components! Crud n’ custard ready … I’m actually thinking of doing it with the white cockpit but two-tone roundels. I’ve seen a few photos with this combination, so a mix of the two options below: Please can anyone help with what colours I’ll need for the cockpit and interior?
- 31 replies
-
- 10
-

-
 Zvezda is to release a new tool 1/48th Lavochkin-Gorbunov-Gudkov LaGG-3 kit - ref. 4833 Source: https://vk.com/zvezdamodels?w=wall-29859496_2798054 V.P.
 -
In 2024 Zvezda is to release a new tool 1/48th Polikarpov I-16 Ishak kit - ref. 4832 Source: https://vk.com/zvezdamodels?w=wall-29859496_2798054 V.P.
-
After my Whirlwind full of mistakes I have to apologize and post something of much better quality. This is the Zvezda 1/48 single seat Sturmovik I built last May almost OOB, just with some Eduard photo etched parts for the cockpit. This is a very good kit comparable with the excellent Tamiya one that I also built few years ago in the two seat version. Colour scheme is as per in-box indications and represents an airplane active on Stalingrad front during winter 1942-43. Quite happy with the result, especially about the white paint over standard camouflage. Enjoy pictures and please feel free to comment. Cheers Andy
-
Thanks Luis Pacheco - link Worth a dedicated thread ! A strong rumour coming from Moscovia: Zvezda could release a 1/48th Kamov Ka-52 Alligator/"Hokum-B" kit at the end of 2023. To be followed Source: https://dzen.ru/a/ZM4FGUonYhvCyrvu?share_to=vk&utm_referer=away.vk.com V.P.
-
Zvezda is to release in 2024 a new tool 1/144th Airbus A-330-300 - kit ref. 7044 Source: https://vk.com/zvezdamodels?w=wall-29859496_2798054 V.P.
-
Eduard is to rebox in October 2023 the Zvezda's 1/48th Sukhoi Su-25 "Frogfoot" kit: - ref. 11176 - Sukhoi Su-25K "Frogfoot"/ Hrábě - in Czechoslovak, Czech and Slovak air forces Source: https://www.eduard.com/out/media/distributors/leaflet/leaflet2023-10eng.pdf V.P.
-
Here is my completed Zvezda C-130H. I posted a Work in Progress topic over the months of the build. The kit is the Zvezda 1/72nd scale kit with a couple of Eduard PE detail sets - cockpit, interior troop seats, and interior detail set. The kit is pretty good and is the only C-130 that I have built so I can’t comment on other available kits for comparison. One comment is that the Eduard sets are definitely not required. Almost none of the cockpit details are visible and the set does not include side panels or the navigation station. About the only parts visible are the seatbelts. For the cargo bay interior, the detail set has some good stuff, but the forward crew stairs are a little too big and some of the cargo bay structure pieces are very delicate and difficult for me to get aligned. Any of the parts forward of the wing box are out of view. The cargo bay seats are pretty good, but do offer some challenges. These are described in the WiP posts. The biggest kit challenge was a poorly molded canopy/windscreen. I am disappointed in how I resolved that problem. If you build this kit opened up like I did this one, I would recommend an LED light set to illuminate the cargo bay and the exterior lights. I’m not sure that cockpit lights would help with visibility into there. Finally, the kit is well designed and a great start for super detailing if you are a true fan of the type. European One camouflage colors are Hataka Orange line lacquers for the greens, 34102 and 34092. The gray is supposed to be 36118 Gunship Gray, but looking at photos, gunship gray looks way too dark in this scale. I used Testors Model Master 36270 Neutral Gray. Interior colors are various light greens that I had in my paint boxes. Tamiya interior green, IJN gray-green, and Model Master RAF Sky Type S. I wanted to put a 1/72 Humvee in the cargo bay but couldn’t find one.
- 16 replies
-
- 68
-
-

-
Thanks Luis Pacheco - link . Worth a dedicated thread ! A strong rumour coming from Moscovia: Zvezda has a 1/48th Mil Mi-28 "Havoc" kit in design. Nonetheless Zvezda is reported having decided to give now the priority to its 1/48th Ka-52 project - thread link To be followed. Source: https://dzen.ru/a/ZM4FGUonYhvCyrvu?share_to=vk&utm_referer=away.vk.com V.P.
-
This will be my second entry to the GB to go along with my Beaufighter. As I mentioned in the chat, I put a £15 bid in for this on eBay with no real thoughts of winning it, but I did. As an added bonus it had the Eduard canopy mask included which was not mentioned in the description. So, a right result! During WW2 the PE-2 (nickname “Peshka”) was the most extensively used Soviet medium front-line bomber. This is the newer 2019 Zvezda version. The mouldings look good. My eye was drawn to the 3 figures, which have separate arms, legs and heads. Something you don’t see very often in 1/72, but might be a bit tricky to put together. I think i will give them a go as they do look nice. 5 marking options provided. I will hopefully make a start on this in the next few days 🤞 George
- 72 replies
-
- 16
-
-
So, after the DAK diorama my youngest son (9 years old) wanted to try some modeling so we decided on this kit from zvesda, the SU-122. A nice starter kit, not too difficult and a great way to introduce my son in this great world of scalemodeling. As you allready guessed this will be an oob build. My goal is to keep my son interested trough out the build. Great way to spend some father son time together. There is a strict agreement on the tasks. My son wants to cut all the parts from the sprues and i'm in charge of cleaning and glue. Together we read the instructions and i'm explaining all the do and don't while we are building this russian tankdestroyer together. So far we got the lower hull completed. When it was bedtime i asked him if he wanted me to continue the build but he was adamant..... he forbid me to continue and he wanted to go again tomorow. This is the new generation guys 😄 This will not be the most complex build. No scratchbuilding, no aftermarket parts etc. Just fun with my son. We will keep ypu guys posted! Cheers! 👍👍👍
-
 Here is the Zvezda 737 Max 8 finished as Norwegian’s EI-FYA “Sir Freddie Laker” which I believe was the first Max to enter service in Europe in June 2017. Freddie spent some time on Norwegian’s short-lived EDI-BDL route but its brief career with Norwegian ended with the grounding of the Max in March 2019. The aircraft never flew for Norwegian again and remained in storage until the summer of 2023 when it finally found a new home with Smartlynx Malta as 9H-GEM. At the time of writing it is on lease to Andolujet. Generally the build is OOB but a couple of accuracy points need attention. Firstly the familiar V-shaped apu intake aft of the right rear door has gone from the Max. In its place is a hinged flap which opens outwards when the apu is running. Zvezda have ignored this, probably in the interests of sprue commonality. It’s an easy enough fix with drill, files, plastic sheet and plastic rod. I guesstimated the dimensions from photographs although when I see the model photos I think it might be fractionally small. Secondly, despite giving us a nice new sprue of Max-related bits, Zvezda have missed the Max’s extended nose wheel leg, needed to accommodate the larger engines. On the real aircraft this is approximately 20 cms longer than the 738 and gives the Max a slightly different sit. I achieved the extension by gluing a piece of plastic rod into the recess on part D15. Once this was firmly set I trimmed the rod to just under 1.5mm and drilled it to take a length of fuse wire. I removed the locating lug from part D20 which was also drilled to take the wire. The two halves of the leg were then superglued together before part D4 was added. It’s rough and ready but gives a reasonably strong assembly which should withstand normal handling. If anyone has a better method I’ll be delighted to hear it. Paint is Halfords Appliance Gloss White and Racking Grey with Hycote Post Office Van Red. Metallics are by Tamiya and Revell. Livery decals are by Lima November. These are generally OK and even take account of EI-FYA’s different engine marking. Unfortunately they are let down by the less than wonderful reproduction of Freddie on the fin and some minor annoyances like oversized fuselage registrations and the slightly indifferent fit of the winglet decals. To my eyes the blue stripes on the winglets are too broad and if I did the livery again I think I would mask and spray the winglets. I supplemented the LN decals with Authentic Airliners windows and details from the spares box. Thanks for looking and constructive criticism is always welcome. Dave G My approach to correcting the nose wheel leg.... / ... and the final result
- 13 replies
-
- 38
-
-
-
Here is the Zvezda Boeing 737-700 finished as SE-RJX “Vagn Viking” which as far as I know was the only 737 to carry SAS’s current livery. Somewhere along the way she also managed to acquire an A350-style black windscreen outline, no idea why. SAS introduced their new livery in September 2019 when the days of the 737 fleet were already numbered and only SE-RJX had been repainted by the time Covid 19 brought everything to a stop. To the best of my knowledge the rest of the 737 fleet ended their SAS careers still in the previous livery which I think dated back to the 1990s. I was never a fan of the sandy grey with orange-red engines but I do like the bright, fresh look of the 2019 scheme so here is my take on it. The build was straightforward and largely OOB with the addition of some Daco p/e and a couple of small details from plastic sheet. The light grey is a by-the-eye mix of Mr Hobby H-1 and H-338, roughly 2:1. Blue is Mr Hobby H-5. Photographs were ambiguous about whether the wings, stabs and pylons were Boeing Gray (as they were in the old livery) or the same colour as the fuselage. I opted for the former and used Halfords Racking Grey. If I’m wrong, so be it. The engines are AK Interactive Aluminium overpainted with my favourite brushing satin varnish - Klear mixed with a few drops of Tamiya Flat Base. Other metallics are by Tamiya and Revell. Livery decals are by Lima November with Authentic Airliners windows. Detail decals came from the kit sheet and the spares box. Thanks for looking and constructive criticism is always welcome. Dave G
- 10 replies
-
- 35
-
-
-
- Boeing 737
- Zvezda
- (and 1 more)
-
Zvezda is to release in 2020 a 1/72nd Lockheed C-130 Hercules kit - ref. 7321 Source: https://www.britmodeller.com/forums/index.php?/topic/235061306-zvezda-2020/ V.P.
- 867 replies
-
- 11
-
-
-
The new BM 30 from Zvezda, I first built up the multi part chassis and weathered it, the part fit was good, although it looked a bit daunting at first and rife for mis alignment, it goes together quite easily with practically zero room for errors. the wheels are just put in place and not fixed. the cab and crew cab go together just as easy as do the rest of the body. whilst I was at it, I dragged the S 400 kit also from Zvezda that had been lounging round unfinished out. The missile tubes are a pain though, each part comes in two pieces with some of the rear parts having three. this is before cleaning seams and attachment points! getting the tubes to fit was problematic at best, although they do have positive location points getting them all aligned was fun! best part of an hour for one section! Everything is just placed on the chassis nothing is glued in place apart from the tubes, the next section went a bit quicker, possibly because I put one of the tubes in a safe place! and possibly because I only glued the rear portion and the front piece is just there for alignment. I also gloss coated the cabs and launch area so I could start weathering. whilst I was on a roll I thought I might as well get on with the Pantsyr
-
 looks like a beautiful kit, the level of detail is insane compared to the Eastern Express IL-96 kit I have just done. I think you can get more detailed resin engines for this kit but at the moment I don't know if it is worth it - the engines look satisfactory to me fuselage is a similar size to the IL96-400/ IL96T + IL96M. note the curved fuselage at the rear for the civil IL86 (above) a snippet of the colour scheme i intend to do. decals are not available but they are available for the 767 the fuselage is obviously larger on the IL-86 but I still think the 767 decals will be suitable for the logo on the tail and the red stripes separating the blue and green (painted areas) from the white fuselage.
 -
Zvezda is to release in 2024 a 1/144th Tupolev Tu-95MS "Bear-H" - kit ref. 7038 Source: https://m.vk.com/wall-29859496_2740388 V.P.
- 21 replies
-
- 15
-
-
-
 As a 12 year old,my grand parents took me with them to Kenya for hollidays. That was back in september 1990...how the time flies... We should have had a flight from Zurich to Mombasa on the Balair DC-10-30,but for some reasons this was changed,and instead Caledonian Airways took us to our destination on a Boeing 757-200. Due to the limited range of the 757,we had to make a tank stop in Athens. I always had a latent interest in airplanes but this flight actually started it all,my passion for airliners and modelling. In fact,my very first kit that I bought was a Hasegawa 747 in 1/200 soon after our return. But I always wanted to build the aircraft that started it all. Unfortunately back then,no 757 kit was available or none that I was aware of nor could I find decals for the Caledonian version,no internet back then,so tracing such items was rather difficult and one had to rely on the local hobbyshops to stock the latest kits. Anyone remember ? Some good 25 years ago I came across the AHS decal set but was still missing a 757 kit... Some years later Minicraft released a 757 kit that was average at least. I bought some of them but for some reason I never actually built one with the Caledonian decals that I had.Maybe the reason was that the AHS sheet had white parts that needed to be applied first before the yellow decals and also a lack of detail on it. Many years later,in 2021 Zvezda released a bew 757 kit which beats the Minicraft version in every aspect. 26decals released also many decals for the new kit,offering countless airlines,amongst them British Airways/Caledonian. So finally this year I came around building the very 757 that I had flown on back in 1990. The Zvezda kit is superb with almost perfect fit and only a minimum of filler needed. I built it straight out of the box The windows are open,no decals used,so also a bit of the cockpit can be seen. To get the correct windows/doors layout,I had to close 4 windows as Caledonian,as well as many other airlines,have/had an additional door aft of the wings. The last row of windows consists of 13 windows,so just need to count from the back forward and then close 4 windows in a row. The additional door is provided with the decals. The emergency exits on the wings need to be filled and sanded and one window between the former exits added. Yep,I still have the onboard magazine from that flight... Paints used,Tamyia Royal blue with a few drops black for the belly and engines,Gunze light grey 315 for the upper fuselage,Testors Voodoo grey on the wings,the corogard is a mix of dark grey mixed with aluminium. Othe metallic parts are painted with Gunze metallics. As mentioned,the decals are from 26 and are absolutely wonderful. The fit is perfect and the carrier film is almost invisible. The window frames are from the kit decal sheet Caledonian Airways was founded in 1988,emerging from British Airtours In 1999 it merged with Flying Colours Airlines to become JMC,which went to become Thomas Cook Airlines in 2003. Unfortunately,this company went into bankruptcy in 2019. The Boeing 757 G-BPEA was delivered factory new in march 1989 to British Airways and came to Caledonian in april 1989. It was frequently leased out during its service with Caledonian and after being sold in 2001 it remained in service with different airlines until its retirement in may 2018,aged 29. Sadly it was scrapped in 2019. I have still vivid and fond memories of that flight and those wonderful hollidays in Kenya and because of that,this model has a special meaning in my collection. Hence the slighly longer than usual thread... Here some pics from my grand parents photo album,of the 757 upon our arrival in Mombasa I hope you enjoyed my walk down memory lane cheers Alex
- 21 replies
-
- 50
-
-
- Boeing 757
- Zvezda
- (and 1 more)
-
Zvezda has reboxed the Accurate Miniatures 1/48th Yakovlev Yak-1b kit - ref. 4817 Source: https://vk.com/wall-29859496?own=1&w=wall-29859496_2293530 Box art V.P.
- 6 replies
-
- 2
-
-
-
- Yak-1
- Accurate Miniatures
- (and 1 more)
-
In 2024 Zvezda is to release a new tool "easy-build series" 1/72nd Yakovlev Yak-1 kit - ref. 7327 Source: https://vk.com/zvezdamodels?w=wall-29859496_2798054 V.P.
-
 This was one of the kits that took a long time to build, but it's finally ready. I started it in May 2021, during the COVID crisis. At the time I thought I would have a lot of free time, but with the happy relief of the health situation, life returned little by little and confinement projects had to be postponed and brought forward when the schedule allowed. Today, I finally managed to finish my Boeing 767 with Varig titles. My 3rd model in my collection, after 2 Boeing 747s (1 -200 and another -400). It was my first interaction with Zvezda, which I can confirm that as a manufacturer it surprised me a lot, since the mold was quite perfect and there were almost no flaws to point out. I can also say that this was the model where my transition to something more rigorous began. In this 767 I have already decided to apply some different techniques that I had applied in the 747s, however there are still many errors that I hope to develop and overcome in the next kits that I will make, but which are still on the waiting list due to daily appointments. I can say here that for a while I will leave the 1/144 scale and will start working a lot with the 1/1 scale, since I received the good news that I will start my Boeing 737 Type Rating this November Overall, the kit is acceptable and worthy of being displayed in my showcase. Unfortunately, the layers of paint that were applied caused the surface to be very thick, filling the lines, preventing the panel liner that I tried to apply from running. So the weathering work was very basic, having only made the shape of the jet bridge at L1 door. I only used makeup powder, which made the plane slightly dirty, and a little panel liner to simulate the dirt trails with the movement. I'll leave the photos below. If you want to see the topic of the plane's development you can see it here: Thanks see you soon!
 -
While I'm still trying to solve the problem with the Lufthansa DC-10 cockpit windows, I decided to start with my other kit that I had in my queue. In order to complete the complete line of Boeing passenger planes, I chose the Boeing 767 in the colors of the magnificent Brazilian airline Varig. The choice of VARIG started through a very strong link that I have with the airline and with Brazil itself: My grandparents emigrated from Portugal to Brazil in the 50's. They met there, got married and had children telling Portugal again already in the 1980's. On the trips they made from Rio de Janeiro to Oporto they chose Varig most of the times and even today, they always tell me how big, splendid and good the airline was in terms of service, quality and planes. Thanks to that and also thanks to my mother, my house is full of things from Varig. Cutlery, trays, blankets and more. Like TAP and Swissair, Varig is an airline that is in my heart, due to my connection with Brazil. An airline that unfortunately shouldn't have had the outcome it did. But turning now to the kit itself! I bought this kit on sale on eBay and with free shipping! I was quite satisfied however, a little suspicious that the kit is from Zvezda. Since I was a kid, I've been used to seeing Revell kits. That's why I always try to give preference to Revell, even knowing that most of the time the mold is not the best. The box is a normal Zvezda box, with the lid and the illustrations drawn, along with the classic box where the kit comes from, which is quite good and resistant and useful for storing things in the future! When I started assembling the kit I put the two main parts together and I was very surprised by the quality of the kit. The two pieces fit perfectly and at first glance everything looked in place. All the pieces have incredible lines and details that honestly left me with an excellent impression of Zvezda! For all kits to be so perfect, I started to have a favorite brand! The next step was to apply putty to all the windows as well as to make the necessary changes to the main fuselage. This Boeing 767 comes with the Aeroflot layout which consists of four doors at the front and four doors at the rear. It turns out that the Boeing 767 that I'm going to make, the PP-VPV has a different configuration: It has two doors at the front, four windows on the wings and two doors at the rear. I confess that I was very close to changing the plane to the -200 version. The 767-200 is an airplane that manages to have a very peculiar beauty. But after comparing the 767-200 and the 767-300 with the same painting (yes because Varig operated with both versions), I opted for the -300 version. Maybe one day I won't make a 767-200 with the colors of American or United Airlines The kit had such a good fitting, that the windows fit perfectly into the holes. Obviously, I putty and sanded everything and in the final result the entire surface was polished. I have to stress this one more time. The kit had such a good fitting, that I didn’t apply putty in the top and bottom. I just sanded it and then with the help of a scalpel I redid the lines I had erased with the sandpaper. It was a 1st time, not applying putty to cover bad fittings, which saved me a lot of time and patience! Zvezda you rock! After sanding and applying the wings (and those had to take a little plastic putty from Vallejo), I turned to the engines while the putty was not drying so I could sand again to apply the primer. I decided to follow the instructions and started with the low pressure turbine and nozzle area of the engines. After assembling (just to check the fit and shape of the engine), I noticed that this interior part would not be very visible. Anyway, I decided to apply a smoky color in order to simulate a little the metallic alloy already marked by the high temperatures there. Varig's 767 used to have General Electric CF6-80C2 engines. After that I decided to apply a primary white to reveal some imperfections as well as for the paint to adhere better when applying the final color. This afternoon I did it and left it to rest. Next time I will probably sand the imperfections a little and then start with the painting process!
-
 The Airbus A320neo family is a development of the popular A320 family of narrow-body airliners produced by Airbus. The A320neo family is based on the previous A319, A320 and A321. Re-engined with CFM LEAP-1A or Pratt & Whitney PW1000G engines and fitted with sharklets as standard, it is 15% to 20% more fuel efficient than the A320ceo family. The airline depicted is Cebu Pacific Air, founded in 1988, and the largest low-cost airline of the Philippines and the largest airline of the country based on passenger numbers. Operating out of Cebu and Manila as main hubs, the A320 family makes up the majority of its fleet, the A320neo making up 9 of its fleet of 48. It was an ambitious paint scheme for sure, but one I've always wanted to do. This airline is a big part of my and any travelling Filipino's memories, after all. The project ultimately got bogged down quite a bit, but I will elaborate on this later in the post. The aircraft depicted is RP-C3281, a Cebu Pac A320neo that I took on a domestic flight to Dumaguete and then saw again in Caticlan Airport. Thankfully, as an owner of a camera taking reference pics proved to be very useful in the build. Here's the A/C itself as I photographed it in Caticlan Airport. I also compiled some of the timelapse footage I got of the build and put it into a sort of "reel" - First time trying this and I didn't want to spend too much time on it, so the editing and cinematography might not be the greatest. I chose to spoiler tag the rest of it as they do have quite a few images and are talked about in length Review - The kit itself is pretty good for an airliner offering, and it's no secret that Zvezda makes some of the best airliner kits out there. Personally I'm content with how the build went together, I don't have any major gripes or issues with the kit and it's still very good. However, there are a few nitpicks worth talking about - Masking Process - The masking was one of the most challenging parts of the build, and the sweeping curves all around the A320 were certainly very hard to replicate. I've been asked quite a bit about this process when posting about it, so here's a thread explaining the process. Decals: Painted with a combination of Armored Komodo lacquers and Tamiya acrylics. Gloss is GX112. Now, to summarize the build experience as a whole... This build has honestly brought me to the edge of quitting modelling more than any other build in the past, partly due to mistakes as a result of my own negligence, and partly due to luck so bad it was comedic, and certainly much worse than I've encountered on any other build. Issues ranged from paint peel on the white paint that then wouldn't feather when sanded, to incorrect hues on the first rounds of paint resulting in multiple rounds of masking and painting the (very difficult!) Cebu Pacific logo on the rear fuselage. For some reason, the white paint I used then started to yellow over time, which I had to sand back while the decals were already on - look closely around the windows where I had to avoid taking a sanding stick to it and you'll see some of the yellowing still there - Afterwards, seams reopened which resulted in having to repaint over the already peeling and yellowing white paint. The painting of the engines then went awry as the coverage of the white wouldn't lay down correctly, having to strip and repaint each one around 4-6 times each. The paint I used on the wings for some reason lightened under one of the registration decals as well, which meant I had to repaint a good fourth of the starboard wing to correct it. I had to speed up the final phase of the build as I wanted to make it in time for the local Nationals, which ultimately resulted in lots of compromises of the build - it was in the IPMS hall with the engine exhaust cones missing, left at home because they were still drying! Needless to say, it didn't really win any prizes but did catch the attention of quite a lot of people, as the only airliner build put in the competition, and with the vibrant and recognizable colors of Cebu Pacific no less. It then got damaged on the drive home, with the engines and landing gear breaking off and another fuselage seam reopening. Ultimately, the cowling ring and one of the nose landing gear wheels went missing, so I had to 3D print resin substitutes, which then made it onto the build in time to be make it my last completed build for 2022. Any modeler with a good eye can spot quite a few mistakes in the build's craftsmanship, many of which I honestly no longer had the energy or time to correct. In the end, I'm just happy to have gotten this project through the finish line. Thanks for reading, especially if you've gotten this far through the wall of text!
- 11 replies
-
- 29
-
-
The new 1/144 scale Zvezda kit of the little Yak-40 tri-jet is my chosen build for this G.B., however i will be using the decals from the AZ kit which included Olympic Airways with it. A book I'm currently reading, Olympic Airways A History by Graham M. Simons, provides some background to the plane. In 1972 Olympic leased a pair of Yaks from Aertirrena of Italy for evaluation as a possible replacement for their recently retired Dakotas, but an order was not forthcoming. Here is the kit (with the extra decals).. Dave
-
Here is my latest finished model. I have built the well known Zvezda kit using the decals by F-DCAL. Additionally I acquired the LACI engine (3D-printed) and so I had to create a maintenance scene. Something must be wrong with the thrust reverser system and the flight engineer and a mechanic are taking care of this problem. Globus Airlines was formed 2008 by the S7 Airlines but ceased operations in 2019 again. For the maintenace platform I used Preiser figures and Evergreen profiles. Thanks for watching!


a.thumb.jpg.58d92d116b0315dc55d352fd191d65e4.jpg)