Search the Community
Showing results for tags 'Takom'.
-
Hi all! Since finishing the previously started models was impossible, I had to start another one. And oddly enough, this is not the first time this has happened... So, at this time It is Hetzer from Takom: About the kit Pros: This kit has no interior and is pretty basic. All the pieces fit together perfectly so far. Cons: The plastic is very soft and elastic, carving it is a real pain! I want to make this Hetzer look seriously beat up, so I started with the fun and most enjoyable - destroying the model's well-made and accurate parts. One wheel damaged by an explosion: Damaged front fender: The damaged rear left fender and toolbox: I decided to make the right rear fender heavily battered. To do this I glued on a few pieces of excess plastic: Carving the damages. Beginning: The right fender is finished : The same right fender from another side: I added a more raised texture to the casted parts and front panel and glued a number. The numbers from the Tamiya sprue label: Vytautas
- 22 replies
-
- 16
-

-
- Hetzer
- Jagdpanzer
- (and 1 more)
-
 Takom is to release a 1/48th Hs.129 kits - ref. 48001 - Henschel Hs.129B-2 - ref. 48002 - Henshel Hs.129B-3 Sources: https://www.facebook.com/story.php?story_fbid=1153667026563080&id=100057593795167 https://www.facebook.com/story.php?story_fbid=1153667329896383&id=100057593795167 V.P.
 -
As the Chieftain is approaching the paint stage and there’s so much of the GB left, I figured I might as well start this one and then I can paint both Berlin camouflage jobs at the same time. It’s the Takom kit, which I picked up at the weekend for a nice price: I’ve been slightly disappointed with what’s in the box though. It’s all very nicely detailed, but there are ejector pin marks in visible places on many parts. The lower hull has them on the area under the seats (on the raised area to the right in the photo below) which will be visible though the rear door: And the side panels have some too (again on the raised areas on the photos below, one filled with black CA): There’re more parts with the same issue, but they have proved to be not too awful (apart from the lower hull) to get into and fix, so I’ll stop moaning about them now. With them sorted, I pushed on to get the base colours on the interior pieces. Takom call out most of the interior in cream with a sandy orange for the padding and black seat cushions. Looking at pictures of the real thing I’ve noticed a mix of silver, white, or cream for the interior, sandy orange, white, or silver for the padding, and dark green or black for the seats. So I’ve gone for Takom’s colours on the interior & padding, and dark green for the seats. Lower hull: Also with the start of the suspension added: And more of the interior parts: This is the first AFV with an interior I’ve tackled, so my aircraft cockpit skills are coming in handy here. I’m hoping to get a lot further with this over the bank holiday weekend, though I’m off to Maldon on Saturday as there’s a museum there with a Chieftain in Berlin camo to have a look at. James
- 11 replies
-
- 11
-
-
Starting my next project - Takom's Bergepanther Ausf.A. It's gonna be Demag's one as the box says. Out of the Daimler-Benz, Henschel and Demag built Bergepanther Ausf.A's Demag is the only one to go with the winch and shovel. To add to the base kit I have Voyager Model's PE, MasterClub metal tracks and T-Rex's 3D-printed idler wheel. The beginning is obiously very similar to the Takom's Panther Ausf.D I built few years ago. Cheers! Kristjan
- 77 replies
-
- 16
-
-
 As a product of the 1980's myself I think taking part in this GB is obligatory... However, since I was born in the mid 80's I can't really remember very much of the decade. But one thing that I can remember is the car my Mum drove when I was little. It was a red Volkswagen Polo which had a warning triangle, a first aid kit and a fuel can tucked in the boot, three items that my Dad's car didn't have and were thus of interest to a curious child. It was only later I found out why her car had them. So, in the early 1980's, before she married, my Mum was a teacher at a British Families Education Service (BFES) school in Germany and in what I understand was almost a tradition of those who've been part of or supported British Forces Germany she took advantage of the tax exemptions available to bring a new car home when she returned to the UK. So the Polo had those three items of kit in the boot because it was a German car, originally bought and driven in Germany where carrying these items was (is?) a legal requirement. A quick check with my Mum the other week confirmed that she'd taught at Collingwood school in Celle teaching the children of those serving in "14th Sigs, 3rd Greenjackets and 9/4 locating regiment". A quick poke around online revealed that 3rd Battalion The Royal Green Jackets were part of 22 Armoured Brigade at the time and would have been operating as mechanised infantry. In the early 1980's I think that would mean they used the FV432 and handily the below was knocking around the stash. So, as a nod to my Mums time in Germany, I'd like to do an FV432 as serving in the 3rd Battalion, The Royal Green Jackets, part of the British Army of the Rhine in the early 1980's as, with the Cold War at its height, NATO stood on guard against the Warsaw Pact. The FV432 isn't iconically 1980's (since they've been knocking about since the 1960's (as an additional family link they were originally manufactured by GKN Sankey in their Wellington plant where my Dad started his working life!)) and the green and black camo hardly places it either (unlike the Berlin Brigade camo) but they were there! Cheers, Richard.
- 30 replies
-
- 11
-
-
The second launcher in the TAKOM kit ... Same "complaints" as with the Sea Dart: instructions are sometimes a bit small/unclear wrt smaller parts and the decals for the missiles are totally inadequate - not enough details (only two srl nos and 1 lettering "drill") and only for 2 missiles while 6 are provided in the kit. Again, I don't understand what prohibited TAKOM from providing accurate details for all missiles. Other than this, I scratchbuild the reloading handler (only from pictures, so scale and details are a bit shaky) as well as the rectangular addition to the launcher base to give it a bit of a "type 22 look". As alway, all comments welcome. Thanks for looking Cheers Oh, and here are all my three launchers so far together. Still waiting for the NSSM 🤞
-
I had my eyes on this set from TAKOM for some time - and finally bought it when I saw it on sale Still hoping for them to come out with a Sea Sparrow and/or RAM launcher (fingers crossed) The kit is ok. It fits pretty well, the instructions are a wee bit small for my old eyes - and could be a bit more detailed (e.g.: the parts with which the missile is attached to the rail are different on both sides of the missile, so only one side fits the rail. Noticed that too late) The big minus are from my perspective the decals (and the painting instructions). While the boxart depicts the drill and live rounds pretty accurate, the painting instructions are over simplified and most of the details are missing. I don't understand what precludes TAKOM to include the yellow and brown bands (explosive markers) or the SRL numbers or the black marker for where the missile is to mate up with the launcher rail. Nothing complicated, shouldn't have any trademarks or so on it. Not happy with that .... (also goes with the Sea Wolf launcher, but that is another issue). I painted the two missiles as a drill round (sooo colorful ) and a TM missile and put the TM round on a stand in front of the launcher. I also decided to open up the reload hatch and scratch the inside. As I could not find any ressources on that, it is purely imagination - but I did the same with the Uragan launcher, so there is precedence .... I only did some light weathering (rather two weeks into a JMC than at the end of the Falklands conflict). Here we go:
-
Most of my model making time lately has been occupied with designing 3D printed parts on my computer. I've missed the feel of plastic though so I dragged myself away from the PC and pulled a Takom Maus out of the stash. I plan to built it as a "what-if" production version with a Maus II turret. For that I'll be using Rhino's resin E-100 Krupp turret, along with a metal barrel from RB models, a voyager photo etch set & some other spare bits & pieces. The wheels & suspension are the first step of this kit & are made up from 288 parts in total! Most of which wont be visible once the model is finished. After working on it for over a week I've managed to get though this rather monotonous first step & I'm now looking forward to the more fun job of working on the hull & turret. The Maus's original turret's had a curved front which caused a shot-trap problem on the lower part. To counter this, armoured plates were added to the top of the engine deck to deflect shells away from the turret. For this model I'm using Krupp's Maus II turret though which doesn't have the same problem, So I've decided to not add the armoured plates & removed/filled the parts on the engine deck related to them. Without the armoured plates you can see more clearly though the grills & into the engine bay. So I had the spontaneous idea of 3D printing an engine to fill the void. It's extremely basic & missing a lot of detail but I didn't want to spend a lot of time & energy on something that will be barely visible when finished. I'm thinking about making the electric motors at the rear of the hull too though. For the next step I started drilling holes into the side of the hull to fit camouflage loops but my only 0.3mm drill-bit snapped 😭 I've ordered some more but they might take awhile to arrive. I'll make a start on the tracks next while I'm waiting for the new drills...
-
Another kit I've had completed for several years. Takom's 1/35 Chieftain Mk.10 in the Berlin Brigade camo scheme. Painted with Mig Ammo for the grey, brown, and NATO green, and Tamiya for the white. Pretty happy with the overall outcome of this one. Took a LOT of masking tape, hah Thanks for looking as always ^-^ Gaz
- 26 replies
-
- 35
-
-

-

-
 Afternoon all. Finally found some time to start a new thread. Been a bit in a rut recently with many ongoing projects and hit a brick wall on a few so decided a nice simple build is in order to get back on track. Decided on a King Tiger (my first) from the stash. I chose this one as on the whole they seem to have minimal detail really, even with the PE upgrade set. Based on some research, many had little left of detail by wars end like fenders and side mudguards etc.....so going that route. Here's the kit itself..... The kit has the option to build a type with a larger gun and night vision that was never actually built......not realy one for "paper panzers" myself, so stuck with the 88mm version. Now here's an interesting point. The 88mm barrel in the kit has a larger diameter that the Voyager one in the PE upgrade set. Curious..............so thinking Voyager is more accurate, it'll be the metal upgrade one to use. Here's the PE set I went with. It's for the Tamiya/Dragon KT's....but can't imagine the Takom being that much different. And of course my favourite track upgrade option, R-Model. Can't fault these, so easy to throw together....all complete in under an hour, both sides. As you can see, the set comes with new drive wheels as in fact later KT's had more teeth and the tracks had no non guide horn links. Later models had a guide tooth on all links. I can't imagine it's too much of a stretch to say by war's end with lack of supply of parts to switch back to the earlier drive wheels and tracks.....so that's where I'm going with this one. I ploughed into the build late last week and it flew by, so haven't got many early build pics. So intend to post where I am tomorrow as I've just finished the re-texturing of the armour. Overall, there's isn't much to a KT build, very simple so a speedy build so far. Anyway, that's all for now. Cheers Simon.
- 66 replies
-
- 10
-
-
Takom Facebook displays a new logo. Source: https://www.facebook.com/permalink.php?story_fbid=pfbid0AWRyWWxdQfWe8KJKTs6cLGEc2jzF4q8mZLgLLvgTJ4NaTZq317K1f9jaVUrGDDKfl&id=100057593795167 Takom has already produced some helicopter kits. Possibly a new range of fixed-wing aircraft kits? Interesting. UPDATE - 1/32nd scale Horten Ho.229 kits It's a choice... Zoukei Mura has for years a 1/32nd Ho.229 kit and add ons in its catalogue: https://www.zoukeimura.co.jp/en/products/sws08_Ho229horten.html V.P.
-
 This was a birthday gift from my son, which I started at the beginning of the long Christmas break (summer for us down-under). Brush painted using Vallejo and Tamiya acrylics, attempting to only weather it lightly as these Chieftains were kept pretty clean I gather. Represents a tank from C squadron, 14/20 King’s Hussars serving with the Berlin Infantry Brigade in 1988-1991. Build thread can be found here: And here it is with the AFV Club Centurion Mk 5 finished as “Dido” from 4 RTR when it served in Berlin in 1960 which I built back in 2022. Thanks for looking.
- 15 replies
-
- 34
-
-
-
-
- Chieftain Mk 10
- Berlin
- (and 1 more)
-
Hello All, Here is my latest addition a bit out of my comfort zone as I have little knowledge and even less reference on armoured things! I have wanted this boxing for some time but baulked at the £70 asking price however I had a bit of luck and managed to get one for £48. On inspecting the sprues I was mightily impressed with the moulding quality of all 525 pieces, vinyl tyres which doesn't bother me and a small etched fret. Construction was a joy as the fit of parts was excellent very precise and not much cleaning up to do or ejector pin marks to tidy. Attention should be paid to sprue removal as it is easy to snip off taking detail with it do not ask how I found out! Painting was done in several stages during construction and I used my 0.2 Iwata to spray the three tone camo. I applied some washes and some ground up cat litter to add some texture. The chromed parts were brush applied with thinned out Molotow and IPA 50/50. A coat of sealing varnish before the smsll amount of decals were applied then a coat of matt varnish to finish off. I must say having now completed the build I am mightily impressed and am considering building the 1/35 versions! Any way enough waffle what's your verdict whilst I await a Trumpeter display case to put it in!
- 11 replies
-
- 34
-
-

-
-
-
So chaps, the next build will be something that is very dear to me, Veh reg 09EA90 ( G3 Ops) my old ride at 6th Armd Bde Salamanca Barracks in Soest West Germany. I signed for the detachment back in 1990 as a young Signaller barely just out of school, 09EA90 was straight out of base workshops after a major overhaul so it was basically a brand new wagon, the paint finish was immaculate ( sprayed black and green) , not a chip or scratch and all the kit was brand new first issue. (didn't stay like that for long) I'll be using the great Takom FV432 as the basis of this conversion which will be a in depth conversion. Most people wouldn't be able to tell a 432 and 436 apart from first glance but there are a bucket load of differences, the interior is the major headache as it filled with Radio kit. 09EA90 had a twin 353 Zulu fit along with a single 321 and a SCRAT fit. We also had 3 Ptarmigan subsets and the Redbrick TAC IC system. Adding to that I have to scratch build the new cage as the Takom cage is too small for a 436, a 1500 w Onan gene set and add the various armoured boxes on the roof plus the Racal 8m masts and mounts. After the first Gulf War our Squadron started getting the GPMG to fit on the commanders cupola, the Infantry started getting the swearing removed LSW as a section weapon so us Signallers got the GPMGs that were surplus to the Infantry. We did still have the LMG (Bren) up until that point but no mounts to fix them to the cupola. The box shot I need to find more of my photo's from the day but here are a few of 09EA90 First photo is of the Forward Headquarters 6th Armd Bde, 09EA90 (G3 Ops )on the left, centre is Radcon and the right hand side is one of the Ptarmigan Radio Relay wagon Stay tuned for more Dan
- 228 replies
-
- 24
-
-
- Clansman
- Conversion
- (and 1 more)
-
Takom/Snowman Model is to release a 1/35th Mil Mi-28N Night Hunter/"Havoc" kit - ref. 2610 & SP2610 Source: https://www.facebook.com/permalink.php?story_fbid=pfbid02NjYWBjfzR5kXBio9ohEhmkvYBZBKi7QnV2LvSrJwZudfkHpGNgvhTMEJ1sn7ZZQKl&id=100057593795167 V.P.
-
Hi all, here is my latest, the Chieftain Mk.10 Tank using the 1/72 Takom 1+1 kit and was built as part of the NATO 75th GB. A lovely kit with lots of detail and comes with some PE although some parts were so small and were easily lost to carpetland. The lower hull with wheels were built and painted first before adding the PE side-skirts, then the rest was painted. AK paints were mainly used and the Mk.10 was painted in the Berlin scheme dated 1988-1991. The figures were from Wee Friends. A simple road base was made using insulation board, sandpaper for the road, some railroad street lights and other stuff. Build log here: Stuart
- 11 replies
-
- 36
-
-
-
-
Hi all, here is my latest, the Chieftain Mk.11 Tank using the 1/72 Takom 1+1 kit and was built as part of the NATO 75th GB. A lovely kit with lots of detail and comes with some PE although some parts were so small and were easily lost to carpetland. The lower hull with wheels were built and painted first before adding the PE side-skirts, then the rest was painted. AK paints were mainly used and the Mk.11 was painted in the 1 RTR scheme in Germany dated 1992. The figures were from Wee Friends. Build log here: Stuart
- 13 replies
-
- 34
-
-
-
 As if I haven't got enough builds on my plate, what with two mustangs entering their paint stages and a float plane moving along, I thought I'd get another on the go. This time a Chieftain Tank Mk.10 that will have the Berlin scheme and hopefully alongside it I'll build a Mk.11 in a slightly later scheme. The kit is the Takom 1+1 in 1/72. Haven't built a Takom kit before, so... Boxart. Lots of plastic. PE and decals for two and a nice instruction booklet. Stuart
- 32 replies
-
- 14
-
-
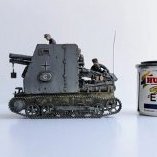
Good afternoon, Gentlemen Here’s my “what if” Kanonenjagpanzer 2 (KaJaPa 2) “Eber”. It’s a Takom VT 1-2 in a “what-he-could-have-looked-like-in-1985-configuration”. I mainly added some (modified) Leopard 1 side skirts from Perfect Scale Modellbau but also pioneer tools, a stowage box, two antennas, jerry cans, MG mount and MG, smoke dischargers, towing cables as well as a modified/scratch built periscope (because the driver would not have seen something because of the smoke dischargers … ) and a few parts other from the spare parts box (IR searchlight, spare tracks, grab handels, ice cleats for the tracks). Hope you like this what-if beast … Roger
-
Here is the second project I was doing for the Tiger GB. Just finished about a month late. Takom JT, Atak and homemade zim, Friul tracks. The WIP: Thanks all for viewing and have a great weekend.
- 19 replies
-
- 29
-
-
-
For my second build I will attempt to replicate the following JT, an early one with Porsche suspension. I will be using Takom's one but, having started this a long time ago, it is well over the 25% build stage so I won't post any final pictures in the gallery. I also have some Atak zim and I think the right tracks from Friul. Cheers again.😁
-
Hi friends, Type 69-II Takom with Aber barrel : build finished
-
.thumb.jpg.ad2b820bfdebfdb8541e9255a05f38c7.jpg)
1/35 9M38 missile (SA-N 7) & Uragan launcher
2Step posted a topic in Ready for Inspection - Maritime
This was the first kit by TAKOM that I built - and I have to say I was pretty impressed. Instructions, crispness, fit ... all good! Although, I bought the kit on sale for about half price. At full price, I probably would have passed. Partly, I hope that TAKOM will release more weapons systems in the future besides their Russian/Sovjet and WWII lines, if the modern weapons sell well. I am especially hoping for Sea Sparrow, Ram or similar ... I also was lucky to be at our Naval Academy in Flensburg, when the first Sovjet task group visited Kiel/Germany in 1990. We were able to get a very extensive tour on board (I was even running around alone for a bid) on the Sovremenny class destroyer Bystryj. By the time we were ready to go to the Krivak class Nieukrotimyj, public Open Ship had started and there was a line all the way down the pier up to the gate of the base, so we bailed. Here you can see said launcher behind the 130mm... I took some liberties here. First I am unable to build a model without opening at least one door or hatch. Unfortunatley TAKOM made all the hatches as separate pieces, but provided no interior. As all the research (including this forum) didn't result in any usable info, I just made something up (litterally ). As soon as this post is forgotten, no one will ever know that it is fake. So: I am good with it The laucher is in reality not sitting directly on top of the (redbrown) deck. However as the pear shaped original decking was not provided, I painted the hexagonal part in that brown, as for me that always had a big part in the looks of Sovjet ships of that time. No weathering. The warshot (SA-N 7 on the rail) should anyhow be pristine, the training round (SA-N 17 green, last pic) shows a little bit of handling. The launcher might get some rust or salt water residue after extended periods at sea, but any bosun worth his (back than only male) money, would try to have that cleaned up while still at sea or latest painted right after coming into port (especially for an important visit as mentioned above). So short story long.... here it is With the SA-N 12 training round And the fake interior up close... Some time after that port visit, I started my 1/700 Sovjet navy collection with a Sovremenny and a Krivak. I might have to restore the Sovremenny now to go with this launcher (It survived about 10 moves in the years in between and show significant wear and tear). Finally, as always, thanks for looking and any comments welcome. Cheers -
Hello everyone Here's my latest work, two cold war brits! I mostly only do WW2 era subjects so this was an interesting sidetrack for me. Modern era stuff doesn't usually interest me that much but I enjoy the look of the Chieftain a lot. I say 'modern', this is a 1960's design afterall... 😅 This is my first experience with Takom, I have to say I was slightly disappointed with this kit overall. It has great detail but for some reason also tons of flash, and the overall fit isn't really that good. Some odd design choices and ridiculous amount of parts for all the stowage boxes, made this building process a little tedious. At least the detail level is good so it was worth the effort I think. One big plus point is that the wheels and tracks can be built as a separate assembly for easier painting. Also every hatch can be opened and has good inside detail. If you want to do a full interior FV432, this kit should be a great starting point. The figures are 3D printed by Peddinghaus. They are supposedly Bundeswehr, but looks close enough I think. There was not a lot of options when it came to British cold war tank crew in 1/72. My reference photo is a BAOR Chieftain from ca 1983, with a camo net. The camo net is made from elastic medical gauze and wine bottle tinfoil cut into small strips. Brush painted with Humbrol enamels, weathering with AK splatter effects "Dry mud" and some dust pigments. Thank you for checking them out!
- 25 replies
-
- 62
-
-
-
I recently gifted myself the Takom SA n 7 kit for my birthday. I saw a video with someone rendering the interior. The kit allows 4 doors to be opened, but does not provide any material for the interior. Research on the net didn`t come up with something (neither NATO name nor Russian nor Indian or Chines version). Any of you guys have something to help me out? Thanks a lot!! Cheers