Search the Community
Showing results for tags 'Takom'.
-
This thread will present my build of Takom's excellent iron cathedral. The kit is of a very early Lee, so much as I'd like to build it as an Operation Torch machine, my lack of proper parts forces me to keep things the way Takom intended. The kit offers excellent details, and I began with the bogies. Each of these consists of 14 parts, and all hinges can be built to swing. The first one is finished. Five more to go
- 27 replies
-
- 10
-

-
M31 US Tank Recovery Vehicle 1:35 Takom via Pocketbond by Bachmann The Tank Recovery vehicle, or ARV has been around nearly as long as the Tank has. Ever since WWI when British Mark IV tanks were fitted with jibs to produce salvage tanks the ability to recover and move inoperable tanks has been needed. In WWII the Germans become very adept at ths. WWII was the beginning of the true ARV, these were most often converted tanks which were obsolete. Many would get cranes or jibs to enable lifting operations as well. In more modern times the ARV is a version of the countires Main Battle Tank in order that another vehicle is not used to simplify logistics and repair needs. The M31 was based on the M3 Medium Tank. This was selected as it was still in production, but soon to replaced as the US Main tank by the M4 Sherman. The Tank Recovery Vehicle would be known as the T2. In order to save weight both the main 75mm gun, and the turret mounted 37mm gun were removed, however they were replaced by dummy units, and the front of the 75mm modified to provide a crew access door. The forward 30cal machine gun in the hull was retained, and the turret received a second 30cal on a British designed copula. A Garwood crane would be mounted in the gap left by the 37mm gun on the turret. This could carry 5 tons if countered by the weight of the vehicle alone, or 15 tons of the vehicle was stabilised. For whinching operations a 60,000lbs winch was installed in the crew compartment which could be used from the front or back of the vehicle. In addition it could go out through the turret to the crane. The M31 would make its combat debut with the 1st Armoured Division in Tunisia in 1943. Just over 800 M31s were produced and they would service throughout WWII never managing to get replaced by the later M32 (Based on the M4 Sherman). As well as the crane the M31 was distinguished by the numerous tool boxes on the exterior to carry all of the crews equipment, quite how successful re-tainment of the dummy guns were in obscuring the true identity of the vehicle were is open to question! The Kit There have been two kits released initially, one being the Lee, the other the British specification Grant. Both kits share a core of common parts, which have come over into the M31. This boxing has all the additional parts for the crane and exterior boxes. Inside the box are 11 sprues and two parts in grey styrene, a small clear sprue with headlights, a PE sheet, decal sheet and instruction booklet as mentioned above. Construction begins with the lower hull, which has a rear bulkhead and final drive housing attached at the front. Rollers are fitted into the floor which was where the winch cable comes out. Three stations on each side for the VVSS (vertical volute-sprung suspension) units are added, which each hold a pair of wheels. The drive sprockets are fitted to the front, and idlers at the rear on a trailing arm that is where tension is adjusted on the rear thing. A number of large bolt heads are added to the suspension units, which can be found on the sprue runners and are cut free with a sharp blade to be glued in the noted position on each arm. The tracks are link and length, with a jig supplied for the top run, which has an upward curve at the front as it rides over the drive sprocket. The highly curved areas have individual links supplied, with the diagonals under the drive and idler wheels fitted in short lengths. The tracks fit under the sponson floors, with separate sides added, which have crew hatches cut into the sides for later fitting. The complex angles of the glacis plate and casemate of the dummy 75mm gun is formed over a number of steps, with the roof having a cut-out for the turret. The engine deck is fitted last, and has a choice of pioneer tools and towing cables, which require some holes to be drilled from the inside before fitting. The exhausts and mudflaps are fitted to the rear bulkhead along with a number of panels and towing eyes to the rear, while the bolted glacis flanges are fitted to the front, with the driver's hatch and caged light cluster on the wings. A number of large tool boxes are then constructed and added to the main hull. Rear mounted winch rollers are added along with the surrounds for the associated equipment. Conctruction then moves onto the turret and attached crane. The dummy 37mm gun is attached to the rear of the turret and then the crane made up. As you may expect the crane comes with a fair number of parts all on a new sprue from the original release of the tank. Care is needed to get the myriad of parts in the correct place here. Cable is provided for the crane. The modeller will need to decide if they want the crane in front of the vehicle, or behind as there are 2 different mounting options. Markings There are five markings options spread over the inner cover pages of the instructions. From the box you can build one of the following: 1st Armoured Regiment Service Company, El Guettar, Tunisia, Aprli 1943. 2nd Armoured Division, 2/66th Armour Regiment "Gerogia on my mind", SV38 Operation Huskey, July 1943. Unknown Unit, Theater Issue Depot, Oran Algeria, May 1943. 2nd Armoured Division, 2/66th Armour Regiment "Invader", SV38, France, July 1944. 5th Army, 756th Tank Battalion, SV39, Mt Lungo, Italy, Jan 1944. The decals are printed anonymously, and have generally good registration, sharpness and colour density, with a thin matt carrier film cut close to the printed areas. Conclusion It is good to see this variant now being issued following the original release from Takom, and that these support vehicles are not being forgotten. Highly recommended. Review sample courtesy of UK Distributors for
-
Here are some more pictures I have managed to find on Meng's and Takom's Panther. Heres some pics for Mengs's Panther. From the looks of these pics it seems that Mengs will not contain an interior with the kit. I have heard that they are making an interior for the Panther but they will be selling it as a separate kit like they did with their KT. From the looks of it, Meng is further ahead in production than takom, but I could be wrong. Hopefully, they do not release on the same date otherwise I'll be broke. Mark
-
Hi, Started a cutaway version of the Takom kit. It's the Henschel version with Zimmerit any 505. Bear with whilst I get up to date with pics. John
-
Hi, Started a cutaway version of the Takom kit. It's the Henschel version with Zimmerit any 505. Bear with whilst I get up to date with pics.
-
Hey Guys I bring to you my first build log, the rather lovely Chieftain mk.11 from Takom. I chose this kit mainly due to the brilliant build logs on Youtube, I wanted something with fiddly little parts, a bit of PE and I could follow along to for my maiden voyage. I'm already a week into the build and loving it so far, i forgot how relaxing cutting, sanding and gluing can be, beats watching the junk on the TV. Here's what i have so far. Seamline hell! I've scraped, sanded, scraped and sanded, will probably need more scraping and sanding I got carried away gluing, those exhausts are going to be a pain to paint. So far no issues with fit, the size of the gates are questionable, they are huge. OH and extra thin cement is pure witchcraft, so much better than the tubes of cement I used many years ago Anyway that's it for now. Going to make a start on the lower hull and more stowage boxes
-
Just finished Takom's FV432. Great to finally see some British modern armour available other than tanks. It's a great kit which was a joy to build with an excellent instruction booklet with some good colour photos. The separate link tracks were a first for me but the jig supplied with the kit was brilliant and they are much easier to paint than the standard rubber types. This was a number of firsts for me. My first outing with Hataka paints using their Modern British Army & RAF AFV paint set. In the past I've used Tamiya, Vallejo and AK colours on modern British vehicles, but without doubt they have to be the most accurate NATO green and NATO black I have seen by far. Also the first time masking with White Tac ( a big thank you to The Salisbury Model centre for that tip). Also a first attempt at weathering with pigments and still some learning to do there but I tried to replicate a 432 on exercise somewhere in Salisbury plain, which for those who are familiar with being sent to play there will know, in summer everything gets a nice coat of dirty white chalk dust. The Gimpy is the kit one (which is actually pretty spot on) with a Accurate Armour ammo box and belt and the cam net is one I had in the spares box with the addition of some oregano and chopped chives (don't tell the wife) Still need to add ariels but I've got the time to post now so here it is, hope you like it? WT
- 35 replies
-
- 39
-
-

-
M3 Lee Early/Grant Medium Tanks 1:35 Takom via Pocketbond The US Army had been remarkably complacent with regard to tank development in the lead-up to WWII, and approached war with precious few that were hopelessly outclassed. This realisation resulted in a frantic clamour to produce a modern tank that could hold its own in combat, with the M3 Lee coming into service as a stop-gap measure within a year of its first design while the M4 Sherman was in development. As a consequence of its rather rushed introduction, it was known to have a number of fairly serious flaws, but it also had some strengths that (at least in part) made up for them. Its high profile and sponson mounted main gun gave the enemy a large target, but when the 75mm main gun was brought to bear on a target, it was surprisingly powerful and effective, gaining a reputation in North Africa. A great many examples were exported to the British and Russian forces in the early stages of WWII, and after the majority of British armour was left on the beaches of Dunkerque, the need became even greater. The British required some changes to improve the vehicle's performance, which most visibly included a new larger turret with a bustle to accommodate radio gear, and a cupola instead of the sub-turret with machine gun mount, which was named the Grant after general Lee's opponent. Due to the pressing need for suitable numbers however, the British did take a number of Lees, and the Soviet Union also took delivery of a substantial number of Lee variants, although some ended up at the bottom of the sea thanks to U-Boat action. The Soviets disliked the Lee intensely and gave it a wide berth wherever they could in favour of the more modern and capable T-34, the production of which ramped up substantially after the initial shock of Barbarossa, which led to its retirement from front-line service by 1943, while the other Allied continued to use them (mainly in Africa) until the end of the war. The Kits There have been two kits released initially, one being the Lee, the other the British specification Grant. Both kits share a core of common parts, which is why I'm reviewing them together. Like the real thing, I'll deal with the Lee first, then note the differences between it and the Grant, with pictures of the common sprues and the individual Grant sprues, as the Lee sprues are effectively a subset of the Grant boxing with one exception in the tracks, but more on that later. Both kits arrive in the same box that shares the tank's feature of having a modest size but higher profile. Sprues are bagged individually, a small sheet of Photo-Etch (PE) brass, decal sheet and a landscape A5 instruction booklet in each box. The box art shows one of the decal options, however some of the glue on the box corners appears to be failing already, so you might want to put a precautionary staple in yours when it arrives to save scattering sprues everywhere at some later point. M3 Lee Medium Tank - Early (2085) Inside the box are ten sprues and two parts in grey styrene, a small clear sprue with headlights, a PE sheet, decal sheet and instruction booklet as mentioned above. Construction begins with the lower hull, which has a rear bulkhead and final drive housing attached at the front, with three stations on each side for the VVSS (vertical volute-sprung suspension) units, which held a pair of wheels each. The drive sprockets are fitted to the front, and idlers at the rear on a trailing arm that is where tension is adjusted on the rear thing. A number of large bolt heads are added to the suspension units, which can be found on the sprue runners and are cut free with a sharp blade to be glued in the noted position on each arm. The tracks are link and length, with a jig supplied for the top run, which has an upward curve at the front as it rides over the drive sprocket. The highly curved areas have individual links supplied, with the diagonals under the drive and idler wheels fitted in short lengths. The tracks fit under the sponson floors, with separate sides added, which have crew hatches cut into the sides for later fitting. The complex angles of the glacis plate and casemate of the 75mm gun are formed over a number of steps, with the roof having a cut-out for the turret and the limited-traverse mantlet of the main gun attached before it is flipped over and fitted to the rest of the hull. The engine deck is fitted last, and has a choice of pioneer tools and towing cables, which require some holes to be drilled from the inside before fitting. The exhausts and mudflaps are fitted to the rear bulkhead along with a number of panels and towing eyes to the rear, while the bolted glacis flanges are fitted to the front, with the driver's hatch and caged light cluster on the wings. The turret has a simple two-part construction, with the mantlet inserted into the lower half, allowing the gun to elevate, while the top machine gun turret actually has more parts, including vision ports, a split hatch, lifting eyes and machine gun barrel. The 37mm gun and coax machine gun are fitted last before the mantlet cover is installed, which makes one wonder what the purpose of the additional machine gun on the top of the turret was when there was already one mounted coaxially. Markings There are four markings options spread over the inner cover pages of the instructions, All of which are in Olive Drab expect for the Soviet option, which is in Russian Green. From the box you can build one of the following: Soviet Union, unknown unit, unknown date, with red star on the turret, and patriotic slogan on the glacis. US 2nd Armoured Division, 1942 with colourful red/white/blue star roundel on the sides, glacis and turret top. Unknown training unit, Desert Warfare Centre USA, 1942 – white star and 16 on turret with yellow band at the bustle. Unknown training unit, Desert Warfare Centre USA, 1942 – White star and yellow band on turret. The decals are printed anonymously, and have generally good registration, sharpness and colour density, with a thin matt carrier film cut close to the printed areas. On my sample the blue centre to the early roundel is slightly offset, but not all that noticeably. M3 Grant Medium Tank (2086) With two addition sprues and one replacement, the build is essentially the same except for the replacement of the smooth track links with treaded plates, with a set of side-skirts and additional stowage on the engine deck setting the hull apart from the earlier Lee. The mudflaps on the Grant are boxed in to reduce dust kick-up in conjunction with the side-skirts, after which the turret is a totally new assembly. Using the same turret ring size as the Lee, the Grant's turret is appreciably larger, although it mounts the same 37mm gun in the same manner as the other, but omits the machine gun turret in favour of a folding hatch in a cupola. It retains the coaxial machine gun and mantlet plate, but goes at least some way toward reducing the profile of the tank in the enemy's sights. it appears on closer inspection that the moulding insert on the cheeks of the turret has not lined up completely, and has left an infinitesmal mark around the port. This should be pretty easy to clean up, just by mimicking the texture with a round burr in your motor tool, and a little judicious sanding. cast armour was never all that cleanly done. Look at the sharpness of the bolt heads below, and the casting numbers on the Lee turret. Crisp! Markings Because the Grant saw service with the British and Commonwealth forces in the deserts of North Africa, the base colour of the tanks were a sandy yellow, with camouflage patches of various shades applied over the top. From the box you can build one of the following: 2/10 Armoured Regiment, 1st Australian Armoured Division – Khaki green camouflage and yellow triangle on the turret. British 7th Armoured Division, 8th Kings Royal Irish Hussars, Squadron C, battle of Al-Gazala, 1942 – black camouflage pattern and yellow circle on the turret. 3 RTR north Africa, 1942 – Brown camouflage patches, and Khaki green horizontal surfaces. Montgomery's personal command tank, 8th Army HQ, 1942-3 – Khaki green camouflage. Decals are again anonymously printed, with good registration, sharpness and colour density, with a thin matt carrier film cut close to the printed areas. The denim colour of the Porky Pig emblem is slightly offset on my sample, but as it looks like a highlight, it shouldn't pose much of an issue. Conclusion Whilst the old Academy offering isn't a bad kit and includes a basic interior, it is beginning to look dated to the modern modeller's more demanding eyes, so these new releases should be welcomed, especially as the cast texture on the turrets and various other parts is provided in-box without any messy dabbling on the modeller's part with noxious solvents and tools. The lack of interior will hardly bother many, as a lot of models are built with their hatches closed up, or with crew figures to give the vehicle a sense of scale. Detail is excellent, and with a number of other variants including a recovery vehicle forthcoming, Grant/Lee aficionados will be pleased. The Priest also shares the same basic chassis, so perhaps we might see a new tooling of this in due course? Highly recommended. Review sample courtesy of UK Distributors for
-
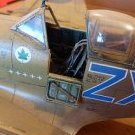
Hey guys! So, this is my third tank on the 'Mark' basis, having built the Tadpole, and Mark. V by Takom also. Assembly was Fiddly yet satisfying as it was simply a repetitive case of building weird, angular boxes. Tracks were click together, and apart from being lengthy, the wheels were a breeze compared to that on other tanks. Painting was a mix of Tamiya Deep Green mixed with Khaki Brown. Although operationally I have read that the colour on these was a chocolate brown, no contemporary colour photos exist of these things as far as I'm aware and Takom calls for 'Moss Green', and to be fair I prefer it in green. The identification bands were masked off with maskol to get over the rivets and if it was over done in areas it wouldn't really matter as it gave a convincing chipped look. Weathering was done by first darkening the colour which i thought was too light to begin with by thinning dark green oil paint and airbrushing it on the low areas to bring a basic colour modulation into the mix. This was followed by thin brown paint ringed around the running gear. Finally, three coats of Raw Umber wash were applied before weathering back with dry-brushing and chipping. The exhaust is an older technique which I'm currently trying to perfect. I tried it on a maus I was building (currently on the bench complete in the corner as the track have scared me off!) and now on the Mark IV. I paint the exhaust in black oil paint to create a sooty fixer for pigment. This is something I'm yet to perfect however... Compared with my Mark V, it is a heavily different tank, just the shape's the same! Hope you enjoy! Sam Excuse the lighting but i've only got a temporary set up at the mo using the sun! Which in the UK is never advisable!
- 10 replies
-
- 15
-
-
This was finished a few weeks ago. Takom's newish release of the Krupp Raumer S (selbstantrieb or self-propelled). An incredibly simple kit with very few parts, but it builds up into a detailed, and huge (18 inches long) model. There was only a single example of the real one built, which was captured at the end of the war by US troops. One of the kit schemes has hypothetical US markings and I went with that option, but showed it as if it had been used for testing, then abandoned to the elements. I wasn't actually that happy with the results in the end, but it was fun to try out some heavy weathering. Thanks for looking Andy
- 24 replies
-
- 32
-
-
-
Kamaz Typhoon K 1:35 Takom The Typhoon-K is part of a family of modular armoured mine resistant vehicles (MRAP) developed for the Russian Armed Forces by Kamaz. There will be a complete family of 4x4, 6x6 and 8x8 vehicles developed. The interior features individual seats with weapons holders and head restraints. The seats are attached to the roof of the vehicle to reduce the effects on the personnel of mines. The vehicle itself is designed with reference to a NATO classification STANAG 4569 to withstand a mine containing 8Kg of TNT. The vehicle is also bullet proof using ceramic/steel armour for rounds upto 14.5mm, this also extends to the glazing. Auto inflation bullet proof tyres are also fitted. The crew can return fire from inside the vehicle using loopholes, and provision is made for a remotely operated gun platform. Entry is normally through the rear ramp though there roof hatches fitted. To date 260 have been built with the first vehicles appearing at the Moscow Victory Day parade in 2014. The Kit This is a welcome new tool from Takom who seem to be on a mission to bring us less mainstream vehicles. The kit arrives in a larger than usual box, when opened the large one part moulding of the upper body of the vehicle really stands out. There are a further four large sprues, a small clear sprue and a small photo etched fret. It should be noted that Takom have provided a full interior for this kit unlike some of thir smaller armoured cars. Construction starts with the chassis which seem fairly complicated, very much I suppose as the real vehicle is. The two sides are separate (left & right) with one large component for each side to which a large amount of chassis and attachement points for the suspension are added. The larger parts which sit between the main wheels are added last. When each side is complete the two sides of the chassis are joined together with three large central components. The suspension units for the three axles are then built up. These feature moveable steering, however the stubs for the moving parts have to be heated and flatened in a somewhat dated method of construction. Once these are on the "V" parts of the lower chassis can be added along with other additional armour parts. The chassis can now be flipped over to work on the inside. The main floor is laid in, and once down the seating along the sides of the main compartment can be made up and added. The front bulkhead of the main compartment can then be added. Up in the front compartment the driver and two passenger seats are made up and added, along with the dashboard and steering wheel. The front compartment can then be added to the chassis. Moving on to the one part top moulding additional internal parts are added along with the front bulkhead to the driving compartment, The seven top hatches are made up and installed along aerial housing and the main filter housings with their PE grills. The drivers compartment doors are constructed and added to the upper body along with the windows. The rear view mirrors are also added to the doors. External steps and a front sun visor are also added. To finish off a variety of external grab handles/lifting eyes etc are added to the main upper hull. the main rear bulkhead is added and the upper hull is then fitted to the lower chassis. The rear ramp is constructed and added in either the open or closed position. The last item is to build up the wheels & tyres and add them to the model. Markings Markings in the kit are sparse as the real vehicles dont seem to carry much. There is a simple set of red stars, and a set of bordered stars featured on the parade vehicles. Conclusion It is great to see Takom kitting these subjects. We have had many western MRAP vehicles mainly as they have been used extensively in recent conflicts. Highly recommended. Review sample courtesy of UK Distributors for
-
The New Takom 1/35 British APC FV432 Mk 3 Bulldog 2 in 1 in 1/35 scale has just been released and is available to order now. . It is the latest new release in the 1/35 Takom military model range.
-
 Finnish Self Propelled Anti Aircraft Gun ltPsv 90 Marksman SPAAG 1:35 Takom The Marksman system was developed by Marconi to be a drop-in solution to the need for mobile, radar-targeted anti-aircraft gun platforms for close-in support of troops, installations and other valuable assets. The system comprises a pair of Swiss made 35mm Oerlikon guns with a fire rate of 18 rounds per second. The Marconi 400 series frequency agile surveillance and tracking X/J band radar is able to detect targets at 12 KM and track them from 10 KM Although the turret could be mated with many different hulls, the British chose the Chieftain tank for trials of this system. The second prototype was mounted on a Chieftain, and have the vehicle a top-heavy look, with the crew hatches perched high on the top of the turret, overshadowed by the radar dish that made it so accurate to its maximum range of 4,000m. Sadly, the Chieftain installation never progressed beyond prototype and it didn't see service with the British Army. The turret did see limited service with other operators such as Finland who mounted it on Polish T-55AM chassis. The Fins moved these systems to wartime storage but have since been fitting the turrets to Leopard 2A4 chassis The Kit This is a re-tooling of the new tool T-55AM kit with added parts for the Marksman turret as seen in the Chieftain Marksman kit we reviewed here. Construction starts with the T-55 chassis. The front plate is added to the rea hull and plates are added for the drive sprockets at the rear. The front idler wheels are made up and added to the hull, these are followed by the drive wheels and suspension arms for the road wheels. The ten pairs of road wheels (five either side) are made up. Here the rubber tyres on the outside of the wheels (moulded in plastic) are separate and are added over the main wheels. With careful construction this could ease the difficulty of painting the tyres that you get with tanks. With the road wheels then fitted you move to the upper hull of the tank. The three parts of the upper hull are joined together, PE rear engine mesh is added along with the drivers hatch. Some tools and a headlight assembly are then added though I suspect some will leave this until last. The upper hull can then be added and the rear bulkhead put in place. The tracks consist of 92 individual links per side. These are put together (i know not as easy as it sounds!). Once the tracks are on the track guards either side are completed. There are PE webs for these, and along with tool boxes and tow cables to add. Once complete they can be added to the sides and the vertical parts added over the tracks. Final assembly of the hull then takes place with a myriad of small brackets, tools, tool boxes etc to add. The turret is then started, with the guns built up first from two halves that have some lovely moulding that results in a hollow flash-guide as per the real thing. These then fit onto a five-part breech fairing that has an axle for joining to the turret body. The two interlock in the middle of the turret, but as there is nothing to provide a friction-fit braking on the pivot-points, you will have to either fabricate your own, or glue them in position, or they will flop. The lower turret with moulded in ring closes up the turret, whilst providing the floor of the bustle that is added later from a single part. A number of sensors and vision devices are installed on the top, along with an insert that contains the two crew hatches and forms the base of the radar installation. The top section of the insert flips up on a pair of hinges for stowage of the radar during travel. More small parts such as smoke dischargers and antennae mounts are added on the sides of the turret and then the tapered radar base is inserted on the hinged panel along with the motor housing. The radome and receiver are put together with some additional sensors on the head-unit, which must again be glued in position. The turret ring then has its bayonet-fitting added to the bottom. When dry the turret is fitted to the hull and twisted to engage the bayonet lugs. Markings Only one set of markings for a Finnish example are provided. These are in the two tone green & black scheme. Conclusion Following on the from the Chieftain marksman there was hope that Takom would kit the one real user of the type. It makes good use of the tooling already developed, and its good to see that they are prepared to invest in this type of kit. Highly recommended. Review sample courtesy of UK Distributors for
 -
AML-90 French Light Armoured Car 1:35 Takom The AML-90 was designed from the original AML-245 specification by Panhard originally being designated the AML-245C. The main feature of this model is the DEFA D921 low pressure 90mm gun. The gun was specifically designed for light vehicles (<10 Tonnes), This made the AML-90 well armed in proportion to its weight. The gun has shallow rifling and coupled with fin stabilised rounds gives a an improved range, however the low muzzle velocity does only favour close combat. Combat in the South African border Wars, and The Six Day War would show the AML-90 was out ranged by older T-34/85 and M48 Patton tanks. Optical fire control, and no power assist on the turret traverse also hampered operations. Even given these factors the AML-90 is capable of destroying older main battle tanks. A Libyan T-62 was reported destroyed in the Toyota War (Libyan/Chad border conflict of 1987). The Kit This is a welcome new tool from Takom who seem to be on a mission to bring us less mainstream vehicles. It is an addition to the Takom AML-60 kit as both vehicles use the same AML-245 chassis (the two kits sharing 3 common sprues & the lower hull). The kit arrives on 4 main sprues, a small clear sprue, 5 rubber tyres, a lower hull part, and the turret. All of the parts are up to Takom's usual standard. The kit does not feature an interior. Of note are the instructions (which I dont normally mention), it seems Takom have shrunk their normal A4 instructions down to A5 to fint in the box, and this had made them harder to read. Construction starts with the lower hull. The rear of the car is attached to the hull along with additional side parts the rear frame and the main side door. The rear wheel housing and suspension components and springs are also added. Additional handles and smaller parts are also added at this stage. The front suspension components are then built up and added to the lower hull. Followed by the wheel housing and their suspension components. The wheels can then be built up. These consist of five plastic components for each wheel in addition to the tyres. The upper hull deck can then be added to the lower hull. Tools and periscopes are added at this stage., along with a sand channel and other parts which I suspect a lot of modellers will leave off until the end. Next the turret is built up from the main part with the hatches, tools and other ancillary parts being added. This turret is much larger than the AML-60. The lower and upper parts are put together with the gun mantlet being added between the two. The hatches, other lights and smoke dischargers are added along with the rear turret bin. the 90mm gun is then made up and added. The completed turret can then be added to the hull. Markings There are 5 options included with the kit, and are featured on the coloured artwork. Argentinian Army - Falklands War 1982 (Green/brown camo) French Army - (Green / sand camo) Israeli Defence Forces (overall sand grey) Iraqi Army - Kuwait 1991 (overall sand) Lebanese Army Special Forces - 2012 (4 colour camo) Conclusion This is welcome new tool from Takom of Armoured Car which was used by the Armies of many nations around the world. No doubt the aftermarket producers will do decals and probably a full interior at some point. Highly recommended. Review sample courtesy of UK Distributors for
-
AML-60 French Light Armoured Car 1:35 Takom The AML-60 was designed from the original AML-245 specification by Panhard originally being designated the AML-245B. This was the initial production variant with a rounded turret containing twin 7.62mm machine guns and a breech lading 60mm mortar. The mortar was normally loaded from inside the vehicle via its breech like normal artillery, or from outside the vehicle like a conventional mortar. It has an elevation of +80° and a depression of −15°. In the vehicle the commander acquires targets and direct the gunner sighting via a combined monocular telescope & binocular periscope. Range of the mortar is 300m in the direct fire role, and 1700m in the indirect fire role. 3200 rounds of 7.62mm ammunition and 32 mortar bombs are carried. The AML60-20 would later replace the twin machine guns with a 20mm autocannon. The Kit This is a welcome new tool from Takom who seem to be on a mission to bring us less mainstream vehicles. The kit arrives on 4 main sprues, a small clear sprue, 5 rubber tyres, a lower hull part, and the turret. All of the parts are up to Takom's usual standard. The kit does not feature an interior. Of note are the instructions (which I dont normally mention), it seems Takom have shrunk their normal A4 instructions down to A5 to fint in the box, and this had made them harder to read. Construction starts with the lower hull. The rear of the car is attached to the hull along with additional side parts the rear frame and the main side door. The rear wheel housing and suspension components and springs are also added. Additional handles and smaller parts are also added at this stage. The front suspension components are then built up and added to the lower hull. Followed by the wheel housing and their suspension components. The wheels can then be built up. These consist of five plastic components for each wheel in addition to the tyres. The upper hull deck can then be added to the lower hull. Tools and periscopes are added at this stage., along with a sand channel and other parts which I suspect a lot of modellers will leave off untill the end. Next the turret is built up from the main part with the hatches, tools and other ancillary parts being added. A choice of twin machines guns & motar, or the 20mm autocannon can be added though the instruction make no note which of any of the decal options carried this, and the decal / markings guides do not show any vehicles with this armament! Once the choice of armament is in place the lower turret ring can be added, other lights and a tarp can then be added to the turret. The completed turret can then be added to the hull. Markings There are 4 options included with the kit, and are featured on the coloured artwork. Spanish Legion - Sahara 1970s (overall sand) Spanish Legion - Sahara 1970s (overall green) French Army - (3 colour camo) Portuguese Army (overall green) Conclusion This is welcome new tool from Takom of Armoured Car which was used by the Armies of many nations around the world. No doubt the aftermarket producers will do decals and probably a full interior at some point. Highly recommended. Review sample courtesy of UK Distributors for
-
IDF Tiran 4 Takom 1:35 History The meaning of Tiran [pronounced as Tiy-RAE-N] in Hebrew is beginner. Israel's chronic lack of AFV's on one hand and it's phenomenal victory in the 1967 Six Days War on the other, brought the IDF to adopt captured enemy vehicles for its use. The Arab armies lost hundreds of fighting vehicles - mostly Egyptian T-54 and T-55 MBT's which were abandoned by their crews. In order to allow for greater standardization in its armour corps, the IDF initiated a conversion program. The captured tanks were re-engined and re-gunned (with the standard 105mm gun used in the Centurion and Patton MBT's). Chief was the several hundred captured T-54/T-55 tanks that were taken and modified into the Tiran 4 (T-54) and Tiran 5 (T-55), called Ti-67 (Tank Israeli-1967) in the west. The main difference between the two versions is the main gun armament. The Tiran 4 having a 100 mm main gun while the Tiran 5 having a 105 mm main gun. The first version of the Tiran 4 is distinguished by a few minor additions such as two brackets, Jerry cans on the back of the turret and a new communication system. The rest seem to be original, even up to the ammunition. The first standard Tiran 4 is one of several sub-versions of the Tiran vehicles. It was directly taken from the T-54 and received a set of different mud guards to the rear, a cal.30 Browning was fitted to the turret, and a box on the rear of the chassis which was also used on most of the Tiran versions. The next version of the Tiran 4 was unusual, in that it retained its original 100mm gun, but fitted with a fume extractor. Many of these cannon are visible on other Tiran versions in the IDF. The second version of the Tiran 4 was fitted with a few additional changes, such as antennas, hatch, and searchlights on the turret, along with spare track links, the biggest change being the fitting of the 105 mm M-68 main gun. The first combat use of captured tanks by the IDF was in operation "Raviv" (8-9 September 1969) - an amphibious raid across the Suez channel. Three T-54 tanks and six BTR-50 APC's were used to wreak havoc behind the Egyptian lines. Tirans were used along Israel's borders - mostly at the Suez front. In the 1973 Yom Kippur war Tirans were used in combat in the southern front - against Egyptian T-54/55 (which caused a lot of confusion). During the 1973 war the IDF managed to capture the newest Soviet MBT of the time - the T-62. Plans for conversion into Tiran-6 were made, but the relatively small numbers captured, together with the massive numbers of M-60 MBT's supplied by the US brought them to a halt (several prototypes were made, however). During the early 1980's Tiran MBT's were withdrawn from active duty. Some were sold to foreign states (including, reportedly, to Iran during its war with Iraq), some were given to Israel's allies in Lebanon and some were converted into the Achzarit APC. Ironicaly, some of the Tirans supplied to the SLA (South Lebanon Army) militia fell into Hizballah hands after the Israeli withdrawal from Lebanon (June 2000). In a way, those tanks made a full circle. The Model We must be getting pretty close to having every single Russian/Soviet tank type being released in injection moulded plastic. At least this kit fills the gap between the JS tanks and the T-62s, and there weren’t too many versions of this vehicle when compared with the T-62 series onwards. Contained in a nicely illustrated box are fourteen sprues and two separate parts in grey styrene, a bag of individual track links in the same material, a smallish sheet of etched brass and a small decal sheet, oh!, and a length of wire. The moulding is superb, with no sign of flash or other imperfections, just a few of the usual moulding pips to clean up. The fact that the individual links are already off the sprue and ready to use is very helpful. Construction begins with the lower glacis plate being attached to the front, the sprocket gear covers to the rear and the idler wheel assemblies to the front. Each idler wheel, which actually looks like a modified sprocket, each one is made up from seven parts. Each road wheel is made up from two wheels and two separate tyres, which will at least make it easier to paint, whilst the sprockets are just two parts, the inner and outer hubs. The slightly confusing bit is that there are three different styles of suspension arm per side, and up to three parts per arm, so take care when assembling and fitting each arm to ensure you are using the right parts for each particular side. The upper hull decking is made up from front middle and rear sections, which, when joined together is fitted out with the drivers hatch, PE grilles, six piece headlight cluster, fastening strips, hooks and other sundry items. With the wheels and tracks fitted, the upper hull decking is attached to the lower hull, followed by the rear bulkhead and inner sprocket gearbox fairings. As stated above, each individual track link is all ready to be used, it’s just a shame they aren’t the click together type as seen in Takom’s Mk.IV and Mk.V Heavy Tanks. They are easy to fit and glue, but it might be an idea to make up lengths of them to match the point in the track and any associated sag required before joining them up around the sprockets and idlers, you will need around 92 links per side. Before the track guards are fitted several holes of various diameters need to be drilled out. The starboard guard is then fitted with the various storage boxes, angled support arms, spare fuel tanks, plus the front and rear mudguards. The pioneer tool rack and tools is fitted to the port track guard, along with the barrel cleaning kit tube, and more storage boxes. They are then fitted to the hull and the fuel tanks pipework attached to the appropriate tanks. The rear bulkhead is fitted with the mounting brackets for the two four piece auxiliary fuel drums and the unditching beam. The build then moves onto the turret, with the single piece upper section being fitted with the hatch rings, internal co-axial machine gun, various brackets, stowage eyes, sight doors, and hand rails before the gunners hatch, which is made up from no less than twelve parts, is attached, along with a sight. The much simpler, four part commanders hatch is glued into position, as is the mantlet cover, three piece 60mm mortar, two jerry cans, small two piece storage box, three piece large storage box, two, three piece aerial bases, and ten piece rear stowage basket. There are two types of main gun barrel, one with a fume extractor and one without, both made up from two halves split longitudinally, so care to minimise the seam will be required, or wait for an aftermarket company to release a metal barrel, the barrel is fitted in place and finished off with the separate muzzle end piece. The six piece 30cal Browning machine gun and eight piece 50cal machine gun are attached, the 50cal having alternate positons. The completed turret is then fitted to the hull at which point the build is ready for paint. Decals Whilst there are three schemes in the full colour paint chart the actual decal sheet is very small and is only required for two of the schemes, one of which only has registration numbers, the other has registration numbers, identification chevrons, and three white rings on the barrel. The schemes are for the following vehicles:- Tiran 4 of the South Lebanese Army, used during the Peace for Galilee operation 1982. Tiran 4 of the South Lebanese Army, Negev Desert, early 80’s Tiran 4 of the South Lebanese Army, Jezzine, 1985 Conclusion Takom really are getting the most of their T-54 moulds, but this is still a very nice kit and looks like it will be a joy to build, much like their other kits. What with Trumpeter and Tamiya producing other versions of the Tiran series, you could end up with a full set. Review sample courtesy of UK Distributors for
-
Hi Folks, So this is my first AFV build, I have previously being building things that only have wings so decided to give something different a go and try and learn a few new techniques along the way. I first spotted this kit when it came out and I was immediately drawn to it so I am glad I finally got my hands on it. It is the Takom 1/35 King Tiger full interior kit featuring Abt. 505. I will be doing my interpretation of how the tank would have looked at the time. Considering I haven't been able track down too many references of this particular KT I am taking a little bit of an artistic licence with the weathering and battle damage. I plan on building the tank as if it was engaging a target from a static position at a distance as I have learned these machines weren't built for close engagements. With this in mind it will mean leaving it buttoned up, but I am going to leave a large portion of the doors and panels unglued so they can be removed and you can have a look at the interior. Unfortunately I never took any pictures when I was building up the interior so I only have them after it has been built and painted but will try and keep up with pictures as I progress. I think I was a little heavy handed on the chipping, but should be able to clear all that up when I start weathering. The engine all painted up. I later gave this a run over of panel line wash and will rust up the exhaust pipes a little later. Also need to add some chipping. And the weathering begins...and finishes: I then started to put everything into place. Thankfully even with the paint everything managed to slip together nice and snug. I have added a lot of grime, oil and even a few leaves to portray the winter environment and the crew dragging the dirt inside the tank. Nothing special was used, litte european earth pigments, streaking grime for interiors, black night panel wash and also some black ink was flicked from the brush to replicate oil stains and spills. If anyone has any questions or comments please feel free to share and chat! Cheer
-
FV432 Mk.3 Bulldog 1:35 Takom Dating back to the 1960, the design for this British front-line "battle taxi" has undergone many changes over the years, and many British Army soldiers will be hugely familiar with this robust, quirky little vehicle. Originally to have been declared obsolete and sent to the scrapyard or into private hands, the eruption of hostilities in the Middle East saw renewed use for the 432, and in light of experience gained in that theatre, a thousand chassis were upgraded and zero-houred to the new Mark 3 standard, including new steering, braking and propulsion systems, as well as reactive armour and even air-conditioning units for those bound for the sandbox were fitted. In addition, new systems were employed to protect the crew and passengers from the perils of asymmetric combat, in the shape of IEDs and RPGs. Along with a number of other vehicles in theatre, perhaps in a psy-ops style attempt to give the 432 some "fear factor", the upgraded vehicles were christened "Bulldog" to represent their pugnacious character and their by-now broad beam. A heavily modified 432 (probably one of those sold off before the need arose) was seen performing duties as a Hover Tank in the new Star Wars film, Rogue One. The Kit Lots of British AFV fans were very pleased about Takom's announcement of a new series of models of this iconic and popular vehicle, which allowed them to push their ancient and iffy Academy kits to the back of the shelf, or offload them to a well-known auction site. This is the second issue from Takom, the first being the 2/1 that came with a full interior, which we sadly missed due to unforeseen circumstances. The Bulldog boxing is a substantially new issue due to the massive differences between the kits, and as we've not yet reviewed its stablemate, we'll start at the very beginning. The box is the now traditional Takom style with separate lid, and individually bagged sprues (with the exception of the multiple sprues) inside, which are resealable if you're one of those folks that like to rebag your sprues after fondling them (you wierdos!). In addition to the ten grey sprues and two hull halves, there is a sprue of clear parts, a small Photo-Etch (PE) fret, a decal sheet, a track jig, and the instructions with integrated painting and markings guide. Not unusually, construction begins with the lower hull and the many suspension parts being added, lined up using the holes in the track jig mentioned above. This is repeated both sides, and the twelve road wheels and two drive sprockets are made up in readiness. The sprocket and one road wheel are placed in the jig and are dressed with the link and length tracks, with two being needed, so a bit of a delay will be necessary to allow the first run to set up before you can start the second. Scrap diagrams show how the finished article should look from both sides, and above the sponson floor the sidewalls are fitted, with a number of mounts moulded-in to accept the stand-off reactive armour. The exhaust is directed along the left side and exits at deck height toward the rear of the vehicle, which is also added at this time. Large stowage boxes fit either side of the wide rear door, and a number of small holes are drilled out in preparation for the fitting of detailing parts. The separate sponson rear ends have long mudflaps added from PE, and the door is made up with ammo boxes fitted to the inside, plus handle and number plate on the outside. The glacis plate has a change of angle around half way up, and is built from two sections to accommodate this (the upper section moulded into the deck), with ERA blocks fitted to the fixed section and slat armour added over the hatch on the lower section. More slat armour panels are fitted below the nose, with light clusters and sensor boxes for good measure. The deck is full of holes at this point, but has pioneer tools and copious smoke grenade launchers installed before attachment to the model, which first needs the outer shell constructing before fitting. Engine ventilation covers are added to the right side of the hull, and are immediately covered by the outer hull panel and its appliqué armour, which has a separate top panel for preservation of detail. This is repeated on the other side, allowing the fitment of the glacis and deck panels, which are detailed with the hatches and grilles to fill all those holes bar the main "turret ring" at the rear, and the commander's cupola, which is added later with clear vision blocks. Additional slat-armour corner parts are inserted in the gaps to protect those areas, and this is repeated at the rear, with the air conditioning box perched on the very back of the deck, overhanging the rear door and decked with aerials and jammer antennae. The rear of the vehicle has a complicated set of slat armour panels that allow the rear door to operate, with bracing struts preventing strumming over rough ground. More sensors, antennae, the rear clamshell top hatch, and the large crew station are built and added, the latter made from a substantial number of parts, which provides more than adequate protection for the top cover man, with shields and armoured glazing all around his GPMG station, which can also be operated remotely from inside thanks to the TV box on the opposite side of the mount to the ammo can. Markings Takom and Ammo hooked up to do the colour and markings options fairly early on, and this carries on in the back pages of the instruction booklet. There are three decal options, all of which are applied over a sand yellow base, with little to differentiate other than the weapons fit and unit markings. From the box you can build one of the following: 1st Battalion Scots Guards Reconnaissance Platoon, Operation Telic, Southern Iraq, January 2008 – Yellow 12 marking on rear and unshrouded GPMG on the upper deck. 1st Battalion Scots Guards Reconnaissance Platoon, Operation Telic, Southern Iraq, January 2008 – Rob Roy on sides, shrouded GPMG on the cupola. 1st Battalion Scots Guards Reconnaissance Platoon, Operation Telic, Southern Iraq, January 2008 – Robert Bruce on sides, and unshrouded GPMG on the upper deck. The decals are printed anonymously, and due to their simplicity there is little need for register (which seems good anyway), with the lighter colours appearing suitably dense. There is a tiny amount of over-printing of the yellow around the white backing, but that should disappear on a sand coloured backdrop. A little variation in units would have been nice to see, but as there's not much in the way of decals anyway, it wouldn't be too hard to build your own choice of subject, taking note of the personalisations to the vehicles. Conclusion The FV432 is long overdue in 1:35, and this seems to hit the spot. If you've spent a lot of time around these vehicles as some of my friends have, you'll be bound to pick up some things that might need attention, but for the majority of us (self included), this is a welcome addition to Takom's increasing armour range. Very highly recommended. Review sample courtesy of UK Distributors for
-
M47/G Patton 1:35 Takom via Pocketbond Despite his insistence that the US Forces didn't require a heavier tank toward the close of WWII, which resulted in the delay of the capable Pershing tank, so that it barely made any difference the final few months of the war, the US Army seem fond of naming tanks after this flamboyant General. Of the four, the M47 was the second, and was a development of the earlier M46, which was always to be an interim solution whilst they waited for the ill-fated T42 medium tank. The M47 was also supposed to be a stop-gap, but it took the M46 chassis and mated it with the turret from the T42, with a 90mm gun as the main armament. It also had the distinction of being the last US tank to have a bow mounted machine gun in the glacis, with following designs having a coax machine gun alongside the barrel for flexibility in combat. Over 9,000 examples were made, and its front-line lifespan was relatively short, being superseded by the M48 Patton almost as soon as production ceased, and being declared obsolete only 5 years later. By the end of the 50s, the US army had sold their stock to overseas customers, and even the US Marines, who aren't so quick to throw their kit away had replaced them by that time too. All in all, not a well-loved tank in US Service, but it served other Allied nations such as Italy and Spain in large numbers, so it wasn't a total loss. The Kit The juggernaut of new releases from Takom continues apace, and the Patton range of tanks seems to be one of the current subjects in hand. The kit arrives in a standard top-opening box, and inside are seven sprues and three separate parts in mid-grey styrene, a small clear sprue, two khaki coloured track jigs, a small decal sheet and of course the instruction booklet with painting guide on the insides of the glossy cover. Beginning construction with the M46 Patton styled underside involved adding the various suspension parts, using the track jigs to line up all the swing-arms, and creating 14 pairs of road wheels, plus two drive sprockets. The jigs can then be used to create the track runs, which are link-and-length, by installing the idler and drive sprockets temporarily in the jig and lining up the parts of the track with small bars that ensure correct position when dry. The whole assembly can then be lifted off once the glue is dry to install the road wheels and tracks in your preferred order of construction and painting. The upper hull is made up primarily from a single slab with moulded-in engine deck louvers and the sleek cast glacis plate, which has subtle casting texture to its surface. The bow-mounted gun, lifting eyes and towing shackles are added along with the D-shaped front hatches and their periscope, finished off with the light clusters and their protective framing. Shackles, vents, towing eyes and tow-ropes are added to the rea, and then the two fenders are built up away from the hull, with stowage, pioneer tools, exhaust boxes with shrouds added to both before being attached into long slots with matching tabs in the now complete hull. The turret also has the casting texture moulded-in, which will need a little fettling around the top-bottom join, paying careful attention to your references so that you don't make it too neat and tidy. In fact, it could do with a little sharpening at the bottom edge, with an almost vertical torch-cut pattern where the area has been "tidied" up, and I use that term very loosely. The casting details are nicely embossed on the bustle, and should escape any damage if you are careful when cleaning up/texturing the joint. A functional pivot for the gun is fitted inside the lower half before closure, and if left unglued will enable the gun to be posed after completion, although there is no damping in the shape of poly-caps, so it might need gluing later to prevent droop. A big trapezoid stowage box is added to the rear with spare fuel cans strapped to the sides, and the commander's cupola with clear vision blocks and periscope is dropped into the hole in the turret top, next to the simple loader's hatch, with an M2 derivative machine gun on a simple pintle-mount next to his hatch. Two barrels for the main gun are supplied, depending on whether you will be fitting the canvas mantlet cover or not. Without it, the barrel is a single moulding, with a choice of muzzle types, while with the styrene cover the barrel is split vertically but uses the same muzzle brakes. If you are fitting the cover however, you will need to remove the little catches that are attached to the front of the turret, as these are moulded to the cover. Grab handles and tie-down points are fitted to the sides of the turret, plus smoke dischargers, and then it's just a case of twisting the turret into its bayonet fitting, and you're finished. Markings There are six marking options from the box, and the profiles have been done in conjunction with Mig Jiménez's company AMMO, so the colour codes are theirs, although you also get the colour names, so conversion to your favourite brand will be relatively easy should you need to. Given the more widespread use of the vehicle by foreign powers, there is only one US option, with the rest being from various countries as follows: M47 Early production Detroit Tank Arsenal, USA 1951 – all over green. M47 G, Western Germany, 1960s – all over green with post-war German cross. M47 Pakistan Army Battle of Assal Uttar Sep 10th 1965 Indo-Pakistan war – Green with wavy brown camo. M47 South Koeran Army, 1980s – Green/sand/white/black camo. M47 Jordanian army 6 days war, 1967 – sand with wavy green camo. M47 Croatian Army Bosnia Herzegovina – green with red-brown and sand yellow camo. The decal sheet is printed anonymously, but is of high quality so could be by Cartograf, which is a guarantee of good registration, sharpness and colour density, with a thin matt carrier film cut close to the printed areas. Conclusion Not everyone likes link-and-length tracks, but otherwise this should appeal to many modellers, with plenty of relatively unusual schemes to choose from. Highly recommended. Review sample courtesy of UK Distributors for
-
Hi gentlemens!) My new job. Paints - Tamiya. Some weathering: rust - Choma pigments. Thanks for watching!) Konstantin
-
Takom and Thunder Models have some great new Tank Kits to add to the 1/35 Military Models range this coming month: https://www.wonderlandmodels.com/blog/article/new-takom-thunder-models-tanks-june-2017/
-
From their facebook page;
-
This is a great kit, lovely sharp details, excellent plastic and etched parts. The running gear and hull go together with relative ease, and soon looks great, especially with the separate plumbing for the fuel tanks; The main gun on the other hand is a test of patience, there will be over a hundred parts to this ‘bit’ once complete, lots of very and I mean very small bits to make sub-assemblies and then glue these onto other assemblies as you go along. I have no doubt that once complete it will look stunning. Just very time consuming https://c1.staticflickr.com/5/4221/34948632682_ce37997e86_z.jpg[/img
-
Another one just announced by Takom, Kamaz Typhoon K MRAP. Will have full cab & interior. Julien
-
Just seen on Takoms facebook page; I know we have a 432 post but this is so different from the standard APC I think it deserves its own thread Julien