Search the Community
Showing results for tags 'Hasegawa'.
-
Hello, I present the first kit that I finished using an airbrush, some 30+ years ago ... It is the old Hasegawa kit with raised panel lines. Built from the box, very small detailing : replaced the navigation lights with clear parts added brake lines on the landing gears added the ejection buckles on the ejection seats. Painted as per the instructions, with Gunze H307/H308/H337. Now I'll try to to as well (or even better) after this very long break.
-
Hi, Continuing my 1980's Phantom Phest before I even complete my Texas ANG F-4C, this is my Hasegawa F-4D that I'll build as a RoKAF aircraft. This one was delivered to the South Korea in 1989, still wearing the special camo scheme with which she had served in the AFRES earlier in the 1980's. Cheers, Stefan.
-
 Greetings! Here is the result of my work on RAF version of Eurofighter Typhoon, built on the basis of the Hasegawa model in 1/72 scale. Brief historical background and selection of prototype 19th of March 2011 NATO started intervention in Libya. The operation was part of an international coalition aimed at enforcing a Libyan no-fly zone in accordance with the United Nations Security Council Resolution 1973 which stipulated that "all necessary measures" shall be taken to protect civilians. As part of these events, there were many military operations. UK part of intervention had codename Operation Ellamy. The British Royal Air Force (RAF) is the largest operator of the Eurofighter Typhoon. As the part of operation, Typhoons together with Tornados were deployed at Gioia del Colle Air Base (Italy) to 21 of March. First combat mission by Typhoons was flown at 12 April 2011. The operation has been finished at 31 of October 2011 after killing of Muammar Gaddafi on 20 of October. Based on available references I’ve chosen to build ZJ919. Photos related to August 2011 shows this Typhoon with bomb strikes marks. So I decided to replicate airplane in this condition. Additional accessories The following additions were used: Brassin, 672114, AN/AAQ-28(V) Targeting Pod ResKit, RS72-0047, Paveway-II Bombs (2 sets, total of 4 bombs) ResKit, RS72-0086, AIM-120 (A/B) AMRAAM Missiles ResKit, RS72-0059, Wheels (only the front wheel was used) ResKit, RSU72-106, Open-Type Nozzles (nozzle parts were used) Olimp Resin Accessories, 72-28, Nozzles (afterburner parts were used, set is no longer produced) Olimp Resin Accessories, 72-30, Intake Channels for Revell model, (used partially, set is no longer produced) Eduard, 73473, Photoetched parts Additionally, a Revell kit 04317 was used. Below is a list of parts taken from the Revell kit: Ejection seat Part of the cockpit's forward instrument panel with screens and central console Deflectable air intake doors Fuselage part near the left wing root, where the gun is located Main landing gear bay doors Main landing gear wheels Decals Building process It took almost 7 years with significant breaks to build this model. Here are the areas that took most of attention and efforts: the cockpit was extensively modified the main landing gear bays were made from scratch the front landing gear bay was significantly modified all landing gears have been detailed the intake ducts were made from scratch riveting was applied all exterior elements have been modified in accordance with the prototype bombs, missiles and fuel tanks have been modified and detailed Details related to each area you can find below. Pilot's cockpit The forward instrument panel, central console, and ejection seat were taken from the Revell model, as these elements are more accurate in the German kit. Eduard PE were used where applicable, along with many other handmaid details. The cockpit canopy was tinted from the inside. Ventral fin Rivets were applied, the thickness of the trailing edge was reduced, the exhaust openings were drilled out, the emergency fuel drain pipe was drilled out, and other elements were detailed. Wing The ailerons and flaps were cut off, as on most photos of the aircraft in the parked position, these elements are deflected upwards at a small angle. In addition, the rivets on the wing surfaces have been reproduced. Air Intake ducts The model had no air intake ducts. I bought a set of intake ducts by Olimp Resin Accessories for the Revell model, hoping to integrate them into the Hasegawa kit. Unfortunately, the set didn't fit at all, so the resin ducts were cut in parts and used fragmentarily (light turquoise parts on the photos). The remaining parts of the ducts were made partially from Hasegawa parts, partially from plastic, and partly using two-component epoxy resin. The inside of the duct was puttied and sanded to achieve the desired smooth finish. The first stage of the compressor was made from sheet metal, and the second stage was made from plastic. Main landing gear bays and struts The main landing gear bays were completely removed and rebuilt based on collected reference photos. First, the shapes of the bays were recreated, then everything was painted, weathered, and finally detailed. The final result looked as follows: To make the main landing gear struts, I used the struts from the kit, removed unnecessary parts, and replaced the shock absorbers with syringe needles. After that I started detailing, painting and washing: The torque links were included in the photoetched set, but I didn't like them, so I made my own. The main landing gears were installed using a custom-made template. Both inner and outer landing gear doors were used from Revell kit. It was easier to improve and modify them and allows to achieve better results, despite they were from a different kit. A Few words about the main landing gear wheels. I purchased a set of wheels from ResKit, but for several reasons, I decided not to use them. In the end, I took the parts from the Revell kit, and after some modifications, they were installed. Here is the final appearance of all the assembled elements: I have to notice that these landing gears are most complex, difficult and detailed work I’ve ever made. And despite the fact that I made some mistakes, due on the one hand to inattention, on the other hand to limitations associated with the size of the parts, I am generally satisfied with the result. Front landing gear bay and strut In the front wheel bay it is necessary to add middle bulkhead and improve details on the rear wall. Based on reference photos, I painted the front landing gear bay. Additionally, a large number of small details were made. The final results at this stage were as follows: I then worked on the front strut, replacing the actuators with metal and adding extra detailing. The front wheel was taken from ResKit, but the wheel disk was replaced with a handmade one. I also made a second hydraulic actuator for retracting the strut. The front bay door was thinned and missing details were added. The final appearance of the entire assembly turned out as follows: Payload After studying various photos from the Libyan War, the following ordnance layout was chosen: LiteningII AN/AAQ-28(V) targeting pod 2 ASRAAM-132 missiles 1 AMRAAM AIM-120B missile 4 PavewayII bombs 2 fuel tanks A lot of work was done on the payload, as described below: LiteningII AN/AAQ-28(V) targeting pod from Brassin. At first glance, it looked fine, but on the British version, the air intake is located on the left side instead of the right. I had to modify it. The glass is absent in the kit so I made the glass and lenses below it. Unfortunately there is little to see below the blue glass. ASRAAM-132 missiles I’ve took Hasegawa parts as the base. I replaced the fins, molded the nose cone from transparent plastic, and drilled out the nozzle. AMRAAM AIM-120B from ResKit This missile is perfect. The only modification is adaptation for conformal placement. PavewayII UK bombs by ResKit The important thing is that ResKit provides the English version of these bombs. American bombs of the same name are very different, and this is important to know. But the quality of the products in this set, in my opinion, could be better. First, I didn't like the laser guidance head, so I made my own. Second, I had to remake the control surfaces, as the ones in the kit were too thick (0.4 mm), which looked unrealistic in 1/72 scale. I made them from 0.1 mm plastic with 0.5 mm diameter supports. Third, I had to make my own decals for the yellow stripes, as the set only included blue stripes for the training variant. Additionally, the printed texture remains visible after painting, though it isn’t very noticeable. Fuel tanks The kits tanks were good, but the thickness of the stabilizers needed to be reduced and holes added to the bottom of the tank. Exterior As I worked on the model, I added various small details based on the photos of the prototype. Here are some photos of the process: Painting and weathering After analyzing and consulting with British modelers, I chose Mr.Color paint No. 334 Barley Gray as the main color. I used Mr.Color No. 306 FS36270 for all the radio-transparent surfaces and leading edges. The decals were mostly from the Revell kit, with a few from Hasegawa. The registration number was combined from separate elements. I also designed and printed the bomb strike markings myself. Enamel paints were used for washing. Stains, dirt and other weathering were made by oils and enamels. Final result This model is a most complex and the hardest project I have ever undertaken. When I started the project in 2017, I didn’t anticipate even a half of the needed modifications. In the end, despite the mistakes and unfinished details, I'm happy with the result. Thank you for attention. Respectfully to modelers of all countries, islands, and continents, Dmitry aka DimaADA
- 63 replies
-
- 97
-

-

-

-

-
- Eurofighter Typhoon
- 1/72
- (and 1 more)
-
 Hasegawa Lancia Stratos 1:24 + GP modeling 24V engine / rear frame transkit This is my first “new model” I aquired when thoughts started circulating about returning into the hobby.. right about 2020 (a year many introverts thrived ) At the time the incredible GP modeling transkit didn’t exist. I bought a Reji engine and detail up set which has now been far overshadowed by what the GP modeling kit offers. I do feel like I’m overstepping a bit into a complex project with modifying of kits with the entire rear frame and engine to be made to fit. Playing with the idea of having both clamshells hinged. The subject car is so exciting to me it might just be the thing that pulls me through to succeed or at least finish. And that’s something I’ve decided is the most important thing to do is to conclude projects. I have a few stratos which I will build but I am starting with the first which was bought chronologically. I like the thought of peppering in lighter projects such as road cars and curbsides when necessary to get the completion satisfaction buzz in parallel to more complex builds which I’ve done the past decade with my 1:10 builds. I had a moment for documentation of parts as I slowly descend into the journey of cutting, cleaning and fusing parts. Project direction is to make a blank slate white Lister Bell type group 4 build. I’m open to a vibrant a yellow colour or others as well.. The wonderful box art livery would be great too. It will be alot of obstacles to overcome before any paint will be applied. Let’s have some fun! Unboxed group b alien species
- 106 replies
-
- 15
-
-
- Lancia Stratos
- Hasegawa
- (and 1 more)
-
So finally this is my first finish of the year Hasegawa's B25J, pretty much straight OOB less the DK Decals Slovak National Uprising sheet which has 2 Mitchells operated by the VVS and the Eduard mask set. The kit was released in 2003 and goes together very well and the problems I had were all down to my ham fistedness and not reading the instructions properly. Painted with the usual Tamiya and Mr Hobby Colour paints with Mig Ammo weathing Powders for the exhaust stains and an oil paint panel wash. The DK decal worked well but I managed to rip halve the 37 from the port side with a bit of masking tap. The kit comes with a handy "step" to prop up the rear crew access door as there is no way to put any weight in the nose. The decals seem to show the aircraft as it was delivered to the VVS with the cheek gun gondola's fitted, these were removed by the crews and painted flat black so I masked these area's of before spraying the main colour's. As usual all comments welcome
-
So while I was getting the paint for the Flyhawk Dauntless a couple of months back, my LMS had the Eduard reboxing of the Hasegawa B25J in the Gunn's Bunny version. It was a very nice with some lovely marking options but it was priced at £55 which is a bit more than I would normally spend on a kit. Once home I started checking on the big online market place and picked up an original Hasegawa boxing for a mere £21. And as I'm a sucker for unusual colour schemes I picked up the DK Decals Slovak National Uprising sheet which has 2 Mitchells operated by the VVS. I'll be doing 327634 Started with the interior parts and spraying my mix of XF1 and XF4 A bit of detail paint next.
-
From the Tintin book 'The Red Sea Sharks'. It's the Hasegawa 1/72 Mossie kit with (heavily modified) Blue Rider decals. Depicting it in flying mode meant closing the undercarriage doors, which required a lot of filling/sanding. The only other deviation from the kit instructions was the re-configured nose gun arrangement, and I added Skut the pilot. My figure painting ability is – appropriately – comical, but he looks OK under glass.
- 44 replies
-
- 96
-
-
-
-
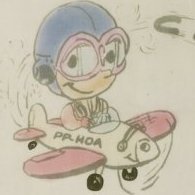
 Hello Britmodellers, The Bf109TL1 was a design for a jet propelled Bf109 with a configuration reminiscent of the Yak 15. After the Second World War many German aircraft stockpiles were seized by the Allied forces, but some were overlooked or forgotten. It was from these stockpiles that new planes were quietly being assembled for the fledging Elbonian Air Force. Thirteen airframes were built and supplied to the 1st Flying Fighter Squadron in early 1946. Due to its typical side profile view it was dubbed the "Tadpole" by its pilots. Thanks for watching, and happy April 1st! 😉
 -
 Just completed my Monogram ProModeler F-4E. It is the Hasegawa E with the J kit "hard wings", i.e. no leading edge slats. Overall not a bad kit for its age, but the Hasegawa molds were getting old by the time these kits were produced. Here is the build thread: The inspiration for the build was this photo, posted on the F-4 google group that I frequent. It is also on the Phantom (or maybe the 388th TFW) Wikipedia page, so not copywrited I guess. Here is my interpretation in 1/48th. Paints are a mix of different brands because I didn't have all of the colors in one brand. FS 34079 dark green and 34102 medium green are Hataka lacquers. FS 30219 tan is a mix of Testors Model Master enamel FS 30219 and ~40% flat white to lighten it up. The underside FS 36622 light gray is Vallejo White Gray acrylic. The Hataka lacquers are easy to work with and cover very well, but I didn't have the tan or light gray that I liked. Metal areas on the tail are Vallejo metal color acrylics. Decals are likewise a mix of kit decals, which worked ok, Caracal star and bar insignia, and on the tail Aeromaster "JV", Detail & Scale "AF 70" and another white number set for the "301". If the weather was better here in the Pacific Northwest today I would have taken some photos outside, but we have low overcast and steady rain. Maybe next week I can take it outside. External stores are the kit AIM-7 in the left forward missile well, Royal Jet 600 gal centerline tank, Hasegawa weapons set AGM-112 Bullpups on the wing inboard pylons and outboard MERs with Eduard SUU-30 cluster bomb units. The CBUs aren't actually correct per the source photo, but as close as I could find last year. I just saw a couple of weeks ago the 48ers had a set that were correct, with the flat plates on the tips of the tail fins. Forgot who makes them... A couple of notes on the above photo: The camo on some of the USAF jets wrapped around the leading edge of the wings a bit. I opted for that here. Also, since the Hasegawa intakes just end, rather than paint them black I went with white and made some engine compressor face drawings on the computer and glued them inside against the back wall. Almost looks like engines back there. I did this on a Hasegawa F-16 several years ago and it looked ok. In the real world the engines put out a lot of black smoke and the soot blanketed the tail. I just sprayed some diluted flat black behind and under the nozzles and stabs. No need to fancy it up with heat-stressed metallic golds and blues. Questions and comments welcome. Thanks for following along.
- 12 replies
-
- 52
-
-
-
-
This build has been on the go since last October, it finally got over the finishing line this week - first completion of 2025 (its been a very slow start to the year, modelling-wise!). I picked this vintage kit up from the Sywell museum model sale a couple of years ago, something in me likes buying second hand kits. This may be why I never seem to find myself making modern, well engineered models! The decals were pretty shot, taping them to a window didn't seem to help, so I bought a Microscale sheet from Hannants to represent a machine from VF-24 with suitably colourful markings. I also fashioned an intake cover to hide all the noseweight that I put in the nose. Have to say, I'm pretty pleased with how that turned out as I was apprehensive about being able to do anything half decent. This was my first proper attempt at pre-shading. To be honest, it didn't work very well - except maybe on the underside. Where you can see it, I think it just looks odd, not like the subtle variations I was looking for. I struggled massively with airbrushing this, even though I was using my go to Mr Hobby paints. I think my airbrush was filthy, and I was very out of practise, having not really done any spraying for months over the winter. Still, she's a USN fighter and she looks decent in the cabinet alongside my F-4B 👍 For references I can highly recommend the Detail & Scale publication on the F-8. Some great pictures in there of lots of esoteric details that are hard to find anywhere else (e.g. the alignment of the sidewinders on the Y pylons). I only discovered this at the end of the build sadly, but its still a great resource to have. Anyway, on with the pictures! Al.
-
I'm on quite the roll this year. 4 kits finished (not all started this year, mind) and another one approaching the finish line. So let's keep the momentum going 👍 I'm very much a cold war jet fan, and of those the flamboyant USN jets of the 50s & 60s are the best! I don't know why, but this one has been calling me for a few days now. Might have been @Lord Riot asking about USN jets in another thread somewhere. I got this second hand out of the back of someone's van at Sywell model sale a couple of years ago. Scalemates tells me it's a late 1970s vintage took reboxed sometime in the 80s. It doesn't seem to get the best press online, but I'm not a rivet counter and it's unlikely to end up sitting next to an Academy F-8 so I'm hoping it'll do just nicely. Obligatory box shot: Apologies for the dim witted politician photo bomb, I have to scrounge newspapers off others. The instructions are quite the contrast with modern efforts. Simple eh? Think I'm going to do it with the wing down as I think that technically you should drop the flaps if the wing is up, and that requires surgery. And the sprues. The decals are a bit yellowed so they are currently taped to the dining room window, hopefully they'll be OK. If not, there are plenty of aftermarket options out there. Think I'm going to do the USMC option as the markings are the prettiest 😁 I really need to get on and buy a display cabinet for my office.. 🤔 Al
- 51 replies
-
- 15
-
-
Greetings everyone! I present to your attention a “Hasegawa” kit F-15C in 1/72 scale. For my building I chose an aircraft with the board number 79-036 as of 1984, when this aircraft was based at Bitsburg Air Base in Germany. The kit was built in 2016. During the build process, I used the following aftermarket: 1. Photo-etched “Eduard” № 72398 2. Photo-etched “Airwawes” № 7209 3. Exhaust nozzles “Aires” № 7170 4. Ejection seat “Quickboost” ACES II № QB72022 5. Cockpit light “BobTaurus” № RT72041 6. “TwoBobs” decal № 72-099 7. AIM-9M/L Sidewinder “Brassin” № 672 037 8. Angle attack sensors “Master Model” № AM-72-008 9. The “Academy” F-15C kit was used as a donor for some details. Below I want to show some of the building steps in more detail. Air intake channels “Hasegawa” does not provide air intake channels, so I integrated it from the “Akademy” kit. Wing Fins Cockpit Front wheel bay Pylons and armament Main landing gear and wheel bays The main landing gear were almost self-made from metal needles, different kinds of plastic, some PE parts, tin and wire. Nose landing gear As the main landing gear, the nose landing gear were almost self-made. Other elements As you can see, all elements of the model have been subjected to great improvements. Building took about two years. I hope the viewing was interesting. Best wishes Dmytro aka DimaADA
- 55 replies
-
- 107
-
-
-
-
-
 Alright, I admit that it might be not the best idea to start two GB projects (have Heller Connie in the works already), but seeing as I've got a kit fitting for this GB, lets see if one more box of sprues turns into a decent model at a reasonable pace. This is the kit I'm working with: Here is a Scalemates link and its instructions or part of them anyway. Kit has two sets of everything except sprues, these likely come in singular editions. Making one side Italian and another German, eh? And here is what we (mostly me though as kit's mine ) come up against/with/along/pick yer relationary word of choice: Italian Hasegawa (same kit btw) by @Dave Klaatu (two letters away from Hlaalu. "Great House welcomes you outlander."): Slightly different but still very Italian F-104 by @Giorgio N: @Hook assembling same kit but as a Dutch plane: @Dermo245 and their "ancient-looking" kit from 2000s or thereabouts: A truly ancient kit from 1989 in an unknown scale (likely 1/72) coming from this forum's resident F-104 builder @reini: Plenty of competition if I was competing but I am not. What does are two decal choices and so far nether is winning. P.S. Yes, I tagged all of you. No, Heller kit is not done yet. Yes, I immediately started procrastinating on this GB.
 -
Hi modellers. This is another one from my Omani Air Force collection - The Jaguar OS, in the newer three tone camo scheme from just before the Jags retired in 2014. It was a bit of a strange project. It started started with me reading a post here on BM regarding the new Omani three tone camo scheme. I thought i would give this paint scheme a go and initially my plan was to repaint an Italeri Jag that i was not satisfied with. But the kit was in too bad a stage, so i took a two seat Hasegawa kit from the stash and kit bashed with the nose section of the old Italeri kit to make it into a one seater. I riveted a little on the wings and made some antennas from styrene. There is not much in the way of decals on the aircraft, but the fuel tanks is littered with markings - so i did my best to try to replicate this with help from the spares box. The colors used are: Sand is a mix of Hataka desert pink and Vallejo sand primer 50/50 mix. The light grey-green is Hataka raf sky and interior green 50/50 mix. The darker green is Vallejo fs 34102 Anyway, here it is.
- 30 replies
-
- 70
-
-
-
After seeing other Phantoms on the site lately, I thought I might add my own current effort. In this case it's the Monogram Pro Modeler early hard wing E, i.e. no wing leading edge slats. The kit is actually the Hasegawa 1/48th F-4E fuselage with the F-4J wing set. Kind of a mishmash of Hasegawa Phantom parts to get an early E. This is my first build of this kit and it looks like the molds were well used by the time this one came out. Some flash, a little more mold line mismatch, and the recessed panel lines seem a little less deep than original Hasegawa kits. My inspiration was seeing this photo in an F-4 Google group email several months ago. When I researched the tail number, this same photo showed up in Wikipedia, so it must be public domain now. This is the only photo with this load out that I could find. I have the Hasegawa Weapons Set B with the AGM-12B Bullpup missiles and have ordered a set of early SUU-30 CBUs for the outboard stations. This is my sixth or seventh Hasegawa F-4 and there are a couple of things I do on them now. There are always ejection pin marks on the inside of the intakes. I don't really mind the "shallow" intakes, but do have a couple of sets of seamless intakes for use on later builds. I filled in the pin depressions and sanded them smooth. Also, the back side of the intake ramps need to be filled in. The lower area is not really visible once assembled, but the upper areas are. Filled with plastic card bits and sanded smooth. After a primer coat, I'll see if they need more attention.
-
 Hi all, This is my first RFI since June last year when I completed my 1/48 Sea Harrier FRS.1 of the Falklands War. I've been interested in the Fuerza Aerea Argentina Skyhawk, since building the Airfix Falklands War 25 year anniversary set in 2007. Having watched period footage of the Skyhawks flying at ultra-low level, taking anti-aircraft fire from the British warships they were targeting, I can't help but have a massive amount of respect for the pilots' courage in carrying out their missions at long range, through foul weather, with the Harrier threat - 17 Argentine Skyhawk pilots died during the Falklands war. Skyhawks damaged or destroyed multiple Royal Navy warships, which destroyed (with the British personnel losses in brackets); HMS Ardent (22 killed), HMS Antelope (1 killed), HMS Coventry (19 killed), as well as being responsible for the Bluff Cove air attacks (56 killed). A small jet, with a very large impact. When Hobby2000 re-released Hasegawas 1/48 Skyhawk A-4B and A-4C I immediately bought one of each, to convert to FAA examples. I made the following upgrades to both aircraft; CAD modelled and 3D printed full-length intakes, with corrected splitter vane and fan face, CAD modelled and 3D printed FAA antennas (nose, upper dorsal, lower rear Omega, VOR fin), Eduard ejection seat, Nose oleo and the smaller linking strut were replaced with aluminium tube, Quickboost resin cannon barrels, Refuelling probe replaced with brass tube, AK Interactive lens for the landing lamp, Aero 1D tanks were replaced with ResKit 3D printed tanks, Weathered with AK oils and MIG Panel Line Wash, Finish sprayed with Winsor and Newton satin acrylic. To finish the A-4C Painted with Mr Color FS36495 and FS34079 over FS36622, Decals from Aztec Models, CAD modelled and 3D printed 1000lb bomb. To finish the A-4P Painted with Mr Color FS34087 and Dark Earth over FS35622, Decals from FCM, Triple Ejector Rack from @Stephen (thanks!) CAD modelled and 3D printed Expal 250 bomb. A-4C Skyhawk C-313 - Destroyed on 9th May 1982 when it crashed into high ground on South Jason island with the loss of Teniente Casco (whose body was found in the wreckage). A-4P Skyhawk C-236 Thanks for looking I hope to eventually get around to building all Argentine combat aircraft of the Falklands war! Cheers Ben
- 31 replies
-
- 121
-
-
-
-
-
- Falklands War
- Skyhawk
- (and 1 more)
-
Some photos of my completed model of the Hasegawa Nissan Skyline R31 GTS-R Group A (kit #21127 / HC-27), built out-of-the-box in the iconic Calsonic livery of the Japanese Touring Car Championship. This model was the clear winner of my Aoshima / Fujimi / Hasegawa Nissan Skyine Group A comparison thread here. I do not think that was ever in doubt given the relative age of the kits, but this model from Hasegawa was an absolute delight to build and looks amazing on the shelf. One of the stand-out models in my collection for sure. The level of detail is amazing and the engineering means painting and construction is simple. Given the basic R31 body is used by Hasegawa in a number of models items like bumpers and rear spoiler had to be added, and I went against the instructions to add as much as possible prior to painting to ensure consistent colour. Paint is Tamiya's TS-44 and the decals were great to work with, responding well to some decal softener and radiant heat. I cannot recommend this kit highly enough. I will be adding a road version of the R31 from Hasegawa to the collection in the future. Grant. A group shot of the three models built as part of the comparison. Front-to-back is Aoshima DR 30 / Fujimi R31 / Hasegawa R31. Finally, the Hasegawa R31 GTS-R Group A with some of it's younger Calsonic Skyline siblings from Tamiya. What's that I here you ask? "Where is THE iconic Calsonic R32 GT-R?" Well, recall that Tamiya, Hasegawa and Fujimi all have R32 GT-R kits in their catalogue. Watch this space....
-
Hi, This was a "quick build" based on a picture my father took of a derelict P-47 back in 1967. It is meant to represent it before it was left to rot, yet at the end of its career with the Brazilian Air Force. This was 45-49244 before it became FAB 4139. WIP here: https://www.britmodeller.com/forums/index.php?/topic/235145798-tired-p-47/ Kit: Hasegawa 09477 - P-47D Thunderbolt ‘65th Fighter Squadron’, 2003 (originally 1996) Paints: Alclad - ALC 102 Duraluminum, ALC 106 Dull Aluminum, ALC 113 Jet Exhaust Gunze - H90 Clear Red, H93 Clear Blue Model Master - 4757 Aircraft Interior Black, 4851 Yellow Zinc Chromate, 17178 Chrome Silver Mr. Hobby - SF-287 Mr. Primer Surfacer 1000 Polly Scale - 505086 US Neutral Gray A/N 603 Tamiya - LP-2 White, X-1 Black, X-19 Smoke, X-21 Flat Base, X-24 Clear Yellow, X-25 Clear Green, X-35 Semi-gloss Clear, XF-1 Flat Black, XF-2 Flat White, XF-3 Flat Yellow, XF-4 Yellow Green, XF-7 Flat Red, XF-10 Flat Brown, XF-16 Flat Aluminum, XF-26 Deep Green, XF-49 Khaki, XF-69 NATO Black Vallejo - 71.250 Bronze Green Aftermarket: Arrow Graphics C-75-48 - 8” High Serial Numbers and Letters for Royal Air Force and Commonwealth Fighters & Bombers World War Two “Stencil” Style FCM 48-01 FCM 48-06 FCM 48-10 Woodland Scenics DR511 Woodland Scenics MG739 Tamiya 61096 - P-47M (seatbelt decal, distributors) Scratch built: Machine gun blast tubes Propeller governor control pulley On to the pictures. IMG_5077 by Wlad Franco-Valias, on Flickr IMG_5078 by Wlad Franco-Valias, on Flickr IMG_5079 by Wlad Franco-Valias, on Flickr IMG_5080 by Wlad Franco-Valias, on Flickr IMG_5082 by Wlad Franco-Valias, on Flickr IMG_5083 by Wlad Franco-Valias, on Flickr IMG_5084 by Wlad Franco-Valias, on Flickr IMG_5087 by Wlad Franco-Valias, on Flickr IMG_5088 by Wlad Franco-Valias, on Flickr Thanks for looking. Cheers, Wlad
-
Hi, While I had planned to take a break from building, I couldn't resist starting on something new. Time to build the oldest kit from my stash, bought in 2003. It will be this old P-47, while it was still active and not so derelict. P-47D-40-RA 600 by Wlad Franco-Valias, on Flickr The first session went rather fast. The major parts fit really well. I was able to start painting and built the wings with main landing gear wells. IMG_4833 by Wlad Franco-Valias, on Flickr The second session was much slower due to all the cockpit details. I am not being fussy here, and will use what the kit provides. IMG_4834 by Wlad Franco-Valias, on Flickr That's where things are at now. Next I'll add Future to the instrument panel dials, rub off the bronze green from the cockpit floor and rudder pedals to show the duraluminum underneath. Then start putting things together. It's great to be back on a styrene model, rather than a polyurethane resin one. Cheers, Wlad
-
So finally got around to picking a subject for this build, and we're headed to Korea. Specifically to Gunsan Air Base, where we find the 80th Fighter Squadron, and this particular example: Anyway, construction is off to a slow start while I gather detail parts and paints. The first issue I need to deal with is the fact this kit is for a Block 50 Viper and the aircraft I'm modelling is a 40, so we're going to need to get hold of the stiffening plates to backdate it a bit. Also not looking forward to putting in aftermarket wheels since the nosewheel is cast into the landing gear leg, and a quick canter through Big Yellow suggests no-one makes replacement legs for this kit. 🤔 Think I also got the right exterior paints for this colour scheme although that wasn't helped by the fact that Vallejo decided to drop the FS numbers off the labels for their new bottles as well as making them smaller.
-
Hi all, Here's my latest 3D printed kit update, this time for the Kinetic 1/48 Sea Harrier FRS1 and FA2 (they may also fit the Harrier Gr1/3 and T-Harriers). The update consists of two parts, including the prominent fan and then a representation of the compressor. As can be seen, there is an enormous improvement with these parts, when compared with the original kit part! Kinetic intake fan, selling for £6 plus £2.50 postage. See also, upgrade for the Hasegawa kit (will also fit kits that use the Hasegawa plastic - Revell & Hobby 2000). 3D printed upgrade featuring a two-piece fan. Hasegawa intake fan, now selling for £8 plus £2.50 postage. Cheers! Ben
-
 I present the Hasegawa Embraer 170 in the well-known “Krakow and Malopolska invite” livery carried by SP-LDC between 2009 and 2012. The tail features Leonardo da Vinci’s painting “Lady with an Ermine” which is one of Poland’s national treasures. Although the kit has been around for many years this is the first time I’ve built it. It was seriously overpriced on UK release but several years ago I managed to get a couple at a sensible price via HobbyLink Japan and they’ve been in my stash ever since. It seems that currently the kit is only available in Japan and various Japanese sellers have it listed on eBay at prices ranging from £26.52 to an utterly ridiculous £108.01. The kit fits well and the scribed detail is generally good. However some areas are basic, notably the undercarriage. There is a PE set available from Extra Tech but I’ve never really liked PE and my eyesight is no longer up to assembling nine microscopic parts to make one undercarriage door for a small aircraft like the Embraer 170 so I contented myself with thinning the kit doors and adding a little detail. I did use the PE to improve the undercarriage bays and also to add pitots. Apologies for a bit of a rant but it’s beyond me why most PE makers can produce scale sized hinges for undercarriage doors but then give you pitots resembling part of the radar array from a WW2 Luftwaffe nightfighter. The Extra Tech set was no different and much fiddling and cursing was needed to get things looking reasonably presentable. Paint is Halfords Appliance White and Racking Grey with Tamiya and Revell metallics. I was going to use a set of Nazca decals which I’d bought at the same time as the kit but I discovered that some of the lettering was over-scale to the point that you couldn’t make an accurate model with it. Fortunately BOA have covered the same scheme so the tail decal is Nazca and everything else is BOA. Detail decals are from the kit sheet and windows are by Authentic Airliners. Thanks for looking and as always constructive criticism is welcome. Dave G
- 35 replies
-
- 54
-
-
-
-
Hi All, This is the second in my "Promise Made, promises fulfilled" project. I had this model over 30 years ago when it was first released. When I saw that Hasegawa had re-released it, I knew that I just had to get it. My memories of the first time was that it was a rather good model, with crisply moulded parts, and reasonably easy to build. My biggest mistake was to use automotive cellulose paints to paint it. The end result looked very good for about 6 months... Then it started to crack, and look rather shoddy. I removed the body from the floor pan, stripped the cellulose paint, can't remember with what, re-primed and sprayed it with enamels. However, that cellulose had attacked the plastic rather badly, even though I had primed it first. I could never get a good finish on it after that. Still, paints have moved on. I tend to use Zero paints these days and with care, they are much kinder to polystyrene. So, here we are so far: The obligatory box top.This kit comes with a finely detailed engine. Here are the first stages of the build. That's just eight parts to get to this stage, The fit is superb. I painted the block and cylinder heads with Tamiya XF-16, and the cam-covers with my own satin black concoction (One part Tamiya X-1, Two parts Tamiya XF-1 + three parts Mr Color levelling thinner). This seems to make a satin black that is easy to paint and with a finish not as glossy as X-18. I mix up about 25 mL and store in a glass bottle. This gives me enough to spray, if I need to, and it will brush paint well as well. One thig that I though looked a bit naff about the kit was the front disc brakes. For some reason, Hasegawa had moulded them on the 'chrome' tree. Some parts look right in high chrome, like the bumpers, and headlamps/tail lamps. But the front discs and callipers? I think not. This is what they looked like: A touch garish, I think. So out came the tub of caustic soda solution I keep in the garage, and I popped the offending items in it for about 50 minutes, and the result was: Completely stripped. They do seem to be coated in some kind of high-gloss varnish which the caustic soda won't touch, but the removal of the "chrome" seems to reveal more of the moulded detail. So, a quick priming with my 'grey primer' concoction followed by the right kind of colours, will make them more realistic, I think... That was where I stopped taking pictures, as I was making such good progress on the model. Anyway, this where I have got by early this morning... The sharper-eyed of you may have noticed that one of the air filter chambers is not yet fitted. That's because I forgot to cut it from the sprue and fix it on. For small parts, I tend to prime and paint them on the sprue then tidy them up on removal before attaching them to the assembly. This is nearly done. I'll show the images soon. Thanks for looking. Cheers, Alan.
-
 Hasegawa 1/72 Mitsubishi F-2B DXM decal set "JASDF Matsushima A.B. Viper Zero Anniversay set. JASDF Mitsubishi F.2B 21.Sqn 30th Anniversary Matsushima A.B. 2006 Wolfpack update set - seamless intake wheel bays & exhaust. Pavla ACES2 seats. MrColor JASDF paint set. Half way through building this researching the airframe, I found that this aircraft crashed. No fatalities, but I think the first F-2 crash but the second model I've built this year which crashed. My other build earlier this year, the Czech MiG-21UM crashed as well.
- 30 replies
-
- 61
-
-
- Hasegawa
- Mitsubishi F2s
- (and 1 more)
-
Hi I'm in with this Hasegawa F-16N kit. The only aftermarket to be used will be an Eduard canopy mask set. I may modify those AIM:s a bit, though. Did/does the US Navy use these with its Vipers too (I mean the P51303A, not the AMRAAM ) Vipers are addictive! V-P