-
Posts
947 -
Joined
-
Last visited
alhenderson's Achievements

Obsessed Member (4/9)
2k
Reputation
-
She's an absolute beauty! Makes me want one - then I realise I'd have to kick one of the kids out of their room and take it over for display purposes.. although - eldest is off to uni soon.. 🤔
-

1:72 Sword Lightning T.4 - 111 sqn 1960s
alhenderson replied to alhenderson's topic in Ready for Inspection - Aircraft
Already got two on the go - a nice easy Airfix JP and Matchbox Jag.. After that I might do the Airfix Mossie as its supposed to be a nice easy build. Al. -

Tremblers Sword Lightning T.4
alhenderson replied to alhenderson's topic in Work in Progress - Aircraft
And that's a wrap. Thanks everyone for following along and offering advice and support. Its been a pleasure (easy to say that now!). I've learnt a lot with this build - and that's supposed to be the point, right? RFI here with some pretty pictures: Al. -
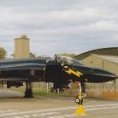
Evening All, It's with great relief I'd like to report that my 6 month build of the Sword 1/72 Lightning T.4 is now complete. There were many points along the way where I nearly had to put up a shelf of doom, but sheer bloody-mindedness won out eventually. Most people on here probably know what to expect with Sword kits, and to be fair, so do I having built their Gannet AEW.3. My overall impression, though, is that this one is not as good as the Gannet - at least I don't remember as much grief with that (maybe if I took a look back at the build thread I'd be reminded, of course!). For anyone who's interested - build thread is here: At the end of the day, I'm reasonably happy with the end result. A lot of things could be better (always the way!) and I struggled mainly with the painting but overall, I have another Lightning that I'm not ashamed to put on the shelf. Have learnt a lot along the way - some things I should have already known - and some new skills gained. e.g. the use of sprue goo to fix the nosewheel in place due to the complete lack of fixing points in the kit, spraying Tamiya smoke as another weathering technique, don't spray when the temp in the garage is <10 degrees C, plus the use of polishing powders. One lesson I need to definitely not forget is not to spray Mr Hobby varnish over a Mr Hobby metallic paint job, amazed that hasn't given me grief before now! Painted with Mr Metalic colours (mainly Aluminium) and Tamiya black. Extra after market was a Flightpath FOD cover and the master pitot probe. Thanks to everyone that followed along with the build, offering advice and support - it was very much appreciated. Anyway, some pics from my DSLR to mark XM992's entry into service..
- 4 replies
-
- 18
-

-

Tremblers Sword Lightning T.4
alhenderson replied to alhenderson's topic in Work in Progress - Aircraft
Well, well, well. Been a busy day with other life stuff, but managed to sit down for a couple of hours to attend to the Lightning. Managed to get most of the paint off the canopy with a damp cocktail stick and lots of patience. Dampness was the key, got nowhere with a dry once. That was really satisfying as I thought I was going to have to put up with it. Regarding the pitot tube, I secured the plastic attachment point to the aircraft using sprue goo. Experimented with that and perfect plastic putty on some scrap pieces of sprue, the former gave a nice solid fix. The angle of the pitot tube as I had it glued to the plastic was completely wrong, luckily it came off in my hands so I re-attached it with more super glue and now it looks better. And with that we limped over the finishing line 🎉 actually, thinking about it I still have the intake cover and ladder to do so not quite there 🙄 but still, worth a celebratory jig nonetheless! Here she is until I get some proper pics.. Off to crack open a beer I think 🍻 Al -
Little bit of progress when I got an hour or so to sit at the bench tonight. Got the legs on, and did more sanding on the tanks - did I mention how bad they were? 😳 Had to prise off the centreline bomb rack that I'd already fitted to make way for the recce pod, luckily it came off without any collateral damage. Need to get the stores sprayed - although I don't think I'm done with the filler yet.. Al
-

Tremblers Sword Lightning T.4
alhenderson replied to alhenderson's topic in Work in Progress - Aircraft
Keep thinking today will be the day... Sourced some extra ejection seat triangles from an Airfix F.6 to replace the two I lost. Have attached the missile pylon that fell off what seems like months ago (probably was!), and the aftermarket intake blank is ready to go on. Was also worth all that effort with the seats early on in the process as they're easily visible through that greenhouse 👍 My biggest challenge now is the pitot probe. The plastic part that attaches to the fuselage is a crap fit. Barely touches the fuselage, meaning that when I glue it on it comes off again at the slightest touch 😟 not sure what I can to, tbh.. it's such a tiny part that it's hard to imagine sanding it to get a better profile and more gluing area. So frustrating, only got this, the missiles and the tiny aerials on the spine to go now.. An hour's work if all went to plan. There's also some paint on the canopy which is proving very stubborn. Have been rubbing with a toothpick but to no avail. So, so close... Al -

Tremblers Sword Lightning T.4
alhenderson replied to alhenderson's topic in Work in Progress - Aircraft
Post Easter update. It's been a busy old weekend (4 days of it 🎉) thought I might get this finished but alas no. When the VMS satin dried I didn't like it on the black, almost looked Matt. Which meant I had to mask the silver 😬 very fiddly and very scared, luckily I didn't break anything off, but I did lose the top of two of the ejection warning triangles to tape, think I have some spares which will hopefully fix that. Brought her in from the paint shop for the final time and used the opportunity to take the canopy masks off. One of my favourite bits of the process. There's a lot of glass on these T birds so makes a hell of a difference. As you can see from the top picture I've also used my chrome pen on the intake ring. Had to go mostly freehand in the end as I wasn't about to risk putting any tape near those nose markings! Missiles and pitot tube to go - and the twin aerials on the spine. Need to have a look in the tool box to see if I have any wire that would look better than the kit parts.. The light at the end of the tunnel may not be a train.. 🤞 Al -
Progress stalled for a while here while I tried to press on with my Lightning (still not finished!). Plus it's been cold and I needed to touch up the camo. Managed to do that in the last few days and also masked off the tail and anti glare panel: I also went hunting for drop tanks as I certainly didn't see them without tanks very often - just display birds really. Found these resin ones: They look like drop tanks, but the fit is terrible, and all 4 halves seem to be slightly different sizes! Hopefully nothing a bit of fettling can't fix. I've also been kindly given a recce pod from an Italeri kit which will be lovely since she's going to be a 2 sqn bird. With the painting out of the way for now, can continue with the construction 👍 Al
-

Tremblers Sword Lightning T.4
alhenderson replied to alhenderson's topic in Work in Progress - Aircraft
Just to prove this is still going.. got the A Stand gloss on. Then followed some tinkering with oils, but I didn't go overboard with that. Have now put a coat of Satin VMS on to seal everything. Will see what that looks like and decide if I want the black fin and spine to be gloss. Don't really want to as that'd require more masking. Next up, I've got the aftermarket pitot tube to fit, along with the intake blank and crew ladder. Also got to chrome the nose ring. Getting there! Al -
alhenderson started following Jaguar builds and 1/72 twin-stick Harrier T.4 - special livery, adapting Sword kit
-
Bit late to the party, but.. I built the Hasegawa a couple of years ago. Found the construction of the forward fuselage quite awkward, and needed a fair bit of filling. I guess they've engineered it so that they can get lots of different versions out of it. Anyway, my RFI if its of interest. Al.
-

Tremblers Sword Lightning T.4
alhenderson replied to alhenderson's topic in Work in Progress - Aircraft
Following on from my gloss varnish near miss the other week, I ordered some A Stand aqua gloss, having been recommended it by someone on Twitter. It duly arrived last week and I took some time to test it on my paint mule. Got to say, it's not easy to spray. You don't need to thin it, which I like cos it's one less thing to cock up, but it goes on very wet and it really looks awful to start with. Goes on with a milky finish and gathers in all the crevices. Have tried different air pressures but nothing seems to help it spray smoothly. Fair dues, though, it dries nicely - several goes on the mule proves this. Finally got brave enough to put some on the lightning, just the underside again, learning from past mistakes. You can see how it goes on 😬 trust the process, though, as it's dried just fine (just didn't have my phone on my screen I finally plucked up the courage to check). Think I can gloss the rest then get on with a small amount of weathering... Al -
Nice! I'm building that Matchbox one at the moment. Got some pylons and other bits from, I think, a Hasegawa kit. Sadly I don't have drop tanks or a recce pod - where did you get yours from? Al
-

Tremblers Sword Lightning T.4
alhenderson replied to alhenderson's topic in Work in Progress - Aircraft
With the back end smoked up, I took 20 mins this morning to mask up the tail and the rear fuselage and spray Mr Mettalic Aluminium over what remained of the front half of the fingerprint. Was nervous about this (I'm nervous about everything on this Lightning now!) but it went fine: If you look closely you can see where I resprayed, but since these things were far from uniform I don't mind. The top of the fuselage near the jet pipe could do with something now I look at it, though.. Al.


