

Ian
-
Posts
3,471 -
Joined
-
Last visited
-
Days Won
2


Ian's Achievements
")
Very Obsessed Member (5/9)
5.1k
Reputation
-
 Hey matey So you know I always enjoy your builds , but this... this is by far-and-away one of your best. Love that finish, superb IMHO. Cheers from across the ditch.
 -
Azur-Frrom, Fairey Battle Mk.1, 'Poles in UK'.
Ian replied to general melchett's topic in Ready for Inspection - Aircraft
Still setting the bar 'high', Andy... Cheers from NZ Ian. -
Original 1960 Airfix Fokker F.27 Friendship
Ian replied to follasha's topic in Ready for Inspection - Aircraft
So much more 'personality' than the Dash 8's we have today (and don't get me started on ticket prices !). Lovely build, wish there was a contemporary injection kit (other than the Esci/Italeri) of a Friendship.... Cheers from the 'Naki. -
That's a great response everyone. Thank you, really appreciated, as always. I have a few builds that need to return from the 'Shelf of Forgetfulness' so likely one of those will be next. Cheers from NZ. Ian.
-
Answer right here, basically one would shut-down before the other. Ian.
-
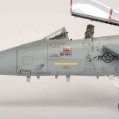
Because I have a knack of making things difficult for m'self I decided to build my 'Late' Tomcat as an 'Early' (1982) version without the extra lumps'n bumps. I was cautious of all the hype around Tamiyas' Tomcat, however, it turns-out that it really does build that well. There's so many shades in this 'overall Light Gull Grey' finish, that I honestly don't think I'll be doing another USN build for a couple of years - sadly they don't really 'pop' in the photos, but they're definitely there. I've used Mr Color &Tamiya lacquers throughout. Decals are from Furball (sheet 48-060), and behaved flawlessly as always. Also used Quinta decals for the first time (the only after-market on the build)... two words 'game changer' simple as that. I slightly changed the loadout to represent an early and rarely seen 3 + 3 configuration just to add more visual interest. Not too much more to say, please feel free to make any comments & observations or ask any questions. Enjoy the Easter break, cheers from NZ. Ian.
- 16 replies
-
- 59
-

-

-

-
Sincerely, thank you to everyone for posting comments. Really appreciate the kind words. Next my Tamiya F-14 is VERY close to finishing now, just the canopy & 'sticky-out bits' to do. Cheers from NZ.
-
Revell 1:72 F-105D : Started in Sept '24 but came to a halt when the thirty-seven year old kit decals and forty-five year old Microscale decals both turned into molecule sized fragments the moment they hit the water. Now here is Memphis Belle II in all her pigeon-toed, knock-kneed glory - there's just no fixing the stance without investing in a brass, white metal or rigid resin replacement set. Other than the loadout and new AM decals from Kits-at-War, this is straight from the (1988) box. Mr Color lacquers for the camo, didn't even try to add a wash or weathering as it's only ever going to live in the cabinet. 'Owt much else to say. great nostalgia build. Cheers from NZ.
- 14 replies
-
- 46
-
-
-
-
Oh those Manx 1-11's , can remember them screeching out of Speke back in the day (even when they had the hush kits fitted !). Brilliant builds, great nostalgia trip.
-
Hey folks So this is my Eduard 'Weekend Edition' 1:48 Focke-Wulf with just generic seatbelts added. Painted with Mr Color lacquers for the camo and decals for a 5/JG300 machine from the spares box. Weathering/stains/leaks are all Windsor & Newton oils. Not too much to say about the kit that hasn't been said here & elsewhere over the years. My first time building this kit and enjoyed it so much I've already added an A4 to my basket at my favourite on-line model shop ! As always, C C & Q's welcome, cheers from New Zealand. Ian.
-
Rare/unusual scheme and limited weathering... really like this one matey, well modelled. Ian.
-
1/72 Tamiya De Havilland Mosquito FB MK.VI 'Amiens'
Ian replied to GazB's topic in Ready for Inspection - Aircraft
Unusual & great to see a 487 machine that isn't MM417. Didn't realise that John did a sheet for Amiens Mozzies... will try and hunt that one down. Ian. -
Nice collection... do like the Totip 0-37 built it years ago, but would would like another go.... Ian (also NZ)
-
Nailed it... well modelled, matey 👍 Ian.
