Colin Miller Posted March 5 Share Posted March 5 It’s amazing how a bit of paint changes things! Looking good 👍 1 Link to comment Share on other sites More sharing options...
Alun Gallie Posted March 5 Author Share Posted March 5 8 hours ago, chrisr57 said: Are you going up to Naracoorte in November Alun you will see loads of 1/72 at the pool I believe it's the annual regatta, how did you find the APS Leander Hull ? was it an Allan or the new guy that took over from him ?? I bought a River class off him years ago 1990 to do Plymouth ended up doing my own, it was ok don't get me wrong. just wanted to have a go still got it somewhere after 4 moves its buried somewhere great work !! Hi chrisr57, At this stage I am purely building as a display model, hence can be a little fiddlier on detail as don't need to handle as much but it, much like the NZ Navy, is fitted ' for but not with' rc. Has correct running gear and I do have the motors, battery etc but I went out to the Gulf Waters TF72 a few times and the actually sailing was not really my thing, I enjoy the act of the modelling more. I might get into the RC more when I retire as time is a precious commodity at present. The hull was fine - I also have a fleetscale hull and pretty comparable. AS you will see from early photos when I got the APS one it has been started as the HMS Charybdis "Cheery B" so had to close well deck etc in. I picked it up second hand but think it dated back to Allan. 1 Link to comment Share on other sites More sharing options...
Alun Gallie Posted March 7 Author Share Posted March 7 Finished a few jobs on the to do list and decided to finish up the day with a progress stack. Still everything aft of the hanger door to do. Beadings and guardrails on O1 deck , signal deck fittings, 965 radar, some things still to paint, lots of little task but starting to look like the end might be achievable. Note everything still in modules so placement is not exact and things are not fitted (hence slight gaps etc) 8 Link to comment Share on other sites More sharing options...
Alun Gallie Posted March 8 Author Share Posted March 8 Recovering from a tooth extraction today so good to distract myself. Spent a while adding a very minor feature but one I am happy with. All the portholes along the superstructure (which went into the officers cabin) had brass surrounds that extended slightly and in the early days of my career I spent much time polishing. At the start of the build I had found some brass hole grommets and the happened to be exact diameter for drilled port holes. The washer was to fit over it as the 'brass tube is about 4 mm long. The super structure is 2mm plastic card so they extended a bit too far. By using washer I got more glue area and right spacer for them to extend the desired .5mm. Had to ease the holes again with a drill bit twisting with fingers (need to get a hand drill for larger bits) due to paint but worked well. Also redid the ceremonial name boards (the first one I made and blue tacked in place I missed removing before I sprayed the superstructure) and add a warning decal to the blast vents panels. 3 Link to comment Share on other sites More sharing options...
Alun Gallie Posted March 8 Author Share Posted March 8 A bit more this afternoon - worked on detail for around the fwd bridge flat door, under the bridgewings. Fitted swimmer of watch equipment (line box on hand rail, ring and epirb and swimmers gantry) Also made swinging rail to shut off waste access when doing a replenishment at sea (RAS). I did manage to hang those the wrong way round but think will live with it as removing them likely to cause damage. Still another coat and the black rubber strip to go on life rafts. 6 Link to comment Share on other sites More sharing options...
Alun Gallie Posted March 9 Author Share Posted March 9 This morning I played around with the fittings for the quarterdeck. I am going to need to have one more rattle can of Waikato grey made up so that will be a total of 4 can Waikato Grey and 1 can Dark Admiralty grey for the build. I will probably have about 3/4 can of Waikato Grey left so if was to do again think if I had planned spraying sessions a bit better and not had issue with that lot of resin 3 cans would have done. About $30 a can so about $150 in paint. I then decided before I got to work on the next section I really should finish off what I am doing. I have to give the life rafts another coat (I hate painting white) and the black rubber strips. I need to paint the duck boards on bridge wing and signal deck 'wood' brown and a few other little details. I also have guard rails for bridge top, 5 cal decks (either side of signal deck) to do but need to wait on some more stanchions to arrive. After finding a good photo of the .50 cal mount I need to find 2 x 1/76 scale .50 cals (should not be that hard at that scale - maybe 1/72). I also found a good photo a some of the bridge top aerials so decided to knock those off this morning. Pretty fiddly and not perfect but after a coat of paint think they will look good. On the larger central one I use a 15mm split ring cut in two for the loops whilst the smaller ones were brass wire wrapped around a piece of plastic tube. 4 Link to comment Share on other sites More sharing options...
Alun Gallie Posted March 10 Author Share Posted March 10 Painted and temporarily fitted with bluetack. I am not going to glue these on yet until the superstructure has been fitted to huill as this is just asking for me to hit them and snap them off. 5 Link to comment Share on other sites More sharing options...
Dancona Posted March 10 Share Posted March 10 This is really looking good with a dash of paint on it, the level of detail that you have on this is just right, very convincing !! looks like its come from a recruitment office window many years ago, lovely job 👍 Cheers David 1 Link to comment Share on other sites More sharing options...
TheyJammedKenny! Posted March 11 Share Posted March 11 Very impressive project. Now all you need is a Wasp. As for .50's, you are spoiled for choice. Just be sure to cut off the barrel-changing handle, if there is one, because modern M2s lack these. 1 Link to comment Share on other sites More sharing options...
Alun Gallie Posted March 17 Author Share Posted March 17 Couple of little jobs done/started this week. Firstly I made a couple of compass binnacles for the bridge wings. A quick little sketch based on the one photo I could find. Then made something approximating that with plastic card and rod. Then a test fit in place on the wing Then I moved aft to the flight deck and based on @chrisr57 post of the Plymouth decided to have a crack at scratch building flight deck nets. I had previously planned to purchase either photo etch or 3d printed. I did have a go at frame with brass rod but my soldering is not my strong point and the leader design has a few more pieces as instead of just angled brackets to hold in lowered position it has a whole second rail with feet and angle braces. Given plan is display model I decided to try plastic rod and using a good plastic cement by the time I got the strutural integrity there it is very solid. Dropped a couple as taking them to spray and stood up fine. Mesh is window screen netting. the grey feet are where will mount to round down and they will be sanded to fit. I made up 5 of these (one side) and got a couple painted so test fitted with a couple little balls blue tack. The frames still needs a wash to remove a little of shine, nets need to be fitted (just held on by couple drop white glue at present) and then I need to get some thread and do the lacing and trim at rounded corners. Plus the bases are not fitted at all so they will be a lot more flush and symmetrical when I properly mount. Overall I am happy with them. 8 Link to comment Share on other sites More sharing options...
chrisr57 Posted March 18 Share Posted March 18 There looking great they just set the flight deck off, brilliant soon be finished Im on the hanger at the moment 30 years have taken its toll cracks in the hips on the corners paint peeling and the wasp well not good Link to comment Share on other sites More sharing options...
Alun Gallie Posted March 23 Author Share Posted March 23 Did a few bits and pieces today and will get some more photos when finished off but one thing I did work on was added decals, missle and supports to the seacat launcher. This photo is HMNZS Wellington (ex HMS Bacchante) bit is decent shot of the launcher. I still need to paint the loading rails silver. They are a little simplified, I may add some triangular pieces with .5 mm styrene or may just leave as is as think it represents ok. You can see some of the decals I added to the launcher, director and in the back ground the turret (that is Waikato's hull not another ship - just don't have the Seacat deck module on it yet. ) 8 Link to comment Share on other sites More sharing options...
robgizlu Posted March 23 Share Posted March 23 Very neat indeed. The larger scale of 1/72 certainly begs decals! Rob 1 Link to comment Share on other sites More sharing options...
Alun Gallie Posted March 28 Author Share Posted March 28 Just a quick little update - I have been chipping away at detail work. I fitted the funnel and Seacat deck models to the main super structure and have started adding details to O1 deck such a torpedo nets, tubes, and a few grills, storage boxes and life jacket lockers. You can just see the base of the guard rail stanchions behind the beading and once the glue has hardened will drill out and fit stanchions. Will the spin it around and do the starboard side. 8 Link to comment Share on other sites More sharing options...
chrisr57 Posted March 28 Share Posted March 28 yes looking very nice good work 1 Link to comment Share on other sites More sharing options...
Alun Gallie Posted March 28 Author Share Posted March 28 (edited) A couple more shots of some detail and then a flyover video As mentioned I am modelling at that point of 'special sea duty men' closing up to enter harbour so I can model a couple of quirky details like the ceremonial name boards being hung. Another was the ships bell. With mast and all the signal deck equipment fitted. Still have to finish off the guard rails (plan on doing a big spray of all the stanchion and hard railed sections and get some fine black fish line to rig the others with. The 965 is on its way (I went with a 3d printed one as the photo etch scared me) Edited March 28 by Alun Gallie photo issue 4 Link to comment Share on other sites More sharing options...
Alun Gallie Posted March 30 Author Share Posted March 30 (edited) Moved aft today and started the detailing on the quarterdeck. Fitted 182 davit and winch and a range of air vents, aft centreline fairlead and built the rails the 182 deployed out (need to check but pretty sure there was a couple of small rollers mounted on deck there for cables to run out over. Built the flag staff from range of bits and fitted the one section of fixed guard rails on port side. Tomorrow hope to do starboard (with exception fuel can stowage as have some fuel cans coming in post and would rather build rack around them) Ignore the deck winches in the spot on flight deck in background. They need to be fitted - I have just taken to keeping finished parts on flight deck as I keep misplacing them. I don't think I am miles from finishing this one. Not days but maybe weeks. I have a hip replacement due on 29th April so thinking I might push to have done by then. The last pieces I need (wasp, wasp decals, 965, flight deck spot lights, 182's, .50 cals and some rattan fenders to store on the ECP (emergency conning position - small deck with binnacle just in front of 965 mast, aft of funnel - was used as fender storage) are all on there way as well as some .81 mm brass rod to make the rest of the whip aerials. I think the only thing left to buy (bet it won't be) is some .5mm black fishing line to rig the guard rails and some fine wire to rig the main hf aerials between funnel and main mast. I also spent a bit of time whipping up a base to display it on. Idea is will just put a couple of holes in hull and it will sit on a rubber washer held at correct height with lock nut. This will be hidden by chrome tube with height adjusted so rubber washer sits proud by about .5 mm. Then rubber washer inside hull and twist nuts secured. The way I have gone about detailing this will not be a working model. I do have another hull if I ever really feel the urge. I found a spare cap tally in my memorabilia box so thought that was a good way to name it. My sister in law and wife come home form a trip to inspect her new beach house yesterday with a new project for me. I guess that means I might have to put the Waveney on hold for a few months but it has got me rather intrigued. The ruined base of this is visible from their beach house lounge. I guess it still counts as maritime ? Would people be ok with seeing a build diary here ? Mainly be built with styrene - aiming for about 60cm in height and scale from there. Contacting the local historical society to see if there are any drawings/plans other wise will be going off a hand full of photos. The top light house and tower from the building up (less lattice work) has been moved ashore and restored and still stands on the foreshore of the town. Edited March 30 by Alun Gallie spelling 5 Link to comment Share on other sites More sharing options...
Steve D Posted March 30 Share Posted March 30 2 hours ago, Alun Gallie said: I found a spare cap tally in my memorabilia box so thought that was a good way to name it. Love that detail Alun, v special Cheers Steve 1 Link to comment Share on other sites More sharing options...
ArnoldAmbrose Posted March 30 Share Posted March 30 7 hours ago, Alun Gallie said: I found a spare cap tally in my memorabilia box so thought that was a good way to name it. G'day, that's a nice idea, I wouldn't have thought of that. And it looks like HMNZS Waikato is close to being done. 7 hours ago, Alun Gallie said: My sister in law and wife come home form a trip to inspect her new beach house yesterday with a new project for me. I guess that means I might have to put the Waveney on hold for a few months but it has got me rather intrigued. 7 hours ago, Alun Gallie said: The ruined base of this is visible from their beach house lounge. Oh, I thought that WAS the beach house. 😁 Regards, Jeff. 1 Link to comment Share on other sites More sharing options...
Alun Gallie Posted March 31 Author Share Posted March 31 Little more progress on the quarterdeck Made the stump mast, painted the zodiac (and made a cradle for it) and fitted the guard rail mounts and made the rollers discussed in previous pot for the 182 and a bathy launcher. Today want to get the guard rail stanchions and sections sprayed. Fit the nets on the port side (still need to make stbd) Will make a cradle to the 2 x 182 decoys (have one - awaiting one in post) and a control box for the 182 davit and maybe add a couple of hydraulic cables to davit. I think that is about for now. Will need to come back the thread the guard rails. 2 Link to comment Share on other sites More sharing options...
Colin Miller Posted April 2 Share Posted April 2 Looking good, can I ask where are you getting your guardrail stanchions from? Link to comment Share on other sites More sharing options...
Alun Gallie Posted April 2 Author Share Posted April 2 6 hours ago, Colin Miller said: Looking good, can I ask where are you getting your guardrail stanchions from? They are RN 3 hole Caldercraft 15mm - I get mine from Cornwall Model Boats in the UK. 1 Link to comment Share on other sites More sharing options...
Colin Miller Posted April 3 Share Posted April 3 Thanks Alun I usually use John Haynes photo etch ones but he’s stopped doing them so looking at alternatives Link to comment Share on other sites More sharing options...
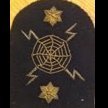
Alun Gallie Posted April 3 Author Share Posted April 3 A little more progress Fitted the HF roof aerials between fore and main mast - wish I could say it was a fun job but I would be lying - although I am reasonably happy with how they turned out I also found a 1/48 scale decal sheet I had for a Wasp model years ago and noticed it still had one of the Waikato crest decals on it, so fitted it to a sliver of plasticard and then after a coat of micro set trimmed and gently filed the plasticard to the crest shape. Little detail but helped to personalise it. I have some 1/72 decals coming so if I have spares of crest might do the same for the crests that were on stopped in 4.5 inch barrels. (yes, I know that is HMNZS Canterbury but could not find photo of Waikato) 3 Link to comment Share on other sites More sharing options...
ArnoldAmbrose Posted April 3 Share Posted April 3 G'day Alun, that ship's crest is a nice touch. Will you be doing the same for your 1/350 scale subs? 😁 (Sorry, I couldn't help myself. I'll get my coat. 🙂) Regards, Jeff. 1 Link to comment Share on other sites More sharing options...

Recommended Posts
Create an account or sign in to comment
You need to be a member in order to leave a comment
Create an account
Sign up for a new account in our community. It's easy!
Register a new accountSign in
Already have an account? Sign in here.
Sign In Now