Vlad Posted October 26, 2015 Share Posted October 26, 2015 I don't own any of these kits (yet!) but from everything I read they are very good, and I'm just gathering research to decide which I want to buy/build. What surprises me though is that for such a thorough range of sub-variants, they don't seem to have an Erla built G-10 in their range. Is this correct or have I just missed it? If they don't have one any idea when it will be released? Link to comment Share on other sites More sharing options...
vppelt68 Posted October 26, 2015 Share Posted October 26, 2015 Hi. In this thread a month ago at post #8 Petr promises an Erla-built G-10 being prepared for production. Regards, V-P 2 Link to comment Share on other sites More sharing options...
Vlad Posted October 26, 2015 Author Share Posted October 26, 2015 Ooh, awesome! Thanks! Link to comment Share on other sites More sharing options...
Duncan B Posted October 29, 2015 Share Posted October 29, 2015 I've just received the new G6AS and am a bit disappointed that it is just a re boxing of the G10 kits so has a G10 fuselage. Lots of sanding, re-scribing and filling of hatches and cowl bumps to get an accurate G6AS then. While comparing their G10 and G6AS kits I had another look at the cowl shape and to my eye they seem to have overdone (or even introduced?) the concave nature of the cowl, especially on the port side where it looks like too wasted, I've never noticed that concave feature on photos or other kits before (doesn't mean they are wrong of course). I'm still of a mind to use them as spares/donors for conversions to some of my Finemolds instead of building them complete. Duncan B 1 Link to comment Share on other sites More sharing options...
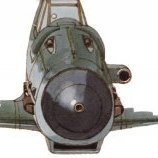
Roman Schilhart Posted October 29, 2015 Share Posted October 29, 2015 (edited) I don't own any of these kits (yet!) but from everything I read they are very good, and I'm just gathering research to decide which I want to buy/build. What surprises me though is that for such a thorough range of sub-variants, they don't seem to have an Erla built G-10 in their range. Is this correct or have I just missed it? If they don't have one any idea when it will be released? Vlad, the first examples of the "Diana/WNF G-10" that were sold at Modelbrno show in June did include another (second) fuselage half; comparing it to my reference drawings (Kagero) it looks like it's the fuselage for an Erla built machine. (The Erla examples have a slightly different cowling.) These extra fuselage parts did not appear in the regular "WNF/Diana" boxings sold at my local modelshop a few weeks later. Add: To illustrate this issue, here's the pictures. First, the WNF/Diana fuselage: This is the mysterious second fuselage in the kit bought at Modelbrno, looks like the Erla fuselage: This may well indicate an "Erla G-10" version is under way! Edited November 4, 2015 by Roman Schilhart 1 Link to comment Share on other sites More sharing options...
Vlad Posted October 29, 2015 Author Share Posted October 29, 2015 Well, I'm not desperate for one since I'm building one at the moment using a resin conversion set, but it would be nice to be able to avoid that expense and hassle if/when I want to build more. Especially since it's implied in a book I bought recently that the few K-4s built at Erla share the asymmetric cowling of their G-10s. Duncan, can you be more specific regarding where you perceive the cowling to be too concave? I'll need to check my drawings when I get home for the panel line differences between the G-6/AS and G-10 but I thought the overall cowling shape was the same. In any case I wasn't planning to buy a G-6/AS but I did want to use a G-10 kit to make a G-14/ASM, so I need to check the differences there. 1 Link to comment Share on other sites More sharing options...
Duncan B Posted October 29, 2015 Share Posted October 29, 2015 Vlad, I'm sorry if I misled you into thinking that AZ's plastic is different for the 6AS kit, it's the same plastic as their G10s. it is the shape of their G10 (and therefore the G6AS too) that looks too concave to me. I haven't compared them to any drawings or to other manufacturers kits yet so it is just a feeling that I have at the moment. It looks almost like the plastic has shrunk back a little to create or over emphasise the curvature of the cowl. I will compare it against drawings and against the Finemolds kits to see if there really is anything untoward going on. As for the ERLA G10 I'd say there will definitely be one from AZModel as they have included the "type 110" oil cooler for them on the fuselage sprue along with the regular Fo coolers Duncan B Link to comment Share on other sites More sharing options...
Vlad Posted October 29, 2015 Author Share Posted October 29, 2015 I think I see what you mean about the shape, or at least I think I see it on some of the sprue shots but not on all the built up kit pictures. Might just be lighting or shadow, I'm going to buy one anyway soon (just need to decide which) then I'll be able to see for myself. My references are a bit limited at the moment (only the MMP book to hand) but I can't see any "deal-breaker" differences between the G-10 and the G-6/AS or G-14/AS. Actually there are the chin bulges, but the late Regensburg built G-14/AS had those as well. The rest of the cowling seems to be the same shape, allowing for the usual difference between factories. Link to comment Share on other sites More sharing options...
Peter AZmodel/Admiral Posted October 30, 2015 Share Posted October 30, 2015 Friends, Can I add? Bf 109G-6AS is dimensionally the same as the G-10Diana / WNF. Attention G-10Erla and G-10 Regensburg are completely different hull bulges than Diana and WNF. It is necessary to distinguish between these versions. G-6AS not be made from the G-10Erla or G-10Regensburg! Everything is very well described in MMP.9110, Bf 109 Late versions. Otherwise, maximizing the difference G-10Diana / WNF from G-6AS are: 1 / G-6AS has a low front cooler 2 / G-6AS has another oil tank behind the propeller. Elsewhere are filling caps - see instructions. Cap can be used to engrave or decal. It is the same from the right side on the engine hood. Again, it is all in the plan. 3 / G-6AS a wing above a small bump to cover the chassis. 4 / G-6AS has a different tail wheel. 5 / G-6AS pump can have a smaller compressor on the left. 6 / G-6AS a rudder with one flap 7 / G-6AS has an antenna column 8 / G-6AS has a long antenna at the bottom of the wings All the necessary components are included in the kit. The differences are described in the instructions. These are really visible differences. I believe that this post helped you. Otherwise Bf 109G-10Erla and G-10 Regensburg already preparing. There must be quite different hulls. They have completely different bulges on the hood. Very apologize for the English, perhaps understandably translator translated. Petr Muzikant KP/AZ 3 Link to comment Share on other sites More sharing options...
Vlad Posted October 30, 2015 Author Share Posted October 30, 2015 Thank you Petr, and all understood good luck preparing the Erla and Regensburg kits, I look forward to their release. Link to comment Share on other sites More sharing options...
Duncan B Posted October 30, 2015 Share Posted October 30, 2015 Thanks for your reply Petr. As far as I can see the instructions only mention filling the cold start valve access hatch on the front right side engine cowl and placing a decal lower down. There is no mention of removing the lower cowl crank cover bulges, the additional fuel filler on the right side after frame 2 should also be removed I believe (although the MMP book that appears to be your reference does show it in their drawings) and another one should be scribed at frame 5. I also note that none of your 109 kits have the main fuel filler point scribed on the left hand spine behind frame 2 (which is also missing from the MMP drawing of the G6AS). I really appreciate the work that you have done to produce some of the lesser known variants of the Bf109 and hope that you continue with the early Jumo engined versions too at some point. However I am a little frustrated that some of the finer details of each variant have been missed or omitted and I think that the instructions for each version could be more detailed to that specific version so they are less confusing. In the great scheme of things these are minor criticisms of points that most modellers would be totally unaware of, please keep up the good work. Duncan B 1 Link to comment Share on other sites More sharing options...
Touvdal Posted October 30, 2015 Share Posted October 30, 2015 Thanks Peter, for doing the G-10 ERLA. Looking forward to that one have some JG 300 subjeks waiting. Regarding the G-6/AS, G-14/AS, G-10, G-10/AS, one has to consult at photo as so many combination of flarings. Have this G-10 on the way, started on the paint job chose 75/83/76, my Bf 109 model no. 192. And here is the reference, from http://falkeeins.blogspot.dk/ cheers Jes Link to comment Share on other sites More sharing options...
Wolfgang Posted October 30, 2015 Share Posted October 30, 2015 (edited) What exactly is MMP.9110? Can you give a full name/source where to get it? Problem solved, found it. Edited October 30, 2015 by Wolfgang Link to comment Share on other sites More sharing options...
MikeR Posted October 30, 2015 Share Posted October 30, 2015 (edited) I think it must be reference to "Bf 109 Late Versions: Camouflage and Markings" by Krysztof Wolowski - Amazon.co.uk LINK. I have a copy and it's very good. I can see where Peter got inspiration for the marking options on the G-6/AS kits! Mike. Edited October 30, 2015 by MikeR Link to comment Share on other sites More sharing options...
-Neu- Posted October 30, 2015 Share Posted October 30, 2015 Honestly I don't know about the shape, but I'm somewhat disappointed by the fit and construction of the BF-109 G-10 Diana. I've got two of them, and its fit is actually very mediocre, worse than the first generation spitfires released by AZ. I wish I took a photo, but I had to use four clamps to get the fuselage to fit properly... it seems as if the cockpit is a bit large for the fuselage, but I had some weird warping as well. Its somewhat strange, considering that the earlier G kits and S-199s were fairly good for fit in this area. Can we have a bit more care with this next time? I have eight of the kits, built three and its a bit dismaying to see 1 Link to comment Share on other sites More sharing options...
Graham Boak Posted October 30, 2015 Share Posted October 30, 2015 "..the cockpit is a bit large for the fuselage..." isn't this to be expected on short run kits? I could make a long list, I thought the habit was dying out but it is even true for at least one recent mainstream Spitfire kit - perhaps others could be suggested but I'm not in the mood for naming names today. My experience is ALWAYS to dry-fit. Check such things and sand the mating pieces before using brute strength to force fuselage or wing halves together. By all means whinge to the producer, but if you have to force parts together then stop and look to solve the problem before gluing. 1 Link to comment Share on other sites More sharing options...
-Neu- Posted October 31, 2015 Share Posted October 31, 2015 "..the cockpit is a bit large for the fuselage..." isn't this to be expected on short run kits? I could make a long list, I thought the habit was dying out but it is even true for at least one recent mainstream Spitfire kit - perhaps others could be suggested but I'm not in the mood for naming names today. My experience is ALWAYS to dry-fit. Check such things and sand the mating pieces before using brute strength to force fuselage or wing halves together. By all means whinge to the producer, but if you have to force parts together then stop and look to solve the problem before gluing. The assumption you make is really not accurate. Of course I test fitted.... that's just basic skills. This is the tenth or so AZ Kit I've built over the past seven years, and countless other Czech low runs. This one was actually worse than their Spiteful from 2009. Since then they have produced some really good kits using their low run molds. This really was a big step back. I'm currently building the S-199, which is significantly better than this kit (the Diana is the left, the S-199 on the right) However there were a lot of different factors that really complicated its construction. to get the nose area to fit correctly around the cockpit, I had to cut down the instrument panel: that's not a lack of care or"test fitting": its really bad engineering. I shouldn't have to cut down the IP to get it to fit: it looks bad. Moreover on the top, the tail of the cockpit piece really needs to fit flush. On the S-199 it fits nicely together. However I had to cut down a fair bit of it on the Diana to get it to fit (which involved clamping the the two halves to sandwich the cockpit in), and it still doesn't look right. The best example of this is the bottom: the fuselage panel lines don't even line up. Partly that's because the fuselage was warped. Overall, the fuselage looks very nice on the sprue, but it wasn't engineered well. It just seemed like they rushed this variant out the door. Perhaps I got a bad sprue: it was slightly warped and misaligned. Nevertheless, it was not what I expected out of AZ, given the quality they have shown over the past three or four years, which is disappointing. 1 Link to comment Share on other sites More sharing options...
Graham Boak Posted October 31, 2015 Share Posted October 31, 2015 Thanks for the fuller description which was interesting to see. You state that it shouldn't be necessary to trim down the instrument panel. (As an aside, if it damages the appearance, would it have been possible to trim the inside of the fuselage halves instead or were they too thin for that?) I agree that such shouldn't be necessary: however that is exactly the kind of operation that I was referring to as being commonly required, and not just on short-run kits. As are adjustments to the bulkhead behind the pilot or the cockpit floor, thinning of wheel well insets so that the wings come together, rubbing down of the mating surfaces so that a sharp (or at least sharper) trailing edge is obtained. I don't have the most recent AZ kits to compare, but expect to see a selection, if not all, of these features present on all their kits. It's good to see you say that you've come to expect better. Link to comment Share on other sites More sharing options...
Vlad Posted October 31, 2015 Author Share Posted October 31, 2015 I had similar issues with a Special Hobby Seafire 47, but I wouldn't count it as a major point against the kit since 1) it's to be expected of the type of kit and 2) after you've done the work to make it fit it looks fantastic. As for the AZ 109s, I've been following every thread about 109s on this forum and the cockpit fit issue has come up at least twice in the last couple of weeks. Petr admitted this is the case and humbly apologised, so I consider that as "we have been warned". It's not something that would prevent me buying the kits. 1 Link to comment Share on other sites More sharing options...
-Neu- Posted October 31, 2015 Share Posted October 31, 2015 Thanks for the fuller description which was interesting to see. You state that it shouldn't be necessary to trim down the instrument panel. (As an aside, if it damages the appearance, would it have been possible to trim the inside of the fuselage halves instead or were they too thin for that?) I agree that such shouldn't be necessary: however that is exactly the kind of operation that I was referring to as being commonly required, and not just on short-run kits. As are adjustments to the bulkhead behind the pilot or the cockpit floor, thinning of wheel well insets so that the wings come together, rubbing down of the mating surfaces so that a sharp (or at least sharper) trailing edge is obtained. I don't have the most recent AZ kits to compare, but expect to see a selection, if not all, of these features present on all their kits. It's good to see you say that you've come to expect better. Again, I think that you're focusing a bit too much on the Cockpit issue: if that was the only thing, I wouldn't have said anything. Probably the most jarring issue was the warping, like its impossible to get the top and bottom lines to match, and there was a slight droop to one side that required a lot of clamping to get near right. Just simply put, I feel that they didn't put that much effort into this one compared to other kits lately. Link to comment Share on other sites More sharing options...
bad edd Posted October 31, 2015 Share Posted October 31, 2015 Gentlemen, come on....Something very nice CAN be built out of this kit, with no trouble at all... The cockpit issue is a 10 minutes work. I'd rather build this one than the fat fishy fuselage, four times the cost, Fine Molds. 3 Link to comment Share on other sites More sharing options...
-Neu- Posted October 31, 2015 Share Posted October 31, 2015 Gentlemen, come on....Something very nice CAN be built out of this kit, with no trouble at all... The cockpit issue is a 10 minutes work. I'd rather build this one than the fat fishy fuselage, four times the cost, Fine Molds. Yeah I know, because I built a G-6 just four months ago... and I really enjoyed it. Actually my experience with it made me buy five more kits. However the G-10 Diana has a different fuselage (newly tooled), which is what I'm talking about. Its quite possible I got a bad shot... I don't know. I have AZ7503 (special markings), and I'll try to build it soonish to compare. 2 Link to comment Share on other sites More sharing options...
bad edd Posted October 31, 2015 Share Posted October 31, 2015 That's a very handsome Slovak, Neu. I'm expecting the parcel with the new G10 , will return once i get my hands on it. Link to comment Share on other sites More sharing options...
Vlad Posted October 31, 2015 Author Share Posted October 31, 2015 Bad edd, what decals did you use for those Romanian G-6s? Also, are the colours of Romanian 109s the typical RLM 74/75/76 mix or are they specific to the RRAF? Link to comment Share on other sites More sharing options...
-Neu- Posted October 31, 2015 Share Posted October 31, 2015 Thanks Edd, and I apologize for the poor photo quality. Your's looks pretty awesome btw... definitely some great skill on display there. Vlad, the decals' are Kora's set. they refer to the typical RLM mixes, so I went with those as I didn't have much else to go on (I have the Osprey aces book, and there isn't anything in there.) Link to comment Share on other sites More sharing options...

Recommended Posts
Create an account or sign in to comment
You need to be a member in order to leave a comment
Create an account
Sign up for a new account in our community. It's easy!
Register a new accountSign in
Already have an account? Sign in here.
Sign In Now