
Bill.B
-
Posts
541 -
Joined
-
Last visited
Recent Profile Visitors
1,855 profile views


Bill.B's Achievements
")
Obsessed Member (4/9)
1.3k
Reputation
-
I've just finished one of these and for an old kit it goes together quite well with a decent amount of detail. The only modifications I did were to add a lock on top of the roof (which is very prominent on the full size), add a petrol cap and cut the glass section from the doors. The paints are Tamiya Acrylics, but I'm not too impressed with the Liquid Chrome pen on the glass frame parts and if I did the model again I'd simply mask off the glass and use Tamiya rubber black.
-

1/32 Italeri F-104G Starfighter
Bill.B replied to Red Dot's topic in Ready for Inspection - Aircraft
Wow! 😮 Great weathering in the cockpit. 😎 👍 -
Hard to believe it's only 1/72! Very nicely done indeed. 👍
- 19 replies
-
- 1
-

-
- Arma Hobby
- 1/72
- (and 1 more)
-
Thanks very much for the kind words Pete and a good call on the sit of the model, I hadn't even noticed it.
-
This is the Wolfpack 1/48 P47D (old Hasegawa kit?) kitted out in the Brazilian airforce colours as flown by Ten. Alberto Martins Torres, Red Squadron, 1st GAVCA (Fighter Aviation Group) Italy, 1944. The kit is built completely OOB using Tamiya paints with Windsor & Newton Matt acrylic varnish. I must admit that I'd never heard of Wolfpack models before so it was a really nice surprise to find the kit easy to assemble and one of the few that didn't cause me any problems at all.
- 11 replies
-
- 30
-
-
Wanting a rest from building aircraft I dug out a 1/35 Zvezda Tiger out of the stash to try some new weathering techniques and as a result this is simply a test vehicle, not a cabinet Queen, although I don't think it's too shabby. It's built from the box apart from the Friulmodel tracks and Aber aerial which I salvaged from an earlier kit that eventually ended up in the recycling. Paints are a mixture of Tamiya and Vallejo, Humbrol weathering powders and Windsor & Newton acrylic Matt varnish to seal everything in.
-
Italeri Willys Jeep MB in 1/24 scale
Bill.B replied to Einar's topic in Ready for Inspection - Armour
I hope my 1/24 Hasegawa version turns out as nice. Nicely done. 👍 -
Very nicely done and I particularly like the scheme and weathering! I have built one of these too and the kit is indeed excellent.
-
Thank you all for the kind comments 🙂
-
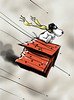
Quoted from Eduard’s instruction sheet: ‘The first unit in which the then twenty-two-year-old Lt. Carganico served after completing flight training was JG 1 at the beginning of the war. This was followed by service with JG 77 with which he saw combat in Norway and then the Battle of Britain. On January 1st, 1941, he returned to Norway where he commanded 1./JG 77. On September 25th, 1941, Carganico achieved his 27th kill and was awarded the Knight's Cross. In March 1942, Carganico's unit was redesignated as 6./JG 5 and in April 1942, he was given command of the entire II. Gruppe. On March 26th, 1944 he was given command of I./JG 5, which saw combat against Allied forces within the Defence of the Reich. On April 27th of the same year, Carganico took off for the last time. In an attack on a group of B-17s, his Bf 109G-5 was heavily damaged and during his attempt to belly in, he struck some high power lines. He did not survive the resulting crash near the French town of Chevry. His final tally consisted of sixty kills over the course of 600 sorties. Bf 109G-6/AS were assigned to the high altitude interception therefore they were camouflaged in the overall coat of RLM 76. Capt. Carganico had Mickey Mouse painted of the fuselage port side, marking carried by his previous airplanes. Starboard side is not photographically documented, it may have carried the Gruppe Commander’s double chevron marking.’
-
Hi Keith, I left the decals for a full 24hrs. to dry out completely and then carefully lifted the corner of the decal carrier film and peeled it off very slowly with some very fine tweezers. So far this technique has work on 2 other kits, the 1/48 Eduard Zlin 526 ASF and the 1/72 Cmelak.
-
It’s been a while since my last visit here, but I thought I’d share one of my latest efforts. This is Eduard’s Profipack 1/48 109G and is without doubt one of the nicest kits I’ve ever come across. The fit of parts is excellent, the crispness of the moulding is very good, the new style decals are truly excellent and give that ‘painted on look’ and the level of detailing with photoetch is just right for my abilities. Paints are Tamiya acrylics with Winsor & Newton Matt acrylic varnish and oil paints for weathering.
- 13 replies
-
- 50
-
-

-
Thanks for the kind words everyone.
-
It’s been a while since I made my last tank, (a T34/85 as I recall) so I thought I’d have a break from aircraft and scratch a long standing Tiger itch I’ve had. This is the Dragon Models version of an early DAK Tiger 1 and goes together really easily. It’s built out the box with the included PE, but I couldn’t resist adding a set of Friul metal tracks to add a bit of weight to the model and give a fairly authentic sag to the assembly. Paints are Tamiya acrylics, Windsor & Newton lacquers, and various washes, oils and powders have been utilised to dirty up the tank and tracks. Weathering AFV’s definitely isn’t my strong point, but it’s fun trying new methods and ideas which may, or may not be of use at a later date, and I really must try making dioramas at some point. Anyway, here it is…
-
Thanks, and yes, they’re the flat packed photo etch guns supplied in the kit.