
Kallisti
-
Posts
5,365 -
Joined
-
Last visited
-
Days Won
1
5 Followers


Recent Profile Visitors
16,674 profile views


Kallisti's Achievements
")
Completely Obsessed Member (6/9)
12.2k
Reputation
-

1:72 Heller Canadair CL-415 water bomber
Kallisti replied to Kallisti's topic in Rescue and Recovery GB
Blimey I've been rather forgetful about updating this! Progress has happened however, here it is mostly assembled with some fillter in some gaps and a bit of primer to highlight he gaps.... The fit has generally been okay, its just a couple of minor gaps. The kit does have a LOT of surface detail... or rather I should say HAD as some of it has had to be sanded off. Its got a LOT of very prominent rivets which have been toned down quite a bit. Like I said I'd forgotten to take many in progress pics since the last lot, so now its onto painting yellow and red... The yellow is a mix of Tamiya X-8 gloss lemon yellow plus XF-3 matt yellow with just a single drop of red to warm it up a bit. The central wing spar looks more orange but that is an artifact of the paint and should vanish when varnish and weathering are applied, same for the tail Lots of bits have also been painted... The triangular bits are actuators for the flaps under the wing some of which fell off during the masking so will need to be reattached. Props... Undercarriage has also been painted but this is going to be replaced for white metal as its a bit flimsy for such a large kit. Talking to someone at the De Havilland museum model show on Sunday who had built one of these, he told me about the white metal replacements, so they've been ordered and will hopefully turn up soon. The wheels need a minor touch up with black since the silver's been painted Thats it for now, I'll try to remember to take more photos as I go along in future! -
1:72 Heller Canadair CL-415 water bomber
Kallisti replied to Kallisti's topic in Rescue and Recovery GB
Fists step is painting internals of the fuselage and cockpit. Some dispute with the intructions about the colour of the inside, the instructions claim its grey, pictures of the real things show a sort of cockpit green... reality always wins! Cabin floor does generally appear grey as does the structure of the cockpit. The water tanks are definitely a shade of khaki, so thats what I've used. I'm more used to building aircraft in 1:48 scale so not used to working with reduced detail The cockpit is basic, but I've added the blue company logo to the middle of the control yoke I've scratch built some throttle and flap levers from small plastic rod to make the instrument panel more 3 dimensional The real cockpit is visible in this fantastic video that has been very useful in research- 8 replies
-
- 12
-

-
Something a bit different! My club is doing its bi annual "Members Trophy" competition in May, this is a competition where the winner choses the theme for the next competition in 5 months time. The theme chosen last time was "Something Japanese", so this will be my entry. Its one of the range of kits produced by Hasegawa of construction and farm machinery, in this case a Combine Harvester for rice made by the company Yanmar. Here is the kit box and here is the finished model, posed in a rice field... There is a rather cool video on YT of one of these in action:
- 5 replies
-
- 27
-
-

-
1:72 Heller Canadair CL-415 water bomber
Kallisti replied to Kallisti's topic in Rescue and Recovery GB
Work has begun, more details soon as some progress has been made -
Oh dear, I think I might have bitten off more than I can chew on this one - I saw this on last week's Veteranus FB auction and thought, hey its an SAR vessel that would fit with the BM Group build as well as my club's theme for Telford this year, so I put a bid in and won. Nice, all well and good until an ENORMOUS box arrived with the postman today... I didn't have a banana for scale so I had to resort to a 12 in rule! Its bloody mahooosive!!!! If I manage to build this for the GB where the HELL and I going to put it? The Revell Oil Platform I built almost 10 years ago lives in a large plastic box in the laundry room as there is no space to display it, and this thing will be 25 inches long - I've already got large models of Angel Interceptors (32"), 2001 Orion Shuttle (34"), multiple 22" long Space:1999 Eagles and Thunderbird 2... what have I done????
- 388 replies
-
- 7
-
-

-
- All welcome
- lifesavers
- (and 1 more)
-
Yes, very tricky to get them to align properly
-
All done, here are the completed pictures. This is reputed to be a very difficult kit to build, however I never really had any major issues. It needed quite a bit of filler and the main problem is the way the pylons attach to the main fuselage - the joints between them are hard to fill because of the moulded detail on the parts which I had to sacrifice some but ended up replacing with some spare bits of plastic strip and rod.
- 22 replies
-
- 10
-
-
-
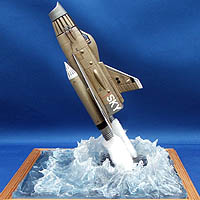
Decals have been added and now for the brass rod to replace the flimsy PE supplied with the kit - this seemed an entirely appropriate way to support the model vertically without fear of slipping while the rods were glued into place... The final stage is due and that will be varnishing and weathering...
-
My first entry for the GB will be something I don't build very often, a 1:72 aircraft! This is a kit I inherited from the stash of one of IPMS Farnborough members, Dave Bainbridge, who sadly died last year. His family wanted the club members to be able to benefit from his extensive stash and this kit is for that collection. I'm building this as a memorial to Dave as well. Obligatory sprue shot: The yellow plastic does feel quite brittle so will need careful handling. The decal sheet along with the instructions shown here is looking a bit manky I'll see if its possible to clean this up a bit before it comes to needing it... I'm currently in the middle of other builds so will start this one off when I have those out of the way.
- 8 replies
-
- 16
-
-
-
Moonbase Alpha Type 1 laser tank
Kallisti replied to IMG1's topic in Work In Progress - SF & RealSpace
Glad I can inspire you I've got two more of the resin kits for the other versions of the Lunar tanks, one day I'll get round to building them! -
Bit more progress, first off, painting the globe. I started by spraying with Halfords white primer followed by a coat of Tamiya XF-2 matt white. Then I masked the ball part and gave the curved surface a light sanding to smooth down the matt paint. Then it got a couple of coats of X02 Gloss white. A couple days later to let it all dry I then started masking the stripes using 2mm wide Tamiya tape plus some 2mm white flexible take when the curves got more extreme. You can see it here after I gave it all another coat of Gloss White. This serves to block and small gaps that would have allowed paint creep. Once that was dry, I sprayed an even coat of X-25 Clear Green over the gloss white. My hope is this will give a sort of glowing appearance over the gloss white once its all done. At the same time, I painted the pylons and the central fuselage ready for the main assembly Included with the kit were a couple of name plates for Comet Miniatures. Normally I wouldn't bother with these, but since this is being built as a tribute to Tony James, I made and effort. I painted them with X-18 Semi Gloss Black and then gave them a wash with MiG pale white wash to pick out the embossed pattern as you can see. I've also built the stand that came with the kit as an alternative base if needed so this also got a nameplate... Finally, I unmasked the engine bulb and attached the pylons to the main fuselage which then allows the engine bulb to be added as well. The gaps between the curved pylon bases were a bit rough so they got carefully sanded and a thing plastic strip glued over the top. The intention is for this to be sanded down along with the grey fillwe tou can see along the back of the pylon bases where they mate with the engine bulb. The gaps here were a bit rubbish. You can also see here, I've also added the brass panels around the middle. These need to be carefully spaced as there is no guildlines for any except the first which has a hole in it to accept the base protrusion. The red boxy bits have also been added. Sadly, this being a white model, the camera flash has washed out the details. I added a few extra lumps and bumps over various areas of the surface to add interest. Hopefully they'll show up better in the next set of photos where I'll try to dial back the flash
- 22 replies
-
- 14
-
-
I built the Bandai equivalent of this kit (in 1:16 scale) back in 2017 as part of the Made in Britain GB, loved it!
- 388 replies
-
- 9
-
-
-
- All welcome
- lifesavers
- (and 1 more)
-
Latest addition to the build was picked up at the Space Crafts show last weekend from Cozmic The base builds up easily using superglue with bracing inside for the top of the base with the Blakes 7 logo The 5mm hole drilled in the base takes the acrylic rod which also fits into the hole in the centre part of the Liberator The rest of the build has progressed, with individual components having been assembled, filled and sanded There are some very small PE pieces to attach, in particular here at the root of the pylon that attaches the pods to the main fuselage and the vanes on the front of the pod The main fuselage has had vanes added to the tip - note, the grey splodges are filler in the sink marks around the collar. The bulb has been filled and sanded as well The next step is to add more vanes to the other pods...
- 22 replies
-
- 12
-
-
-
I've seen the surviving Liberator model that Mat owns several times at multiple Smallspace shows. Its in a bit of a state as it was set fire in the episode where it was destroyed.
-
Oh and in case you had forgotten...