

Royster
-
Posts
496 -
Joined
-
Last visited
Content Type
Events
Profiles
Forums
Media Demo
Everything posted by Royster
-
1:48 Hasegawa Sea King Mk4 (ZF121)
Royster replied to Royster's topic in Work in Progress - Aircraft
Ok next steps: Photo etch being added all over now. I have to admit that some of this was a struggle and some pieces frustrated me. fortunately I didn't wear my patience too thin to make progress. I do have 2 sets of 1:48 AEW Sea Kings in the loft insulation that have the 3rd generator bulge already moulded. But the Mk4 Sea King won't benefit from all the extras that kit carries. So I used the original SH-3H kit. So scratch building a bulge was daunting and fun. I didn't think I'd get it right 1st go but I'm happy with the results. Preparation done Build up complete and cut from backing and ready for fitting. Lump in position And there we go mounted and sanded During the drying of 3rd Gene filler bulge I added more PE More to follow, thanks again for looking. -
Where's that popcorn...?
-
Building from scratch KC-10 Extender 1/48
Royster replied to Paulo Regini's topic in Work in Progress - Aircraft
That's pretty serious scale modelling! Not for the feint hearted. Nice work -
1:48 Hasegawa Sea King Mk4 (ZF121)
Royster replied to Royster's topic in Work in Progress - Aircraft
Thanks Woody37, Front glazing all wrapped up and pre-sealed with marker pen. Hopefully that'll make the inside a slightly darker colour Now for the Nose Avionics: Made a start on the framework with simple plastic cut up. There seems to be a lack of Nose avionics images on the web so an old friend obliged with his camera and I was able to use that for reference Opened up to see the framework. Most all is plastic strip with a piece of PE along the front edge and a cable tidy to mimic some cabling. I can't remember half or a quarter of the kit in this section but some bits are familiar! lol Ok last dry fit before being closed up for the next few weeks ready for external painting And the finished article. I'm quite happy with that. Any last tidying will be done when she's mostly complete Finally a better shot with the nose door ready for some tidying and paint too PE City next -
I like your progress so far! Keep it coming
-
Operation Corporate - Part 2 - Super Etendard
Royster replied to Marlin's topic in Work in Progress - Aircraft
Wow what an aeroplane! Nice job -
Oh my word that's nice, love that!
-
Kitty Hawk Saab JAS-39C Gripen (Griffon) OOB Build 1:48
Royster replied to Mike's topic in Work in Progress - Aircraft
Blimey Mike that is awesome, Weathering... now there's a opportunity for me to learn a new trick... -
1:48 Hasegawa Sea King Mk4 (ZF121)
Royster replied to Royster's topic in Work in Progress - Aircraft
Thank you. Hmm not sure what's occurring but my images are coming and going. If it happens again, I'll sort it into a better host. More progress this evening to add hopefully.. -
I have one of these buried in the stash that I think I'd like to start this year. So will follow your thread Iain, with interest. Looking good so far.
-
1:48 Hasegawa Sea King Mk4 (ZF121)
Royster replied to Royster's topic in Work in Progress - Aircraft
Thanks for the comments thus far. Some more progress for you then: Better troop seat images as promised Now time to work on the office: I contemplated detailing the instruments myself but they need a steadier hand than I currently have. Therefore I ordered some Eduard Zoom cockpit details from the HAR 3 set to help me out. So panels prepped ready for PE I did my own work on the overhead panel with some extra styrene. The extra panels are correct for the Mk4 and I used the extra piece from each kit. The wire is there to represent the cabling running down the pillars of the front screen. The curved grey pieces are extra strengtheners that are not included with the kit but are there on the real machine So the first real assembly of the cockpit is underway. Still waiting for the Eduard to arrive Cockpit finished and final assmebly under way And there we have it even the glazing is on! Nose bay next! Thanks again for looking -
Amazing work! Where did you get the penguin decal?
-
That is a spectacular finish you have on that! I kinda fancied one but never got inspired, well I am now! thanks for sharing
-
Airfix Sea King HAR.5 - Search & Rescue - A50113
Royster replied to Rickpadwick1801's topic in Work in Progress - Aircraft
I'm not a big fan of the Airfix Sea King Kit - Even as much as I love Sea Kings. But that's coming along a treat -
Your build might just spur me on to hasten a Tamiya Spit in the stash - Lovely work thus far
-
Hasegawa 1/48 AH-64D Apache helicopter
Royster replied to NavDoc's topic in Work in Progress - Aircraft
Oh my word! That is looking terrific! -
1:48 Hasegawa Sea King Mk4 (ZF121)
Royster replied to Royster's topic in Work in Progress - Aircraft
The only decent shot I have got of the fully painted seats, will try to get some better at next opportunity a couple of electric plugs added for the AN-ALQ157s, can just make out the aft battery panel made from kit PE right side of pic Some curly wirlies for the pilots and some cable runs added for extra interest. Some more PE added to nose now too. SACRU cable run added and I didn't like the Flightpath bubble window (not it's fault - my fault with lack of skill) so I fashioned a window and stuck a bubble from the Revell 1:48 Chinook on it. Realistic despatcher's curly wirly added and assembled troop step dry fitted (with blutak) Ok you're bang up to date. Depends if the Man Cave stays cool will dictate how much more I get done... Thanks for looking. -
1:48 Hasegawa Sea King Mk4 (ZF121)
Royster replied to Royster's topic in Work in Progress - Aircraft
Thanks guys Some more photos. I made the troop seats from some Ø1mm styrene and 10mm wide Tamiya tape. To make sure they all stayed together, I bought, from the model shop in Snetterton (whilst on Holiday) some Revell special glue I'd never heard of for sticking chrome to styrene. It's very gloopy! This was my second attempt as the first go I'd made them quite undersize... Going from memory, Sea King ref book, a friends access to SAR aircraft and a fair bit of artistic licence, I crafted the troop seats as best as my skills will permit. To make sure they stayed put one of the legs I increased it's length, drilled a hole through the floor to make sure the CA took hold better. I also intend on detailing the nose avionics bay, hence why I cut the belly in two pieces. Add to this a few bulges of PE and things are moving along. A quick dry fit to make sure the stand off scale of the troop seats work ok Some external electrical items added from brass tube also the small climbing step has been trimmed and will be shown open. Another view -
1:48 Hasegawa Sea King Mk4 (ZF121)
Royster replied to Royster's topic in Work in Progress - Aircraft
Last few images for now as I need to sort some more out. Some extra detail added around cargo door plus some rattle can paint for the interior then a spikey wheel to create the floor texture opened up to see the progress Front screen anti glare painted, Not too happy with the brush lines but heyho. And a lovely dip in Klear Troop seats next..... Thanks for looking -
1:48 Hasegawa Sea King Mk4 (ZF121)
Royster replied to Royster's topic in Work in Progress - Aircraft
Scratched a roof not quite the right shape but once closed up will not be too noticeable. Some more learning for next time perhaps. Now for some more interesting progress 2 sections of photo etch added, plus shield behind co-pilot's seat added, final rub down of large filled areas. You can make out the gap between the roof sound proofing and bulkhead that exists on the real a/c Now some cable runs and pipe work added Now some sound proofing added under the MRGB using an old sponge Someone said that I could put some old carrier bag over this but didn't feel confident enough I knew what I was doing this time round -
1:48 Hasegawa Sea King Mk4 (ZF121)
Royster replied to Royster's topic in Work in Progress - Aircraft
Some progress made: Where I'm starting: The donor kit that I obtained from Jacksdad iirc a while ago, He'd made a cracking start on the inside and this gave me the courage to go for it too! A couple of areas filled and some windows cut and the doorway cut through (very scary moment) Of course a dry fit of the stub wing had to be done! Cargo door removed Some paint to test if filling worked, some sunk areas to be address and the pressure fuel port moved to the correct position for a MK4 airframe because of the fitment of the full length troop step. Thanks for looking -
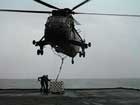
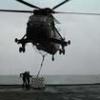
It's been a while since I have been able to show something that's worth showing. But now after a few weeks I have some work that I am quite pleased with. During my time in the Fleet Air Arm I cut my engineering teeth on this airframe: ZF121 from 772 Squadron then I met her up again on 846 Squadron. Where I worked with it in NI (where these old images come from) Here's all the kit that will be creating my masterpiece The donor kit I have just incase I get something wrong. More to follow... Thanks for looking
-
845 Naval Air Squadron HC MK4 Sea King Bosnia 1996.
Royster replied to faakeith's topic in Ready for Inspection - Aircraft
Never mind dream garage but dream hanger would do me nicely, awesome work mate -
Lovely line up faakeith
-
Italeri 1:48 Hawk T1A "Red Arrows"
Royster replied to Royster's topic in Ready for Inspection - Aircraft
Thanks, The wife has it in her craft room now on display, I think it worked, she looooooooves it!!!
