
Spiny
-
Posts
4,419 -
Joined
-
Last visited
2 Followers

About Spiny

Recent Profile Visitors
6,260 profile views


Spiny's Achievements
")
Very Obsessed Member (5/9)
10.1k
Reputation
-
Shows how busy this forum is getting - I go on holiday for one week and this becomes a Page 3 model Anyway, instead of unpacking I decided to add some Ford Performance Blue to this, which unfortunately meant digging out the airbush. Not entirely successful in that I knocked over the bottle and only just had enough remaining to get it painted, and I must not have had enough coverage on the sides of the body as the colour match with the doors was awful, so I had to give the body a 5th coat to get it looking something like decent. As you can imagine, with the green painted and the car having a white interior I needed to do a little bit of masking. Forgot to take a pic before paint, but here it is after painting: Then for the nerve-wracking moment - tape removal. Was the masking successful? This pic would suggest it was (although I admit there were a couple of very small bits where I removed the blue from the green and white with a cocktail stick dipped in IPA before this pic). There is a small bit on the right hand side skirt where something has obviously touched it before the paint dried, and even worse there's a bit on the rear left corner where I accidentally handled it when it fell off the stand leaving a fingerprint down to the primer - fortunately I was able to airbrush enough that the colour is fully restored and a bit of very light sanding should sort that out. However... when I looked inside it turned out my masking was not as successful as I thought 🤔Hmmm, I'm thinking my best bet at this stage is to brush paint white over the blue seeing as any slight differences shouldn't really be visible once I have the glass in. Hopefully that will sort it a bit.
-
Having been away on holiday like @Windy37 I also came across some working rust on the coast near Blakeney, Happy to be corrected, but I think it was a Massey Ferguson to me
-
I've got to admit that I didn't know about it (I know Thornton Dale better than Pickering if I'm honest), but glad it was a good one. I seem to have picked the same week for holidays, but fortunately apart from the drizzly Wednesday the Broads were very good weather wise (and relaxing wise too). But I didn't even think to take a kit with me - I'd almost certainly have lost a little bit on the way or to the river monster when I was there! Anyway, following the move I have the same workbench as on Page 1 of this thread, also under the window, but with a new improved view As you can probably tell by the frost, this pic is from winter and not from today!
-
One thing I have found which helps is to warm the bleach a little to speed up the chemical reaction. And as I stripped these during hot weather that may partly explain the relatively rapid dechroming.
-
Thanks, I have to admit I was pondering whether it was worth filling the holes as I suspect they will end up covered (although there's a lot of them, they mostly seem well placed). But I figured it was better to waste some time filling a covered pin mark now than to find unfilled ones on display down the line. Possibly, but given I didn't dare use primer for fear of blocking the mesh, I thought there was a high risk of pulling the paint off (now what might have prompted that thought ;). In the end, even though the back was masked, there were only a couple of chips of paint which came from the PE stencil anyway, so looks like I got away with it.
-
 It's a shame it had to happen, but better the intake warped now than further down the line when it may have been too late. And you've done a great job on V.2 so I think you're right to be happy about how it's turned out.
 -
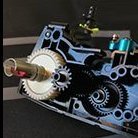
Thanks. I'm guessing you won't really need to flock seeing as you do rally cars, but should you fancy a road going car I can recommend embossing powder as it is a bit finer than flocking powder. The only problem is that most of them do seem to have a sheen to them. After putting the Y-section into the tub, there were a few little bits to do to finish off the engine, which could be summed up as fuel tanks and carbs. Both are on the chrome sprue for some reason. The carburettors I can accept, sometimes you do see them shiny, so I just gave them a dark grey wash and then did the additional painting and airbox addition. But the fuel tanks? No. I can't imagine that they would be chrome plated in real life so they had a bleach bath, fortunately the chrome on this one is very susceptible to bleach so it didn't take long to sort out. And this was a good thing as there were also pronounced mould lines around them so these also got sanded off too. Having painted them silver, I'm pleased to say that they went in easily as did the carbs, in fact the only questionable thing is unusually there is nothing to orient the circular thing at the end of the air box. So here's the engine viewed from the front. No idea how that ejector pin mark appeared on the pulley, I don't remember it from the beginning of the build. I can only guess it sneaked past me while I was clearing the chrome off that piece too. Still, it won't be noticeable on the end result; in fact this is probably the only time you'll see the front of the engine as the next step will be fitting the bulkhead. And seeing as I have nothing more to show on this one, here's more conventional view of the engine from the rear. As you can see, Tamiya have also modelled the choke. Thanks for looking.
- 83 replies
-
- 14
-

-
You're absolutely right about the wheels, they do suit the little Fiat. Great work on this, and as usual completed at rapid pace.
-
Don't worry, I wouldn't have put gold Watanabes on just any colour, but I figured if the flake in the paint was too big for 'normal' wheels they would have worked with this colour I have to admit that I'm also interested to see how it looks with this colour on (I have to be careful because if you spray from too close the flake dominates and it looks more grey than brown), but unfortunately modelling time in July is looking like it may be limited and what painting time I do have will initially be focussed on the Focus. (Pun not really intended, I just couldn't think how else to phrase it!).
-
I'd say it already looks better than atorn decal, finger crossed for you getting it sorted. As Keith has suggested, I'd agree about a little clear of some sort over the decalling if possible just to protect them and soften the edges, even at the expense of maybe losing a little smoothness in that area.
-
Yes, I will. The plan is to do that after I clear coat to seal the decals but before I paint the nuts.
-
Not a big update today, but a big hint in terms of where this build is going - I got colour on the first piece today and I'm sure a significant number of you will not be surprised to hear its... ...brown. To be specific Halfords M6-030 Metallic Brown. I had had doubts about whether the flake would be too large, but seeing it on the model I think it will be ok. So I will be following the suggestions of a few of you and using the stock wheels. And that's all I have to show for now. Hope the colour passes muster.
-
The good news (for me) is that I've got this week off work, so time to get a bit more paint on this one. First of all, the chassis has been done in Appliance White both inside and out now. So this is one piece I can put to bed, and it should mean I can get pretty well started on building this one over winter even if I don't get the body finished. Another piece I got finished spraying was one which had been concerning me for a while - the front grille. This has an Abu Dhabi graphic which needed spraying on using the attached PE stencil. Trouble is, that runs the risk of paint going everywhere and leaving a bit of a fuzziness to the lettering if the two PE pieces separate. So I gave the grille a bit of a convexness (although it has since returned to being concave, and the stencil a bit of concavity so they wanted to press together in the middle, then squeezed the end tabs to hold it in place as best I could. Then masking tape at the ends and behind to try to stop paint getting in, with a bit or wrapping around the edge where I could. After spraying with white it looked like this. And with the tape and stencil removed, and a little bit of touching up of the bits where I'd chipped the black paint off I realised there were some bits where the white paint had filled the mesh. A 0.3mm drill bit poked through the offending holes gave a reasonable end result which looks like this. There's a couple of holes I've missed which will need redrilling, but I'll take this as a result (the grey mat background isn't showing it at its best). Finally, I made a start at the decalling, but only on the wheels. The decals in this kit are by Cartograf and I can see where their good reputation comes from (although so far I've only done tiny decals, but they went down well). At some stage these will be cleared to seal in the decals, then detailed, but you get the picture. And that's progress so far on this. Thanks for looking.
-
I'd have to agree with Ross on this, it does seem as though various manufacturers have gone through a phase of cutting costs only for those savings to upset their loyal customers. The most obvious ones in my lifetime would be Ford in the late 80s/early 90s (1991 Ford Escort anyone?) and Mercedes around the turn of the millennium and Peugeot around the same time although I think there is a good argument that VW fell foul of the same thing in the 2010s. Certainly it felt as though they only regained their reputation by intentionally producing cars to a much higher standard than they would previously have needed to - probably the best example being the Mk1 Focus which was a league ahead of almost everything else in its class at launch. And despite the fact that its been out of production for over 20 years, you still see quite a few today so it seems as though they upped the standard as well as the handling.
-
1/24th scale Hyundai i20 - Monte Carlo & Tour de Corse
Spiny replied to ceeb555's topic in Ready For Inspection - Vehicles
Thanks, that's a relief to hear. I think the Fiesta was only something like their second kit and, while the decals certainly wouldn't have been enough to put me off, it would certainly have been preying at the back of my mind. As it happens, I only have one Belkits kit in my stash, but being the 6R4 there isn't really a lot in the way of curves to worry about.

