Rampage55 Posted March 10, 2010 Posted March 10, 2010 Having built a 1/48 Hobbycraft MiG-17 many years ago I can remember the disappointment I felt at the result. In part due to my lack of modeling skills and in part due to the toy like features of the Hobbycraft kit. When I heard that someone was planning to release a new tool 1/48 MiG-17 my interest was piqued, even if it was Hobby Boss. Having completed a very satisfying build of their FJ-4 Fury combined with the AMS Resin detail set, I was interested in what the their MiG -17 kit had to offer. After using the AMS Resin detail set on my Fury I was familiar with the outstanding quality of Harold Offield's work, so when he offered to send me a cockpit set for the the HobbyBoss MiG-17, I was excited to say the least. At the time I warned Harold I was an extremely slow builder, but apparently I failed to mention that I'm a slow starter as well. Harold sent me the resin over 8 months ago and I'm just now getting around to this project. My apologies to Harold for taking so long getting this build started. Here's a break down of what the AMS cockpit set entails. This cockpit detail set is comprised of five beautifully detailed and crisply cast resin parts. The cockpit tub is full of fine detail. Both side consuls are delicately recreated. One of the things I like most about this set is the gun sight. Harold captured the look of the real thing very nicely here. The gun sight is molded as a single piece with the instrument panel. I like the simplicity of this arraignment. The seat is nicely done with the harnesses realistically captured. A little paint and this is sure to be an eye catcher. Also included in this set are the two cockpit side panels. These add detail to a prominent area in the cockpit that the kit is lacking. In addition to the AMS cockpit set I also have the Quickboost gun barrels to add to this project. I plan to use the kit supplied decals. Not because I like them that much but there seems to be a distinct lack of aftermarket decals available for this particular subject. I plan to do a NVAF MiG-17F "2011". But I think I'm going to camouflage mine. Apparently "2011" wore several different schemes during the conflict. After opening the box and inspecting the parts I was a bit concerned about the parts break down, particularly about the four fuselage parts and how well they would all go together and then the intake and nose section looks a bit tricky as well. I started by removing these shaded areas in order to fit the AMS cockpit. The tabs to support the kit supplied cockpit parts need to be removed as well. Here's the cockpit test fit. I perhaps removed a little too much plastic in a few spots, but overall I think the fit is quite good and will require just a bit of clean up. That detail in there is a vast improvement over the kit parts... So, now to the area I've spent some time trying to figure out the best way to approach it. The fuselage assembly and wing join. First I'm going to deal with the fuselage assembly. The kit provides a beautiful engine, unfortunately once it's installed and the fuselage is buttoned up nothing much can be seen of it. So I'm not going to bother with all of the detail of the engine. One, It will save some weight in the tail and second, I won't have to deal with all of those little bits. I just assembled what was necessary to get the tail pipe in position because without it there's nothing to attach the exhaust to. The nose wheel bay has been assembled also so I can start dry fitting all theses parts so I can sort out my assembly sequence. I'm considering gluing the front and rear fuselage parts together before joining the fuselage halves together. However there is a lot of stuff that needs to be crammed in there before I can do that. Thanks for looking, Mark
Rampage55 Posted April 22, 2010 Author Posted April 22, 2010 There hasn't been too much progress lately on this project but I'm getting back to it. So far I have painted the cockpit. I tried to keep it simple as most of the images I have seen of these aircraft seem to show a blue grey cockpit with black instruments and a few red knobs and buttons here and there. There's also a white stripe down the center of the instrument panel, from what I understand, it's there to remind the pilot where to put the stick during spin recovery... The side panels have been painted and after a lot of dry fitting to make sure everything was going to fit together properly they were glued in place. This adds some nice detail to an area that HobbyBoss over looked. The AMS ejection seat is exceptionally nice. Harold did a beautiful job with this one, I just wish my painting skills could do it justice. The detail in this cockpit is what really makes this model come alive for me... I'm still going back and forth with my assembly sequence on this one though, if I glue the front fuselage halves together first it will make it easier to fit the intake parts, align the nose gear well and get the cockpit in position properly, but the join at the front and rear fuselage halves will be more difficult to deal with... I'm hoping to get this thing buttoned up by the end of the week so I'll let you know in my next up date which way I decided to go with it. Thanks for looking, Mark
Rampage55 Posted April 27, 2010 Author Posted April 27, 2010 I've come up with my plan of attack for assembling this one and I've decided to not to glue the front and rear fuselage halves together first for several reasons; It will make attaching the cockpit assembly much easier and ensure that I get a good fit here. The cockpit has been test fit and I'm pleased with how it fits. There's also a seam at the intake where the mouth attaches and will be very difficult to get to at once all of the other parts are in place so I decided to glue this piece in place first so I can deal with this seam, then I'll attach the rest of the intake assembly. I also think getting the nose gear well in place properly and aligned correctly will be more tricky if I try to attach it to one side then glue the fuselage halves together. The part that fits over this area that holds the cannon will be a bit more tricky to get on cleanly as well When it comes to attaching the engine I think the instructions are misleading. The instructions would have you attach the completed engine assembly to the tail section then attach that assembly to the forward fuselage section. However I think it should be attached to the forward section and there's even a raised lip around the inside rear of the front fuselage halves that fit the engine mount just perfectly. I think the kit was designed to be assembled this way but the instructions got it wrong. After test fitting the fuselage halves together with the engine in this position, they do seem to fit together pretty well. I have also heard that some builders of this kit have found the exhaust sticks out a bit too far and I think this may be why. So I committed myself to this plan of action by gluing the forward fuselage parts together along with the intake mouth. Once I get that seam around the intake cleaned up I can attach the rest of the intake assembly and the cockpit. So I figure that I'd rather deal with one seam at the join between the front and rear fuselage sections than have to deal with fit issues on these other areas. This kit sort of reminds me of the Hasegawa Harrier kit in that the fit isn't too bad, but it's quite fiddely in places and needs a lot massaging and test fitting to understand how the parts relate to each other to ensure the best fit. It's certainly no shake and bake that's for sure, but I'm enjoying it so far. Thanks for looking, Mark 1
crookedmouth Posted April 27, 2010 Posted April 27, 2010 No comments on this so far? Interesting build - it's a crying shame that engine will be lost from view though.
Silver Fox Posted April 27, 2010 Posted April 27, 2010 Looking fabulous so far, I think the AMS resin is just brilliant and you have done a top job painting it. I built my HB MiG17 as you considered, by assembling both fuselage halves then joining together, it went pretty well appart from the cannon cover. I'm looking forward to seing how yours goes.
Rampage55 Posted May 1, 2010 Author Posted May 1, 2010 it's a crying shame that engine will be lost from view though. Thanks crookedmouth, I agree, it's a beautifully done engine that can't be seen, but I think if one wanted to display it with the fuselage in two to show the engine I don't think it wouldn't be to difficult. I like this kit enough to get another one and since it has such a nice engine I was wondering if the support trolley from the 1/48 Tamyia MiG-15 kit might not be usable to support the tail section of this kit and display it this way to show off the engine... Looking fabulous so far, I think the AMS resin is just brilliant and you have done a top job painting it. I built my HB MiG17 as you considered, by assembling both fuselage halves then joining together, it went pretty well appart from the cannon cover. I'm looking forward to seing how yours goes. Thanks Silver Fox, The AMS resin is a pleasure to work with and. I definitely think there's more than one way to skin this particular cat that's for sure. I found a lot of test fitting helped sort out where the trouble areas were. So far things have gone together fairly well, I haven't had too many fit issues...Yet...(knock on wood)... After I glued the two front fuselage halve together, attached the intake mouth and cleaned up that seam inside the intake I added the upper and lower access panels. It seemed to me that putting the intake splitter and the cockpit in place before the access panels were attached changed the shape of the fuselage just enough so that when the access panels are added the fit is off a bit. There're a few minor seams that will need some attention but I'm pleased with the fit so far. I let the glue joins on the access panels cure overnight and the next day I slid the intake splitter into position and glued it in place, but before I did that I attached the nose gear leg to assist me in assuring the alignment was correct with this part. Before I glued the cockpit in place I added some weight to the nose just to be sure I wasn't going to have a tail sitter. I think that and the weight of the resin cockpit should be enough to keep her on her toes. The next step after gluing the cockpit in place will be to attach the engine to the forward fuselage section. Here you can see the lip on the inside of the forward fuselage section that I think was intended for attaching the engine mount to but the instructions would have you attache it to the tail section. I believe this is a mistake. The engine mount fit perfectly in there and this also provides much needed support for the join between these two sections and makes it easier to align the two correctly. The plan is to have the fuselage buttoned up this weekend so I hope to make another update soon. Once that's done I can tackle the last significant hurdle with this kit and that's attaching the wings without a big gap at the wing root... But I think getting a good join between the two fuselage sections will be the key to getting a good join at the wing root... Thanks for looking, Mark
dambuster Posted May 1, 2010 Posted May 1, 2010 Thanks crookedmouth,I agree, it's a beautifully done engine that can't be seen, but I think if one wanted to display it with the fuselage in two to show the engine I don't think it wouldn't be to difficult. I like this kit enough to get another one and since it has such a nice engine I was wondering if the support trolley from the 1/48 Tamyia MiG-15 kit might not be usable to support the tail section of this kit and display it this way to show off the engine... See here for a detachable rear fuselage. The only problem seems to be that the rear fuselage is so tight around the engine that if it is fully closed up it is a real struggle to get apart again. http://www.britmodeller.com/forums/index.php?showtopic=48081 Peter
Rampage55 Posted May 5, 2010 Author Posted May 5, 2010 A bit of progress to report on this build; The fuselage went together without too much fuss. While I definitely have some seams to clean up that will require some filler it's not as bad as I thought it might be. The bottom seam is a little worse off than the top, but again not too bad. Here's the AMS Resin cockpit in place. The horizontal stabilizers have been attached, the fit here is quite good. Hobby Boss has provided the control surface as separate pieces which is nice. Before I can attach the wing I need to fill in these six holes on the bottom of the wing. There's no mention of this in the instructions but I figured these were for the rocket and missile pylons that I won't be using. I plugged the holes with some stretched sprue and liquid cement. Trim off the extra and sand smooth. Thanks for looking, Mark
Doug Rogers Posted May 5, 2010 Posted May 5, 2010 Looking good Mark. I'm not normally into Russian jets, but this is coming together nicely.
Rampage55 Posted May 19, 2010 Author Posted May 19, 2010 Thanks Doug! Here's the progress I have since my last update; The wings have been attached without too much issue. There were some small gaps that needed filling, but the fit was better than I expected. But a little bit of white stuff putty and a Q-tip with nail polish remover on it and those gaps were sorted those out nicely. I did have to rescribe the panel line along the right wing root as I removed most of of the detail here smoothing out the gap. The seams around the cannon cover have been cleaned up and I'm now ready to attach the Quickboost cannon barrels that simply replace the kit parts. The seam where the front and rear fuselage meet turned out pretty well I think and I didn't need any putty here, I just smoothed it out with a sanding stick and I'm good to go. So far so good. Once I attach the cannon barrels and clean up a few more seams I think I'll be ready to start painting this Bandit. Thanks for looking, Mark 1
Stephen Posted May 20, 2010 Posted May 20, 2010 I missed this, great work.I have this kit in the stash. Stephen
huntermountain Posted May 20, 2010 Posted May 20, 2010 very nice. I'm not the biggest Russian jet fan, but this looks great.
Metallicus Posted May 20, 2010 Posted May 20, 2010 I really like the old school jets and you are doing this one justice, also cant believe I only saw this thread today. *bookmarked*
Rampage55 Posted June 1, 2010 Author Posted June 1, 2010 Thank you gentleman!...I appreciate your encouragement... The Quickboost cannon barrels have been attached. There was a few little seams that needed to be cleaned up but other than that they fit well. The ailerons have been attached and the rest of the fuselage has been cleaned up ready for painting. I have also attache the elevators in a slightly down position. I hope to start painting sometime this week... Thanks for looking, Mark 1
rookie Posted June 1, 2010 Posted June 1, 2010 Nice job and thanks for the tips. I thought I had a good idea of how to do certain tasks, obviously not and I would have wasted a stack of time. What are you using for weight in the nose Mark, bearings?
Rampage55 Posted July 3, 2010 Author Posted July 3, 2010 Nice job and thanks for the tips. I thought I had a good idea of how to do certain tasks, obviously not and I would have wasted a stack of time. What are you using for weight in the nose Mark, bearings? Thanks rookie!...For the weight I used some BB's and a flattened 3oz lead fishing weight. I may have over done it a bit but at least she's in no danger of being a tail sitter. Now I just have to worry about the landing gear collapsing... looking great!!! Thank you Metallicus! This past week I finally got the opportunity to get some work done on this project. I primed the model with Floquil Old Silver and let that cure for about 5 days and now I'm ready to start painting the camouflage scheme. I hope to get some more painting done this weekend. Thanks for looking, Mark
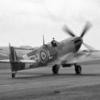
Rampage55 Posted July 7, 2010 Author Posted July 7, 2010 I got some painting done this weekend and once the paint was dry to the touch I started chipping it gently with a sharp wooden toothpick. After I got the paint chipping the way I wanted it I applied a dark wash to tone things down a bit. This was my first experiment with chipping paint in this fashion and I 'm pleased with the result. Next on the agenda will be the decaling. This should not be too time consuming as there are only 8 of them to apply. Thanks for looking, Mark 1
Rampage55 Posted August 4, 2010 Author Posted August 4, 2010 that looks fantastic!! really good chipping!! I love the worn look. Very nice Mig yep, that is on hell of a build! awesome Wow, that paint job is awesome!Kev Thank you gentleman! I appreciate you kind encouragement. Cheers, Mark This project has been on the back burner for a bit while I made some progress on a couple of other projects I have going on at the moment. I did receive a welcome surprise in the mail the other day though... Doug Smith of Royal Resin has sent me a set of his new 1/48 MiG-15/17 wheel set and his timing couldn't have been better as I was just in the process of getting the kit wheels sorted out. As I was cleaning up the kit wheels and getting ready to paint them I kept thinking they looked a little odd to me but I'm no expert on these things and my reference photo's didn't show the wheels very well so I moved on. Then I compared them to the wheels Doug sent... Well, I'll let you decide for yourself. Both sets of wheels together. The dark grey ones are the kit parts. The inside of the wheels. The outside of the wheels. Nose wheel. The Royal Resin wheels also have finely done tread detail. To me the engraved lines on the sides of the kit tires bothers me, especially on the nose wheel, just based on that I immediately preferred the look of the Royal Resin set over the kit wheels. But the hub detail on the RR wheels is also much crisper and the tread detail, especially on the prominent nose wheel, will definitely add to the look of the finished model. In my opinion these wheels are a big improvement over the kit parts. Many thanks to Doug for sending me these wheels. I'm sure anyone who has used his products can't help but be impressed with not only the talent it takes to master and mold these amazingly detailed resin accessories but with his passion and dedication to providing his customers with a quality product. Doug Smith and Royal Resin get a big thumbs up for me... Here's the progress I've made on this project since my last update; Most of the decals have been applied. The airbrakes have been painted. And I added a brace to the back of the canopy to help it sit at the proper attitude when open. I forgot to take a picture of the canopy brace, I'll add that on next update. The plan is to finish adding the remaining decals and then get the landing gear sorted out along with the wheels so I can get this MiG up on her feet. Thanks for looking, Mark 3
Logan181 Posted February 23, 2016 Posted February 23, 2016 Mark What colors did you use on your Mig, Also do you have some pictures of the underside? John
Recommended Posts
Create an account or sign in to comment
You need to be a member in order to leave a comment
Create an account
Sign up for a new account in our community. It's easy!
Register a new accountSign in
Already have an account? Sign in here.
Sign In Now