Search the Community
Showing results for tags '1/24'.
-
Okay, onto another one! This is going to be part of a set (maybe a diorama... ) along with the Italeri series 1 Range Rover and the mystery side project that won't be getting a WiP. There seem to be a few little details on this box photo that aren't part of the kit. Mainly the winch line and 'hook' and the central winch line locator on the front edge of the trailer base. Looking at the Brian James website, this trailer doesn't come with the winch or the wheel rack thing at the front as standard, so I might just exclude them. The first thing to note is that the box is quite empty (I've already cut some bits from the sprues, but they are all in the box). The next thing to note is that I do not like those wheels! Especially as the spare doesn't match. Also, because this is being paired with a series 1 Range Rover that will be rolling on steel 8 spokes, I feel like steels on the trailer is more appropriate. So I knocked up a quick steel wheel (and forgot to do the tyre valve, but I don't think it will matter). I actually went with my JDM standard 5 x 114.3mm stud spacing and I think I should have gone 5 x 108mm. This would have given me a smaller mounting area and would have looked more like the OOB spare. I might re-do them, but I'm not sure... I'm also planning on using the OOB tyres at the moment. The original wheel... My steel wheel Here are a couple of shots of the OOB spare for reference. As the back is what you'll really see, I don't think the differences with my wheel will matter. And, finally, here's a comparison between OOB and my steelies. The next step is fitting the main trailer frame together before painting and this is going to require some thinking. All the bits are separate, so it'll be really easy for it to get a wonk on. I think I need to make a jig. Anyway, thanks for looking! I'm hoping this will be a nice little 'over Christmas' project... let's find out! Martin
-
 I have finally taken some completed photos of my Mazda MX-5 NB (Mk II) 787B tribute build. There is a wip thread here. I certainly do not claim to be the first to do this - even Mazda UK had a 1:1 tribute in the NA / Mk I MX-5s - but here is my take. The base kit is the Aoshima 'Garage Vary' version of their Mazda MX-5 NB (Mk II) range (kit #040904). This kit comes with the front and rear bumpers you see here, the rear wing, a Mazdaspeed-style roll-hoop, hard-top roof and some white six-spoke wheels. The wheels used on this build are actually from a different Aoshima MX-5 NB kit and are supposed to represent the period OEM Mazdaspeed wheels; which they kind of succeed. I have further added a parts bin "race interior" of driver's race seat, fire extinguisher and steering wheel. I created a full rollcage with a combination of 3-D printed rear cross brace and polystyrene tubing for the front half. There is a Parts Box (brand name) resin intercooler jammed in the front bumper and some parts bin tow hooks. I lowered the ride height to get the tyres just tucking into the arches. For the livery, this is strictly an homage trying to capture the main features of the Le Mans winning 787B. Paint is Tamiya's TS-31 Bright Orange and TS-35 Park Green, with my first use of Tamiya's 'masking tape for curves' to create the pattern. I used Hobby Design decals (HD04-0082) which came with the white dashes; some versions of aftermarket decals for the 787B livery do not. I tried to put the Renown and door number in approximately the correct spot, then after that it was purely placement by what looked 'right'. Overall, I am very pleased with the outcome of this build. I threw all my (limited) expertise at the model and - for once - the end result is a perfect match for my original vision. I am not sure I will build another model I am happier with. I may have just reached my peak! Hope you enjoy it as well. Grant. And now for something a little more fancy.... Finally, with a more out-of-the-box build of the Garage Vary kit:
- 11 replies
-
- 15
-

-

-
- Mazda MX-5
- Aoshima
- (and 1 more)
-
This is my Mazda Eunos Roadster (badged MX5) with some 'upgrades'. Here is the WiP if you're interested in the back story. The idea of this is to offer a trans kit on my Cults3D page that can be printed off and will integrate seamlessly with the original kit. The inspiration was an episode of the greatly missed Motor Trend show Dirt Every Day, where Fred and Dave made a ‘sand buggy’ out of a four door Dodge station wagon. It was terrible, but it looked insane! After creating the sand wheels and tyres, I decided a set of off road wheels and tyres would look better. I've modelled the wheels, tyres, suspension, drive train, rock sliders, sump guard, spare wheel rack, roll cage, light bar, steering wheel and seats in Fusion360 and printed on an Elegoo Saturn S at 0.01mm layer height. Looking at the photos below, I can see my panel lining leaves a lot to be desired but, in my defence, it's only the second time I've tried it and I needed new reading glasses (which I picked up yesterday). I've also noticed that one of the front tyres is mounted the wrong way round, but it's not massively noticeable. Anyway, enjoy! Thanks for looking! Martin
- 32 replies
-
- 23
-
-
-
This is Fujimi's BMW 325i Group A kit, #TC-96. It is an old motorised kit so has low detail, especially in the chassis. The livery is after a car that ran in European touring car series in the 1980s, though I could not find too much online about it. Reference photos I could find suggested the livery changed in details quite frequently. I think this livery is supposed to represent a Spa (24 Hour?) race. Paint is Tamiya TS-26 Pure White and the kit is essentially straight out of the box. There is only a half roll cage but someone with more patience than me could readily create a more realistic full-cage. The decals were terrible, mostly I think due to their age. They required soaking for a good ten minutes in quite hot water, a lot of decal solution and a few encouraging words. The 'BMW M Technic' decals had to be trimmed and I used a reference photo for placement. I completed the Fujimi M325i road car at the same time, though I think the 325i Group A is a better overall look. They look okay as a pair on the shelf. Grant.
-
This is Fujimi's BMW M325i kit (#03241 / ID-60). A very old, originally motorised kit, with the expected low level of detail. I don't believe the body has captured the proportions of the 325i particularly well with the roof line appearing to low to my eye. At least the factory 'wide-arches' are molded in, not a cut-and-shut add on, but as the track was not widened the wheels sit a little to far inside the arches. I think the Fujimi 325i Group A I completed at the same time has a better overall stance. Given this kit comes with the same half roll cage as the Group A kit I decided to give model a track-car feel. Painted the grill red as an homage to the factory M3 Group A cars, masked and painted the bonnet 'BMW Motorsport' stripes, and fitted a left-over decal from the Group A build. Paint is Tamiya TS-47 Chrome Yellow straight from the can, wheels are from the box. It looks okay on the shelf, though I think it needs some number plates. Grant.
-
Here is my little Tribute to Michele Mouton who will retire from her role as FIA Safety Delegate at the end of 2024. Fourth in RAC rally 1984 in this car.
- 14 replies
-
- 25
-
-
-
Here's my build thread, it will probably be quite slow as I've already had this build on going for some time though often paused! The basic kit is this... It's of the roadster version, though looks quite nice, with plenty of bits... Here is the C1 Model transkit box and parts... My plan is to model this on my next door neighbour's car (and give him the finished model, if it doesn't look too bad) - he's an elderly gent and whilst he enjoys tinkering with it, I get the feeling that one day he may no longer be able to drive it. With that in mind I do have access to a reference vehicle (well OK in the summer when it's parked outside) and the colour choice has already been made for me - Sandy Beige, no a colour I would normally pick for a car build, So I ordered some custom paint from Zero Paints... The first job is to split the top of the rear arches out of the chassis to facilitate the new upper arches/interior boot part, unfortunately I cut a little too deep but thankfully recoverable. Here are the parts connected together, with some added filler! I primed the body in white before adding the colour, however it didn't to my eye seem to match the reference vehicle so I mixed in some MG Metro white at a ratio of 1:12 (see below), I'm still happy. I wonder if the real paint (having had over 50 years of sun has lightened somewhat - especially the red particles, the bottle colour looks more akin to what I'm looking for and that's without it being vigorously shaken and from the image above you can clearly see the red particles seem to drop out of suspension a lot more readily - so hopefully the 3rd time will be a charm (I'll allow the paint to settle out a small amount - to remove more of the red and simulate the red paint 'burning out' in sunlight. So some of the other parts have been primed in black (see above), though as mentioned the body will need another coat of paint, though I need to get the paint out again anyhow - since I forgot to paint the underside of the chassis part - which is body colour!
-
I haven't done a WiP for this because most of it was done before I joined BM. Also, the interior was kind of rushed because the model was supposed to be a mule for photographing wheel designs. Now I've finished it (barring the reg plates), the tuck is so tight at the rear I can't swap the wheels out! This is built straight out of the box with the exception of the front hubs, brakes, wheels and tail pipe. Oh, and badges. I forgot to put the little red and white GT stickers on the side before I clear coated, so I just painted them on instead. I also painted the rear high level brake light in with Molotow chrome and Tamiya X-27 clear red. Although, I can't remember if I bought this X-27 in 2014, early 2000s or the early '90s, and it seems to have started migrating towards orange. 🤔 For the big brake/lowering/camber solution, I modelled new front hubs with 2mm raised rotor mounts and -1.5º of camber. At the rear, I didn't want to have to recreate most of the rear subframe assembly, so I modelled rotors with a 2mm offset -1.5º hub mounting point. This meant the half shafts and everything from the original will all still line up. with the hubs. I kept the calipers separate for ease of painting and modelled smooth and drilled rotors. Here are some renders of said bits... As I happen to have two of this kit, here are some comparison photos... For wheels, I used my SM1-19 set. The set is based on the rears I've used here, which I think is an HRE design. I then evolved this into a full spoke version and two turbo fan versions. The wheels are a 19in instead of the original 18in and are a couple of inches wider (although when I measured the kit wheels and allowed for rim width (about an inch) they're 10 inches wide as opposed to the 8 I think they're supposed to be!). With the GT-R and Nissan badges, I used ZoomOn 'Metal Sticker' versions. They aren't really as good as photo etched in this application, because there's no detail in the 'R' to paint in the red. I ended up just painting the whole 'R' with X-27 and I think it's okay. Also, the nissan badge is too modern for this car, I think. I painted this in Pro Scale Paints Millennium Jade and I have to say I really struggled with it. And, on reflection, I struggled with it the last time I used it, too. It seems to react with itself when applied sometimes and no matter how many times I sanded back and re-applied (4 times on the bonnet, I think) it just reacted again. So I called it good enough. And, actually, even with that, I'd say this is the most successful model I've built! I'm no expert and I lack the patience (although I'm trying!) to really get a good finish, so it's far from perfect. But, here we go! (Car posed on foam to absorb the camber ) Thanks for looking, Martin
- 19 replies
-
- 13
-
-
-
 Many of you will have seen this build as I've crawled through the build, about 18 months from first beginning disassembly to completion. And for those who haven't seen the build thread, yes that use of the word disassembly is correct. This is a model I first built when I was 12 which was before I discovered the joys of paint. Fortunately also before I discovered solvent cement so I could take it to pieces. If you haven't seen it and want to, the WIP thread is here: Before I move onto the finished pictures, it may be worth me showing some pics of the rather dirty and badly built state of this before I started. There were also some bits missing, plus some damaged during disassembly so I have had to demonstrate my lack of scratchbuilding skills. I am also aware that the real clamshell isn't sitting quite right, unfortunately that's down to the front half being about half a millimetre too far forward on the chassis so would need major surgery to fix. The build isn't perfect, but it's probably the best I can manage. Overall I'm happy with it as I knew this would be a challenge and I doubted whether I would be able to complete it. And with that written, time for a trip over and around the car. A couple of close-ups of the engine bay. This was probably the major part of the build, although it will be hidden away when the model is in the display cabinet. No pictures from inside the cockpit though as I just couldn't get a decent shot in there. And with the normal shots done, a bit of playing about. I didn't really have much time, or materials to play around this time, so fairly functional I'm afraid: As always, thanks for looking, and I hope at least some of you found it interesting.
- 26 replies
-
- 35
-
-
-
- restoration
- Tamiya
- (and 1 more)
-
 Hello all, Having just finished the last update today over on this thread of two years research and design work on 1/24 and 1/32 versions of the Westland Wasp helicopter: - I'm starting this new thread here to outline the 3d printing and contruction of the kit at 1/24th scale. The project includes options for both torpedo (Mk.44/46 versions, Mk.44 shown here): - and AS.12 missile version: With working blade folds on both: This thread wil be quiet for a bit whilst I put the next series of parts on to print, but eventually we should end up with something approximating this as a physical entity: Until the next instalment: Tony
 -
Hello fellow modelers. This is my last project, the Renault 4L in 1/24, by Heller. This model is the Renault 4L basic, (labeled "TL", ) which means that has no antenna for radio system, or side protect panels alongside the body. Year 1985. I have decided to represent it in a quite acceptable condition, without being excessively worn out. The built is totally OOB. Most of the time was spent in the engine bay, that I tried to reproduce according to the real thing. The front bonnet an the right door are not glued, in order to see the interior: A fun model, that I hope you like and enjoy, as I did during the modelling. If you want to see the bulidng process, this is the link to the WIP thread: Rhank you for watching! Josep
- 22 replies
-
- 33
-

-
-
-
- Renault 4L
- 1/24
- (and 1 more)
-
The first of several 'in progress' projects I'll post and the most recent one I started. It's the Tamiya Mazda Eunos Roadster, or MK1 MX5, or Miata... Anyway, I bought this because it was cheap and I thought I might lower it and chuck some little fat wheels on. But then I thought that's what happens to most MK1 MX5s, so maybe I'll make a dune buggy because the tyres should be fairly easy to model. So I need to model a lift kit and some wheels, maybe a roll cage and new exhaust. First thing I did was wheels and tyres - because it's fun! I decided to recreate the original 14in wheel centres but as though they'd been machined from the original wheel and converted to split rims. Then I went with a 17in front rim and 15in rear to keep the overall diameters similar. The wheel centres are the same front and rear (because they're modelled on the originals) and I made separate valves that push in from the outside. After printing a set of these and mucking about with them for a while, and making a start on the front suspension, I decided I'd quite like to do a set of off-road wheels, too. Then I could make a trophy truck or rock crawler type vehicle as an alternative. Because the off-road wheels would be a square set-up (same diameter, width, offset front and rear, not actually square!), I thought my rear offset on the sand wheels was a bit too aggressive for the suspension to work with both sets of wheels and keep a similar front and rear track. I re-modelled the rear rims and re-printed them. As you can see in the photo below, it's not a massive difference (1.4mm actually). The left is the original and the right is the new version. Below is the final set of sand wheels and tyres with an original wheel and tyre for comparison. In order to create the off-road wheel set I needed to up my tyre modelling game and picked the Yokohama Geolandar X-AT as my inspiration. This wasn't too bad to model as it turned out and I'm really happy with the result. For the wheel, I went with a Fuel Zephyr as my starting point but made them a 4x100 bolt pattern to match the original MX5. I went for a 17in wheel and I can't remember what size tyre I picked but it comes out at about a 32in. The wheel comprises a Tamiya style locator that is also the wheel nuts, the wheel, a centre cap, a valve and a lock ring. I did this mainly for ease of painting Although, the separate centre locator does mean I can create an Aoshima/Fujimi style one in the future. I'll probably model some 5 and 6 bolt versions of the wheel, too. Once I'd printed the wheels and tyres, I thought it'd be much better if I gave the tyres a bit of 'sag' so they look like they've been aired down for off-road use. I use Fusion 360 for my modelling but it isn't really made for deforming stuff. As it happens, I also have a copy of Blender installed, so I used the mesh deformer in that to squash the bottom of the tyre and I'm really happy with the results. Below is a photo of the full set of wheels and also a comparison between round and sagged tyres. Whilst I'd been messing with wheels and tyres, I'd also been working on the front suspension mods. These components basically replace the kit originals directly with the removal of the anti-roll bar and addition of a sump guard/skid plate. I didn't want to have to cut or modify any of the original kit parts, so the front and rear track are vastly wider that original for tyre clearance. In fact, the wheels are entirely outside of the original bodywork! Although this doesn't articulate, I did check that it was "useable" in terms of camber and steering. It has a crazy amount of lift and I wanted to give as much ground clearance as possible, so the track rod angles are ridiculous. Through the full "movement" of the suspension, though, the hub would remain the same distance from the steering rack, so it shouldn't be a nightmare to drive. The track would actually alter dramatically, though, and I guess that's not ideal. Here are some shots of the front suspension so far, with comparisons to the original kit parts. Everything is beefed up for off-road use. I'm now working on modelling the rear suspension and am pretty much there. I still need to work out the propshaft, differential and half shafts, as I'm keeping to independent suspension. I think I'm going to attempt to model a Mazda RX7 diff and use it upside down for extra ground clearance. Here's a render of where I'm upto so far Wow! I think it's taken me almost as long to create this post as it has to model everything! I was thinking I could actually create a full exo cage for this and make a military version so I'd fit in more Anyway, if you've managed to make it this far down, I hope you've enjoyed it! Cheers Martin
- 84 replies
-
- 11
-
-
- Mazda MX-5
- Tamiya
- (and 1 more)
-
 The Briggs Cunningham team entered 2 cars in the 1950 Le Mans 24 hour race. One was a standard(ish) 1950 Series 61 Cadillac, the other was an experimental car with streamlined bodywork and subsequent weight reduction. Unfortunately the streamliner car was involved in an 'off' resulting in time lost due to Cunningham actually having to dig the car out of the sand banking by hand. The end result saw the standard body car finish in 10th place, one position ahead of Le Monstre. A failed experiment but one that left us with, well, a talking point at least! Resin kit is from Roaring Replicars and was painted with Zero paints. Various details were added including the provision of recesses for the front and rear lights, bonnet straps and seatbelts from spare etch and tape, etc. It would be great if a standard 1950 Cadillac kit was available in 1/24 scale, just to build and display alongside the monster. It would show what you can do with a load of steel tube, sheet metal and a little help from a Grumman aircraft engineer 😊 I do hope this hasn't hurt your eyes too much 🤣 Atb, Steve.
- 25 replies
-
- 26
-
-
-
- 1/24
- RoaringReplicars
- (and 1 more)
-
Seeing as the Skyline is all but finished, I may have intimated to @Col. that I would look in the stash to see if I had anything else suitable. All I have is '98 and a '99 versions of the Tamiya Subaru Impreza WRC Col said that the Colin McRae '98 car would be his choice, so who am I to argue with the boss 😉 Here is a place marker for my build, which will be OOB. I'm away at the end of next week for a few days, so I may get a few bits in prep beforehand, but there won't be mega speedy progress. This was the first car I built getting back into modelling and I always said I would like to redo it now I have more of an idea 1st pic below was my effort from 2018, missed some detail painting out and decals not sat down properly, probably won't go with the night light cluster either as I already have this car in the display with it on Ian
- 13 replies
-
- 11
-

-
-
After building the Mustang GT4 I'm getting on with a Tamiya Skyline R34 Nur version in Millennium Jade. I don't normally build road cars as they don't interest me, but as it was bought for me I'm going to do it for the Asia GB in Zeros Millennium Jade paint as the Nur version, which I believe was the only version Millennium Jade was used on. Prepped bodywork and mega priming session for all chassis stuff is all for now. Ian 😀
- 20 replies
-
- 10
-
-

Airfix spring summer surprise with new 1/24 Spitfire mk. 8
Whofan posted a topic in The Rumourmonger
Unless I have completely missed it on the site, the latest issue of Airfix model world is leading on a new Mk. 8 variant from the 1/24th Mk. 9c. It has a completely new Mk. 8 specific sprue, and various changes to complete the new model. It will be available apparently in the Autumn. -
The Cunningham C-4RK is either the most handsome ugly car ever made, or the other way round. Either way I love it; first raced by the Briggs Cunningham team in 1952, it looked years ahead of the competition even then and was still racing competitively into 1958. Powered by a 5424cc Chrysler Hemi, the C-4RK was the only vehicle ever designed by Wunibald Kamm (he of Kamm tail fame); thus it was probably the first race car to feature Kamm’s signature cut-off tail and this alone makes the car look a lot more recent than its 70+ years. This is Profil24’s lovely 1/24 kit, with a few tweaks, mainly to the interior. I also wanted to depict a fully open grille - the car as depicted ran at the 1953 Le Mans 24 Hours with varying degrees of intake blanking-off; hence the studs fitted around the lower edges of the grille. To model the non-blanked grille, I ground away the kit’s moulded-in detail and made a new one from plastic mesh; the race number was then masked and the white sprayed directly onto it, just as they did in-period. Other than that it’s pretty much OOB. Oh and there was a flaw in one of the headlights so they are held on with Blu-Tack at the moment. Profil24 (awesome customer service) are sending a new one, free-of-charge. It’s no surprise that the company’s kits form the largest part of my stash.
-
Still on a break from my stalled FW-190 project I figured this little kit would be a short fun build. How wrong was I?! Turns out that for my shaky hands and poor eyesight its a fiddly little bleeder that requires to be painted and decaled before assembly... and then, when assembly starts is a fragile kit that lacks suitable holding positions... i.e. you can't place it upside down on a box lid for example whilst you work on the underside. Still, gripes aside (I like to whinge in my senior years), I have honestly enjoyed building it and am pleased with the result... although I think Airfix should up the skill level from 2 ! Another problem area I had was my decals. Not sure if it was due to the age of them or something having been spilt on them by the previous owner but they would just not separate from the backing paper and required a lot of coaxing to remove them. Additionally, I was aware that their thinness would mean the white was translucent - so during the build I first sprayed the white areas and then masked them off before painting the yellow and silver. This seemed to do the trick - although I'm sure more competent builders would probably do away with the decals and just use masks instead. Adaptions from the box kit were: - Replacement rocket tubes from Evergreen styrene tube and rod - Replacement AA missiles from Evergreen styrene rod and sheet - Replacement machine guns made from brass tube - Seat belt made from masking tape and wire - Fuel and brake lines from fishing line - Spark plugs by AnyZ - Spark plug cable and control cables from varying gauge wire Anyway, here it is:
-
My victim for this is the Tamiya Skyline R34 in Millenium Jade paint from Zero (2nd pic not mine but borrowed from net just to show colour, not exactly same spec car though) I don't normally build road cars as they don't interest me, but I got bought this as a Christmas present a couple of years ago and this is my best chance of finishing it I'm hoping for a bit of decent Tamiya parts fitment after the Airfix Ford 3ltr GT I'm currently on Ian
- 32 replies
-
- 13
-
-
I pre-ordered the transkit as soon as it was announced. Originally I was just going to build a model of the car my brother in law owned back in the day, shortly after, I plumbed or the X-pack version as well. This build will be the factory stock version in signal yellow. Unfortunately, neither me or Kev can remember the full reg number, it was LUV ***X as far as we can recall. I'll make up the numbers, it will have to do. Initial work was removing the printed parts from the frames and cleaning up the body. There is much more here than I was expecting and the quality of the parts is superb. The bonnet has some fairly pronounced striation lines but I've sanded this back a fair bit so far. It will be more telling once the primer goes on. A few pics to illustrate the contents. The kits are well presented in stout boxes with all parts sorted in separate bags. The body fits on to the chassis very nicely. The interface at the engine bay is quite good, the unsightly gap present on the kit parts is avoided. The chassis improvement work will be the biggest job in the whole build. The wheels and tyres needed a bit of sanding to fit. Love the old fashioned 'deep' rubber on these 😊 Front nosecone and bonnet fit is good. I also tried the 'glass' part in the body. Fit is very good. An improvement would probably be to replace the side windows with clear sheet, Work started with prepping the chassis pan. The fuel tank filler piece is a great improvement, there are some more holes in the wheel arches, easy to fill with thin plastic card and a smear of filler. An example of the quality of these 3D printed parts. Front McPherson struts have the springs printed open 👍 Will be a headache to paint the springs a different colour to the shocks though ! Lots of cleaning up and test fitting to follow before any primer can go on. Atb, Steve.
- 42 replies
-
- 18
-
-
I bought this kit second hand during the first covid lockdown - as we have come to expect it was less than a month later that Tamiya announced they were re-releasing it for (fortunately not much) less than I paid and with additional photoetch. So this one is being built without the additional detail of a brand new kit, and the added disadvantage of 25 years old decals. The kit was virtually unstarted... I say virtually as two wheels have been removed from the sprue but that was it. Don't expect rapid progress with this one, I'm getting the traditional summer paint on now, but there are a couple of other builds to finish before I start gluing it in earnest. First job though was to get some gluing done - the lower part of the front end is a separate piece to the main body, and as far as I can tell the only thing I need to glue inside the two pieces down the line is the mesh that makes up the grille (although there doesn't seem to be any mesh in the box so I will have to take some left over from another kit). With the lower part glued solid, it was time to get some filler into the gap as this is a single piece of fibre glass on the real thing as far as I can tell. So with the gap solid, filled and sanded I had the body looking something like this. After that, it was a case of scribing out the panel gaps with a 0.4mm scriber, then on with a coat of Halfords Grey primer on the body and all the large bits which will end up satin black. Surprisingly I seem to have a done a good job at sanding down the mould lines as there aren't any immediately visible. Even more surprisingly, there are no sink marks on these parts other than a couple on the floorpan - I won't fill those as they won't really show when complete and you don't expect perfect floors anyway. It does look as though there is a very slight imperfection where I've filled the join between the two body parts, and the scriber has slipped on the roof so I will need to fill that, but overall for a first guide coat this is looking quite promising. I think the join just wants a light sand to get it fully smooth (I might have got away with it with a heavier coat as I think there's an element of the slightly rought texture of the filler coming into play here), while a very light skim and sand should sort out the roof. And that's it for my first post on this one, don't be surprised if it takes me a year to finish it though!
- 84 replies
-
- 27
-
-
This is my finished Aoshima Toyota Celica LB 1978 (kit #049198). Paint is Model Master Turquoise Green over Tamiya TS-50 Mica Blue. The use of the blue undercoat was suggested by a family member with a graphic design background as an attempt to bring out the richness of the green suggested by the rattle-can lid. The thickness of the lacquer paint meant the blue did not permeate even the first coat of green, however, so the end result is almost like a metallic pastel; if such a thing exists. The model was built out of the box. This is an update / reissue of an old motorised kit, so the details are not great; especially the suspension and chassis. I decided not the install the very chrome front and rear bumpers as I liked to look of the bumper delete. The kit box-art and instructions also called for chromed front and rear light clusters, but I went with other versions in the kit that I painted Tamiya Champagne Gold for accent against the green. The wheel spokes are also Champagne Gold. Grant.
-
Bedford 'OLB' Tanker Emhar 1/24 One of my occasional forays into vehicle modelling, you guys produce such lovely work that I get tempted by your results! I've long been tempted to try one of these Bedford kits, and wasn't disappointed. I thoroughly enjoyed it. I wasn't too sure about the lighter French blue suggested on the kit instructions, I thought it looked a bit toylike, and considering that I have no idea what the original color was, I went for a darker shade (Tamiya TS15 from a rattle can, 5 coats micromeshed in between). My model, my choice and I like it, although the red 'Motor Spirit' titles are a little dark! I had problems with the front mudguards as they left quite a gap when I came to put the bonnet sides on, and had to cut them off and reset them. Lesson learned for next time! I have hardly put any weathering on it, as I am a bit nervous of messing up the finish, maybe later. I've now bought the little breakdown truck to have another go. Damn that devil dust that only shows up when you take photographs! Thanks for looking, John
- 24 replies
-
- 41
-
-
-
-
When I first heard of the SalvinosJR kits for the next-gen NASCAR race cars I fancied getting one. But postage prices US-UK had just gone doolaly so I had to wait for them to appear over here. Spotmodel listed them but then their distributor dropped out for some reason (they can supply now I believe). This kit then came from d-Model in Portugal using one of their frequent discount and free shipping promotions. The kit fills the box well, but there are some quality issues. The instructions need a jaundiced eye and some parts like the under tray was warped. Once altogether it comes together well and Salvinos seem to offer lots of choices for the NASCAR grid. The decals are really good quality, I did seem to get a slight reaction between them and Tamiya X-22 with MLT, but this may be down to my first effort with this gloss combo. For now the body is removable from the chassis, not perfect once in place but looks the part. Even so plenty of detail is fairly well hidden after assembly. Also (luckily) I left the intake duct to the top of the engine loose, as the bonnet/hood won’t sit properly if fitted. Min paint is Tamiya TS-44 Brilliant Blue, possibly not quite right for Hendricks Motorsport blue but seems to look okay. The white is decal included, getting these to lay down was challenging but only due to size over curves, the decals are actually really nice and well behaved. This represents the 2022 car, Kyle Larson version was one of the first released so I suspect decor is from a proposal rather than any race? Subsequently Salvinos have issued many kits in specific race decor. It’s taken a while to get this finished, more due to long breaks, but it’s been worthwhile and a good looking addition to the display line.
-
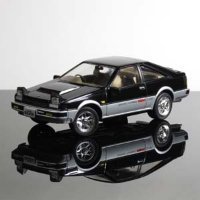
This is my model of the Koenig Specials Porsche 928 S4; Fujimi kit #12003 (RS-03). The model is completely out of the box, painted with Model Master Turquoise Green over Tamiya’s Champagne Gold. The sample dot on the lid of the Model Master paint shows much richer colour deeper in blue so the paint is something of a disappointment. The interior is various Tamiya tans and light browns. The kit is very simple but goes together well, and the final model looks good on the shelf. Thanks for looking, Grant. With my model of the Fujimi Koenig Specials Porsche 911 Biturbo.
- 14 replies
-
- 14
-

_opt.thumb.jpg.be9c1e22e34c329b51268dfacc8614e0.jpg)

.thumb.jpg.cfc129272ffec824439b15e6013d5952.jpg)
