Search the Community
Showing results for tags '1:144'.
-
Hello everyone! Here is my latest kit. It's F-toys' 1:144 Douglas B-26C Invader modified to represent 7102, of Esquadra 93, Força Aérea Portuguesa, based at BA9 Luanda, Angola, in 1973. Portugal was in dire need for a proper COIN aircraft during the "Guerra do Ultramar" (Overseas War) in its colonies in Africa. Although a NATO member, it could receive material for its use in the Alliance but, due to a UN arms embargo, not for its conflicts abroad. Several different aircraft types were obtained through various means, mostly from France and Germany but also through the civilian market (Harvards). An official request for 20+ Invaders direct from the US was denied. France offered its survivors from the Algerian conflict but they were turned down due to their poor conditions. Eventually, the spares would be taken though. Portugal then resorted to obtain the Invaders through more shady means. With the mediation of a Swiss arms dealer, 20 Invaders were arranged from a US company. These were ferried one by one to Portugal in 1965 under the guise of being destined for the French civilian market. US authorities caught on to the scheme when the eighth machine was being prepared for the flight together with a C-46 loaded with spares. The machines were put into service one at a time but use was limited. Thanks to the spares from France, the seven machines were finally fully overhauled, with the wing spars renewed as had been done to the B-26Ks. One of them was found to have severe corrosion and was cast aside. Its remains are currently in the hands of the Museu do Ar. After several tests and bouts of indecision, the six were finally sent to Luanda, Angola, in December 1971 replacing the F-84s of Esquadra 93. They flew armed reconnaissance and interdiction missions and were well-liked by their crews. With the introduction of the SA-7 Strela missile by the guerillas, the aircraft were repainted in an overall anti-radiation green in 1973. Following the revolution in Portugal in 1974, the war was ended and independence granted to the colonies. The Invaders were left behind but apparently one was taken by the Cubans and is on display at Havana in Cuban markings. Of the six, only one machine was a glass-nosed B-26C, the remainder being gunship B-26Bs. This was a pre-painted, partially decalled and partially assembled snap-fit Gashapon kit. I took apart the assembled sections and bathed the parts in ethanol which helped to easily remove most of the paint using cotton buds. I then treated it as a new kit which I built mostly OOB. I made a rear cockpit wall, added a steering wheel and reshaped the alignment pin in the nose cockpit to disguise it. I covered the top turret holes and scratchbuilt the underwing pylons and the various aerials and blisters along the spine using the limited photos as a guide. The wire was made from stretched sprue. The kit was fully painted and varnished with brush. I used Hataka's A016 Dark Green as the main colour. The insignia came from Mark I Decals Portuguese Insignia sheets. I painted the numbers on clear decal sheet (I managed to get the numbers printed to size on paper and use them as a guide and template - I couldn't print them on the sheet). I decided to represent the plane as recently painted in green and kept weathering to a minimum. This green deteriorated quickly but without references, I had no target guide. The finish should be more matt but after some trouble, I decided to live with the satin finish. Although I packed it with weight, it wasn't enough to sit on its nose so I made a simple base with thick card, and a tarmac image printed on adhesive paper, and glued the kit to it. I'm really glad I decided to do this project and carry it through making a fine addition to a sub-collection of mine dedicated to aircraft used by my country. Thanks for looking and all comments are welcome. Miguel
-
Golden Age of Transport is an interesting subject for a GB, certainly something that is on my mind every now and then - but I haven't actually built any kits for. So I searched for a kit that would suit this GB and came across a Dornier Do X. The biggest and heaviest of it's kind that made world records that lasted past WW2 - and made a transatlantic test flight that lasted almost two years! It's almost as much as a boat as it's a plane. Pilot controlled two 'throttles' - left and right. But they were not really throttles, they simply signalled the engineers inside the wing - and they made the adjustments to the twelve engines, much like in ships. All in all, certainly a worthy subject of this GB!
- 17 replies
-
- 23
-

-
a.thumb.jpg.58d92d116b0315dc55d352fd191d65e4.jpg) Here is another DC-8. I have built this one parallel to the Braniff model, So it was finished almost simultaneously. The kit is from Karaya, run by our Polish modelling friend Radek Kemski, who combined the Minicraft kit with his decals, which allowed to build a couple of Polished leased aircraft operated by Arrow. I picked this one, because I like the large sign. The kit includes only the long -71 fuselage, which has to be shortened to build a -62, which is not really a problem, because the positions where to cut are clearly marked on the inside. I used Revell Aqua colours. The kit decals provided a window, which just did not look right after applying. The side windows were not horizontal, but tilted upwards. So I had to look for spare windows. Only a frame was available, which I had to fill with dark grey colour. I did not want to use the colourful decals by authentic airliners decals this time. Hope you like it!
Here is another DC-8. I have built this one parallel to the Braniff model, So it was finished almost simultaneously. The kit is from Karaya, run by our Polish modelling friend Radek Kemski, who combined the Minicraft kit with his decals, which allowed to build a couple of Polished leased aircraft operated by Arrow. I picked this one, because I like the large sign. The kit includes only the long -71 fuselage, which has to be shortened to build a -62, which is not really a problem, because the positions where to cut are clearly marked on the inside. I used Revell Aqua colours. The kit decals provided a window, which just did not look right after applying. The side windows were not horizontal, but tilted upwards. So I had to look for spare windows. Only a frame was available, which I had to fill with dark grey colour. I did not want to use the colourful decals by authentic airliners decals this time. Hope you like it! -
After much delay, I finally got a moment to post my latest builds completed more than a week ago. I've built three Miniwing Cessna Bird Dog's simultaneously throughout the previous month. This project began because my department head, with whom I have had a great working relation since 2007, is retiring at the end of this year and I had the idea of making a personal gift by building a kit. I've been showing my builds to him and some colleagues throughout the years and he always jokes about buying one from me. When he finally announced his retirement date, I decided to get on with it now rather than later. Having the LF Models sheet for Spanish Bird Dogs, I bought an extra kit and a sheet of extra Spanish AF insignia (Mark I) as the LF sheet only has enough for one kit. While I was at it, I decided to make one for me at the same time and I ended up including the Miniwing US Army option too. These kits have few all-clear parts and go together well in general. This was my first experience with all-clear model kits and I made some mistakes but I have learnt from the experience. The wing-to-fuselage join was the only real trouble spot. I filled the awful forward join with plenty of Kristal Klear since that area is an extension of the windscreen. It isn't worth adding much else in the cockpit as you can't really see it. I scratchbuilt a rear seat and added the forward interior frames from stretched sprue (mucked it up a bit on one kit). The leading edge blisters of the tailwings were removed on all three since this feature belongs to the O-1E and its communications aerials. That's going to be fun to make when I build mine! I also added the underside engine exhausts, the radio wires and the wingtip lights. On the Spanish machines, I added an ADF blister and underwing pylons on one, and an ADF loop on the other, as well as the tall whip antennae. All were painted Vallejo Olive Drab which I realized too late might not be entirely correct, but I'm not loosing sleep over it. It does match older photos of the Spanish machines but on newer ones, such as in the museum, the colour seems to be more of an olive green. I don't know if they were repainted at some point. First up: L-19A 50-1327 of the 10th Liaison Squadron 8th Army, US Army, attached to the 5th Air Force HQ, based at Seoul (K-16), South Korea, December 1952. This was the first production L-19 and was used to fly President-elect Dwight D. Eisenhower on an inspection tour over the Korean war front lines.
-
Here is my latest kit: the MiG-31 Firefox of the 1982 Clint Eastwood film. It's the Anigrand 1:144 resin kit. Keeping in mind the discrepancies between the full-scale film prop and the "flying models", the kit has some inaccuracies, namely around the undercarriage. The nosewheel should have twin wheels and the bays and doors are wrong but I left well alone and only cut the nose bay door in a way that made it closer to what we see in the film. My only other modifications were replacing the WW2-type seat with one from a Revell/Mark I F-104 kit (chopped down a bit in height to fit) and adding a landing light to the nose u/c leg. One of the major discrepancies is the finish. The full scale prop was a dark grey colour whereas the flying models had a highly glossy or metallic) blue-grey tone. I found a comment of the prop designer in internet that stated that Clint Eastwood wanted the plane to be very shiny and that the plane was a dark blue-grey colour. I tried to get somewhere in between. I made some mixes and the final one was Tamiya Gun Metal with Medium Blue and Gloss Black (+ Vallejo Black when the latter ran out). I got a nice pearly dark blue-grey colour. The kit was fully painted by brush. The kit's painting instructions were fictitious so I tried to follow what I could make out from the film. The leading edge panels were painted Vallejo Natural Steel. The kit's decals were oversized so I used some from a Mark I red stars sheet and I placed them according to what I could make out in the ice floe scene. I applied a slightly gloss satin varnish (mixed from Vallejo varnishes) since a high-gloss sheen would look awful. Thanks for looking and all comments are welcome as usual. Miguel
- 15 replies
-
- 46
-
-
After my previous two projects, I feel like tackling something simpler for a change. That's why I set my sights on the Boeing 717 by PAS. I've already built the DC-9 and MD-82, so technically, there's no reason for me to build the Boeing 717. But, there will come a time when I've built all the Boeing aircraft, and this one would be missing. That just wouldn't do. The livery is that of Spanair, simply because it's an easy scheme to replicate. That's partly why I've specifically chosen the EC-KRO, as it's the only one without Coroguard on the wings. Spanair was founded in 1986 as an initiative of the regional government of Catalonia, aiming to position Barcelona as a significant aviation hub. The company commenced operations in 1988 with a fleet of McDonnell Douglas MD-80 aircraft and primarily focused on domestic and European routes. Throughout the 1990s and early 2000s, Spanair expanded its network and gained a reputation as a reliable airline with a focus on customer service and operational efficiency. Despite its successes, Spanair faced financial challenges. In 2008, the airline encountered a severe crisis due to the global economic downturn. Efforts to attract investors to improve the financial situation proved unsuccessful. In 2011, Spanair reached a tragic low point when an MD-82 aircraft belonging to the company crashed at Madrid-Barajas Airport, resulting in the loss of 154 lives. Following this tragedy, Spanair's financial problems worsened, ultimately leading to the cessation of operations. In January 2012, Spanair abruptly announced bankruptcy and suspended all flights, resulting in the termination of the airline's aviation activities. The kit is from PAS and as per usual is pretty good. The decals are from Classic-Airlines. Windows from Authentic Airliner decals, as are some details. Antennas are from Counting Rivets Models. Display bases made by myself. At any rate, the pictures: All in all I had a lot of fun with this kit and comes recommended for sure. My next project will be the Authentic Airliners ERJ-145 in the KLM Exel livery. Thanks for reading and see you next time!
- 14 replies
-
- 34
-
-
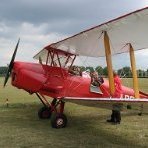
Luftosvaret De Havilland DH100 Vampire FB Mk.52, Skvadron 337 Vaernes Air Station, 1953. Tiny little Vampire was nice little kit that I just planned to do 'in-between' - but proved to be more fun than I expected. I might re-visit 1:144 scale again in the future! Painted with Vallejo acrylics and weathered with Ammo products. And no, I still haven't managed to build a Vampire that is not a tail-sitter! So this one received a clear peg under its belly to keep it up
- 5 replies
-
- 22
-
-

-
- 1:144
- mark1models
- (and 1 more)
-
Hello everyone! Here is my latest kit finished a week ago. It's Sikorsky CHSS-2 Sea King "05", s/n 4005 of HS 50, Royal Canadian Navy, on HMCS Bonaventure, in 1965. It is AFV Club's 1:144 kit built OOB with corrections and some details added. This is a nice kit with several options (rear sliding door in any position, rotors an tail folded for storage, search radar and spray shield) but is a bit disappointing in the lack of detail in the rear cabin for example. The box comes with two full kits and four decal options of which that of the Canadian Navy really stood out. Unfortunately, although described as being for a 1965 option on the HCMS Bonaventure, the decals, scheme and the options added (radar and shield) are based on the machine when it was repainted in the old scheme in 2010 for the centennial of the Canadian Navy and with several errors too! Canada received 41 CHSS-2 (later CH-124) Sea Kings of which the first 4 were built by Sikorsky and the remaining 37 were assembled by United Aircraft of Canada (now Pratt & Whitney Canada), in Longueuil, Quebec (just across the river from Montreal). 4005 was the first one assembled there in 1964 and survived up to the retirement of the type in 2018, going through all the upgrades and is now on display at the National Air Force Museum of Canada (NAFMC) at CFB Trenton. I intended to represent the type as suggested by AFV Club on the HMCS Bonaventure which required few additions from stretched sprue, ignoring the radar and shield and adding some flags for the sponsons (sourced from a Mark I H-34 kit). Unfortunately, I couldn't find a replacement for the insignia since those of the kit are for the later type (less-detailed maple leaf). Some errors in the instructions concerning the scheme and the colours were corrected thanks to research and photos of the type in the 1960s. The kit was fully painted and varnished with brush. For more information on the build see my WIP at the Kampfgruppe144 forum: http://www.kampfgruppe144.com/phpBB3/viewtopic.php?f=82&t=9016 Thanks for looking and, as always, all comments are welcome. Miguel
-
 Hello everyone! Here is my second kit of the year which I finished last weekend. It is Eduard's 1:144 scale Supermarine Spitfire LF.IXc representing MJ250/UF-Q, of No. 601 "County of London" Sqn., RAF, regularly flown by F/O Desmond Ibbotson, from Perugia, Loreto and/or Fano, Italy, summer 1944. It was built mostly OOB and was built together with the other kit from the dual combo boxing which is taking longer because if its more complex paint scheme. These kits are simple but very nice though, sadly, they lack cockpit detail. I decided to add some detail in the cockpit by making the rear bulkhead and seat only, the most visible elements. I used a spare Beacon Models Spitfire Mk.I part as a template and scratchbuilt the section with plastic card, stretched sprue and an etched seat from a Brengun set. I added harnesses from masking tape. I added some small sections of flat sprue to the cockpit sides to act as a support to attach the bulkhead. A bit of trimming was needed but the part fitted nicely and makes a big difference. My other additions were a rear-view mirror above the windscreen (sprue from etched parts with Kristal Klear) and the underwing probe (from stretched sprue). The kit was fully painted, weathered and varnished with brush. A photo I found of this machine shows it readying to take-off with another one and both are kicking up dust. Engine exhaust stains are clearly visible too so I made this kit a little on the dirty side. Sadly, there was no bomb to put slung underneath as seen in the photo. 601 Sqn was involved in attack missions at that time. Nevertheless, I'm very pleased with the kit and in a metallic finish, it really looks different from any Spitfire I have built so far in any scale. Thanks for looking and, as always, all comments are welcome. Miguel
 -
I was impressed by Kevin Aris' large-scale SD-14 card model and thought perhaps I could have a go at something like that. The SD-14 kit is too expensive for me though, so I am going to attempt doing something of my own. The plan is that this will hopefully build into an aircraft carrier. Initial drawings have been done and the first frames have been cut out. These frames are for the bow section and in this area the gap between each frame is 3 feet. At this scale that works out at 6.35mm betwen each frame. This means I need to put spacers in between each frame and the best way (I think) is to separator strips to each piece. This should also help to strengthen each frame piece, which is only 0.5mm thick. The plastic strips have been cut and then glued around the edge of each frame section, plus a strengthener piece down the centre. The first frame has been glued into place. It is not the front frame, but No.8 frame and I placed this one first as it gave me room to place a try square either side to ensure the piece was vertical. All the other frames can be formed around this one. These strips are 5.75mm wide which, when added to the 0.5mm frame piece, gives a frame gap of 6.25mm which is near enough for me. So far so good, the tops of the frames are all to a uniform height, it is just the positions of the separator strips that make it all look uneven. I've just made some more calculations and realise that this is going to take a lot of plastic, which invariably is going to work out quite expensive............. However, I have found an alternative which is to use card from cereal boxes rather than plastic. I know where I can get an endless supply of card like this! All I then need is to strenghten the edges with thin strips of plastic and this will reduce the amount of plastic I need to buy for this project. It doesn't look much at the moment, and working with white plastic is not the best for photographing progress however, this is just a start, and is really just an experiment but, hopefully, it will give me the incentive to get back into building again. cheers Mike
-
It's been a minute, but my latest build is the Zvezda Il-62. The Ilyushin Il-62 was originally developed in the Soviet Union. It was the first passenger aircraft in the Soviet Union designed for long-distance flights. The prototype of the Il-62 made its maiden flight on January 3, 1963. However, the Il-62 was only put into service with the Soviet airline Aeroflot in 1967. At that time, it was one of the most advanced aircraft in the world, boasting a large range and the capability to perform transatlantic flights. The aircraft had four jet engines and could carry approximately 200 passengers. The unique feature of the four jet engines positioned at the rear of the fuselage was shared with only a few other aircraft types, namely the Vickers VC-10 and the Lockheed Jetstar. This design similarity led to accusations of espionage between the UK and the USSR, but no evidence was ever provided by either side. It is more likely that the requirements for a new aircraft from British Airways on one hand and Aeroflot on the other hand were somewhat similar, leading engineers to arrive at comparable solutions. During the Cold War, the Il-62 was frequently used by the Soviet government for diplomatic travels and official state visits. The aircraft was also utilized by other airlines in countries friendly to the Soviet Union, such as Interflug and LOT. Over the years, various variants and improved models of the Il-62 were developed. The Il-62M, introduced in 1978, featured an extended range and several aerodynamic improvements. In total, over 280 Il-62 aircraft were built. With the fall of the Soviet Union and subsequent economic challenges in Russia, the usage of the Il-62 declined. Modern aircraft with better fuel efficiency and advanced technology became more popular. Nevertheless, some airlines and charter companies, including Air Koryo, still operate the Il-62 for cargo and passenger flights. It holds a place in aviation history as an iconic aircraft from the Soviet era. Now, about the title "Aeroflot/KLM." Did KLM operate the Il-62? Indeed! Or at least, partially. During the Cold War, the Soviet Union closed its airspace to Western airlines (unfortunately, history repeats itself in this regard). As a result, flights between Europe and the Far East had to detour and make interim stops for refueling. Most airlines opted for a layover in Anchorage, Alaska. To offer passengers a faster route to the Far East, KLM provided the option to fly with Aeroflot. Aeroflot operated flights from Amsterdam to Moscow and then to Tokyo, using the Il-62. Although the pilots were supplied by Aeroflot, the crew consisted of a mix of Aeroflot and KLM personnel. In the 1970s, it was unusual for two airlines to have such a partnership, let alone the national carrier of the Netherlands and the national airline of the Soviet Union. To celebrate this collaboration, the KLM logo was added to some Il-62 aircraft alongside the Aeroflot logo (https://www.airliners.net/photo/Aeroflot-KLM-Royal-Dutch-Airlines/Ilyushin-Il-62/2413817/L). Despite this joint effort, the partnership was not successful and was terminated after a few months. But it does beautifully demonstrates the strong trading spirit of KLM: West meets East - conducting business without paying any attention to geo-political tensions! The kit is the Il-62M from Zvezda. To make it an Il-62 sans suffix I used the NK-8 engines by Druz. The decals are from Ravero (which where incorrect in some places, so I had to make some modifications by using spares, especially near the nose). Details from the Zvezda decal set and windows by Authentic Airliners. Anyway, the pictures: Display bases made by me, by using purchased Shutterstock photo's, modifying them in Photoshop and have them printed on Canvas. Next up will be a an easier build (as a palate cleanser) with the 1:144 Boeing 717 from PAS with Spanair decals. Thanks for reading and see you next time!
- 10 replies
-
- 37
-
-
Here is the last of the three kits I finished in the very last days of last year. It's Beacon Models' 1:144 Supermarine Spitfire Mk.Ia built as a Mk.IIb with the aid of decals from an AML sheet. It represents P8325/RF-B, flown by Czech pilot Sgt. Josef Balejka and Polish ace P/O Boleslaw Gladych, both of No. 303 Sqn, based at Northolt, spring 1941. For this build, I made use of the parts available in the kit for other variants as yet unreleased such as the cannon-armed "b-type" wing and the Rotol propeller. As with the Mk.Ia which I built simultaneously, I added the underwing probe and the wires, in this case the lateral IFF ones, but I also added the Coffman starter on the starboard nose from scrap plastic. The triangle from the radio mast was removed as corresponded to the wireless radio IIb variant. I also fashioned a rear-view mirror from etched metal sprue. The kit was fully painted and varnished with brush. The stencils decals came from the kit with the main decals coming from the AML sheet. This was a disappointment as, apart from seeing the printing pixels on some colours, the yellow and the grey were completely off, being too light. I ended up overpainting these and the red of the markings. As with the other kit, I skipped using the decals for the gun tapes but gave up and painted them on instead. Thanks for looking and all comments are welcome. Miguel
- 9 replies
-
- 29
-
-
-
- Beacon Models
- 1:144
- (and 1 more)
-
Hello everyone! Here is another of the three kits I finished in the very last days of last year. It's Beacon Models' 1:144 Supermarine Spitfire Mk.Ia. It was built mostly OOB and is finished in the option offered in the kit: N3196/XT-L, flown by P/O Gerald "Stapme" Stapleton of No. 603 Sqn based at RAF Hornchurch, September 1940. As commented elsewhere, this is a very nice kit with optional parts to make most Mk.I and II machines, sadly marred by heavy panel lines. In this build, I replaced the rear cockpit part with a 3D-printed one with a pilot which I received as part of the launching of the kits. My only additions were the underwing probe and the radio wire. The kit was fully painted and varnished with brush. The decals came from the kit but I overpainted the red of the markings as I found it to be too brown. I tried to use the decals for the gun tapes but gave up and painted them on instead. Thanks for looking. Miguel
-
 I decided to have a crack at one of these a few weeks ago. Not sure why but I think the re-release of this kit from Mark1 in December triggered an impulse somewhere. This comes from the Malta boxing. N5525 flew with 802 NAS when it was based at HMS Grebe (or what is now Alexandria Airport) when HMS Glorious was stationed in the Eastern Mediterranean in 1939. The black tail indicates it was a Squadron commander's aircraft. The record is slightly hazy but I think it was then boxed up and dropped off at Malta with a bunch of others when HMS Glorious was recalled to the North Sea to take part in the Norwegian Campaign in early-1940 (where Glorious was sunk). It was never actually re-assembled but was used as a source of spare parts to keep the handful of other Gladiators flying in defence of Malta. I built one of these Malta Gladiators at the start of Covid lockdown in 2020. This is the first Gladiator I've built since then. I decided not to do the full photoetch treatment I did with the previous build, but added a few external bits a pieces from the spares box, like the step (quite proud of this - made out of 1:700 ship railings). There were a few bits about the last Gladiator I built that bugged me afterwards, which I have rectified, or tried to, here. First was shaving down the canopy rail fairing behind the cockpit - this is very pronounced as it comes in the box, giving the tapering rear fuselage a curiously boxy shape. So I sanded this right back to what reference photos suggested was about right. Second was replacing the kit-supplied cabane struts with plasticard. Less telegraphpoleish. Otherwise I made all the the other changes I made then, including shortening the undercarriage and main wing struts, and closing the cowling opening a bit. Rigging was Uschi Van Der Rosten thread. Gladiator rigging is quite complex but it was satisfying to finish it. Painting was fairly simple. I painted the areas not to be silver and then sprayed AK Dull Aluminium over the rest. There are some superb photos of this aircraft in flight, taken mine armament and before it was delivered to 802 NAS (see above) but which show all the stencils. I used Shelf Oddity's excellent set of Hurricane stencils. The rest of the kit decals worked nicely. And with another Alex resident from three years later. And there she is with another pre-war RAF biplane, the (by comparison) extremely dainty Hawker Fury. Thanks very much for looking. I really enjoyed this build - a satisfying end to 2023. Happy new year to you all! Angus
- 10 replies
-
- 28
-
-
-
Hello fellow modellers, here is the third DC-8 I have finished this year. here is the first one: https://www.britmodeller.com/forums/index.php?/topic/235131153-dc-8-52-air-new-zealand-authentic-airliners-1144/ here the second one: https://www.britmodeller.com/forums/index.php?/topic/235132131-douglas-dc-8-73-aire-devasion-minicraft-1144/ This one here is from the X-Scale kit with decals from Nazca. African Safari Airways started their business with a single Bristol Britannia (available from Roden) and bought this aircraft here as their first jet airliner in 1973 and used it for three years for flights mostly from Basel and some german airports to African destinations. The -33 used a very special kind of thrust reverser. The rear part retracts to the back, then folds the doors to reverse thrust. After landing, the so called ejector stays in the backward position as shown here. I hope you like this airliner with the non standard markings. cheers, Norbert
- 14 replies
-
- 49
-
-
From what I can see this is the first time an NB-36H has been posted in the RFI section and my first ever experiance with a Roden kit. So here is the Roden NB-36H nuclear test aircraft an aircraft well worth reading up on as not only was it a test for the use of reactors in the air but also for the use of potentially powering an aircraft with a nuclear reactor, its self a worrying concept with todays knowledge of radiation etc. Extract from wikipedia for info on the conversion of a B-36H into the NB-36H "The original crew and avionics cabin was replaced by a massive lead- and rubber-lined 11 ton crew section for a pilot, copilot, flight engineer and two nuclear engineers. Even the small windows had 25-to-30-centimeter-thick (10–12 in) lead glass.The aircraft was fitted with a 1-megawatt air-cooled reactor, with a weight of 35,000 pounds (16,000 kg). This was hung on a hook in the middle bomb bay to allow for easy loading and unloading, so that the radioactive source could be kept safely underground between the test flights. A monitoring system dubbed "Project Halitosis" measured radioactive gases from the reactor." With this being my first Roden I didnt really know what to expect beyound what was told to me by one of my fellow IG modellers. So what did I find?....Well the plastic varies between parts, the fuselage being quite thick and hard the wings being thiner and softer. Overall fit was ok a little filler needed on the fuelage half seams and a little extra on the wing joint (wing goes onto fueslage not slotted in) the worst fit was with the engine intakes of the wing leading edge this needed quite a bit of fill and sand fill and sand to get the smooth look of the real thing and the prop spinners needed some work to get a flush fit with the back plate. Overall surface detail is good just could do with being a little deeper. Biggest faults with this kit is 1- the decals lots of edging that I couldn't cut off on the paper as it seems to tare the decal (I had to trim some once dry on model), 2- Instructions the decal numbers are wrong in quite a few places following them aimlessly I ended up with the fueslage striped on the engines and the next day the engine stripes on the fueslage. Yes the engine stripes where too long but I thought they where just longer then needed. So a little dive into the spare decals and a bit of air india 707 spare trim cut to size fixed that. 3- The nose weight needs more then stated, I had to remove the cockpit glass and slip in some lead strips and pva glue to stop it nose bouncing (it didn't tail sit but did hover.) 4- The holes in the wheels for the axel is far larger then the axel size resulting in a hard time getting a non cambered or loose wheel. 5- The decals unfortunatly are out of alinment when printing resulting in that staggered annoyance. Would I make another Roden?.. Yes but I would ceratinly look at the instructions much more closely. Built OOB using plastikote mettalic silver, plastikote brilliant metallic silver, Revell 90, 99, 91, Humbrol 15, 24, 33 So here she is the "BMF" NB-36H (taking the pics I noted the tail reg slipped on one side!)
- 15 replies
-
- 56
-
-
This model has just left my workbench. It is a nice kit with no flaws. The only thing I added, was the horseshoe-type antenna, which was a fiddly operation. Hope you like it! cheers, Norbert
- 17 replies
-
- 56
-
-
-
Hello everyone! Here is my latest kit finished this past weekend. It's Mitsubishi Ki-46-III "Dinah" white 37 of the 16th Dokuritsu Hikotai (16th Independent Wing), IJAAF, found by US soldiers at Chofu, outside Tokyo, following Japan's surrender in 1945. This was an F-toys prepainted Gashapon kit. I wanted to squeeze a quick build for the "Twin-engine" GB at the KG144 forum and this fit the bill. After removing the paint, I assembled it mostly OOB, just modifying the stick for a proper yoke (scratchbuilt), sanding away the exaggerated ribbing from the flaps and rudder and removing the awful tabs of the canopy parts (intended for snap-fit purposes). I also added the radio wire from stretched sprue. The kit was fully painted and varnished with brush. I used Vallejo IJA Khaki Brown for the upper surfaces and IJA Grey Green for the undersurfaces with White Ensign Models Red Brown Primer for the propellers. Strangely, the scheme came out with quite a green hue on the photos I took of the kit with the camera (similar thing happened with my smartphone). I have managed to do some colour correction with GIMP but it still lacks some "brown-ness". The decals came from an MYK Design decal sheet. I'm very glad I decided to make it and am very pleased with the result. Now I must get my other projects back on track... Thanks for looking. Miguel
- 10 replies
-
- 23
-
-
A pair of grey Schlacht Würgers - Fw 190F-8s
Mig88 posted a topic in Ready for Inspection - Aircraft
Here are the last pair of Mark I Models (ex-Eduard) 1:144 Fw 190s in my stash, which I completed last week. This time they're from the Fw 190F-8 boxing which had some colourful options. I already have built option B, the sand-coloured SG4 plane ten years ago using a Revell 1:72 kit. In the end though, I went for the least colourful option (A) because it covers a missing unit in one of my sub-collections, that of trying to cover as many Luftwaffe units as possible, in this case SG77. And it was in this spirit that the second kit was built. I found a profile for one of the operational conversion units, SG151, for which the white 11 of option B came in really handy. Apart from the modifications and/or fixes I made on the previous kits, this time I added a headrest in the cockpit (though I forgot to add the rear support strut (duh!)), I removed the outer guns as the F-8s didn't use them, and I used the underslung bomb. First up then is White T of II./SG77, Luftwaffe, at Lemberg (Lvov) airfield, Ukraine, summer 1944, with a standard RLM74/75/76 grey scheme livened by the yellow band and red spinner tip with the characteristic black square in the exhaust area. Second one is White 11 of 14./SG151, Luftwaffe, at Berlin-Staaken, Germany, early 1945. This aircraft was shot down on 4 February, 1945. The primary duties of SG151 was to provide replacement crews (incl. operational training), for the frontline Schlacht units, but during the war, several combat (Einsatz) units were formed from SG151 (Michael Holm, internet). This machine sports a very standard RLM74/75/76 scheme without any "extras". I used the kit instructions for the other kit as a guide for the pattern of this one. Decals came from various sources (spares), apart from the number, the upper wing crosses and the stencils which came from the kit's sheet. Despite the less interesting schemes, I am very pleased with both and glad I made them. Although the weathering is the same as with my previous kits, I changed my approach to some areas (using a smaller brush) and the result was much more satisfying. It's a pity there are no readily available Fw 190A-8/F-8 kits in 1:144 as I would like to have a go at the other two options of this boxing. I still have a pair of Aoshima kits but there are several other options I would like to make from the Printscale sheet too. I'll leave that for later on... Thanks for looking and all comments are welcome Miguel -
Hello everyone! Here is my latest kit finished this past weekend. It's Fw 190A-7 "Yellow 1" flown by Oberleutnant Otto "Bruno" Kittel, 3./JG54, Luftwaffe, from Riga, Latvia, in June 1944. This is the companion kit from the Mark I Models A-8/A-9 boxing (in 1:144). As I mentioned in the NC.900 posting, I wasn't that interested in the Mark I Models' A-8/A-9 kit options (except for the A-9 which was out of the question due to the lack of alternative parts), so I looked for something else. A profile in one of my books sparked my interest which grew with further investigation and seeing it was feasible with the decals I had in my spares made it possible. Otto Kittel was the 4th ranking Luftwaffe ace with 267 victories, all in the eastern front. He was also the top Fw 190 ace with less than 40 of his victories being achieved on Bf 109s. He was also the highest ranking Luftwaffe ace to not survive the war, being shot down and killed by an Il-2 over the Courland Pocket on 16 February, 1945. I made the same modifications I made on my other Fw 190A-7 earlier this year. I added the wing probe, tail mast, underside aerials, main u/c retraction arms, underside pylon sway braces and radio wire from stretched sprue. The scheme is a bit speculative as apart from the book profile and others I found and a couple of limited-view photos, the only other references for the pattern of the scheme I found were other people's kits on internet and they varied between them. I chose one and followed it. The spinner spiral was also a bit of guesswork as I could only see the front area. Decals came mostly from the MYK Design A-4/A-8 sheet (for different aircraft). I first used swastikas from the kit's sheet but I soon realised that didn't go over the greens but in a light blue square. Besides, they were too large. I overpainted them RLM76 and applied new smaller ones from another sheet and then repainted the greens around them. The kit was fully painted and varnished by brush. I'm really happy with how this one came out and very glad I decided to make it. Thanks for looking and, as always, all comments are welcome. Miguel
-
Hello everyone! Here is my latest kit finished earlier this week. It's S.N.C.A.C NC.900 A8 No.25 "white 11", GC III/5 "Normandie-Niemen", Armée de l'Air, Le Bourget, France, early 1946. After the Sea King and the summer holidays, I decided to resume my Fw 190 run. I went for the Mark I Models A-8/A-9 boxing (in 1:144). Unfortunately, the A-9 option wasn't feasible since the kit didn't have a bulged canopy and an alternate propeller with wider blades which were permanent features of that sub-variant. Added to that, the other three options of the kit didn't really interest me that much so I found a couple of others I could make instead. First one finished is an S.N.C.A.C. NC.900 A8. I had received a special edition bonus sheet for French Fw 190s with the MYK Design A-4/A-8 sheet so I decided to go for one of the options on offer. The NC.900s were Fw 190As (different sub-types) assembled in France from components and machines left behind under repair in French factories as France was liberated. The decision was made to complete up to 125 machines to rapidly, and cheaply, re-equip the Armée de l'Air. Service was brief mainly due to troubles with the reliability and others, mostly stemming from sabotage of parts during the occupation, and production was stopped in February 1946 at 62 units. Some machines carried on flying until 1949 with the CEV (Flight Test Centre) of Cazaux and Bretigny. About 14 or so served only with one unit, GC III/5 "Normandie-Niemen" at Le Bourget in early 1946. My kit represents one of these aircraft. The MYK sheet basically had options for two aircraft, all-green No.25, with and without the "11" and all-grey No.52. I had decided on doing the former. Investigating revealed a series of questions to which I slowly found answers. In most cases, the gun barrels were removed. No underside rack or aerials were present either. The tone of the green is unclear and could be anything from RLM71 to Olive Drab. The paints, most probably of German origin, were mixed for the tone and rapidly degraded. One machine was repainted in khaki and two in a light blue-grey (for the CEV). For the paint scheme, I decided for RLM71 overall with areas and patches overpainted/dry-brushed with a lighter mix I had. The effect actually came out quite good, only really showing once I applied varnish. Although some suggest the propeller was black I decided to stick to the standard RLM70. The remaining details were painted in standard colours. I don't know what kit the MYK Decals were really meant for. Apart from some discrepancies in the proportions of flaps and panel lines between the kit and MYK's illustrations, the only tricky part was the rudder which didn't quite match the shape in the decals. The decals went on very well as usual and I only had trouble removing the clear film on one side of the rudder. Once dry, I touched up the rudder with Hum89 (blue), white and Hum60 (red). I didn't want to do much weathering since these machines were barely used. Apart from highlighting moving surfaces with thinned Vallejo Black Grey, I dry-brushed a little Hum67 Tank Grey for the exhausts on the sides and underneath. I decided to use Vallejo Sky Grey to dry-brush a little wear on the wing roots. It wasn't coming out well so I tried to wash it off with water leaving a result which wasn't bad. I was uncertain about the radio wire. I can't see any in the photos but some kit builds and profiles have just the wire from the canopy to the tail so I went with this. I am pleased with the final result and glad I made this option. It really looks different. On top of it, I managed to complete it in just over two weeks! Whenever another Fw 190A-8 kit becomes readily available, I'll consider making the grey option as there are enough decals to make it. Thanks for looking and, as always, all comments are welcome. Miguel
-
Away on hols, so I needed something small enough to pack and simple enough that I might actually finish in a week. One of my favourite planes, ever since a visit to the FAA Museum at Yeovilton about 60 years ago and purchasing the FROG model. The plastic looks nice. A quick comparison to the plans indicates they seem pretty accurate. Actually a lot, lot better than the 1/72 FROG kit. Nice decals too. I'm thinking I'll make WJ223/106 flown by Sub Lt. Brian 'Schmoo' Ellis, who shot down the MiG-15. https://www.aerosociety.com/news/sea-fury-vs-mig-15-the-true-story/ And VX764/134 of the RAN. Holiday reading; To work. Not sure what the big lugs/extrusions where, but obviously they had to go. Dry fit didn't highlight many problems apart from the need to make more room in the fuselage for the cockpit tub. But holiday walks with SWMBO and the dog (it's a toss up who's really in charge out of those two ) beckons. Back soon.
- 45 replies
-
- 8
-
-
- Sea Fury
- Mark I Models
- (and 1 more)
-
Here I would like to show you my latest finished model. I built it from the old resinkit by Kurt Lehmann, (authentic airliner), which consisted of two fuselage parts. Also the realistic window decals are made by this manufacturer. The Airline decals are from Flightpath. The D-AMUX was used by LTU Süd from 1988 til 2001 for chartered flights to holiday destinations. I had some trouble with the paint job, the first window decal was not opaque, so the red colour was shining through, but I quickly got a new one from the Lehmann company. I was not careful enough doing the red and white striping, so I had to remove part of it and had to look for another one of these very rare decal sheets, but finally found one on a model show in the Netherlands. But after all these fallbacks this project is completed now. I hope you like this colourful airliner from an almost forgotten company! cheers, Norbert
-
I started this as something I could assemble quickly and finish OOB. Didn't quite turn out quickly, but it was OOB, apart from window decals (I baulked at masking such tiny glazed areas) thanks to one Chris, aka @stringbag of this parish. Edit: oh yes, and I had to replace the fin-top [Edit of edit] HF antenna with a Master pitot for a 1:48 MiG-21 (tip only) when the original snapped off. A quick couple of photos until I get around to some better shots. Not my best effort, not least as I usually do 1:48 and 1:32 stuff, but here it is. Used to see these and the tankers overhead going into and out of RAF Mildenhall almost every day during my teenage years, but I've never modelled one until now. Comments welcome, thanks for looking.
-
 The De Havilland Canada DHC-8-102 ( Dash 8 ) is a regional turboprop airliner designed and manufactured by De Havilland Canada. It was first introduced in 1984 as a successor to the earlier Dash 7 model. Development of the DHC-8 began in the late 1970s in response to a growing demand for a faster, more efficient regional airliner. The De Havilland Canada design team focused on creating a highly reliable and versatile aircraft that could operate on short airstrips, in remote locations and in a variety of weather conditions. The DHC-8-102 is the original version of the Dash 8 and features two Pratt & Whitney Canada PW120A turboprop engines. It has a maximum capacity of 37 passengers and a maximum range of 1,224 nautical miles. The first flight of the Dash 8 took place on June 20, 1983 and the aircraft entered service with NorOntair in 1984. It quickly became popular with regional airlines for its fuel efficiency, reliability and ability to operate in challenging environments. Several variants of the DHC-8 have been developed over the years, including the more powerful DHC-8-200, the lengthened DHC-8-300, and the largest type: the DHC-8-400. More than 1,200 Dash 8 aircraft have been produced and have been used by airlines and operators in more than 100 countries around the world. In 1992, De Havilland Canada was acquired by Bombardier and the Dash 8 became part of Bombardier's regional aircraft program. In 2019, the Dash 8 program was sold to Longview Aviation Capital, a Canadian aviation company that also owns Viking Air, another manufacturer of turboprop aircraft. Today, the DHC-8-102 continues to be flown by airlines and operators around the world and is renowned for its reliability, versatility and low operating costs. It has been used in a variety of roles, including passenger transportation, cargo operations, and even military applications. I myself have flown with some regularity with the Dash 8, (but only with the Q400 variant) with Austrian Airways and especially FlyBe. I will definitely make the completely purple version of FlyBe, but for now first the -102 version. Why? Because Schreiner Airways has flown with it and I enjoy building aircraft that Dutch operators fly or have flown with. The kit is from Eastern Express and is excellent! The fit is pretty good, the panel lines are accurate and the overall shape is rather nice. Two minor nitpicks are the clear plastic front part as per usual is a pretty poor fit and this small kit is made up to quite a lot of parts (nine parts to build the front wheels is a little bit overdone I would say). Nothing serious, just something to keep in mind. Also I used some extra details from Metallic Details (who, by the way, are located in Dnepropetrovsk, just a few kilometres from the front line…) The windows are from Authentic Airliner decals. The livery decals are from V1 decals, which I'm very pleased with. They are quite sturdy, fold easily around irregular shapes, come off quickly when put in water, and dry quick also. I especially liked the added details. They are printed light grey to make them less obtrusive which makes for a more realistic finish (take note Nazca). At any rate the pictures: Next up is the 1:144 Roden C-47 kit in KLM colours. Thanks for reading and see you next time!