Search the Community
Showing results for tags 'IBG'.
-
Another ship started. Yes I know I haven't finished Nubian, but I will... eventually This time I am working on HMS Ilex. I will try to make her in the outfit she was around Matapan. @dickrd teased me with awesome scheme she had in 1940 (so maybe at Cape Spada as well?) but as he can't post full photo online, 1941 will it be. After looking through photos, I noticed that I bought wrong box, or more precisely, I should have bought Glowworm box as well to mix&match necessary pieces. I am still considering that option, though most probably I will draw and print necessary parts. I will be working based on @dickrd suggestions posted HERE (Thanks!), some photos I managed to find, plans of HMS Icarus found HERE and WoWS model of HMS Icarus. Sorry for poor photos, I am not at home and lack proper lights. So far I put hull pieces and main superstructure together, filled the holes around superstructure and made early aft deck for forward superstructure. I also reworked the reinforcing ribs for forward part of superstructure deck. I removed paravanes, Will be replaced with better alternatives (If I have enough then Flyhawk if not I'll have to draw&print them too. Bridge area detailing: I used print of my DCT and compass platformplus some scratch building with paper and plasticard. Still to do side balconies for signal lamps and some other small details.
-
Hello. I wanted to say hello to everyone with this topic. My name is Chris and I come from Poland. The model was built a few years ago, but I think this plane will be a good topic to introduce myself. I build planes in 1/72 scale. I am also timidly trying my hand at building vehicles in 1/35. The period concerns World War II with a few exceptions. I invite you to see the photos of the PZL 37 Los. Best regards. PS. I apologize for my poor English. I am using a translator.
- 20 replies
-
- 59
-

-

-

-

-
Hello everyone, My TKS from this thread is finally finished: I learned a lot during this build, especially while making the vignette and painting the figures. This is my first finished "diorama" and only about the fourth time I've painted figures. Thanks for looking. 🙂
- 14 replies
-
- 29
-
-
-
-
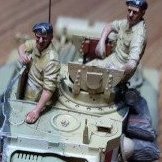
Almost completed this before the new year, but got sidetracked by eating lots of cake. The IBG kit is generally good with decent fit and details. However, there are some inaccuracies based off the images I've been able to find, mostly around the rear where the footplate and storage shelf are incorrect. The sand tracks are also of a type that only seemed to be used on the earliest production models. I skimped on stowage (and missed off the tiny PE rope hooks on the body) but may revisit it in the future. I would also like to find an ammo box for the Vickers, which is mysteriously missing from the kit. Might also try to source a box for the commander to stand on, and some mechanics to work on the apparently unreliable engine. Figure is from MiniArt. Paints were mainly AK acrylics, with a few random Vallejo and MIG Ammo washes and acrylics here and there.
-
Hi all. I'm going to start building this kit, to which I'm going to add, at least, the exhaust pipes, which I already have. I don't know if the tires might need replacing, I also bought the seat with the harnesses along with the kit and the exhausts. For now I've started with the exhaust pipes, the propeller and the inner landing gear covers. It's not much, but it's a start. The propeller, as always, has received a sanding session to fine-tune the thickness of the blades. Andrés.
- 45 replies
-
- 12
-
-

-
 Phew, finally finished this build of IBG's Hunt type II destroyer in 1/700, modified to become the Type III HMS Talybont. I build this for the D-Day GB, since it was the ship my Grandfather was serving in at the time as the gunnery officer; HMS Talybont was assigned to Omaha beach and along with USS Satterlee, provided close support for the US Rangers' assault on La Pointe du Hoc. I've included some of his writings on the event for those interested (scholars of D-Day, I hope will forgive any parts that have subsequently proven to be inaccurate). She's presented as best as I can guess she appeared at that time. Many thanks to those who helped me narrow down these specifics. Talybont's career had its ups and downs; suffering two collisions with civilian ships in fog, and as part of the (for the RN) disaster at the battle of Les Sept Iles in October '43 in which the AA cruiser Charybdis and escort destroyer Limbourne were both lost. I have a lot of reasearch and correspondence surrounding that event, and had originally planned for this model to commemorate that loss, but my rate of progress wasn't up to the task! That is a story for another day perhaps. Specifics of the build; the IBG kit is nice, but a tiny bit simple or out of scale in places. Modification to a type III is reasonably simple, mostly moving around some superstructure, adding some torpedoes and constructing a new funnel. Being such a personal build, I've frankly gone completely out of control when it comes to aftermarket upgrades; I've put a list below in the knowledge that I won't remember in a year. Paints are substantially colourcoats, the specific colours being guess somewhat from earlier period photos and RN practice at the time; with some utility Tamiya and various (rather heavy handed) oil work thrown in here and there. Please forgive the sea base; it's a bit of artistic licence modelled from a photo of a Daring pulling at tight turn at flank speed; while she was certainly on the move on D-Day, I doubt an full bore flank turn was ever on the cards! It's turned out rather too over the top, but hopefully I'll get the knack one day with practice. It's made of artists foam, cut to shape and coated in W&N modelling paste, painted and topped with W&M gloss gel; A bit more of the paste is used unpainted for the wakes. Crew painting and positioning is largely a random guess; I had originally intended to use the brass barrels as a means to provide LED lighting to illuminate inside cotton wool 'explosions' from the guns in true youtube style (indeed there are holes through the base, model and gun mountings for just such a purpose), but it was all too small and time too short. A blessing in the end I think, given how badly that was bound to turn out. The plate is from Nameit! (with apologies), since is the first time I bothered and in retrospect silver on silver was unlikely to be particularly legible. I'll replace it with a new one next time I put an order through. For those intersted, this is what an unholy amount of money spend on aftermarket looks like, when compared to the first time I build the kit as his previous ship, the type II HMS Bramham, mostly OOB: Although more charitably, that does also include a couple of years of experience and a large amount more time spent on it. Here's the RFI. Many thanks to all those who followed and provided help and encouragement along the way. A nerdy reference of aftermarket jubbly bits in case it is useful to anybody: Shelf oddity RN Hunt II detail set (general; bulwarks, 271 installation; detailing 4" twin mountings type XIX - Shelf oddity Twin Oerlikon power mountings - Starling models Quad pompoms - Starling models hunt upgrade set Torpedo tubes- Shelf oddity (IJN type 6 + scratch) Depth charge gear - Starling models hunt upgrade set (resin), shelf oddity PE (cages) Boats, carley floats - Micromaster, Davits - Starling Anchor chain - Shelf oddity DCT - Micromaster (Mk. V**) 285, 291 radar - WEM MFDF - shelf oddity Figures - Ion Decals - Sovereign hobbies draught markings, Starling Pennant numbers. Masts rigging, various bulwarks, huts and cowl vents; bridge superstructure, funnel- scratch. Doors, hatches - WEM? Starling? Atlantic? Thanks for looking in, Andy
- 20 replies
-
- 34
-
-
-
-
-
- 1/700
- Hunt Class Destroyer
- (and 1 more)
-
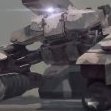
Morning all. Here is my latest build, a Crusader Mk III AA Tank using the IBG kit in 1/72. Built OOB with the only hiccup being a missing part from the sprue which had to be scratch built. Painted with AK paint, kit decals and a general dirty oil wash for the weathering. The decal for the top turret was never going to work properly due to the contours and had to be corrected with white paint. Build completed with a simple base and a couple of 1/76 Milicast figures. Build log here: Thanks for looking. Stuart
- 18 replies
-
- 34
-
-
-
-
-
I hope it's okay to bandwagon onto this GB. This was the ship my Grandad was serving in during D-day, which was assigned force O to bombard and provide close support to the landings on Omaha and La Pointe du Hoc. The reason for the Rangers' assault on the Pointe was to neutralise a suspected battery of 15.5cm guns, which were in a position to do immense damage to the landing and support craft on Omaha and Utah. In fact, they had been moved some weeks before and been replaced with wooden fakes; but the prospect of moving to within 4000 yards of this battery for the supporting destroyers would've meant likely annihilation had they been present. As it happened the landings started somewhat off course, and some landing craft had to make a long run westward, parallel to the beaches to reach the base of the cliffs. Talybont and USS Satterlee moved in pretty much as close as was possible (<2000 yards) to cover this and took out various machine gun installations that were targeting the Rangers landings and cliff ascent. Talybont was even able to use her short range AA pom poms to good effect at this range. This is a build I've had in mind for a few years, but it's been slow to get off the ground. Hopefully this is a good incentive to actually get started on it properly. HMS Talybont was a Hunt type III escort destroyer. Unfortunately, no kits in 1/700 are available for the type, but the hull was largely unchanged from the type IIs, of which IBG make several kits. The type 3s had a different funnel, the aft 4" mounting removed and aft superstructure moved back to allow space for a pair of torpedo tubes amidships. I've already made a very limited start on modifying the deck, but a fair amount of scratch work will be needed for the funnel and new superstructures. The IBG kit is nice, but a simple or out of scale in places. A PE set by Polish company Shelf Oddity does exist however, and I've made a start removing the bulwarks in order to replace with some ridiculously intricate photo etch. I've also a wide array of replacement 3d print parts assembled for various RN subjects, a selection of which is shown below. Starling Models has also since made a 3d print upgrade kit, of which I have a few copies, so that will no doubt be making an appearance. There might even be a chance to mess around with LEDs, cotton wool and brass gun barrels for a bit of a diorama, but that's well in the future. I've had a lot of help from the good people of these forums to narrow down the likely fit and camouflage that she was painted in during June '44. These posts can be seen on the build log for the last time I build this kit, here: Hopefully will make a proper start on this soon Andy
- 45 replies
-
- 11
-
-
Feeling the need to add a PZL 11 kit to the stash, most likely in 72nd although 48th scale is a possibility, but can't find a comparison between the Arma and IBG kits that discusses matters such as parts fit, detail levels, accuracy, and other considerations. Most reviews I've found online are telling me all the kits look nice in the box but go no further. Can any of you advise me on the intricacies to consider with either option?
-
Here is my recently completed build of the British A9 Cruiser Tank Mk1 using the 1/72 IBG kit that was part of the 'The World at War' series. It was built OOB and was a quick simple build that to me, depicts the A9 very well. Like most things, there could be improvements and that would be the tracks and the instructions. Build log here: Just realised that I hadn't fitted the aerial, better get that done before I forget again. Stuart
- 14 replies
-
- 32
-
-
-
 As the A9 awaits its base, actions moves onto another AFV subject. The next subject is a Crusader Mk III AA Tank by IBG in 1/72. I started this this afternoon while sitting behind the club stand at the Wings & Things Model Show. The box. Instructions, decals & some PE and I can say that my fear of IBG instructions was unfounded. The plastic. Moulded tracks & wheels don't bother me and when assembled, look good to my eye. Lower hull built with its rear and glacis attached. Fitted track assembly too. Upper hull and track guards fitted. So far, so good. Lights, drivers position, storage boxes and engine deck parts added. Extinguishers, intake filters, external fuel tank fitted. Other little parts also fitted. A little clean is required here and there, nothing much and I can move onto the turret. Not bad for about 4 hours work. Stuart
- 19 replies
-
- 13
-
-
Thought it was about time that I did an armour thread and so here is my next build, an A9 Cruiser Tank Mk.1 using the IBG 1/72 kit. So, the stuff. The box The plastic The instructions or booklet. I believe the kit is part of the 'The World at War' series and the booklet is quite comprehensive in its content, it's a pity that the instructions for the build are confined to an A4 size page. Having never built an IBG kit, I hope their other instructions are not like this. Stuart
-
The model is finished and I already invite you to the gallery. I made a few changes to the model compared to what IBG offered in their kit. But these are all cosmetic changes. Based on the photos and plans I made an open cockpit but without the windscreens and in it I added a few small details, on the engine cover I changed the locks for opening it and on the underside of the wings there is a top coloured leading edge and wing tip. I described everything in the workshop thread. Model of a Polish aircraft used by the Bulgarian Air Force. PZL P.24 B, 1st Armejski Orliak (1st Army Squadron), Bozurishte airfield near Sofia 1937. The inscription on the fuselage (Simeon Kniaz Tyrnovskiy) was applied on the occasion of the birth of Tsar Boris's son (16 June 1937) The aircraft in such markings took part, among others, in the ceremonial dedication of the banners of Bulgarian aviation units on 27 June 1937.
-
I haven't been posting here lately, but perhaps an RFI and a WiP thread or two will pull me out of the current cycle of dabbling ineffectively in about 50 kits at once. I completed a build of IBG's HMS Harvester, finished as her sister HMS Highlander recently. This was for a 'Crest of a wave' theme at my local chapter, so really I just used it as an excuse to learn a bit how to do these sea base thingys. I made one cursory attempt before, and the results reflected the low effort put in. In this case, I had a concurrent 'quick build' of Tamyia's O class posed in much the same manner, but used as a mule to try out different techniques; very few of which I got on with but that at least saved them from this one! I'd seen lots of dramatic photos of Fletcher classes bouncing clear of the water like this, so there's a bit of artistic licence used, but it turned out to be a fun experiment. I've never got on with cotton wool, and the water coming from the bows didn't really work out how I intended. I'll have to work on that technique. The deck could do with a lot of water work, but with the risk of knocking off the rigging and PE, I chickened out at that point. Quick and dirty summary of the build; the kit itself is waterline, so needed some hull to be added to pose in a big swell. This is just under the forecastle and is carved of basswood. A few scratch additions were made here and there to match photos; many jubbly bits of 3d print from Starling models came out of the spares box to replace kit parts; the gun barrels got replaced for Master ones; and a few Ion figures got added to the bridge. Draught marking decals from Sovereign hobbies worked really nicely. Paints Tamiya, colourcoats and oils. The Western approaches colours are actually my own mixes as an experiment and came out too vivid; they are not representative of the well researched colourcoats versions. The base is a slab of modeller's foam roughly carved to shape, and the structure substantially W&N modelling paste under W&N gloss gel. HMS Highlander, for those interested, spend most of the war in the vital but thankless task of schlepping back and forth in the North Atlantic on convoy duty. I've had to guess a fair amount at fit and photo dating, but this is my best guess as how she looked in the climactic convoy battles of Spring 1943 as the leader of Escort group B4, particularly the brutal struggle to defend HX229 in March of that year. I have a real soft spot for these 'Brazilian H' class ships, with their attractive extended bridge, and escort-focussed equipment. I really loved this kit, but IBG tend to polarise opinion. A lot is left to PE, and I think to very good effect, but this does not make them particularly user friendly. Thanks for looking, as always I'd be very happy for any criticism, corrections or suggestions. I'm always interested to know more! Cheers, Andy
- 16 replies
-
- 45
-
-
-
Hello all, These are my last completed kits, the amazing IBG Fw190D-9 (in my case de 210 series) and Tamiya's 190D-9 (500 series). When this kit came out, I had a very wrong first impression of the IBG kits' accuracy, having all the shapes and proportions of previous Fw 190 A’s and D’s kits etched into my memory for years. In truth this kit is a labour of love, researched to the minimum details, resulting (IMHO) in the best long nose Fw-190’s in 1/72, capturing perfectly the sleek beauty of the Doras. The model itself has an amazing finesse of details and (perhaps) the only questionable point would be the pronounced rivets, that needed a bit of care to not be even more emphasized when weathering the airplane. I used the 3D printed IBG open cowling flaps, Master brass guns and pitot, Reskit wheels, Eduard PE and CMK resin exhausts (remember to fit the exhausts before closing completely the forward fuselage or you will have to unglue everything to correct it…don’t ask me how I know that…..) In parallel to the IBG kit I tried to build a Tamiya kit that I had for many years, but along the build it become more and more evident how ill shaped the Tamiya kit is, even though I worked a lot on the upper gun cowling and used the IBG nose and cowling flaps (plastic ones). I hope you like it. Happy modelling and May the 4th be with you! Marco PS: Dortenmann's figure admiring his aircraft, was kindly painted by my daughter Anna. IBG Fw: "Should I take off against a thousand bombers and fighters .... " Tamiya Fw:
- 11 replies
-
- 43
-
-
-
Dear Friends This one of the new wonder kits from IBG, that really throws down the gauntlet for other Companies to follow. It has glorious but restrained rivet and panel detail. You can see the rear of the engine on looking into the undercarriage bay. My only struggle was with the brass with the kit in the undercarriage bay. The barrels are from Master. The markings are from the kit for JG 54 in December 1944, I think the first unit to operate the aircraft This is a Noy's Miniatures hanger and figures are Gunthwaite RN gun crew in overalls. They were the nearest I could get for 'schwarzmanner' To try things out I used some oil brusher colours from AMMO to dry brush the exhaust and wear on the wings, what do you think? Andrew
-
Hi All. This is my first post after years of just reading and picking up info from the site. This is my Airfix Scammell Tank Transporter and IBG Models Crusader Mk3. Supposed to represent circa 1943 scene. Crusader painted to represent a Polish Army example with SCC2 and SCC1A in an MTP 20 pattern. Reference mainly Mike Starmers guides. Ultimate aim is to include in a diorama. All finished with Humbrol enamels. A few little additions here and there - glazing to the tractor cab, a few tools etc. Weathered with a combination of acrylic paints and pastels. Hope you like.https://photos.app.goo.gl/vjqATNmFNs1tD1SUA
-
Hello all, These trucks from IBG were built by my mum and I. 1) The Ford Maultier with Flak 38 was built by me and is my latest completion of the year, I managed to finish it Sunday evening just in time to be counted as a 2023 build. It was painted with Ak Real Colors acrylics and weathered with Tamiya enamel washes and weathering powders. Some modifications were made to the model: -The headlights were drilled out, painted chrome (on the inside), then light bulbs made from transparent sprue were added and finally the lenses were made with Ak crystal magic glue. -A Photo-Etched window wiper from Brengun was used. -The windows on the door do not come with the kit, so I cut them out from a piece of transparent plastic card. - Although you might not be able to see it, decals which were not included in the kit and which were stolen from some spare aircraft decal sheets were added to the car's instrument panel. The figures are from Zvezda. 2) The Truck was built by my mum a few months ago, it was built straight out of the box and painted with Tamiya acrylics, the weathering was done with Abteilung 502 oils. I was inspired to build this model after seeing my mum build hers, I am very pleased that our collection of 1/72 vehichles is growing. Happy New Year to all and may your scale modelling wishes come true! Anna
- 15 replies
-
- 26
-
-
With several complicated builds on hand, I want to do a simple quick build in-between. So, here's my IBG Toldi III, build straight from the box, painted with Tamiya spray can colours, with details and pin wash using Vallejo colours, and a dusting of 'mud' from Tamiya's weathering set A. Peter
-
This is a build of IBG's lovely recent Dora tool. It was originally built under the FW190 GB banner, but after the entertainment of construction, interest lagged a little and I never quite got round to putting the final touches on it before the deadline (WIP below). Not being a particular fan of 190, nor late war Luftwaffe schemes, the quirky maritime what-if scheme appealed to me, although clearly I had issues with the wiggly lines when the time came. The kit has come in for both praise and criticism from what I can see. It's certainly fiddly, and perhaps over-engineered depending upon taste; and the surface detail, while exquisite, is significantly be-rivetted, which will skew opinions as it always does. From my point of view, the build itself, while a bit nuts, was a joy; and while all that engine and PE detail is probably unnecessary for the scale, it did make the process very enjoyable. The fit was excellent, but I can easily imagine that it might not be so for every build. Your mileage may vary! The kit could really benefit from a build with a little more care and attention (scratch pipes between the engine and firewall for example), and expertise when it comes to the paint scheme. This build was mainly using Gunze lacquers with some Tamiya XF thrown in here and there. The blue (C328) turned out very vivid, likely due to under-mixing. Clearly, I had issues with the wiggles, but opted to blunder on rather than let the build stagnate. I couldn't find a paint marker that 'sat' unfortunately. Bit of chipping over Tamiya LP38 for fun, and some rather unenthusiastic washes and weathering with oils and Tamiya powders (I hate that bit to be honest). At the time of writing, this kit and its earlier release brethren seem to be on discount at Hannants, so do check it out if the kit is of interest, I really think it was a cracker and a steal at the price. Cheers for looking in, Andy WIP:
- 15 replies
-
- 28
-
-
-
I'm not really a 190 person, and am generally pretty ignorant to the type and its history. Still, I've always admired the lines of the Dora, and when IBG released their all-singing, all-dancing new tool last year, it ended up being a day one purchase for me for various reasons. Firstly, I was impressed by their ship kits, and anyone who makes an obscure little Hunt type II has my eternal gratitude. Second, it seemed like a good way for a recently returned modeller to have a go at the recent 'hyper detailed 1/72' kits, and IBG had clearly gone way out there with the detail and construction. Third, the quirky 'what if' boxing suited my maritime sensibilities. So here it is, and seems to have come in for equal measure of praise and derision from what I can see; lauded for it's detail, sharp moulding and fine rivets but panned for it's fussy fit, over-engineering, reliance on PE for structural parts, and of course, its fine rivets. A full frame by frame rundown seems unnecessary as better versions will exist on t'web. I've just highlighted a few things that caught my eye. The surface detail looks exquisite to me. Jury's still out on the riveting (having not built a recent tool eduard for instance), but I'm cautiously optimistic that it can be made to look nice. Interior parts look nice. The DB603 seems is reasonably comprehensive given the only view of it will be through a tiny gap in the wheel bay; there's no open cowl option without scratching. The main spar is part of the cockpit assembly and hopefully will tie it all together nicely. I'm going with this scheme, being both attractive, interesting (I hope!) to paint, and also it includes a torpedo! What's not to like? Bonus points because it allows for another joyful RLM83 debate (as the navy blue is called out here). I thoroughly enjoyed @Procopius's lovely double build last year (rather more than he I did I think), and have been several other similarly stunning examples on the boards. This won't be that, but hopefully it won't be so horrific that I can't get some enjoyment out of it! Lots of suggestions and alternative build orders IIRC will be necessary, so I've some research and re-reading to do. I'll be busy with the SSD GB to start with, but the plan is to slowly progress this one a little in the background until hopefully I'll have more time to devote to it once that build is finished. Cheers, Andy
- 52 replies
-
- 13
-
-
 Tamiya Quad Gun Tractor with IBG 75mm French Gun. Free French Brigade, 1st Artillery Regiment, Bir Hakim. Gazala Line, May 1942. The British Quad Gun has been the classic 25-pounder gun of the British artillery since the beginning of the conflict and would also be during the Desert Campaign. In terms of modeling, I'm tired of seeing this dynamic duo of Tamiya Quad Gun always with the 25 pounds. It reminds me of that annoying Batman and Robin series from the 60s. Looking to show a more interesting use for the Quad Gun, I decided to present an alternative weapon for this tractor. The cannon chosen is another classic, but this time, it's from French artillery. The kit selected was the IBG 35058 M1897 75mm French Field Gun. I found a good photo that helped develop my initial idea for the vehicle and gun... ...and in this other photo, it helped with the creativity for placing the figures. The flag in the photo is from the French Navy. Of course it couldn't be missing from my model. The 1st Artillery Regiment had the consecrated soixante-quinze, the efficient and rapid-firing 75mm cannon (QF). The cannons had been brought from Syria, reformed in the Beirut workshops and given wheels, some modified known as the “tropical type”. The wheels would make the cannons better suited to the mechanization of desert warfare. My model has wheels of the same type used on British 18 lbs guns. They were organized into 4 batteries each with 6 cannons. Despite being a safe and performing weapon, modern guns had already surpassed it. Figures are modified Tamiya. Painted in oil and acrylics. Also acrylics on the Quad and cannon and painted in the 2-tone camouflage, common to see in the vehicles of this unit. If the vehicle is going to carry the cannon to Bir Hakim, it will also serve as a ride for medical personnel. On the roof of the Quad I placed some accessories, highlighting the boxes with medical equipment. Decals are Archer Fine Transfers. Note the 2 British helmets with different red cross identification patterns. Cheers, Fábio.
- 14 replies
-
- 43
-
-
-
Hi all, Here's my just finished 1/72 Diamond T Asphalt Truck. It's the IBG kit, which I got from the hobbyshop last week. Great little kit, with excellent detail and fit. The only slight dissapointment are the headlight guards, which are not clear. I used some MRP Olive Drab on it. Thanks for looking, I hope you like it. Pete
-
Hi, this is a build of HMS Bramham, a Hunt type II destroyer in 1/700 scale. This has been built from the IBG kit, in this case entirely from the HMS Zetland boxing. I had intended to have this finished in time to commemorate the 80th Anniversary of Operation Pedestal, the crucial supply convoy to Malta in August 1942, in which she played a significant role. Unfortunately I've overrun by a few weeks, but better late than never! It's a personal build as well, as my Grandfather was serving on her at the time as young Sub-Lieutenant. He would sketch the ship for me on occasion, and it would make regular appearances in my childhood drawing books, no doubt each time diverging further from reality to sprout missile launchers and lightning bolts down the side. I feel a bit strange talking self indulgently about this model first when really it's of no importance compared with the gravity of the subject matter. However, this being a modelling forum, I suppose I should start with the model, but for those interested in the history and some of his writings on the subject, I've opted to put that in the next post, so please feel free to skip that if it is of no interest to you. So specifically the build, this is my first ship build since returning to the hobby (although I know I rather roughly glued together without paint some old Airfix 1/600 kits back in the day). It being a relatively simple kit and an important model to me, I had intended to go the whole hog and upgrade it with the Shelf Oddity PE and various Flyhawk gubbins. However it quickly became clear first that my embryonic modelling skills were not equal to the task, and second that all the constant planning, checking references, making notes and apprehensive stalling were unlikely to yield any finished kit this side of the next ice age. I'd also put a little entirely unnecessary pressure on myself to get something out for the aforementioned anniversary, which was unlikely to lead to a enjoyable experience. So instead what we have is a mostly OOB build, completed with a deliberate lack of care, attention or sense of shame! A first attempt or prototype, if you will, built to the mantra of 'rubbish but fun'. There are many things that didn't turn out quite right and were I wanting to do a job to my satisfaction, I would go back and change or redo. So my apologies for putting such a rough model up for RFI! My hope is that, having thoroughly enjoyed carelessly bulldozering straight past any mistakes, and having learned the lessons from this build, I'll one day go back and update this thread when I've made version 2 with rather more care. With that in mind, it's an open invitation for any and all criticism, this being a learning experience and a model that I set no great store by; being a total beginner to ship modelling, I'd rather know what doesn't look right or hasn't worked so I can do it differently in the future. So yes mostly OOB, with addition of some rather nice Starling Models 4" turrets, pom poms and Oerlikons. There's a little scratch here and there, most notably a steel rod replacement for the oversize mast and some rather dodgy Type 285 radar aerials from chopped up PE bits. The kit is finished with a combination of Gunze primers and matt varnish, Tamiya and Colourcoats paints, and some rather over-enthusiastic oil paint washes and weathering, which turned out to be impossible to claw black without repainting entirely (turns out the matte varnish just ate the wash up and spread it indiscriminately around). Any pointers how to do a detail wash onto matte without just wicking the whole surface with grime? Anyway, it's my intention to practice building a sea base for her, but that being so far beyond my skills, and with time ticking, I will leave that for another day. The RFI can be found below, and some writings about the Operation by my Grandfather in the following post. Thanks very much for looking in! Cheers, Andy A little escort destroyer in this scale really is tiny. I was amazed on opening the (rather large) box. Here's it next to generic 1/72ishness
- 15 replies
-
- 29
-
-
Although I have built a fair number of soft skinned and AFV's over the years by only such builds in BM have been within Group Builds, so this is my first such WIP in this area of the forum. I built the Airfix QLT /QLD when there were first issued, (2010) and managed to pick up 2 more boxes for £5 each fairly soon after. These have sat in my stash ever since. I now want to expand my collection of late second world war two vehicles as part of my "Exercise Meteor" project and a second freelance model railway set in a similar period, To break away from the Airfix range I was drawn towards the IBG trucks as they offered some variety. Last week I took the plunge and bought two from their range, one of which is the QLR and the other will appear alongside my build in the Matchbox GB next year. As an end of the year project I will be building both the Airfix vehicles alongside the IBG one ans , apart from the scale differences, see how these match up. For starters here as the boxes: Rather than sprue shots I will post pictures of the various sub-structures as they progress.