
JamesP
-
Posts
894 -
Joined
-
Last visited
1 Follower

Recent Profile Visitors


JamesP's Achievements
")
Obsessed Member (4/9)
1.5k
Reputation
-

**UPDATE** Private Vasquez, Aliens 1/12 "LET'S ROCK!!"
JamesP replied to Robj's topic in Figure Ready for Inspection
Great work on the skin tone and camo -
Westland Wasp, VSQ 860 Royal Netherlands Navy
JamesP replied to Shake's topic in Ready for Inspection - Aircraft
Nice attention to detail. A great model -
Freightdog (RotorCraft) 1/72 Westland Wasp
JamesP replied to JamesP's topic in Ready for Inspection - Aircraft
Cheers Matt, but I think it’s more by happy accident 😁 -
Westland Wasp, VSQ 860 Royal Netherlands Navy
JamesP replied to Shake's topic in Work in Progress - Aircraft
Your work is very neat and tidy which is very hard at this scale with diverting fiddly. -
Freightdog (RotorCraft) 1/72 Westland Wasp
JamesP replied to JamesP's topic in Work in Progress - Aircraft
I got this completed just before I went away for a week, and then had to wait for some sunshine (which promptly disappeared behind a cloud). Finally, here it is. -
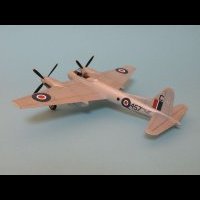
Given the issues I had with the kit I'm quite happy with the result, apart from the rear bulkhead/canopy, which bulges out too much and crowds the rotor mast. In an age of CAD and 3D printing, even for short-run/cottage industry manufacturers, it's easy to scoff at the issues with this kit. The Wasp in 1/72 is also one of the toughest challenges to take on. Everything is on display, so my hat is off to anyone even contemplating mastering such a kit. Only some of the problems stem from the scratchbuilt master, some from probably due to its long on/off gestation and some from frankly poor moulding. With the release of the LF models kit, many had hoped that a 1/72 Wasp was now a done deal, but it's evident from reviews that the short-run IP nature of its manufacture is not up to the job either. You may find it strange but I've enjoyed building this kit, the challenge has been interesting but not insurmountable and I have a model I'm pleased with. The lack of flotation gear and weapons may be a negative to many, but the Wasp served in many configurations and this clean variant has its own charm ... and dayglo! Thanks to @Colin @ Freightdog Models/Rotocraft for the opportunity to build this kit. Here you can see the extra detail the kit provides as well as how all the wheels touch the ground 😉
-
An excellent homage. The WIP prompted me to repurchase and reread the story.
- 7 replies
-
- 1
-

-
- Pegasus Hobbies
- Mercury 9
- (and 1 more)
-
Freightdog (RotorCraft) 1/72 Westland Wasp
JamesP replied to JamesP's topic in Work in Progress - Aircraft
It has been a bit of a protracted start to painting as I kept finding minor issues and jobs that needed attention. Thankfully, once I was ready things have gone very smoothly. I used Xtracolour Blue-Grey which though very thin in the tin and probably rubbish for brush painting, sprayed beautifully. The Orange Crop antenna was added at this stage. For the dayglo, I based coated these areas in yellow, then made a 2:1 mix of Xtracolor Roundel Red and Hu 209 Fire Orange. I'm very happy with the result. -
MG K3 Magnette, Auto Kit, 1/24
JamesP replied to cmatthewbacon's topic in Work In Progress - Vehicles
Oh this looks tasty. -
1931 Cadillac V16 Convertible Coupe, Jo-Han, 1/25
JamesP replied to cmatthewbacon's topic in Ready For Inspection - Vehicles
Beautifully captures the look of the real thing. Well done. -
Freightdog (RotorCraft) 1/72 Westland Wasp
JamesP replied to JamesP's topic in Work in Progress - Aircraft
It's been a long week... Firstly, time to get the rest of the airframe together, but that required untwisting the tail boom. It's hard to see, but the stiffeners are not at the right positions either, but it looks better than before. The other parts that are going to be painted blue/grey got stuck on as well. Now the (un)fun part of building the undercarriage. The legs themselves were far too chunky and were sanded to a more slender shape. The wheels, being too wide, were sawn in half and rejoined, then completely sawn off and repositioned with the bracket angled. I had already discarded the upper V sections with the intention of replacing them with plastic rod. I was keeping the lower parts as they were moulding hard resin and would rely on them for strength. So I needed to make new parts to match. I started by drawing out a plan, where it quickly became apparent that the front legs weren't in the correct position. The log pencil marks show the kit's locations, and the short marks are where I think they should be. The incorrect position was fixed by the location of the underside surface detail, so this had to come off and be repositioned further forward. Note the geometry of the back and front legs should be similar. The kit's front V struts are narrower than the rear, but I went along with this. I then made some new upper struts... What happened to get to here is too traumatic to recount. Suffice it to say things were redone many, many times. Despite plans, the combination of many small errors quickly compound into something that needs each part to be individually tailored. Even though the kit has its errors, one quickly learns to respect anyone trying to scratchbuild something as complicated as the Wasp, at this scale, by hand. There was a moment before this when all the legs were on, though the front legs weren't glued to the fuselage to aid in applying the paint scheme I want to do. However fate decided that it would be better if I pinged the parts across my modelling room. -
I had the very same graphic novel, I leant it and never got it back. Great inspiring stuff and the kit immediately put me in mind of it, so was quite stunned at the coincidence when I scrolled down. I’ve a feeling it’s going to cost me to replace the book.
-
Freightdog (RotorCraft) 1/72 Westland Wasp
JamesP replied to JamesP's topic in Work in Progress - Aircraft
Cheers guys. The next major hurdle is the cockpit glazing. Two resin sides and vacformed roof and nose. The sides (and fuselage) were settled to get the best fit and I made a small spacer to keep them the required distance apart. With them in place the roof could be trimmed to fit as best as possible. The nose had already been cut out to determine the length of the floor extension I'd added earlier. The vacuum parts were tacked in place with CA before flooding the joins once I got the best fit I could achieve. Unfortunately, the best fit was not great. The rear had to be bent inward and the nose is not deep enough to meet the windscreen. A "spare" set of vacform parts would have really been a great help here, as you learn a lot from the mistakes you make on the first. The gaps were initially sealed with my rather gloppy Mr Sufacer 500, which stopped anything from getting into the cockpit. I could then use actual filler to level things out. The bottom of the windscreen was now too deep, so some more filler was used to try and build up the nose. The rear of the canopy though is the worst part, being far too bulbous. I considered replacing it, even getting out the Airfix kit. The canopy is that kit's weakest feature and would've needed a scratchbuilt rear bulkhead to match the width of this one. I've added the small chin to the underside of the nose, which was missing from the kit altogether. -
1931 Cadillac V16 Convertible Coupe, Jo-Han, 1/25
JamesP replied to cmatthewbacon's topic in Work In Progress - Vehicles
I can see this being indistinguishable from the photo above. Are the lourves separate parts?


