Tango India Mike Posted June 30, 2008 Posted June 30, 2008 Well, I'm still frozen out of Photobucket and instead am enjoying (not) fun and games with Picturetrail. At least, with perseverance, I can shuffle together a few things to show here . . . if you're not all sick of seeing them by now! Anyway, here's MPM's 1/72 Wellington Ic - in a few words, a COW of a thing to build! Accurate it is not, so I did my best with it and have to admit that it hasn't ended up too badly. It won't pass close scrutiny by the rivet counters though. And as a pleasant contrast for ease of construction and exquisite accuracy, Tamiya's magnificent Mosquito kit. And just as a bonus while rummaging about in the archives, I thought perhaps this Matchbox Tempest VI might please a few fans of Hawker fighters. As always, all the best. Tim. 1
Nico Teunissen Posted July 1, 2008 Posted July 1, 2008 As always very nice, but I did not think of the Wellington from MPM to be a COW to build. Allright some adjustmenst should be made, but overall I considered it to be a nice kit. Cheers, Nico
Cornish Posted July 1, 2008 Posted July 1, 2008 These pictures and the others in other posts are too much - excellent work Mike Reading your other posts on the photograhic techniques used (glass and backdrop), could you enlighten us a little further and post some pictures from alternate angles on the setup for how you achieve these results? I am struggling to fully visualise it.
Pete100 Posted July 1, 2008 Posted July 1, 2008 As alway's Geat build's and stunning photography!!!!! The first time I saw your build's I actually thought they were real aircaft pictures, the photography and settings are so good. Best Regards Pete.
Tango India Mike Posted July 1, 2008 Author Posted July 1, 2008 As always very nice, but I did not think of the Wellington from MPM to be a COW to build. Allright some adjustmenst should be made, but overall I considered it to be a nice kit.Cheers, Nico Thanks Nico, and while I agree that the Wellington built straight from the box presents no more difficulty than the average kit, I was astounded by the number of inaccuracies I kept on finding. As I always do when starting a new project, I armed myself with every scrap of photographic reference that I could lay my hands on, a lot of it found in my large collection of old Aeroplane Monthly and Flypast magazines. Of particular value were walk-around photos of the Brooklands Wellington Ic, R for Robert. From close study of these I could deduce that MPM's impressive looking kit would build up into a badly flawed model in terms of accuracy. To start with, the engine cowlings looked nothing like those of the genuine Mk Ic, so these needed to be replaced. This also created problems with the fitting of the exhaust pipes - which caused me a few headaches. The fore to aft length of the cockpit opening, and consequently the canopy also, is too great. To be fair, other Wellington kits have got this wrong too in the past, and I think it may be down to misinterpretation of photos showing side views of Wellingtons with the cockpit side windows slid back all the way open. Whatever, it seriously affects the character of the Wellington and is extremely difficult to rectify without major surgery that would destroy surface detail immediately aft of it. Getting a bit tired of the build by this stage, I figured that the best I could do would be to creep the canopy framing a little further forward, but it still isn't an ideal solution. The rear turret area caused a few headaches too. For starters, both nose and tail turrets are different sizes, when they should be exactly the same. No big deal really, because I intended to crash-mould new turrets and scratch-build the interiors anyway, using the nose turret parts as a master. But I found that the rear turret mounting was too far forward, resulting in the turret appearing a bit too 'buried' inside the rear fuselage ends. Moving it to its proper position resulted in it overhanging the extreme end of the fuselage - so there was little option other than to extend that end of the fuselage with built-up layers of putty and a slab of plastic card to maintain the flat area for the turret to sit on. Another disappointing, though not insurmountable aspect of the kit was the absence of any fuselage interior or representation of the geodetic structure plainly seen on the other side of those long windows. I masked the structure on the inside faces of the side windows and painted them in a couple of thick layers of aluminium paint, which turned out to be pretty effective, and scratch-built the interior. Another baffling problem I came across later after I'd done with taking 'in flight' photos of it, was the wheel wells being far too narrow to accommodate the width of the main undercarriage members. To get them to fit without splaying outwards, I had to carve away great chunks of plastic and just be grateful I could hide the damage reasonably well with the doors. Also a bit disappointing was that the wheels are more suited to later Wellingtons and not at all representative of the Mark I. Not having suitable replacements to hand, I've used the kit wheels as they are. Other anomalies include the port wing-tip being substantially thicker than the starboard - impossible to rectify without destroying surface detail - incorrectly sized starboard nose window, complete absence of the flare chute on the starboard fuselage, incomplete elevator and trim tab engraving on the tailplanes (almost like the toolmaker knocked off for lunch and then forgot where he was afterwards!), and many smaller details like mass balances, pitot tube, nav and tail lights etcetera, not provided at all. In short, I thought the kit overall was a poor effort considering how much I paid for it and, more importantly, that there is a genuine full-sized Wellington Mark Ic that has had PLENTY of photographic publicity. Would I build one again? I doubt it, now that I've seen Trumpeter's kit, although I notice recently that MPM are releasing a Merlin-engined Mk II. I wonder if I should hang on a bit longer to see if Trumpeter follow suit with a Mk II of their own? On the whole I'm very impressed by the MPM/Special Hobby kits but, like all other kit companies, they occasionally get things wrong . . . this was just one of those occasions! Sorry for the rant . . . cheers! Tim.
Bobs_Buckles Posted July 1, 2008 Posted July 1, 2008 Hello Tim, Great use of background scenery for your models. How did you achieve the prop blur in your pics? Cheers, Bob
Tango India Mike Posted July 1, 2008 Author Posted July 1, 2008 (edited) Hello Tim,Great use of background scenery for your models. How did you achieve the prop blur in your pics? Cheers, Bob Thanks Bob, you may have missed my quick description elsewhere (and right at this moment I can't remember in which thread), but my props are powered by an electric fan positioned out of camera-shot. Building models pretty much purely for photographic purposes, I fit propellers with brass or aluminium tube shafts so that they spin true and easy. Two tubes with one telescoping into the other and lubricated with graphite - works like a charm. Cheers, Tim. Edited July 1, 2008 by Tango India Mike
Skii Posted July 1, 2008 Posted July 1, 2008 Well thats just knocked me off my chair Nice pics of real planes there Tim, where are the models ?
Bobs_Buckles Posted July 1, 2008 Posted July 1, 2008 Thanks Bob, you may have missed my quick description elsewhere (and right at this moment I can't remember in which thread), but my props are powered by an electric fan positioned out of camera-shot. Building models pretty much purely for photographic purposes, I fit propellers with brass or aluminium tube shafts so that they spin true and easy. Two tubes with one telescoping into the other and lubricated with graphite - works like a charm.Cheers, Tim. Tim, Superb idea. Thanks for sharing. Bob
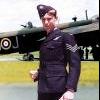
Tango India Mike Posted July 1, 2008 Author Posted July 1, 2008 Thanks every one - Cornish, as mentioned elsewhere, I busted my nice pane of glass quite some time ago and will have to get another. When I do I'll most certainly take lots of pictures of how the whole exercise is set up. Believe me, there are plenty of others waiting patiently to see how it's done! Sorry all, but it may be a few months down the track before I'll have the time. I don't know why I never thought of this before, but I wondered what my 1/72 pilots might look like in extreme close-up. The following is about as close as I can zoom in without it becoming rather messy . . . Would you believe this is the basic Airfix pilot figure with a few alterations?
The wooksta V2.0 Posted July 1, 2008 Posted July 1, 2008 Outstanding! Especially the Mosquito. Mmmmmmmn!
Heraldcoupe Posted July 1, 2008 Posted July 1, 2008 The fore to aft length of the cockpit opening, and consequently the canopy also, is too great. To be fair, other Wellington kits have got this wrong too in the past, and I think it may be down to misinterpretation of photos showing side views of Wellingtons with the cockpit side windows slid back all the way open. Whatever, it seriously affects the character of the Wellington and is extremely difficult to rectify without major surgery that would destroy surface detail immediately aft of it. This is one I've been pondering too. I reckon the excess length in the opening is at the front of the canopy, by comparison with photographs and the 4+ plans. Coupled to a very upright front windscreen, the effect is all wrong. I'm still experimenting to see if I can fix this, whatever I do will lose the canopy framing. That's no issue in itself, it's the subsequent polishing where I invariably end up with a crazed canopy! Maybe I should resign myself to moulding a new one immediately, rather than putting in lots of futile effort in re-shaping the kit part. Now I've taken this off-topic, I should add that I'm really impressed with your models, and particularly how you have photographed them. Very, very convincing, Cheers, Bill.
Tango India Mike Posted July 1, 2008 Author Posted July 1, 2008 (edited) This is one I've been pondering too. I reckon the excess length in the opening is at the front of the canopy, by comparison with photographs and the 4+ plans. Coupled to a very upright front windscreen, the effect is all wrong. I'm still experimenting to see if I can fix this, whatever I do will lose the canopy framing. That's no issue in itself, it's the subsequent polishing where I invariably end up with a crazed canopy! Maybe I should resign myself to moulding a new one immediately, rather than putting in lots of futile effort in re-shaping the kit part.Now I've taken this off-topic, I should add that I'm really impressed with your models, and particularly how you have photographed them. Very, very convincing, Cheers, Bill. Thanks Bill, and no - not off topic at all as I'm more than happy to talk about the pros and cons of any of these kits, or answer queries about work done in the process of building them. I'm glad I'm not alone in my observations regarding the canopy, but at the same time ready to admit that I just can't put my finger on exactly where the problem lies. Unfortunately I don't have reliable Wellington drawings and could only do the best I could from studying photographs. Drawings would indeed have been handy! From your mention of moulding a new canopy I take it that you're well versed in such techniques. I mould new canopies as a matter of course these days, and did so in this instance. If you're planning to use the kit canopy as a master you'll probably find that it's a little too wide for the cockpit opening as it is and will need quite a bit of reducing when shaping it for moulding, to also allow for the thickness of the acetate copy eventually formed over it. It sounds like you're serious about this proposed model, so I'd be interested in seeing it when it's built. Thanks for the compliments Bill - good to meet you. Cheers, Tim. Edited July 1, 2008 by Tango India Mike
Heraldcoupe Posted July 1, 2008 Posted July 1, 2008 Thanks Bill, and no - not off topic at all as I'm more than happy to talk about the pros and cons of any of these kits, or answer queries about work done in the process of building them. I'm glad I'm not alone in my observations regarding the canopy, but at the same time ready to admit that I just can't put my finger on exactly where the problem lies. Unfortunately I don't have reliable Wellington drawings and could only do the best I could from studying photographs. Drawings would indeed have been handy! The drawings in the 4+ book are at least convincing, unlike any other set of Welling ton plans I have studied! They could still be inaccurate, but they work quite well when sanity-checked with photographs. From your mention of moulding a new canopy I take it that you're well versed in such techniques. I mould new canopies as a matter of course these days, and did so in this instance. If you're planning to use the kit canopy as a master you'll probably find that it's a little too wide for the cockpit opening as it is and will need quite a bit of reducing when shaping it for moulding, to also allow for the thickness of the acetate copy eventually formed over it. I've already spread the fuselage with a sliver forward of the canopy, so the canopy fits quite well - it just looks wrong once in place. I've previously smash moulded canopies, this time I'm looking at making a small vacuum forming platform to do the same thing with greater control. It sounds like you're serious about this proposed model, so I'd be interested in seeing it when it's built. Thanks for the compliments Bill - good to meet you. I've covered some of my progress here: http://www.britmodeller.com/forums/index.p...c=12190&hl= Mine is the Italeri MkX variant, which shares most of it's problems with the original MPM boxing. I wish I'd waited for the Trumpeter kit, but you know how it is once you've got your teeth into something and won't let go! With hindsight, the wheel wells would have been more easily dealt with by an Eduard set, or the resin (CMK?) set which is available. I have bitten the bullet and ordered am Eduard Zoom set for it's instrument panel, though even that will need to be modified for a MkX configuration. The model has been on hold for a few weeks but should resume once I can close up the interior. Overall I know it won't be the perfect Wellington, but at least I'll be happy that it's substantially accurate. I've obsessed about Wellingtons for years and realise that even the flawed MPM kit is streets ahead of the Airfix, Frog and Matchbox versions I grew up with! Cheers, Bill.
Mike in Aotearoa Posted July 2, 2008 Posted July 2, 2008 Hiya Tim Like everyone has said, the quality of the models and the photography are first rate, the composition and lighting are exceptionally well done. They remind me of some of the Charles Brown photographs of WWII. I'm looking forward to seeing some more of these! Cheers from Aotearoa Mike A
fatalbert Posted July 2, 2008 Posted July 2, 2008 Tim,you truly are a master modeler.I hope you dont mind,but i am using your image of the clipped wing dutch mk ix spitfire as my screen background.I just cant belive its not the real thing ....Neil
Tango India Mike Posted July 2, 2008 Author Posted July 2, 2008 Thanks for all your comments chaps - Sean, Pete, Craig, Skii, Mike, Neil and anyone I've missed (sorry!). Neil, I don't mind at all if anybody uses my images for whatever they like - it's why I've posted them in the first place. This is the one I'm currently using as a screen-saver . . . 1/72 Airfix Bristol Bulldog - lovely little kit!
fatalbert Posted July 2, 2008 Posted July 2, 2008 Thanks Tim.have you ever made the Airfix 1/48 spit VB.I have a couple on the way to me in the post.Your pictures have inspired me to have a go at going to town on a basic model.....Neil
AnonymousAA72 Posted July 2, 2008 Posted July 2, 2008 I love your photo's Tim (and the modelling skills aren't too bad either!!). Now...did you by chance ever build Brigade Models Spitfire XII and Seafire XV and send the photo's to someone in Kent by any chance????
Tango India Mike Posted July 2, 2008 Author Posted July 2, 2008 I love your photo's Tim (and the modelling skills aren't too bad either!!). Now...did you by chance ever build Brigade Models Spitfire XII and Seafire XV and send the photo's to someone in Kent by any chance???? Yes Bill, that would have been Kevin Nunn, who I bought the kits from. Do you know Kevin? It was all very strange because I never heard from him again despite two subsequent letters enquiring about other kits. I assumed something must have happened to him, so I'd be very glad to clear up the mystery. I'm glad at least that he was sufficiently impressed by the photos to show them around to a few people - the models were built from his kits, after all! Thanks Bill, Tim.
AnonymousAA72 Posted July 2, 2008 Posted July 2, 2008 Yes Bill, that would have been Kevin Nunn, who I bought the kits from. Do you know Kevin? It was all very strange because I never heard from him again despite two subsequent letters enquiring about other kits. I assumed something must have happened to him, so I'd be very glad to clear up the mystery.I'm glad at least that he was sufficiently impressed by the photos to show them around to a few people - the models were built from his kits, after all! Thanks Bill, Tim. I've known Kevin for 15 years (or thereabouts!). He traded as Brigade Models and from Beaneys Model Shop - here in Sittingbourne, and I bought the shop off of him in October 2006 - Kevin helped me in the shop on Saturdays (I closed the shop down earlier this year due to the economic downturn and the lack of trade!!). The photo's were taped to the wall and Kevin was incredibly proud of "his kits". I forwarded all mail to Kevin whilst I was in the shop and he is still selling his kits. Funnily enough I saw him last night at the Medway Modelling Club and he's well. I'll let him know we've "spoken"! Its a small world Tim!!
Recommended Posts
Create an account or sign in to comment
You need to be a member in order to leave a comment
Create an account
Sign up for a new account in our community. It's easy!
Register a new accountSign in
Already have an account? Sign in here.
Sign In Now