Search the Community
Showing results for tags '1/700'.
-
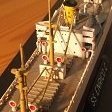
The HMS Prince of Wales came to Singapore last month. Here, I am going to build the one that came to Singapore too but in December 1941. I realized this Tamiya kit is a bit to the lite version and decided to make things difficult by adding PE parts. The PE parts and wood deck are meant for Flyhawk kit, so I will need to do some adjustments. Everything on the kit deck has to be removed for the wooden deck to stick on nicely. Will figure later how I can fill in the holes in the wooden deck. Now the headache part comes after the deck is in place. The PE parts are so small for a 1/700 ship.
-
 Here we go again folks! GP bringing you another tandem Pedestal build (its nice building these in pairs). This time with the two F-Class destroyers HMS Fury, who managed to complete the Operation safely, and here sister HMS Foresight which was hit by an Italian aerial torpedo; blowing off her stern and killing four men- the result being a later scuttling at the hands of HMS Tartar. For this build I will be using two Tamiya E-Class Destroyers along with a associated 3d upgrade sets from Starling Models, (a detail improvement but also allows me to use the HACS on the P-class models) For colours... I have seen on the armoured carriers website a graphic of various ships from Pedestal (I am not sure of the actual origin of these images) showing Forsight in a Mountbatten Pink (along with the Manchester) which I would really like to go for, it will make the fleet even more colourful and in the image of the Foresight prior to scuttling she is one uniform colour so it works for me. And for the Fury I'm walking along the lines of a WA scheme, the vast majority of pictures I have found of her show this on the Starboard side from around 1941 and then a more disruptive pattern in the same colours on the Port around the time of her beaching after D-Day. Cheers, GP
- 32 replies
-
- 10
-

-
Hi All, here is my place marker for this GB. It's HMS Bristol, a Type 82 Destroyer using the MT Miniatures 1/700 kit. HMS Bristol was the only ship in this class, the rest of the program was cancelled due to defence cuts. She spent her early years as a trials ship for testing new weapons and computers and served as the Royal Navy flag ship during the Falklands. Anyway, the compulsories: The box. The resin lump. The metal bits. Decals and PE. The instructions Some would say that this should be a quick build but being 1/700, metal parts, PE and detailed painting will slow this down. Don't expect anything too soon as I need to finish a build for another GB first. Stuart
-
Just a little something I picked up cheap second hand and was building in between other models. For 1/700 is pretty nicely molded with the rails for the hull and conning tower molded to their respective sections. Painted with WEM enamel in Hellgrau 50 and PSBF III, the standard for early war subs. Deck is black. The base even has the nice writing on it already printed. I think I went cross-eyed trying to paint and weather it though!
- 2 replies
-
- 13
-
-
- uboat
- hobby boss
- (and 1 more)
-
Hey everyone, GP is back after the Winter break and feeling the vibes of another OP Pedestal build, following on from my recent HMS Wilton build. After meeting a fellow Britmodeller in the wild and chatting about Pedestal I am cracking on with my next step, the two P-Class destroyers from the convoy, Penn and Pathfinder. The Tamiya 1/700 O/P class kit will form the basis of the model. I know it's not a great kit these days but I hope some detailing will go a way to prop it up! Pretty basic plastic, but hopefully still relatively accurate. I have already got some nice Camo profiles but I am not sure if I can post them here, as they are drawn and not a photograph! Let's set sail on another Pedestal build!
-
Having built the Revell 1/700 Titanic a few years back I'd always fancied having a go at Olympic and Britannic so this kit came my way at Christmas. So far I've got hull parts, funnels and the lower portion of the superstructure glued together. Like Hobby Craft models I've built previously all the parts fit together perfectly. Two deficiencies I've encountered are: There are no bow anchors included in the kit, only the flat spare anchor which is fitted on the fo'c'sle deck. The anchors are absent from the sprue, printed instructions and the 3D generated images on the side of the box. It looks like Hobby Boss overlooked them completely. The little plastic name plaque reads: 'RMS' Olympic rather than HMT Olympic. I've been in touch with Hobby Boss support (via Trumpeter) and they have forwarded the issue re. bow anchors 'to the engineer'. With the RMS Olympic plaque provided I'm probably going to let the tail wag the dog and model the vessel as she was immediately prior to WWI as I've now gone off the idea of attempting that tricky camo scheme. Unlike the Revell Olympic-class models the superstructure is a separate part with some Titanic deck parts. Happily, it fits very snuggly on to the hull: The rudder is a separate part and once fitted is very delicate. I've already had to do one repair on it. If you're building this armed, dazzle camouflaged version I'm pretty sure the name plaque should read 'HMT'. The hull sits rather loosely on the black plastic stand provided (it has 1/700 Kuznetsov printed on the underside) so I've drilled some holes for a 16mm bolt. There are a couple of small photo-etched sheets of funnel details and boat rests included but no deck railings.
- 6 replies
-
- 10
-
-
- Hobby Boss
- 1/700
- (and 1 more)
-
.thumb.jpg.ba34a9f6ddce411193946dbdcc7b5fe8.jpg) Hello all. I have just finished this lovely little resin kit of the United States Coast Guard Lake Class Cutter 'Tahoe'. There was a comprehensive etch set with it, and a superb instruction guide. Two ships could be built from the parts supplied (USCG Itasca was the other). Both were transferred to the Royal Navy during WWII. There is a build log here if you missed it: It does contain some builder errors and potential errors, but I have nothing but praise for the kit itself, and I thoroughly enjoyed building it. This is how she ended up, but I may well replace some of the thicker rigging in the future as explained in the build thread: Thanks for looking, kind regards, Ray
Hello all. I have just finished this lovely little resin kit of the United States Coast Guard Lake Class Cutter 'Tahoe'. There was a comprehensive etch set with it, and a superb instruction guide. Two ships could be built from the parts supplied (USCG Itasca was the other). Both were transferred to the Royal Navy during WWII. There is a build log here if you missed it: It does contain some builder errors and potential errors, but I have nothing but praise for the kit itself, and I thoroughly enjoyed building it. This is how she ended up, but I may well replace some of the thicker rigging in the future as explained in the build thread: Thanks for looking, kind regards, Ray -
With the Hadleigh Castle in the rear view mirror I'm thinking about a project for next year. While I have a couple of Starling kits and IBG Hunts in the stash the plan is that 2025 will be the year of Flowers. I have the excellent Atlantic models HMS Buttercup (it was boxed and purchased as Bluebell - but hey life is too short to worry and I quite fancy the quirky acoustic hammer look) which I will build out while I work on scratch building several other variants. I most enjoy painting attractive models, and so my choice of ships will be determined by the camo' schemes they wear. For the scratch builds Starling Models will be my choice of resin details, but I do think I am going to have to learn how to draw PE so I can fit out the various builds with the PE parts required. I'll spend some time over Christmas identifying which ships I plan to build and what bespoke parts each might need. That is the plan anyways - now to see whether it survives contact with the enemy ! Hull drawing for my first hull trial. If a success I will make a couple more, if not I'll try a different approach. I will be basing all the models within a seascape so I am not worrying too much about the details under the waterline provided I can get the correct hull shape showing in a rolling sea. I also hope to get better at making hulls as I go so the later ones might be more detailed - we'll see. Hull outline constructed and now to be filled with putty. I can already see the rear cross section bulkhead is not correct. Current plan is to file and sand it to a better shape once the hull is filled and solid. P
- 97 replies
-
- 11
-
-
- 1/700
- Flower Class
- (and 1 more)
-
Recently assembled this kit, decent fit, but had to make do without putty so there is a groove in the deck near the aft turret. This is my third 1/700 kit, after completing Tamiya's Enterprise (CV-6 not 65) and their Gato class submarine set, which comes with two subs, two Japanese sub chasers and two B-24 Liberators. I have quite enjoyed the 1/700 Waterline Series from the Shizuoka model companies, and have Tamiya's USS Missouri in the stash from the same series. It went together without much difficulty and there was no flash on the parts. Once assembled, I held off on putting the main guns on to paint the camo on them separately. Unfortunately, the flagpoles and masts did break off during priming, and I lost the flagpoles. However, this is not the end of the world as the kit did not come with flags anyway, and I will reattach the masts with CA at the end. So, on to the pictures: The assembled kit, I did make the mistake of attaching the boats before painting, a mistake I will not be making again. The primed kit. The broken off masts. The kit with the deck painted, I had already painted the sides of the hull with the 1944 splinter camouflage, which I had to get instructions for from the Tamiya 1/350 kit off Scalemates as Aoshima's painting instructions consisted of 2 17x4cm pictures, only showing one side of the hull and the deck. I used these instructions to also paint the main guns, as shown here. The two Arado Ar-196 floatplanes that came in the box did not have any assembly or painting instructions, so I followed Tamiya's. However, as the kit came with no decals, they are missing all symbols on the aircraft and are simply painted in green and grey. I attempted to put the crosses on the wings, but my brush skills aren't exactly up to it, particularly with my shaky hands. All that is left is for me to pick out the moulded details on the deck in grey and paint the superstructure, secondary battery and boats. When that is done I will paint the results here on Britmodeller.
-
Due to lack of space at home, I have been stashing 1/700 scale ships. To make life miserable, I am adding PE parts for the ships. A 1/700 Hobbyboss Titanic with PE parts are on the way from China onboard a ship now. While I am waiting and building the squid boat, I decided to start my first sailing ship. I didn’t realize a sailing ship is actually more difficult to build than a modern war ship after reading deeper into it. The sails and rigging are another science to fix on the ship. Here’s the parts of this model kit, with interior. Shipped a book from UK on the HMS Victory and looking up any internet sites on this ship, hoping to learn and get the correct configuration for the riggings and sail for a moving ship. Will need the sailing ship experts here to guide me on the riggings. Started the lowest deck and moving my way up the decks. I may not fix any of the included interior parts other than the must have cannons since it won’t be seen after assembled.
-
 Here is my recently completed HMS Sheffield using the 1/700 Dragon/ Cyber-hobby kit. Built mainly OOB with a couple of corrections and was an experience to use 1/700 PE that was included in the kit. Paints were from Colourcoats, kit decals and was depicted in her final scheme before her demise during the Falklands Conflict. Build log here: Stuart
 -
 Dear Fellow Modellers Flyhawk has a lovely kit of one of the German K-Class cruisers, Konigsberg. These were built strictly to the limitations of the Versailles Treaty, so they were very light indeed, just over 7000 tons. The Konigsberg and other KM ships seem to have gone for ID colours on their turret roofs about the time of the invasion of Norway. Konigsberg was damaged in the opposed landing of her troops at Bergen on 9th April 1940 and so couldn't immediately return to Germany. After being spotted by RAF reconnaisance aircraft, tied up in Bergen harbour she was targetted by FAA Blackburn Skuas of 800 and 803 NAS, flying from the Orkney Islands, and sunk at her moorings on 10th April. So she has the dubious honour of being the only ship to be sunk by FAA dive bombers and thus represented the Skuas finest hour. You will notice two of her three turrets are at the stern and are offset. I believe the idea was they could bear quite a way forwards if necessary. In practice such situations often led to damage to the ship's superstructure. Hope you like it? Andrew
 -
Hello all. Having finished the old Airfix HMS Iron Duke recently I have had to delve into the stash to find a relatively simple kit to start, which will be built alongside a much more complex project that I will start and post up in the New Year. I ummed and aarred for quite a while (as I do), rejected many potential subjects, then narrowed it down to this one, which I had almost started at least five times before. The one I chose was the White Ensign 1/700 U.S. Coast Guard Lake Class Cutter. The kit is mainly resin, but has an extensive photo etch sheet along with two lengths of brass rod. This is sort of a sad build, as it was the last item I ever ordered from the original White Ensign when they were based in Herefordshire. However, it will also be a fun build because I know just how good their kits were. This is what was supplied: A nice, sturdy box with a lovely colour illustration, It is quite petite when compared to a 6'5" pen... There is plenty of fine detail in the hull and no sign of air bubbles, and just a little flash along the forward waterline, Lots of smaller (and not so small) detailing parts. Again there is a little flash but nothing untoward. One of two ships can be made from this kit, Tahoe or Itasca. The only difference that I can see in the instructions is in the type of ventilation cowls. There is plenty of photoetch to keep me out of mischief, some of which will be interesting to size and fit (lifeboat rigging, for example). The instructions are the normal White Ensign style, giving plenty of information, not only pictorially, but also with the written word. Must make sure I read them as I go along. This is the colour scheme which is for Tahoe. I just need to find out what 'Spar' is, and also what the nearest equivalent to WEM CC (ColourCoats) M22 Steel Deck Grey is in my collection. The last time I tried to start this was in the 'In the Navy' Group Build a few years ago, when I promptly found out that the United States Coast Guard was not navy. I then thought that I could modify this from Itasca into HMS Gorleston from WWII and promptly realised that it was beyond my skills. Anyway, hopefully I will be approximately sixth time lucky with building it, it really does deserve to be built. Any advice will be greatly appreciated, especially if I say that I am going to do something and it is plainly wrong, which has been known. It will still be a day or two before I start this properly, I need to sort out a base for it first as I like to get them attached before I get too far - it makes handling the model a bit safer. Thanks for looking Ray
-
Having gotten the Titanic for Christmas and not being too keen on modelling a subject that so many lost their lives on ( generally I don’t like to model subjects where I know someone died). I’m going to convert the kit to the Olympic, the only one of the White star trio to have a long career before being scrapped in the thirties. With the added distinction of having sunk a German submarine. I’m going for the Dazzle camouflage the Olympic wore while serving as a troop transport. Sprues. Even with the small scale it’s a fairly large kit. Step one will be to figure out the best way to modify the A Deck ( the most obvious difference between the two ships) then get a proper handle on the rest of the modifications needed.
-
 Another Blitzbuild so soon after the Blitzenbuild? And my partner back at work leaving me on full time Daddy duties? There can be only one solution. The kit. And my reference photo. UK MOD © Crown copyright 2022 Cheers, Richard.
 -
 Phew, finally finished this build of IBG's Hunt type II destroyer in 1/700, modified to become the Type III HMS Talybont. I build this for the D-Day GB, since it was the ship my Grandfather was serving in at the time as the gunnery officer; HMS Talybont was assigned to Omaha beach and along with USS Satterlee, provided close support for the US Rangers' assault on La Pointe du Hoc. I've included some of his writings on the event for those interested (scholars of D-Day, I hope will forgive any parts that have subsequently proven to be inaccurate). She's presented as best as I can guess she appeared at that time. Many thanks to those who helped me narrow down these specifics. Talybont's career had its ups and downs; suffering two collisions with civilian ships in fog, and as part of the (for the RN) disaster at the battle of Les Sept Iles in October '43 in which the AA cruiser Charybdis and escort destroyer Limbourne were both lost. I have a lot of reasearch and correspondence surrounding that event, and had originally planned for this model to commemorate that loss, but my rate of progress wasn't up to the task! That is a story for another day perhaps. Specifics of the build; the IBG kit is nice, but a tiny bit simple or out of scale in places. Modification to a type III is reasonably simple, mostly moving around some superstructure, adding some torpedoes and constructing a new funnel. Being such a personal build, I've frankly gone completely out of control when it comes to aftermarket upgrades; I've put a list below in the knowledge that I won't remember in a year. Paints are substantially colourcoats, the specific colours being guess somewhat from earlier period photos and RN practice at the time; with some utility Tamiya and various (rather heavy handed) oil work thrown in here and there. Please forgive the sea base; it's a bit of artistic licence modelled from a photo of a Daring pulling at tight turn at flank speed; while she was certainly on the move on D-Day, I doubt an full bore flank turn was ever on the cards! It's turned out rather too over the top, but hopefully I'll get the knack one day with practice. It's made of artists foam, cut to shape and coated in W&N modelling paste, painted and topped with W&M gloss gel; A bit more of the paste is used unpainted for the wakes. Crew painting and positioning is largely a random guess; I had originally intended to use the brass barrels as a means to provide LED lighting to illuminate inside cotton wool 'explosions' from the guns in true youtube style (indeed there are holes through the base, model and gun mountings for just such a purpose), but it was all too small and time too short. A blessing in the end I think, given how badly that was bound to turn out. The plate is from Nameit! (with apologies), since is the first time I bothered and in retrospect silver on silver was unlikely to be particularly legible. I'll replace it with a new one next time I put an order through. For those intersted, this is what an unholy amount of money spend on aftermarket looks like, when compared to the first time I build the kit as his previous ship, the type II HMS Bramham, mostly OOB: Although more charitably, that does also include a couple of years of experience and a large amount more time spent on it. Here's the RFI. Many thanks to all those who followed and provided help and encouragement along the way. A nerdy reference of aftermarket jubbly bits in case it is useful to anybody: Shelf oddity RN Hunt II detail set (general; bulwarks, 271 installation; detailing 4" twin mountings type XIX - Shelf oddity Twin Oerlikon power mountings - Starling models Quad pompoms - Starling models hunt upgrade set Torpedo tubes- Shelf oddity (IJN type 6 + scratch) Depth charge gear - Starling models hunt upgrade set (resin), shelf oddity PE (cages) Boats, carley floats - Micromaster, Davits - Starling Anchor chain - Shelf oddity DCT - Micromaster (Mk. V**) 285, 291 radar - WEM MFDF - shelf oddity Figures - Ion Decals - Sovereign hobbies draught markings, Starling Pennant numbers. Masts rigging, various bulwarks, huts and cowl vents; bridge superstructure, funnel- scratch. Doors, hatches - WEM? Starling? Atlantic? Thanks for looking in, Andy
- 20 replies
-
- 34
-
-

-

-

-
- 1/700
- Hunt Class Destroyer
- (and 1 more)
-
Hello all Here's my latest one off the bench; HMS Starling coming into Gladstone Dock to a big welcome on 25th Feb 1944 after Walker's 2nd Support group had had sunk 6 U-boats in one patrol in the Western Approaches. All my family are from Bootle so its been nice to pay homage to those who served in the Atlantic and to good old Liverpool itself. This was my first stab at a resin model and I was impressed with the detail in the revamped Starling Models kit (though I didn't enjoy removing all the printing supports!). This welcome into Gladstone was well documented, so there were lots of pictures of this scene to go from but i only realised after painting that it looks like Starling had lost her camouflaged pattern, in favour of overall grey. The lock quay was made from foam, with a layer of filler spread across, through which I then dragged a fine razor saw across to mimic the bricks. The lock door was made from styrene and a spare PE Jagdpanther radiator. Initially I optimistically only ordered 120 resin figures for the crew and the crowd but I'd estimate there must be around 400 in the end (a mix of resin and PE figures) but I could probably do with another couple of hundred really to properly give a sense of the real crowd that day- there's only so much fiddly figure work i could take!
- 9 replies
-
- 35
-
-
-
-
-
- Starling Models
- 1/700
- (and 1 more)
-
One of the largest battleships ever built, and certainly one of the most well known, she was the pride of the Imperial Japanese Navy. Saved for the decisive battle that never came, she only saw combat during the Battle of Leyte Gulf, and was ultimately slaughtered by nearly 400 aircraft from 11 aircraft carriers. I picked up this used 1/700 Fujimi kit at a local IPMS show a few years back, but the bow had damage, so its been shelved for a long while. Recently I reached out to Fujimi for a replacement part, which has since been received. All the parts (I hope). A little bit of the superstructure has been started Previous damage Replacement part And next to a 1/72 P-47 for size comparison. I have too many builds going on right now with slow progress (trying to do a good job!), so I need a build that requires easy assembly, easy painting, and completely OOB. Main colors are grey and deck tan, so hopefully I can't mess this up 😅
-
Dear Friends Akizuki or autumn moon was the lead ship of a new class of Japanese super destroyer that entered service in 1941. Rather than being configured as a ship killer with multiple torpedo batteries these were intended more as AA escorts for carrier task forces. Unlike the normal 127 mm Japanese destroyer main armament, these destroyers went for 100 mm 65 cal guns as much handier for AA work with, by Japanese standards, a reduced battery of 4 torpedo tubes. They were 2,700 tons, with a speed of 33 knots and a range of 8000 nm at 18 knots. The Fujimi kit is a good base for the ship but comes to life with the specialised Flyhawk PE set and turrets from Rainbow. Akizuki was in action from the moment of completion and in 1942 took part in defending many of the supply convoys to Guadalcanal. She was sunk in the Philippines in 1944 Hope you like it Andrew
-
I hope it's okay to bandwagon onto this GB. This was the ship my Grandad was serving in during D-day, which was assigned force O to bombard and provide close support to the landings on Omaha and La Pointe du Hoc. The reason for the Rangers' assault on the Pointe was to neutralise a suspected battery of 15.5cm guns, which were in a position to do immense damage to the landing and support craft on Omaha and Utah. In fact, they had been moved some weeks before and been replaced with wooden fakes; but the prospect of moving to within 4000 yards of this battery for the supporting destroyers would've meant likely annihilation had they been present. As it happened the landings started somewhat off course, and some landing craft had to make a long run westward, parallel to the beaches to reach the base of the cliffs. Talybont and USS Satterlee moved in pretty much as close as was possible (<2000 yards) to cover this and took out various machine gun installations that were targeting the Rangers landings and cliff ascent. Talybont was even able to use her short range AA pom poms to good effect at this range. This is a build I've had in mind for a few years, but it's been slow to get off the ground. Hopefully this is a good incentive to actually get started on it properly. HMS Talybont was a Hunt type III escort destroyer. Unfortunately, no kits in 1/700 are available for the type, but the hull was largely unchanged from the type IIs, of which IBG make several kits. The type 3s had a different funnel, the aft 4" mounting removed and aft superstructure moved back to allow space for a pair of torpedo tubes amidships. I've already made a very limited start on modifying the deck, but a fair amount of scratch work will be needed for the funnel and new superstructures. The IBG kit is nice, but a simple or out of scale in places. A PE set by Polish company Shelf Oddity does exist however, and I've made a start removing the bulwarks in order to replace with some ridiculously intricate photo etch. I've also a wide array of replacement 3d print parts assembled for various RN subjects, a selection of which is shown below. Starling Models has also since made a 3d print upgrade kit, of which I have a few copies, so that will no doubt be making an appearance. There might even be a chance to mess around with LEDs, cotton wool and brass gun barrels for a bit of a diorama, but that's well in the future. I've had a lot of help from the good people of these forums to narrow down the likely fit and camouflage that she was painted in during June '44. These posts can be seen on the build log for the last time I build this kit, here: Hopefully will make a proper start on this soon Andy
- 45 replies
-
- 11
-
-
 This is a pretty new subject for me, so I'll be quoting a lot of Wikipedia 😉 Aircraft Carriers were becoming all the rage in the 1930s, a new and exciting area of technology. Nations were converting ships to carriers, learning what works and what doesn't, then designing carriers from the ground up. In the rise of Germany military might and an attempt to improve political relations, the Anglo-German Naval Agreement allowed Germany nearly 40k tons for aircraft carriers. Germany designed 2 within that limitation, the lead ship, Flugzeugträger A, would be the Graf Zeppelin. The initial design was quite interesting. The thought was these carriers would need to be able to defend themselves against surface ships, with cruiser armor and 16 150mm guns for defense. This was common with a lot of early carrier design, with the belief that aircraft would not be fully effective as weapons. Lexington Class carriers had 203mm guns themselves. The successful carrier doctrine we know today was still years away. The launching of aircraft was to be from the two catapults on the flight deck, but not using the entire deck. This allowed for rapid takeoffs, as well as the ability to both launch and recover aircraft at the same time. The process to do this was complicated yet intriguing. Aircraft were loaded onto launch trollies on rails to the forward elevator, which would then go to the catapult on the flight deck, launching the aircraft via compressed air. In theory, 18 aircraft could be launched at 30 second intervals until the air ran out, requiring nearly an hour to fill up again. If additional aircraft needed to be launched in an emergency situation, they could use the entire flight deck like other carriers. Aircraft could be kept warm in the hangar deck, ready for immediate flight operations instead of a warming process on the flight deck. Graf Zeppelin was built with an upper and lower hangar, and was to be able to hold 43 aircraft, a mixture of Fi-167s, Ju-87s, and BF-109s. After studying carrier operations in the Pacific, this was changed to 30 BF-109Ts and 12 Ju-87Cs. Graf Zeppelin was laid down in late 1936 (once Gneisenau left the slipway), and was launched December 1938. The ship was scheduled to be complete in 1940, being an estimated 85% complete at the end of 1939, but the war and politics prevented this. At a Naval conference in April 1940, it was decided to halt work on the carrier in favor of strengthening coastal defense in Norway. She would be used as storage for timber for the next 2 years. By the time of the naval conference in April 1942, lessons from Taranto, Pearl Harbor, and the hunt for Bismarck showed the power of the aircraft carrier. Work was promptly resumed the following month. However, the world had changed in the 2 years she sat in port. Much of her equipment was in need of upgrades or complete replacement. The aircraft originally designated for her air wings were now obsolete, and the Luftwaffe refused to allocate the resources to design and produce new aircraft, requiring modifications to the current aircraft. The modified aircraft were noticeably heavier, which required further updates for aircraft handling. By January, due to the poor performance of the German surface ships, work was once again halted, with little changing by the time the Red Army approached in 1945. In an effort to prevent its capture, it was purposely sunk at port. Raised post war, the Soviets determined it would require too much cost and time to complete, and was instead sunk as a target ship. The Graf Zeppelin aircraft carrier offers plenty of what-ifs, but in the end, too many issues probably would have prevented it from being a successful ship. Its complicated and outdated design was compromised by the time she would have been operational. Aircraft development would have been hampered without significant war progress for resources. Her crew would have limited knowledge of carrier operations, against an enemy that had years of built up experience. Odds are she would have been hunted and harassed as much as Tirpitz was. But had war been delayed to 1941, who knows? I hope to build this Graf Zeppelin much quicker that the real ship, though while the part count is massively less, it still appears somewhat intimidating.
- 54 replies
-
- 20
-
-
This is the 1/700-scale AFV Club Knox-class frigate with Five Star Knox PE add-on set. Other aftermarket details include Five Star whip antennas and SSModel Phalanx CIWS. I used SSModel 0.05mm memory metal for the rigging, having learned that the elastic Infini Aero rigging I used on my last build makes getting the right amount of slack in the lines difficult. Painted with Vallejo, weathered gently with Tamiya enamel panel liner and some oils on the hull. Overall, the AFV Club kit suffered from a couple inaccuracies and didn't always have the best fit. Decals often were not sized correctly and didn't include flags or helpful things like helopad markings (which, incidentally, are molded onto the plastic and I was able to bring out by painting the surface and lightly sanding the paint off the raised lines, revealing the light gray, albeit not white, plastic beneath). The Five Star kit is lovely, but is also missing some obvious adornments, like the goodies that line the mast. Still, it all comes together in the end.
- 8 replies
-
- 18
-
-
-
- 1/700
- Knox-class
- (and 1 more)
-
Hi All. I thought it was about time to do a couple of maritime builds before giving attention back to my scratch build of the Fushimi Maru. So what do have? The subject will be the Type 42 Destroyer, HMS Sheffield using the 1/700 CybeHobby kit. First, the stuff: The box. I will be building her as the waterline version. The plastic. Instructions, decals and PE. This will be an OOB build but like life, things are bound to be either incorrect or missing and will need to be remedied. I know very little of this type, so if the 'collective' spot something please tell and I will give it some deliberation. Stuart
-
Ok, I reached the point in Formidable construction that I have to make a base for her. And as making this base is basically watching Water Effect go transparent over multiple days before I can proceed to next stage, I decided to start a new ship. Something smaller this time, destroyer. And another one from Matapan battle - HMS Nubian. Page here suggest Nubian was reconstructed in Bombay during her year long repair following damage from May 41 so should I assume she was in her original "as build" config during 1st half of 1941? https://www.naval-history.net/xGM-Chrono-10DD-34Tribal-HMS_Nubian.htm I am also looking for photos of her in first half of 1941. So far I have only a photo of her blown off stern showing she has wavy 2 color camo on stern. Should it be 507A and C or 507C plus darker grey like on, say, Hotspur? I was looking for Cossack Profile Morskie, but it seems this book is not available at the moment. But it seems there will be A LOT of work to turn trumpeter's model into somewhat reasonable reproduction of original so please point me to any inaccuracies and I'll try to work on them. Work so far, centered on repairing the bow:
- 9 replies
-
- 4
-
-
- Tribal Class Destroyer
- 1/700
- (and 1 more)
-
Hello everyone, I'm planning to purchase the 1/700 scale model of the Queen Mary 2 by Revell towards the end of the year and I need some advice regarding the paints and tools I'll need for this project. Since I don't own an airbrush, I'm looking for spray paints, preferably from Tamiya. Could you recommend the specific colors I should use for this model? Also, I'm interested in enhancing the detail of my build. Does anyone know if there are any photo-etched parts available for this kit? I've tried searching but haven't been able to find any. Thanks in advance for your help! Best regards, Szymon