
March
-
Posts
251 -
Joined
-
Last visited
Content Type
Events
Profiles
Forums
Media Demo
Everything posted by March
-
I have always wanted my own prowl of Jaguars, looking forward to this one!
-

New Tool Airfix Vulcan 1/72 - Black Buck rebox announced
March replied to Adam Poultney's topic in The Rumourmonger
I do the idea of the outline of that chaps elbow having been immortalised in plastic. Airfix’s blunder aside, in the plus column, this boxing contains the darker and more importantly harder plastic Airfix have been using for recent releases. I got coin 229 with mine. -
Tamiya F-4B Phantom II with Eduard parts/decals
March replied to mathy's topic in Ready for Inspection - Aircraft
Ok, admit it, you found a way and miniaturised a real aircraft, didn’t you?! Fantastic work. 🙂 -
Eight whole minutes have passed since a reply. Guessing everyone is hosing down their monitors?! Anyway who am I to resist a Buc... just pre-ordered two. Now the quiet anticipation begins... If you are an accountant working for Hornby I'm guessing today is your Christmas day?!
-
The only things lacking now are some dry ice, a figure with curly hair to represent a mid 90’s Jeremy Clarkson and a recording of him saying “This is the Lockheed SR-71 Blackbird. It is the fastest jet in the world…”, on repeat.
-
One of the inlet spikes on the box that I have opened are also rounded. This seems like a potential open goal for some aftermarket company to provide some corrected and 'spikier' parts. @Serkan Sen Thread followed. I'm also up for purchasing parts (whether these be for improving the detail, or allowing the Revell model to be adapted to an A-12 or YF-12) if you are in a position to supply at some point in the future. 🙂 The Oxcart family of aircraft are my favourite flying machines, so would love the opportunity to go to town on them.
-
Review Build Mike Builds a Zero - a 1:48 Eduard Zero, eventually
March replied to Mike's topic in Work in Progress - Aircraft
Ooooh, same total as me! I’m hoping to improve on that score by at least 1 this year… -
HABU for learner drivers - Italeri SR-71 1/48 - B or C model
March replied to March's topic in Work in Progress - Aircraft
Over the Christmas period progress made is best described as ‘fits and spurts’, I’ve had important things to attend to, such as eating and drinking. At this point I am absolutely certain that I have foie gras’d my liver. Despite all of this, some progress has been made. The top half of the forward fuselage has now added and via the means of clamps, brute force and a modicum of ignorance, I’m pleased to say that panel gaps have been kept to a reasonable minimum. Attaching the wing halves have also called for some creative thinking. In his build @bar side ultilised the cunning use of elastic bands to ensure there was enough tension to keep the wing half being attached as close as possible to the body. This worked a charm on the first wing, but the second wing took a drastic turn as too much tension pulled the wing out of tab sockets, breaking one of the tabs in the process. This led to some creative thinking, with two elastic bands being joined via a knot, fed through the already glued engine nacelle and around the tail stinger. This then allowed me via the a screw driver and a humbrol paint tin to adjust the tension, enough to keep the wing as close to the body as possible, but not too much as to ensure a repeat of the SR-71 undressing itself. In addition to this, I took care of some pretty impressive sink marks in the rear engine sections. These have now been coated in primer. Talking of primer and paint, with such a large beastie on my hands I’ve decided that it may be an opportune time to give this recently acquired gadget a go: It slots on to the neck of the can and via an arm connected to the trigger, presses down on the diffuser. Whilst I am not expecting anything approaching airbrush levels of control, I am hoping that it will allow me to coat primers and maybe varnishes quickly. I am not so sure on the latter, but on first attempts to use, it is certainly allows for more control than the analogue route of just using your finger to press down on the diffuser. Additionally, as I suffer from some arthritis in my wrists, it actually helps here too. As of today I now have the cockpit canopies attached, I’m finding that Ammo Mig ultra thin cement works well for this job, in my experience it has not caused any fogging of clear parts associated with Tamiya cements, although I hasten to add that this is my experience, and my perceived experiences in modelling do tend to crash headlong into reality and bite me in the butt in the process, so treat this advice with caution. With that little lot out of the way, I have started filling some of the pitted areas caused by the delaminating I mentioned earlier. One thing I have done to try and reduce this is to deal with some of the areas where delaminating is occurring by running some Tamiya Extra Thin into these areas. It gets in between the top layer and the main plastic layer, hopefully reducing the effects this head scratching issue has been causing me. Next up is to fill and sand the gaps on the underside and top side of the wing to body joins and well sand those pitted areas that I have already filled. Once that is done I will tackle any rescribing that may be required and attach the Metallic Details nose. To help with alignment I am considering adding some thing plastic sprue in strategic places on the main body. All in all, it is now starting to resemble a Blackbird, that’s if you look at it from six feet away whilst squinting having carved an onion before hand… Still a lot of work to be done. For the main base colour, I’m actually considering using some Mr Surfacer black primer toned down a tad by adding seem grey primer to it. Some experimentation may be required… In the meantime may I take this opportunity to wish you all a Happy New Year and all the best for 2022. May all your paint jobs turn out perfect and decals perform and conform correctly… -
Built at the speed of Mach 3! Lovely end result, I’ll go over your build thread and make notes re the issues you’ve discovered in the instructions if you don’t mind? It’s prove an invaluable document, of that I have no doubt. I’m still soldering on with my now obsolete Italeri SR-71B build. My bench looks like it has a thin layer of snow covering it, but in reality it’s dust from sanded filler…
-
That will be my solution. I’m going to keep the Kitty Hawk one though, if only for future nostalgia.
-
For your agenda - Monday 10th January - 4.PM - Airfix 2022 range launch
March replied to Homebee's topic in The Rumourmonger
If Airfix are going to honour the 40th anniversary of the Falklands War then I hope they do a commemorative Black Buck boxing complete with two Vulcans and eleven Victors…- 338 replies
-
- 14
-

-

-
HABU for learner drivers - Italeri SR-71 1/48 - B or C model
March replied to March's topic in Work in Progress - Aircraft
Additionally I have been having some delamination issues with this kit. Here is and example. I've also started the assembly of some of the other large sections. The rear fuselage sections were best tackled with a 'take it slowly' approach. Attaching the rear tail sections to their respective rear fuselage sections and then slowly glueing the upper and lower sections together. Whilst I waited for the glue to set I turned my section to the engines housings and outer wings. The outer sections of the engine nacelles are known for being a weak point due to there being no mounting lugs, it's a thin butt joint of the upper and lower halves. I decided to line these up as best I could then attach a small strip of thin plastic card. Once this had dried in place I then hit it with Extra Thin until it became gloopy, then using the rounded end of a paint stirrer I smoothed it into the join. The end result will hopefully add some strength to this area and allow for sanding without the two sections splitting apart. I've forgotten to photograph the final part, but will do so once the internal sanding is complete. All in all, it's coming along slowly, and I'm currently mulling exactly how much effort I want to put into this kit, not that it will be added to the shelf of doom anytime soon. Initially I intended to use the Squardon cockpit with this, but given that I intend to have the canopies down and being a B, the Squadron set does not have the Instrustors raised cockpit section, I've decided to go with the kit parts. I have another Testors SR-71 in the stash, as well as a YF-12, so I am thinking I can repurpose for these builds. I still intend to use the Metallic Details nose cone though. Lot sof sanding and filling lie ahead. -
HABU for learner drivers - Italeri SR-71 1/48 - B or C model
March replied to March's topic in Work in Progress - Aircraft
I've made some progress this week, although not as much as I intended to. I had some bad news on Tuesday and that stopped me in my tracks for a few days. Long story short, my partner and myself were looking forward to taking on two adult cats that belong to my neice, unfortunately her circumstances have changed and was looking to rehome the pair of them. My other half and myself were on the look out for a pet and jumped at the opportunity. Unfortunately fate had other plans - the senior of the two cats was involved in a tragic accident and unfortunately, for his welfare, had to be put to sleep. He was a unique character. With everything that has gone on, it's not the right thing to take on the other cat at the moment, it'll only compound my neices grief. It's been a tough week... 😢 So, where are we on the build? Well, I've finished the scribing and have washed the plastic and run Tamiya Extra Thin down the grooves to level them out. Next up I decided to glue the upper fuselage cockpit piece to the middle section of the upper fuselage. This is a butt joint and some dry fitting revealed that this was not going to be a simple excercise of picking a flat surface. The width of the fueselage section was slightly wider than the section I was joining it too. Running through several permutations I ended up gluing the top sections, then once these had set, using a clamp to align the two sections (using the lower fuselage to aid alignment) and glue the rest. The result has led to a tiny step, but this was dealt with with a few minutes of sanding. -
As someone who has a second 'Testors' boxing of the kit sat on the shelf please colour me interested.
-
With the news that the long awaited Revell rendering of the SR-71 has finally started landing at the homes of folks in nations far and wide, naturally there is an uptick in folks wanting to commence builds of this subject matter. In fact three managed to make their way to my abode and I plan to start building one in the near future. Naturally, this has meant that ’ve decided to inflict maximum pain on myself and choose to build the old Italeri SR offering instead. Why I hear you cry? To be honest, there are several reasons. One is that I want to hone my scribing skills and the raised panel lines of the old Italeri kit offers ample opportunity to refine those skills whilst being relatively low on complexity. The second is that I can also use it as a (very large) paint mule to try and test techniques ahead of tackling the Revell. The third reason being that whilst the new Revell tackles the ‘A’ model, the Italeri offers the opportunity to build the ‘B’ and ‘C’ models too. I’ve long had a fascination for this incredible feat of design and engineering. As Mike alluded in his excellent review on this very forum, the Blackbird would still look futuristic if it rolled out of the hanger for the first time today, which makes it all the more incredible to think that this aircrafts gestation can be traced back to the 1950’s. Having accumulated and read many books on the aircraft over the years and even obtained a small piece of titanium taken from the airframe of Super Skater and having a dear friend whose company recreated the mounting pod for the D-21 drone and display stands for the M-21 on display at the Museum of Flight in Seattle and had the opportunity to crawl all over that aircraft (he also obtained the piece of titanium that I have too). For this build I have a small selection of aftermarket, the Metallic Details nose correction set, the Squadron Products cockpit set (I’ll use the pilots cockpit section, the seats and the glare shied). I also have the Caracal Decal sets for aircraft too. I’m somewhat undecided as to which one to build at present. Current thoughts are to do one of the NASA schemes, but there is also an opportunity to do the ‘B*stard’ or ‘two aircraft flying in close formation’ SR-71C. So, first things first, scribing. I’ve made a start and have a good many of the various pieces of plastic scribed. I do not know whether this is unique to the Italeri kit, but I am noting some delaminating of the surface from the scribed areas. I’d say I am around 75% done with the scribing, and have started knocking back the little peaks that the troughs created by scribing create. After that I will use a toothbrush and some alcohol to clean the plastic, then run some liquid poly into the scribe areas to level them out. I’ve read that the build process can be made easier if you glue the top halves of the fuselage together first. Having done a test fit, it would appear that the cockpit section is a little wider than the section that butt joins behind it. I’m thinking that I could use superglue and squeeze the halves into alignment, then run liquid poly to secure the join, or build as per the instructions and break out the filler if needed. Anyway, tools down the time being, the F1 is on…
-
@bar side Nice progress, I’ve made a start on re-scribing mine for a SR-71B build and am noticing what appears to be some weird delaminating evident in the scribed areas. Is this something you noticed too? I’m finding that I can take care of it during the sanding process to knock out the raised edges created during the scribing process, but wondered if this was something you’d encountered when re-scribing yours?
-
A good start. Great to hear that the fit of the two main fuselage halves is a good one, I always have nagging doubts in my mind about two large pieces of plastic going together cleanly when I see kits like this. As I’ve just started re-scribing the Italeri kit ahead of building that before turning my attention to the Revell offering (I know, I know, I’ve never claimed to be sane), I’ve started going through my references. Think I may have enough to start a small library when it comes to this subject matter. I even have a small piece of titanium from Super Skater! I’m tempted to start my own build thread if only so I can share my pain in building the old kit version of the aircraft.
-
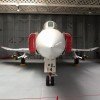
A detachment of SR-71’s has arrived at the March household, Santa arrived wearing a DPD uniform this year! Initial thoughts? Even though dimensions for the box have been published, in my case, it still does not fully prepare you for the size of this kit. I’ll also add that the box is sturdier than previous Revell packaging attempts, with the two main sections of the fuselage packaged on a cardboard plinth within the box, providing a visual ‘ta daa’ when you first lift the lid and avail yourself of the contents. Despite the lower than usual parts count when compared to many kits available today, due to the sheer size of the subject matter there is an awful lot of plastic. Detail, at a cursory glance is a massive improvement over the old Italeri kit, and looks good overall. If I had a couple of very minor gripes, the ejection seats look a bit simplistic and the exhausts nozzles could have more detail, but my view is very likely being informed by the Metallic Details kit which even by 3d printed/resin standards spoils us (but you pay for it). But I stress, these are very minor gripes, if the seats are a big deal for some I’m sure one of the aftermarket firms will soon have something on offer. I’m guessing 3D printed cockpit instrument panels would look fantastic too. Overall, I love what I see, finally a modern SR-71 kit that does the subject matter justice. I cannot wait to start building it, but as I’ve just started scribing one of my Italeri/Testors kit, I’m tempted to go through the pain of building that one first but change tack and build it as an SR-71B as that is a subject that is rarely seen in finished form, then start on one of the Revell kits. BTW, I even wore my IWM SR-71 t-shirt to receive and open the kit. This is peak nerd as far as I am personally concerned…
-
This does nothing, absolutely nothing to quell the anticipation… come on DPD, hurry up… 😁 ‘T’was the night before SR-71’mas, and all through the house, an impatient March strolled, terrifying the mouse, armed with cutters, TET and fresh sanders, in hopes that he’d revel in the, erm, Revell…’
-
Just had an email from Jumblies, my small detachment of SR-71's is ready for despatch and will be with me on Thursday. Sod Christmas Day, Santa arrives wearing a DPD uniform sometime on Thursday... Interesting thought re other boxings. The YF-12 pilots canopy would different, that I know for sure. We can live in hope though (although I am refusing to cross my fingers).
-
There I was in the middle of a strongly worded missive to the museum - but the link does show that they do indeed have an SR-71 cockpit on display which is different to the aircraft I had confused it with, the M-21 (which is the one that it had been arranged for me to sit in). As you were.
-
Apologies for the deployment of the high adenoides, but the aircraft at the Seattle Musuem of Flight is not a SR-71 but an M-21, itself a rare two seat variant of the A-12. I am however insanely envious that you have got to sit in its cockpit, I was supposed to enjoy that experience last year, but unfortunately the Rona put paid to that (as well as, on the same trip, flying to Dayton, Ohio to see the YF-12A - I've made it my mission to see every variant of the Blackbird) A dear friend of mine was heavily involved in getting that aircraft ready for display, his company recreating the pod the the D-21 drone sits on and the stands that secure the aircraft, amongst other things.
-
New Tool Airfix Vulcan 1/72 - Black Buck rebox announced
March replied to Adam Poultney's topic in The Rumourmonger
The sprues are in separate bags. I almost do not want to open any of them, just sit there and savour the fact that each one has it's own dedicated bag. Such an emotional moment, no, hang on, it was trapped wind... What a huge leap forward though, Airfix using individual bags for the sprues - wonders will never cease. -
When asked the scale on Facebook they responded confirming 1/48. Fingers crossed. :)
