Billos Posted November 15, 2023 Author Share Posted November 15, 2023 @Biggles87@Dave Swindell Thanks for that I missed that in the instructions. Now you've told me I've found a couple of pics showing it. 2 Link to comment Share on other sites More sharing options...
AdrianMF Posted November 15, 2023 Share Posted November 15, 2023 On 14/11/2023 at 17:05, Dave Swindell said: step 233 Whoa! I think I'll be sticking to 1/72 a while yet Sounds like a heck of a project. I'm not seeing your pictures (Chrome, Win10) even after a hard refresh. Is it me? Regards, Adrian Link to comment Share on other sites More sharing options...
Billos Posted November 16, 2023 Author Share Posted November 16, 2023 @AdrianMF. No it's not you. see my earlier comment to @Bertie McBoatface It's to do with certificates and HTTPS. Chrome by default wants every link to be https. You can switch that off, or use another browser (e.g Firefox, blessed be it's name!). I'm trying to get a certificate for my site, but there's hoops to jumps through..🦘 Anyway, I've started on the wings now. I put all the ribs in place in one go across the whole wing, even though the instructions tell you to complete one side before the other. But I needed to spray it silver before putting in the ammo boxes, so It was easiest to do all of them... I hope I'm not going to regret that later. So all ribs in place, a quick coat of Canadian Tire's finest automotive silver and we're ready for the ammo..... (Canadian Tire = Halfords+ Maple leaf.🍁) Actually of course not just a quick coat, several thin coats to build it up. Golden Rule: do not attempt full coverage in one coat! Several thin coats is the order of the day for any spraying! 2 Link to comment Share on other sites More sharing options...
AdrianMF Posted November 17, 2023 Share Posted November 17, 2023 I can see all your pictures But it's on my phone, which is Safari... The project looks great, I will continue to spectate on a Billos-appropriate platform... Regards, Adrian 1 Link to comment Share on other sites More sharing options...
Billos Posted November 19, 2023 Author Share Posted November 19, 2023 So, wing interior complete, cannons and guns fitted. I don't know why Airfix doesn't give the cannon barrels... I know they can't be seen, but neither can the gun barrels and they're complete..... ?? And from a model point of view they're the same cannons in the typhoon which are complete., and can't be seen. Another imponderable. I expect some are available aftermarket? Anyway that's day 25 complete. It's not going to be finished by christmas. 🙂 I'm off now for a out of town break for ten days so ta-ta for now.... 2 Link to comment Share on other sites More sharing options...
Billos Posted December 6, 2023 Author Share Posted December 6, 2023 I'm back. Ten day break turned out to be a bit longer than expected......... Anyway next step is to fit the assembled fuselage to the lower wing. After a number of dry fitting practices, I decided the best way was to firmly glue the front first, then proceed towards the rear. 4 Link to comment Share on other sites More sharing options...
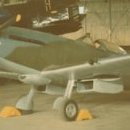
Billos Posted December 7, 2023 Author Share Posted December 7, 2023 Incidentally during my longer-than-expected break I went to the RCAF Museum in Trenton, where they have a Spitfire MKIX, a replica (fibreglass) built in 1990. Good for some general views, but not I think to be relied on as a definitive reference. Mind she looks good in the snow. Note lack of undercarriage doors.... 2 Link to comment Share on other sites More sharing options...
Billos Posted December 7, 2023 Author Share Posted December 7, 2023 Anyway back to the real thing. 😁 Upper wings on. This was where the tiniest deviations from precise fitting became apparent. the port wing was misaligned with a slight gap, while the starboard wing overlapped very slightly the wing root. Some judicious bending and careful pressure and it now fits nice and snug... but just goes to show however careful you think you are, some slightest misalignment creeps in. Still if it's no worse than this I'll be happy. 4 Link to comment Share on other sites More sharing options...
Billos Posted December 10, 2023 Author Share Posted December 10, 2023 Fitted the wingtips, started with some coats of Mr Surfacer 500/1200 on some of the seams and gaps. I am now halfway-through the instructions. But I suspect that's not equivalent to halfway through the build! Next up: starting the engine build! 1 Link to comment Share on other sites More sharing options...
Biggles87 Posted December 12, 2023 Share Posted December 12, 2023 The port wingtip looks like a near perfect fit, but the starboard one looks like it will need quite a lot of work. Strange that this often happens on the same kit. John Link to comment Share on other sites More sharing options...
Billos Posted December 15, 2023 Author Share Posted December 15, 2023 On 12/12/2023 at 02:54, Biggles87 said: The port wingtip looks like a near perfect fit, but the starboard one looks like it will need quite a lot of work. Strange that this often happens on the same kit. John Actually it looks worse in the photo than it really is. A lick of surfacer and some fine sanding should do it. 1 Link to comment Share on other sites More sharing options...
Billos Posted December 15, 2023 Author Share Posted December 15, 2023 ...oh and building with the engine all exposed means you can skip three pages of instructions! Or of course alternatively if you build with the covers on, you'll be finished the front end in three pages ! Mine'll be fully exposed. Can't cover up all that lovely motor. Link to comment Share on other sites More sharing options...
Billos Posted January 3 Author Share Posted January 3 So after a longer than expected christmas break, mostly caused by urgent repairs to my planes that got broken in shipment from Brazil, I'm back on the engine. There are 54 parts to the engine alone, not including the support structures! (for comparison, that's one more than the entirety of Airfix's 1/72 FW190!) I sprayed all the engine parts black before starting. which in retrospect was probably not the best thing because it makes it very hard to see the part numbers on the sprue, as well as when assembling black-on-black parts 😐 2 Link to comment Share on other sites More sharing options...
Billos Posted January 5 Author Share Posted January 5 Engine all finished. Semigloss black allover, dry brushed silver to pick out some details. Shown with pound coin and special Canada $1 for size. I painted the camcovers silver, which I know is strictly not an operational color, but I have a photo of aMerlin under restoration at RCAF Trenton with the unpainted cam covers - probably just an artefact that they haven't painted it yet, but it looks good! 3 Link to comment Share on other sites More sharing options...
Billos Posted January 8 Author Share Posted January 8 Started on the firewall. Does anyone know/have a link for what all the actual, real, parts are? I have been able to find a good couple of pictures of the actual firewall, but can't find a good list of what all the parts are. There are a couple of cutaways I've found but none of them give clear view of the firewall or names of the bits. I've searched here on Britmodeller and though there are a number of topics relating to firewall, none of them (that I've found) has a list. Would appreciate any info. The reason is, I find that knowing what a part is often helps when making decisions as to how to paint it. Link to comment Share on other sites More sharing options...
Dave Swindell Posted January 8 Share Posted January 8 18 minutes ago, Billos said: Does anyone know/have a link for what all the actual, real, parts are? The horizontal bar is part of the linkage from the throttle lever in the cockpit to the carburettor on the back of the engine The pot with the silver cap above it is the fuel filter The oval tank at the top is the intercooler system header tank iirc 1 Link to comment Share on other sites More sharing options...
Billos Posted January 9 Author Share Posted January 9 Assembling the chinese puzzle of the engine bearers and associated pipework....?? Follow the instructions carefully because it's easy to get things in the wrong place. Dry-fitting practice is essential... And don't forget to cut the strut to get the pipe through, as called in the instructions. It is impossible to get it in place otherwise. Believe me, I tried... Link to comment Share on other sites More sharing options...
Billos Posted January 10 Author Share Posted January 10 (edited) Fitted bearers to firewall - fiddly job lining up 8 pins and holes and getting them even and straight. Then put engine in place, fiddled through some other pipework- especially part K55 which looked impossible at first glance, but proved to literally just drop right into place easily. A remarkable engineering feat of alignment and tolerances by Airfix! And now it really looks like a Spitfire! Only 11 more pages, 61 steps and about 120 parts to go! Edited January 10 by Billos spelling 2 1 Link to comment Share on other sites More sharing options...
Billos Posted January 11 Author Share Posted January 11 Fitting the side bearers (L7 & L8) (cowling supports I guess) I notice from many pics online and here that these ribs had what appears to be a leather padding fitted. I guess to stop vibration/chafing of the cover panels. Can anyone confirm this assumption? Anyway, the point is that the instructions tell you to paint these interior green which is correct in as far as it goes, but for extra detail (pedantry?🙂) I used a dark brown pastel to color the surface of the parts. 1 Link to comment Share on other sites More sharing options...
Billos Posted January 19 Author Share Posted January 19 On to assembling the exhausts..... 12 pieces per side.... carefully labelled to keep the sides apart. The instructions don't give an explicit order of assembly, but from experience with the typhoon, I will fit them from the rear to the front. Trying to tuck them in under the 'fishtail' is impossible if you do it front to rear. I'll paint them with a fine wash of copper/aluminium mix to get the bronzed' look. 1 Link to comment Share on other sites More sharing options...
Billos Posted January 22 Author Share Posted January 22 (edited) Edited January 22 by Billos updated picture 3 Link to comment Share on other sites More sharing options...
Billos Posted January 26 Author Share Posted January 26 And with the engine wrapped up, it's on to prep for all the bits hanging off .... flaps and wheels. First though, masked off all the little nooks and crannies for a preparatory primer spray. For the wings, I used the actual gun bay covers as masks, held on with white pva so I can take them off again. Similarly the radio bay hatch which I opened up earlier, I used the now loose radio hatch cover as a mask. Otherwise just plain ordinary paint masking tape cut to shape. 2 Link to comment Share on other sites More sharing options...
Billos Posted January 29 Author Share Posted January 29 Wheels on! Prop prepared, camo template prepared! Starting to approach the faint glimmerings of the distant prospect of a final approach! Yellow prop tip in 1/24 is 4.23 mm. I can't measure that accurately! and I hope no-ones going to get their calipers out! Somewhere else on BritModeller there's a list of scale for prop tips. I apologise that I don't know who put it up originaly, but it's 4" (101.6mm) = 1/18" (1.41mm) in 1/72, 1/12" (2.12mm) in 1/48, 1/8" (3.175mm) in 1/32, 1/6" (4.23mm) in 1/24. And also someone else mentioned (again apologies for not having the citation) "paint the tips first then mask for black", which seems counterintuitive, but having done it a few times now, it really does works best! I will ultimately be gluing the prop in fixed position. I always feel that having "moving" parts always results in unsightly far too wide clearances, not to mention wobbles. It's removeable at the minute for painting. 3 Link to comment Share on other sites More sharing options...
Billos Posted February 1 Author Share Posted February 1 Green! The Tamiya spray can is only good for four very thin spray coats, and I think it actually needs one more. It's a lot of plane! 3 Link to comment Share on other sites More sharing options...
Billos Posted February 3 Author Share Posted February 3 I made full size camo template (photoshop), then cut masking tape to shape. Then first coat of ocean grey, using 'Talento', a Brazilian brand that I had in my stock. Seems very good, good coverage, and smooth finish, that looks like it won't even need a second coat. 2 Link to comment Share on other sites More sharing options...

Recommended Posts
Create an account or sign in to comment
You need to be a member in order to leave a comment
Create an account
Sign up for a new account in our community. It's easy!
Register a new accountSign in
Already have an account? Sign in here.
Sign In Now