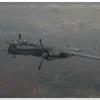
Rangi01 Posted April 28, 2015 Share Posted April 28, 2015 Hi All, This is the first of my multi seat/engined Nachtjagers of the late war. Kit: Revell Me 262 B-1a/U1 (04179) Scale: 1/72 Finished as: Me 262 B-1a/U1 “Red 12” as per the box art belonging to 10./NJG11, no WrNr 111980 Aftermarket accessories: none Decals: Kit supplied with after market swastika Extras: Scratchbuilt Naxos radar aerials. Paints: Interior/exterior. AK Interactive acrylic Luftwaffe set and Tyre black. Upper surfaces RLM 76 base with pencil 'sqiggles', wings RLM 70, lower surface Tyre Black. various detail painting with Tamiya acrylics, oil wash, Future gloss coat and Tamiya acrylic matt varnish. Overall the kit is well detailed with no need to add any extras, even if you were to pose the canopy open, the cockpit is well done. Radar aerials were well overscale so I replaced them with fine electrical wire. Decals went down very nicely, I used Micro Set and Sol to help but do not think it was needed. There are a good amount of stencils which add the finishing touches. With the camouflage I decided that the upper wings and tailplane would have been solid rather than the splinter pattern in the instructions. I based this on 'Red 8' which is in South Africa. I kept weathering to a bare minimum because these machines had very little use before surrendering. Overall a very nice kit and well recommended. In full sun Thanks for looking and hope that you enjoy it. Shane 15 Link to comment Share on other sites More sharing options...
Pawel Szczudlyk Posted April 28, 2015 Share Posted April 28, 2015 Nice,really nice. I like the camo. How did you pait it? Well done Link to comment Share on other sites More sharing options...
Reserve_22 Posted April 28, 2015 Share Posted April 28, 2015 Nice witch pencil have you use? Link to comment Share on other sites More sharing options...
kira666 Posted April 28, 2015 Share Posted April 28, 2015 Though rather cheap, the Revell kit is so good as the Hasegawa one. The Heller kit is now obsolete. Nice work Link to comment Share on other sites More sharing options...
Mitch K Posted April 28, 2015 Share Posted April 28, 2015 Lovely work! Link to comment Share on other sites More sharing options...
mikesmodels Posted April 28, 2015 Share Posted April 28, 2015 Amazing work. Link to comment Share on other sites More sharing options...
batcode Posted April 28, 2015 Share Posted April 28, 2015 looks great, nice job Link to comment Share on other sites More sharing options...
The James Posted April 28, 2015 Share Posted April 28, 2015 Great work on the fuselage camo, it looks outstanding! Link to comment Share on other sites More sharing options...
Duncan B Posted April 28, 2015 Share Posted April 28, 2015 Nice work, the squiggles work really well. I made the same kit quite recently but used some photos and a colour profile of Red 12 as reference for the colour scheme. They agreed that the wings were most likely a solid single colour. Duncan B Link to comment Share on other sites More sharing options...
Spitfire31 Posted April 28, 2015 Share Posted April 28, 2015 Very clever camo idea with the pen! The result is really pretty, but I have to say that to me it doesn't look very similar to any actual Me 262 night fighter camo that I've seen on period photos. Maybe a lighter grey and a wider tip would get it nearer to the impression of the original? Inventive modelling! Kind regards, Joachim Link to comment Share on other sites More sharing options...
steveinns Posted April 29, 2015 Share Posted April 29, 2015 Fascinating pencil camo, what a great idea ! Link to comment Share on other sites More sharing options...
GREG DESTEC Posted April 29, 2015 Share Posted April 29, 2015 Great 262. Love the idea of using the pen or pencil for that squiggle camo - nice one :thumbsup2: Link to comment Share on other sites More sharing options...
Rangi01 Posted April 29, 2015 Author Share Posted April 29, 2015 Thanks for all the (mostly) positive comments guys, appreciate it. Using a pencil (Sorry Reserve_22 I don't know the type of pencil as it has no markings on it and I bought it a long time ago, but it is a fairly soft, dark one if that helps) was very much an experiment trying to replicate the way the painters applied the squiggles in real life (however in the negative as it is the lighter colour that was painted as a the squiggle). At normal viewing distances it looks realistic, but closer up you can see it is simply drawn on so the technique still needs a bit of work. I have a Uhu that will more than likely have the squiggle scheme and I will see if I can improve upon this. Thanks again for looking and the comments. Shane Link to comment Share on other sites More sharing options...

Recommended Posts
Create an account or sign in to comment
You need to be a member in order to leave a comment
Create an account
Sign up for a new account in our community. It's easy!
Register a new accountSign in
Already have an account? Sign in here.
Sign In Now