Search the Community
Showing results for tags 'Havoc'.
Found 19 results
-
 After the Ka-52 (link), Arma Models is to release a 1/48th Mil Mi-28N "Havoc-B" 3D printed kit. Source: https://m.vk.com/wall-114983756_398946 First renders V.P.
 -
Hong Kong (HK) Models Co Ltd has just announced they will attend the IPMS Scale Model World in Telford with a Douglas A-20 Havoc/Boston flight formation picture... A clue ? Wait & see. Source: https://www.facebook.com/hkmmodels/posts/pfbid02wxtM6bS7UkbaG4fYee2s8AAkegtpvHxYQEDKVvwC3rjoPpNtvt6Pin7ztfoGf5SEl V.P.
-
Thanks Luis Pacheco - link . Worth a dedicated thread ! A strong rumour coming from Moscovia: Zvezda has a 1/48th Mil Mi-28 "Havoc" kit in design. Nonetheless Zvezda is reported having decided to give now the priority to its 1/48th Ka-52 project - thread link To be followed. Source: https://dzen.ru/a/ZM4FGUonYhvCyrvu?share_to=vk&utm_referer=away.vk.com V.P.
-
P-70 “Dusty”, 6th NFS, New Guinea, 1943 P-70 was a night fighter version of A-20 Havoc light bomber and it was used to test night fighter tactics before the first dedicated US night fighters (P-61 Black Widow) made an appearance. Plexiglass nose was painted over and radar installed - also extra weapons installed in the underside gondola. The kit is by High Planes and let me tell you it was not easy. There are lot of things missing (like the wheel wells are completely empty) and not all things line up perfectly etc. but I'm still relatively happy with the result, considering the starting point. But for my next Havoc, I think I will try the MPM/Special Hobby kit instead... 😄 Painted with Vallejo acrylics and weathered with Flory Models washes. WIP here:
-
Takom/Snowman Model is to release a 1/35th Mil Mi-28N Night Hunter/"Havoc" kit - ref. 2610 & SP2610 Source: https://www.facebook.com/permalink.php?story_fbid=pfbid02NjYWBjfzR5kXBio9ohEhmkvYBZBKi7QnV2LvSrJwZudfkHpGNgvhTMEJ1sn7ZZQKl&id=100057593795167 V.P.
-
Out now, and chock full of the usual detailed close ups and big colour profiles. Check out the insides at www.wingleader.co.uk.
-
- 1
-

-
- Douglas Boston
- Havoc
- (and 1 more)
-
 A-20A/B/C/DB-7C Havoc/Boston "Early Gunships" 1:72 Special Hobby The A-20/DB-7 Havoc, known in Royal Air Force circles as the as the Boston, was a light bomber developed by the California-based Douglas Aircraft Company. Designed to a US Air Force specification issued in 1937, the aircraft’s first customer was actually the French Air Force, representatives of which had been impressed by its performance whilst visiting the USA as part of a pre-war purchasing commission. Those aircraft not delivered to France by the time the armistice had been signed in 1940 were taken up by the RAF instead. The Soviet Union was a major user of the type, with the Soviet Air Force and Soviet Naval Aviation acquiring nearly 3000 Bostons before the end of the war. The Kit It Was back in 2009 first iteration of this kit was released under the MPM Production label. The kit has been re-released about 20 times since then, including a re-box of the Boston Mk.V by big boys Revell. This time around the kit includes extra parts in resin, plastic and photo etched brass for earl;y gunship versions featuring extra guns in the nose. Inside the box are the usual five sprues of grey plastic and two sprues of clear plastic (the original sprue plus a new sprue for the turret transparencies. Together they hold over 160 parts, which is very respectable for a kit of this size. The mouldings look crisp and clean and there are no flaws in the plastic as far as I can tell. Surface details are comprised of fine, engraved panel lines and convincing textures on the rudder and horizontal tail. Although Special Hobby have had their money's worth out of these moulds, they seem to be holding up well and the overall impression is pretty good. The cockpit is rather well-appointed for a kit in this scale. It is made up of a floor, seat, rudder pedals, two-part control column, instrument panel, sidewalls and bulkheads. Details on parts such as the instrument panel are picked out with fine, raised details. The bomb aimer/observer position is just as good and includes a very nice bomb sight. The rear gunner's position is just as good, with nice extra details such as spare magazines for the lower defensive machine gun. The engine nacelles are made up at this point also and put aside for later. Once the fuselage halves have been joined together, the wings and horizontal stabilisers can be assembled and fixed to the fuselage. Unlike some limited run kits, the parts have location tabs and slots to help ensure a positive fit. The prominent nacelles, which house the large Double-Cyclone engines, are each made up of seven parts, while the engines themselves are made up of three parts – two rows of seven cylinders and the reduction gearing. They are nicely detailed and should look good once assembled. New resin cowlings are included for some of the decal options. The undercarriage looks well detailed, but frighteningly complex. Each of the main gear legs is made up of no fewer than six parts, plus the wheels themselves. I would recommend taking great care over these stages in the instructions as you don't want to end up with a wonky aeroplane when you come to rest it on its boots. The main gear legs actually fit directly to the wings, and it is possible to fit the rear engine nacelles over these parts afterwards. This should make things a little less frustrating as you will be able to place the parts precisely rather than having to stuff them inside a cramped undercarriage bay, but it will obviously make the task of painting the model a little more laborious. The remainder of the build is concerned with the addition of the transparent parts and some fine details such as the the radio antenna and propellers. The transparent parts are thin and clear and shouldn’t present any problems, although I have not been able to check to see how well they fit at this point in time. Different parts for the different nose gun options need to be fitted into the nose the decal option being modelled. Side blisters with additional guns are also added where needed. Decals Markings for five aircraft are provided on the decal sheet. A-20 13357/14 "Dirty Gertie" 47th Bomb Group, Tunisia 1944 A-20A 0166/13 "Little Hellion" 89th Bomb Sqn, 3rd Bomb Group, Port Moresby, 1942. This aircraft crashed and was repaired, later it was renamed "The Steak and Egg Special" As above but sporting the "Steak and Egg Special" Officially a non existent airframe re built from 2 crashed aircraft (and bits of others including Japanese ones) by mechanics. Again as above but stripped of its camo., and polished, the name was shortened to "Steak & Eggs" This aircraft then crashed of Low Wood Island Australia, where the wreckage remains to this day. Boston III, RAAF A28-9 "She's Apples" The decals are nicely printed and look quite thin and glossy. Conclusion This is the only modern tooling of the Boston in 1:72 scale, so it’s fairly easy to recommend it to modellers interested in adding the type to their collection. It looks good on the sprue, although opinion seems to be divided as to how easy it is to build. Some people have reported fit issues whilst others have stated that the kit practically falls together. Nevertheless, it is still the best Boston out there and with the interesting twist of the new gunship marking options, it can be firmly recommended. Review sample courtesy of
 -
Special Hobby is to release in June 2016 a 1/72nd Douglas A-20B\C Boston with a UTK-1 dorsal turret kit - ref. SH72337 Source: http://www.specialhobby.net/2016/05/sh72337-20bc-boston-with-utk-1-turret.html V.P.
-
 A-20G/H/K/J Havoc/Boston Mk.IV/V Resin Upgrades (4726 & 4727 for Special Hobby) 1:72 CMK by Special Hobby These two sets are to upgrade the detail to Special Hobby’s 1:72 kit, with modular upgrades that require minimum alteration to the kit parts. Both sets arrive in the yellow-themed blister pack with card backing and instructions supporting the resin and Photo-Etch (PE) parts from harm, with a further acrylic sheet provided to prevent denting of the PE parts by the resin jostling during transport. Interior Set (4726) This set includes 10 resin parts, a small fret of PE and a slip of pre-printed acetate sheet. In preparation for insertion, the fuselage sides should be sanded or scraped thin to accommodate the sidewall detail parts, which is best done before main assembly. The cockpit is made up on a stepped two-part platform, with instrument panel and PE/Acetate sandwich applied to the front, PE rudder pedals, resin and PE control column, pilot seat with PE belts and a dinghy pack to the rear. The kit front bulkhead and nose gear bay are attached, then with the aforementioned sidewall details pre-fitted, and an insert to the sides of the dinghy bay added, the new cockpit can be fitted between the fuselage halves, with a small PE sight added to the windscreen hoop. Gun Turret (7427) This set increases the level of detail in the fuselage under the mid-upper gun turret, as well as replacing the kit guns with new more detailed resin parts. Again, the fuselage where the bay will be placed needs scraping thin to accommodate the bay, which is made up from an L-profile floor, two large side parts with another two small parts adding length and detail. The turret itself is augmented with the guns, plus turret base and curved part over the top. The kit’s glazing is utilised to close-in the new detail. Conclusion The devil’s in the detail, and at 1:72 these sets will make quite a difference to the finished model, begging to be shown off. Highly recommended. Review sample courtesy of
 -
Kitty Hawk has a 1/48th Mil Mi-28 "Havoc" kit in project/design - ref. KH???? Source: https://www.facebook.com/groups/369828906819827/permalink/668836086919106/ 3D renders V.P.
- 12 replies
-
- 3
-
-
- Mi-28
- Kitty Hawk
- (and 1 more)
-
Hi mates, I finished this one a few days ago, one of my favourite planes. This model from Special Hobby is very nice detailed, with almost a very good fitting, and came with nice PE from Eduard. I added some scratch and wires and some rivets with my Trumpeter's riveting wheel. I enjoyed it a lot and I hope you like it... Cheers Ricardo
- 35 replies
-
- 41
-
-
- havoc
- MPM Boston
- (and 1 more)
-
 Hi all, here is my new 1/72 MPM Douglas A-20G Havoc "la france libre": Construction: MPM has created a superb kit in 1/72 for the Douglas Havoc / Boston variants. In 2008 i brought the D-Day Havocs kit variants with the solid gun nose. At first, I wanted to build OOB, but after a while, some details were added scratch: Cockpit: Life raft and details Nose: Brass MG barrels (accessory), fuselage reinforcement, MG ejectors Fuselage: Rudimentary fuselage installation, rear exit Turret: Entire tower structure, brass MG barrels (accessory) Engines: Cables, valve lifters, exhaust pipes, slightly opened cooling flaps Charger: Inlet details, open outlet Gear: Brake lines, resin wheels (accessory) With some creative breaks, I worked on the model for almost 6 months. Original aircraft: My model, the "la france libre" was the first Havoc in Europe with 100 successful mission missions and was called "Miss laid" for a long time. The plane was sent to Paris in the autumn of 1944 for the French liberation celebration as a part of an exhibition and renamed for this reason. Most of the Havocs were heavily weathered. Source: worldwarphotos.info Finish: I wanted to transfer the impression of the original photo above to my model. The paintjob was started as standard for me on an Alclad Airframe aluminum primer. After that preshading, three glazing layers per colour, painting scratches with a silver pin, masking and painting of the walk-ways, masking, painting and weathering of the invasion stripes, intermediate finish with future, decals, washing, painted exhaust gas traces, dust oil paints, chalks etc. etc. Walkaround: Bottom: Details: I hope you like my model. Criticism, notes, and comments are gladly welcome. Kai
- 33 replies
-
- 58
-
-

-
HpH is to release in 2017 a 1/32nd Douglas A-20G Havoc resin kit. Source: http://forum.largescaleplanes.com/index.php?showtopic=28641&p=801592 V.P.
-
 In late 1943-1944 771 Squadron FAA based at Twatt in the Shetlands, was issued with a number of Boston and Havoc aircraft, mostly Turbinlites, for use on radar calibration and target simulation purposes for Home Fleet units preparing to deploy to the Pacific. One of these was Havoc II AH507 "T8A" (Sturtivant calls it a Boston II but I think he is wrong on that). Air Britain does not record it as one of the many aircraft from that particular Havoc batch converted to Turbinlite configuration and it had previously served with 85 Sq so I conclude it was one of the aircraft fitted with the Martin-Baker 12-gun nose. In Sturtivant's FAA Aircraft there is a photo of this aircraft, taken from the starboard rear quarter, after running off the runway into mud on 8 November 1943. It is very useful for many details, including the nacelle configuration, but the nose is not visible. Question 1: is anyone aware of any other photos of this incident, preferable showing the aircraft nose. I am assuming that the redundant AI radar has been removed (it clearly has been from the less camera-shy Turbinlite aircraft) but am unclear whether the gun muzzles would have been left open, doped over but still visible or plugged. Question 2: since the chances of a positive answer to q.1 seem very slim, is anyone prepared to speculate on the most likely option? Are there any photos of other 12-gun Havocs on second -line duties late in the war? My inclination is to think that on an aircraft operating from one of the wettest places known to man any superfluous orifices would have been securely plugged against the all-pervasive damp. For me it would be easiest for fill all the gun apertures but my hair-shirt mode says I ought to drill all 12 of them out. Any leads/thoughts?
 -
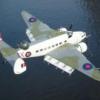
A Google search on "Helmore Turbinlite" has thrown up this picture of a Turbinlite Havoc. https://www.google.co.uk/search?q=helmore+turbinlite&tbm=isch&source=hp&sa=X&ved=2ahUKEwjGs4ThtcDgAhVsVBUIHeLeA1wQsAR6BAgEEAE&biw=1536&bih=747#imgrc=uiXMuMRBynh5pM: You will note that the aircraft is in the later Medium Sea Grey/Dark Green camouflage rather than the more normal black. There are also 3 men in the foreground parading with a flag. I think that I have seen a captioned version of the photo before and that the gentlemen are Polish. Can anyone identify where and roughly when the photo was taken? I am wondering if it is one of the Turbinlites used by the FAA (eg 771, 772 Sqs) as fast targets for units working up to serve in the British Pacific Fleet. Any details on the aircraft itself would be wonderful but probably too much to hope for.
-
Canopy Masks for MPM Douglas Havoc Turbinlite (X72014) 1:72 MH Masks via Special Hobby This is a set of the masks for the MPM (now Special Hobby) 1/72 Douglas Havoc Mk.II Turbanlite kit. The kit has extensive glazing which will be difficult to mask in 1.72. These masks from MH Models should help. They are of the vinyl type. Conclusion Sometimes kits can benefit from masks, and this is one. Recommended. Review sample courtesy of
-
I am looking for info on the recce fit of the Douglas F-3A Havoc. I want to start on my conversion of the AMT/ERTL 1/48 A-20J, and do a bird from the 155th Night Photo Sqn, 10th PRG. I plan to do either "Sleepy Time Gal" (preferred) or "Starize", using the AeroMaster decals. I did a search here on Britmodeller, but found nothing (Flaky search engine?). What I am looking for is info (Drawings/photos) of the camera fit & location, including the Edgerton Lamp (SP?). I have found some written info on the equipment fit, but not specific enough. I could either do the Edgerton fit, or load up the bomb bay with photoflash bombs, even though the latter would require much more scratch building/converting. I am also looking for confirmation of whether the plane would still have the upper gun turret, or a clear dome, or just faired over. If you have info, but don't want to post the photos/drawings online, you can email me direct at lengesath(AT)cox(DOT)net. Larry
-
Good day, gentlemen. It's my next model.
- 13 replies
-
- 44
-
-
-
Hello All, As part of my garage clearing and stash organising (260-odd, if you are wondering), I came across some old-old models of my Dad's, from WWII. Here's a "Grace Airplanes" kit, including "everything you need to build the model", including paint, bamboo, and pins: You even get spare wood! Here's a Hudson: I also have an "Airlines" kit. This seems to be a bit more basic, shown here next to the new Airfix Defiant to show that things have progressed a leetle bit: Not a scrap of balsa in sight! Presumably it was all going into 1:1 Mosquitoes at the time. Paint of the day was based on a cellulose dope formula: One of them was even liquid! The brown, after a lot of stirring, came out quite well: Although then, as now, nobody quite agreed about Sky: My Dad had got quite a long way through a Havoc build: So I thought I would continue it in keeping with the spirit of the build. It was going to need crew - these fellows are carved from a lollipop stick. Any similarity to Captain Pugwash characters is accidental! Although the plunge-formed canopies from the time (on the right) are still very usable, I made a new plug from balsa to fit the model better and vac-formed some new ones (on the left): Detail was limited to a pair of Brownings, from wood and pins: I painted the whole airframe black from a tube of acrylic and applied the decals. The fuselage decals went on perfectly! I knew I was going to have trouble when the wing and tail decals started drifting into pieces on the sheet. I applied them by placing my thumb on the decal and pulling the paper out from underneath. I teased the various broken bits back into position and touched up the missing bits. I am unable to say how well they conformed into panel lines... A coat of matt varnish and done! It was quite nostalgic to take part in a posthumous joint build, so here's to my Dad: Thanks for looking, Adrian
- 13 replies
-
- 23
-