Search the Community
Showing results for tags '737'.
-
Revell 1:144 Boeing 737-800 Helios Airways This one fits into my collection of aircraft 'seen at Manchester', mainly because I love the colour scheme. Decals are from BOA, and it features the 737-800 of the ill fated Helios airline. They suffered a dreadful accident with one of their 737-300 series machines, and unfortunately they are no more. The kit was an early edition of Revells 737 in the Hapag Lloyd boxing without the winglets, which was just as well because this aircraft didn't have them. I hope you like, it is a belter of a livery! 'With something else' another 737-800 this one with the winglets, in another of my favourite schemes. For anyone who has this decals sheet, there is something to beware of, the tail decal was slightly undersized. Ok, there is a silver leading edge to go on the fin, but it was still a little small and I had to touch in with paint on the trailing edge. Great to see so many nice 737 posted on RFI recently, keep them coming! Cheers John
- 19 replies
-
- 20
-

-
Here at last is the third part of my 737NG conversion trilogy, lagging a long way behind the 736 and 739 which I finished last year. It is, of course, a cut down Revell kit fitted with the wonderful BraZ engines. As with the 736 and 739 I shortened the undercarriage legs to improve the sit. Paint is Halfords Appliance White and Racking Grey with Xtracolor X324 for the orange bits. Natural metal is done with various Tamiya and Revell metallics. Decals are a mixture - titles and registrations from Scaleliners, fin titles from a TwoSix A319/320 sheet (I dislike overall fin decals which is what Scaleliners provide), windows from Authentic Airliners and details from the kit sheet. All I have to do now is build a 737-800 straight from the box! Thanks for looking and as always constructive criticism is welcome. Dave G http://SAM_0853 by David Griffiths, on Flickr http://SAM_0856 by David Griffiths, on Flickr http://SAM_0859 by David Griffiths, on Flickr http://SAM_0860 by David Griffiths, on Flickr and with its predecessors both of which have been retrofitted with AA windscreens .... http://SAM_0866 by David Griffiths, on Flickr
- 21 replies
-
- 30
-
-
I built this on and off for about a year, with extensive pauses because of unforeseen circumstances and health issues. Eventually got it done though, and then found out about a local modeling exhibition and entered it. You can see the build thread here, although most of the decaling process is not very well covered. I managed to put the left side windows onto the right and vice versa, which led to some pretty extreme moving around and cutting out of windows to save the build. A few of decals, especially parts of the thin red cheatline, refused to stay put, which warranted the use of diluted PVA glue to keep them in place. Metallic leading edge decals on the tail and horizontal stabilizers went on fine, but the first one I tried to apply to the wing (there are two massive one and two small ones per wing, I tried one of the big ones) crumpled up and partially disintegrated almost immediately. I ended up masking off and drybrushing all of the leading edges on the wings and winglets. The winglets, by the way, were left uncorrected, as I didn't want to overcomplicate my first (proper) build. Here are the photos: The modeling exhibition I mentioned earlier - Mini MAKS 2016 (MAKS being the bi-annual airshow which happens just outside Moscow) - ended two days ago, and it turns out that my 737 got 3rd place in the under-18s category. I was quite happy about that, especially considering that the prize was two new airliner models. Having never applied so many decals on such a large plane (my actual first model was a Zvezda 1:200 Ju-52 with, like, five decals), I had no idea how to make them set properly. This led to quite a lot of decal silvering. I have no idea how to prevent this in the future, so...any advice?
- 14 replies
-
- 14
-
-
- air berlin
- boeing
- (and 5 more)
-
Boeing 737-400 Pics thanks to Graeme H
-
Boeing 737-700 Pics thanks to Graeme H
-
Hell fellow modellers. I have finally completed my Norwegian Air Shuttle fleet. A project that has lasted me far too long. The first model being the Revell 737-800, LN-NOL, was finished back in November 2012. The -300 was completed back in January 2014. Now, two years later, the Dreamliner is complete. My target back in the days, was to model one of each plane type in the 2012 fleet. The -300 has now been withdrawn from service. The Dreamliner has switched registration, so its now on norwegian registration; LN-LNA, and accordingly, the 737-800 has changed from LN-NOL to EI-FHC. The Norwegian Trio by Robin Matcham, on Flickr Norwegian Long Haul 787-8 EI-LNA by Robin Matcham, on Flickr Norwegian Air Shuttle 737-3Y0 LN-KKR by Robin Matcham, on Flickr Norwegian Air Shuttle 737-8Q8 LN-NOL by Robin Matcham, on Flickr After being three months in the Phillippines with work, I have now returned to Denmark and should be able to complete some more models in the near future. Robin
- 14 replies
-
- 29
-
-
 It's been a while since I've built Revell's 1/144 737-800 and I fancied a 'quick build' after the nightmare of Revells 1/48 F-5F This one has been built almost oob, the only change being replacing the kit engine fans with home-made decals on plasticard. The main decals were from Gio (the Nok Air scheme) and Authentic Airliners (fuselage windows). The model was hand painted using Model Color acrylic for the orange, Tamiya X2 acrylic for the white, Humbrol 85 acrylic black, and Xtracolour enamel greys for the wings. I also painted the yellow beak rather than the Gio decal to avoid inevitable decal wrinkling and creasing around the complex nose curves. I've not used Gio decals before - lets face it, they're not easy to get hold of, but a word of warning: check your references carefully before using them as I found a major error in this set. Gio has printed the Nok logo (yellow beak on white disc) with the beak mirrored so that it always faces forwards i.e it would be different on the port and starboard sides. This, however, is not correct as the Nok beak always points to the left and is therefore the same on both sides of the airframe. Luckily the decal sheet has 4 options of Nok aircraft so I had enough correct-facing logos to build this model. I will need to make some replacements though if I want to do any of the other options from this sheet. Another error is that the white Nok telephone number font (forward fuselage below windows) is too small. This is also the first time I've used Authentic Airliners windows, but I understand now why everyone raves about them - they really look nice. Anyway, hope you like
- 12 replies
-
- 23
-
-
Hello guys. That´s my last for 2015, a 737-800w in a special Gol scheme, celebrating 10 years of the airline. Kit Revell, almost out of the box, except the winglets. Decal Gio Decals.
-
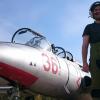
 1:144 Boeing 737-200 Busy Bee. Lima November decals. I saw this humourously liveried Boeing 737-200C parked on the ramp at Oslo Fornebu airport back in 1986, and thought 'I would like to make a model of that', so 30 years on, I have! I started with the old Airfix kit of 1969, and decided to see what improvements to could be made to it. These came down to: - Replace the cockpit glazing with the part provided in Daco's 737 kits. - Scratchbuild some interior detail for the cockpit - Open up the main and nosewheel bays, which are just shallow opening on the kit - Improve the engines. They are too short in the kit, and have the early 'skinny' pylons only applicable to the first 100 or so machines produced. - The passenger cabin windows are just little square shapes. I filed the all top and botton to open them up to oval shape. 2 were filled in and re-done further apart to allow for the cargo door. - This aircraft was equipped withe the 'Gravel kit' for operation off rough fields and gravel runways. Basically this is a large deflector plate fitted behind the nose wheels, and some pipes feeding compressed air forwards from the engine nacelles to blast any FOD away from the intakes. The nose plate stays horizontal all through the retraction cycle as the leg retracts forward, and ends up in its own housing grafted onto the lower nose. There is a great youtube of one landing and taking off on Youtube here Just look at all the crud kicked up! This is actually the second 737 that I have applied these mods too, the fiirst (in Air Europe livery) is complete but I have not posted it yet as I am making a diorama, and painting the little passengers walking out to it is taking ages! Some of the scratchbuilt parts Cockpit and crew painted up Nosebay on an unmodified kit, and the modified/scratched parts Noseleg additions. Done by eye from internet photos, as I could not find drawings Main gear bay. Just a blank on the standard kit, looks so much better opened up; Engines after accurising/improving. Lengthened with a section from a 1:48 bomb (covered with a band of white filler), and pylons fattened with plastic sheet & Milliput; And finally 'with something else' - the other 737 waiting to be finished. I did even more on this one, opening up the front & rear galleys, and luggage bay, and integral front airstairs. It also has all the mods I did on 'Busy Bee' apart from the gravel kit. Special thanks to Skodadriver Dave who very kindly sent me the Daco clear cockpit sections & the frame decals for them, and enabled this project to go ahead. Happy new year to all, and thanks for looking. John
- 21 replies
-
- 33
-
-

-
 Authentic Airliners produce a series of all resin airliner kits which are considered by many to be the best and most accurate on the market, although quite pricey. I met Authentic's creator - Kurt - at Telford last year and his enthusiasm for the detail in his kits is quite exceptional. This is one of their Boeing 737NG series, the 737-900 which is the longest stretch of the iconic 737. There are few parts in these kits so assembly is pretty straightforward. However there are no instructions for the landing gear or etched parts so reference to walkaround pics is essential. Among the few operators of the 737-900 in Europe is Turkish Airlines who fly them into UK airports. With no decals yet available on the market, I've self made a set using graphics available on the Airline's website. The detail decals for doors and windows etc. are by Daco. I've also built the shortest version of the 737NG, the 737-600 in SAS Scandinavian colours who are now the only European operator of this type. Decals are from Liveries Unlimited and the SAS colours are Xtracolor paints. And the two versions together to illustrate the size difference. In my view Authentic Airliners well deserve their excellent reputation. Thanks for looking. Tim
- 12 replies
-
- 13
-
-

Airfix Boeing 737-200 Brittania Build 1:144
Hamdhan777 posted a topic in Work in Progress - Aircraft
Hello, After my spitfire (http://www.britmodel...e-starter-mkia/) I'm going to do my second build ever, my first airliner ever. Quite excited for this one. I'll be making the Airfix 737-200 in Brittania Airways colours. As I'm a beginner I'd ask for all the help you guys can give me The unboxing of the kit is here: Tomorrow I'll glue the fuselage halves together and begin construction. I am planning to fill the windows with UHU and maybe cover it up with some Revell Plasto to make it solid (Thin layer of Plasto on the outside with UHU clear glue on the inside part of the windows to reinforce it). What do you guys think? I'll then slap on the window decals later. If anybody has any tips before I even start, please share your knowledge oh wise ones! Wish me luck! Hamdhan -
Hello everyone, This is my first building report on this forum. I am building the standard Revell Boeing 737-800, but with the quite extraordinary 'Flying 101' paint scheme from Kulula, a South African airline. I will fill and remove the panel lines on the fuselage as an experiment to see if that looks good, and maybe I will draw some of them back on with a pencil after painting. I'll leave the lines on the wings as they are, though. The winglets in Revell's kit are horrible, but I have not used aftermarket replacements. I simply made them a bit slimmer and didn't heighten them. I am also aware that the cabin windows are molded too low on the fuselage, but I like to leave the windows open instead of filling them so I'll just have to accept that. Now for my work so far: With a few layers of primer... I think I'll do it again with grey primer to get an even colour, and then with white again. I put some pieces of stretched sprue in the back of the engine to make it a bit less empty and monotone. And I also filed the fins on the sides of the engine to make them thinner
-
I've been having a tidy up weekend trying to complete all those 'nearly finished' models lurking around the workbench, and there are about 8 of them. I had two 737's that were almost finished in the Christmas holidays, and have been waiting for the final bits. I have been working my way through building one of each of the New Generation Boeing 737's, which is a complete redesign of the classic Boeing 737 100, 200, 300, 400, and 500 series airliner. It features new engines, new wings, tail and undercarriage amongst other things, and has very little in common with the Classic. The NG starts with the shortest variant, the 600, and has a progressively larger fuselage through the 700, 800 and 900. Revell do a kit of the 800 which is not bad but requires mods to the engines and winglets, and the window line is too low so they need filling and repalcing with decals. To make a 700 and a 900 I used two kits cut up at the same time. Basically what you do is cut one fuselage into 3, making the cuts close to the leading and trailing edges of the wing. On the other fuselage you make the cuts as far from the wing as you can. Then by swapping the two centre sections, you have a long fuselage and a short fuselage. Obviously you do it by accurate measuring, I'm only trying to simplify the description here. (Edit - All 4 models here are built from the Revell 737-800 kit, with shortened/lengthened fuselages) Anyway, I ended up with a 700 and a 900 series fuselage. Both were built side by side. The 700 has Skyeurope decals by Boa Agency. That paint job involved a lot of fiddly masking, the blue, white, and red fuselage & engines are all masked & sprayed. For a while they featured famous Slovakian beauties, this one is Adriana Karembeu The 900 is in KLM coluurs using Draw decals, and very good they are. Here they are, for comparison I have included previuosly build 600 and 800 models. The 700; Biggest of the lot, the 900; An 800 in Kulula livery, Draw decals. The shortest of the lot, a 600 in SAS livery from Lima November decals Not easy to photograph in a line up, apologies for the poor pictures. Left to right 900, 800, 700, and 600. Thanks for looking, John
- 31 replies
-
- 14
-
-
Qantas 737-800's 1:144 Draw Decal One of the most attractive airline liveries of recent years has in my view been that applied to the Qantas fleet. The A380, 747, 767 and 737 all look very clean and uncluttered, with that big red fin flash and 'Roo making them instantly recognisable. Draw decal have released a set for the Revell 737-800 kit in their 'Digital Silk' range, covering most of the 738's that Qantas have used. The printing is, as always, razor sharp and neatly laid out on the sheet, on continuous carrier film. No fewer than 32 different fleet names and registrations are provided. A nice touch is the inclusion of two sets of Roo decals to apply one on top of the other and eliminate any chance of the underlying red paint showing through. The leading edges of the red have a thin gold pinstripe, the two lengths on the sheet being more than enough. Red areas for the winglets are also provided, but as the Revell kit has undersized winglets it is easier to paint them after correction. It is important to follow Draw's instructions. The constant carrier film requires that you need cut around each decal individually. Here is how my sheet looks after all the subjects have been removed with a no. 11 blade. It can then be dipped in water, and applied to the model as normal. After allowing 10 - 20 minutes for the decal to grip, a cloth dipped in hot water can be pressed over it to blend it in to the surface. I used a sheet of kitchen paper folded over many times, dipped in hot water from the kettle, being careful not to burn my fingers! The decals will the conform to any curvatures, and stick like limpets to the surface.As with all types of decals, a coat of Kleer/Future will seal them in. More info here Conclusion. Another lovely sheet from Draw, of a livery I have long wanted to have in my collection. Having now built and applied these to a Revell 737 I can confirm that they go on beautifully and make a lovely little model.(In Ready for Inspection) Review sample courtesy of
- 3 replies
-
- 4
-
-
- Qantas
- Draw Decal
- (and 2 more)
-
-
Well if Jessica can get a new 'Airdo why not scruffy ol' me? Nothing to say beyond cool decals that were a bit thick but no real problems. Wonderful way to keep the mojo flowing and practicing masking skills. Took one look at the gazillion miniature wheels and UC legs and reached for the kit supplied stand. Didn't fancy masking hubs that are 1.5mm. A simple fun build using Alclad and BMF chrome for the leading edges. Great little kits, picked them up for $5 each for three in a recent sale. And now it’s Photoshop time! Cheers and happy styrene bashing, Anil
-
Hello all, Whilst I still have to finish my Spitfire build, thought I'd purchase more models ahead of the Christmas rush! Was so excited when I picked up the intercom and heard "Hello, I have a package for your flat." I did a very quick celebration and ran down to get my stuff. My first airliner scale model kits ever! Anyway, the unboxing of these kits is here: Around mid-late December is when I'll be building these, so do stay tuned! Hope you enjoy it! Regards, Hamdhan
-
Boeing 737-200 1:72 BPK Whilst Boeing was achieving considerable success with the larger 707 and 727 in the 60’s, development of the BAC 1-11, DC-9 and Fokker F.28 were progressing well to serve an anticipated need in the world market for smaller aircraft on short haul routes. In 1964, Boeing proposed their intention to tap into this market. To keep timescales down, they proposed a design that would use 60% of the structure and systems of the 727 which would also benefit by keep costs to a minimum. The 727 cabin had an advantage over its potential rivals in that it accommodated six abreast seating compared to a maximum of 5 abreast on the others. Another feature of the 737 would be its capability for Cat 2 Landings, the first of its kind. Production of the 737 was guaranteed following an order by Lufthansa for 21 100 seater aircraft, the first of which went into service in 1968. A follow up order came from United Airlines for another 40 aircraft; however they wanted a larger aircraft that would become the 200 series. Further refinements to the 737 200 led to the refined 737-200 Advanced which included improved thrust reversers, modified flaps, more powerful engines and greater fuel capacity allowing a 15% increase in payload. This became the ‘standard’ configuration by 1971. A lull in orders in 1970 drove Boeing to offer greater diversity in the design. Versions included the 737C (meaning convertible passenger / freight version) using a large freight access door, 737QC (Quick change which had palletised seats allowing quick removal) and the gravel kit equipped model for use on unpaved runways. Production of the 200 series continued until 1988 when no less that 1,114 aircraft were produced and served hundreds of airlines around the world and in 2010, over 300 were still in operation! The kit News of this release from BPK of Ukraine has been popular and when I received mine, I could see why. The only other 737-200 model in this scale is the multi-media kit from Welsh models with a vac formed fuselage. The kit comes in a sturdy top opening box and inside you’ll find a lot more parts than you’ll be used to if 1/144 is normally your scale. The version represented is the ‘Advanced’ model with refined details as mentioned above so can be built into a vast amount of livery options as and when they become available. First impressions are very good, but not mainstream. There’s an absence of locating pins where you would expect them on a mainstream kit, so some additional skill and patience will be required to deal with this, but don’t let that put you off. Included in the set is over 100 injection moulded parts, additional resin & etch, rubber tyres and cockpit and cabin window masks. A great feature too is the clear nose section meaning that you won’t be left with the challenge of trying to prevent glue marks on your cockpit windows! There is no flash or sink marks to be found on any of the parts. Included on the sprues but identified as not used in the instructions are what look to be the gravel pack parts, so we could expect further versions to be released. The instructions are in A4 gloss paper and mostly adequate, however there are a few ambiguities that I’ll cover in the review. Assembly starts with the cockpit. In here you will find all major features including seats, side, front and overhead panels, centre console, control columns and decals to add the necessary detail. The cockpit assembly locates to the rear bulkhead and it all fits into the transparent nose which on first impressions captures the shape very well. The next step for the cabin windows requires a decision from yourself and reflects in my opinion some clever design work to give you these options. The cabin windows for each side are provided as clear strips that locate into the fuselage halves with finely marked windows. The kit is supplied without window decals that you typically find in aftermarket decal sets, so you will be required to cut the plastic out of the fuselage parts and replace them with the clear strips. If you intend to use decal windows that will probably become available from aftermarket suppliers, you could simply glue the clear strips over the top of the indented sections although one side will need a raised bead sanding or dremmeling down as noticed in the picture below. Doing this enables the clear parts to sit flush with the exterior surface. Leaving the indented sections in place and painting it with a dark colour before inserting the clear strips and masking the windows may also be an option to consider. If you do decide to remove the indented plastic, leaving some of it in as a locating surface for the clear parts would be advisable as long as it doesn’t foul the windows. The surface detailing in the fuselage is very nicely done with fine recessed details. Moving on to the next build assembly and we have the main gear bays and wing box that locates in to the lower fuselage. Two spars are added as well as adequate gear bay detailing that adds plenty of interest. You may want to add some additional plumbing here if you like a lot of detail. The spars protrude out of the wing box to support the wings when fitted. With the main parts of the fuselage assembled, it’s all brought together – fuselage halves joined and cockpit, wing box, nose and tail cones attached. Again without the benefit of locating pins, be careful to get everything aligned correctly. Here I noticed a few things missing from the instructions. One of the last stages is to add the nose wheel bay, but to do so, you need to cut away part of the clear nose and fuselage halves to do so. It will be easier to do this before you assemble the fuselage. No mention is made of nose weights either, so I’d play safe and stick some metal up front too whilst you’re there. This may be obvious to some, but I’m one of those who steams ahead and pays the price later for my impatience!!! Onto the wing assembly. This is a simple affair; the wings are supplied in top and bottom halves with the gear bays to be inserted as separate parts. As these will take the weight of the kit when sitting on the gear, I’d recommend plenty of glue here to prevent them from breaking loose under load. Separate flap jack fairings are supplied and simply fit to the lower wings. The tail and tail planes follow the same two halved approach with a small spacer to be inserted between the tail halves to offer some rigidity. Detailing in the engines is well catered for. The intake fan is mated to an etch IGV (inlet guide vanes) part that requires the vanes to be twisted through 90 degrees and the intake cone fitting to the IGV. These then mate to an injection moulded cylindrical insert that provides a smooth intake profile. The exhaust looks to be more challenging. Instead of using a plastic insert, the exhaust has to be made forming a flat sheet of brass plate into a cylinder. You may try to find some tubing of a suitable diameter to avoid doing this...I think I will! Resin exhaust compressors and exit cones are supplied to finish off the inner detailing. The undercarriage is quite a complex arrangement. Each main gear assembly is made up of no less than 6 parts excluding the wheels themselves. The nose wheel bay also has to be assembled from 5 parts, so you may want to reinforce the joints to prevent it from collapsing under the weight. The nose gear assembly contains a further 10 parts, so you may want to have a beer on standby for when you finish that off! The tyres are supplied as rubber which some dislike. I suspect that some aftermarket resin replacements may become available in due course. The tyres do have some small amounts of flash so this will need to be removed. The instructions for the main gear door assembly aren’t very clear, so I will be looking for some reference material when I come to build this to see exactly how the 3 parts fit together correctly. The etch sheet contains quite an array of exterior parts including wing root intakes and the various antennas and probes around the fuselage which is a welcome addition in 1/72 scale. A nice touch too is a front passenger door and port baggage doors supplied giving you the option of cutting the fuselage out and having the open doors. I see a good diorama possibility here. Unfortunately, the forward air stair isn’t included. The decals The decal set produced by Decograph is quite simple. I would of preferred a number of options but only one livery is included for Piedmont airlines; aircraft No. N780N which was delivered in 1980. This aircraft finally ceased operations as registration YI-APY in 2010 with Iraqi Airways. The sheet doesn’t include fuselage cheat lines, door frame markings or windows which again would have been useful for those who prefer that route. Masks are included to paint the door markings though. The cockpit panel decals are nicely detailed too. For those wanting some British liveries, keep an eye out of the Two-Six website as Ray has a number of options that he’s planning to release (as well as non-British liveries) including: Britannia 1970s & 80s British Airways Negus & Landor Dan Air London BA World liveries Air Europe Conclusion This is a welcome model of an iconic aircraft so will probably be popular amongst the airline modelling community. The detail is good and the shape looks accurate too from what I can see without assembling it. I suspect it will spur a number of aftermarket initiatives too. It’s not a kit for beginners, but nor does it require expert skills either. Judging by the release of the T-43 and the inclusion of the gravel pack parts, BPK are going to cover most if not all of the 200 series options in due course. Additional liveries and decal options would of been a good feature to add value, but overall I’m very impressed with what BPK have created. Review sample courtesy of
-
Does anyone have any experience with EE's classic line of 737s? I know that the best kits are made by DACO, but I can't afford to buy a bunch of all the different series. I would like to hear the opinion of those who actually have this kit or are working on one. Thanks in advance.
-
I'm sorry this page is only in finish, but you can see video clip and picture. One SAS 737 was painted in Disney Planes movie colors. http://www.lentoposti.fi/uutiset/sasn_737_sai_kylkeensa_disneyn_lentsikat
-
Hey all This is my newest model, its a Minicraft Boeing 737-400 of Dan Air. The decals were by Flightpath, they were awful, they exploded in the water. The kit was the Cayman boxing. The red stripe is a dark red, like it should be, but my camera doesn't like red, ask the Corendon 737-800 i took a photo of, it looked purple.... Considering the kit has the Minicraft stamp on it, its not bad, it lacks several details, but its not awful. This is 99% finished, i just have some smaller decals left, ill post some better photos when its done. 100% Finished 26/08/13 Photos on page 2 Thanks The white 737-800 in the background is going to be Transavia :-) Thanks Bradley
-
Hi, So I was asking questions about Boeing 737-100 in other topic(http://www.britmodeller.com/forums/index.php?/topic/234933832-revell-or-airfix-737/). And now it's time to start WIP thread. Target is to do proper model of one of these: Basically there is two ways to do this. First is simpler and then only Airfix kit is needed basically then modification is shorten fuselage two windows front and behind wing. Then there is need to change rear cabin door to larger one. Basic understanding is that Airfix fuselage is not exactly right, but this way is possible get decent model. Second way is using Revell's fuselage and shorten that to correct length and rudder wings, engines, landing gear from Airfix kit and this is my way. More pictures will come during weekend. Br. Vesa
-
Good evening everybody! Just started my second 737, and decided that this one should be a baby one. I bought decals of, of ln-decals.com a month or so ago, and decided to do the -600, or SE-DNX Here is my progress so far Robin
-
Hi! My first ever airliner! Really like the result! Came out just as expected. All over a fairly easy build with a few problems, but they were easy enough to correct. Decals are from lndecals.com, and they are brilliant! Winglets are Brazz, and engines are redone by myself. Not to perfection though, but I think I got it alright Paints used were white: rattle can from a local shop. Only some cheap stuff Red: Revell 31 Gloss coat: Rattle can from the danish Halfords. So here goes: (ENJOY ) As I said before, my first airliner, but certainly not the last! Have a great evening fellows! Robin
-
Mjello guys! Have anyone of you had any experience scratching a wifi bump in 1:144? And do anybody know the specifications of the actual thing? I'm currently thinking of making one for my 737 (LN-NOL) which can be found here: http://www.britmodeller.com/forums/index.php?showtopic=234928375 Thanks Robin