
Search the Community
Showing results for tags '1:35'.
-
Starting with a new one - this time it is Panzer III by Dragon. The kit I'm using is artillery observer tank Panzerbeobachtungswagen III but I'll build it into a regular Panzer III Ausf.G, as all the bits are supposedly in there. The turret shell is the only exception, but it'll be not too hard to convert. I have Voyager PE set and fenders to add as well as Aber barrels for the main gun an for MG's and a set of MasterClub metal tracks. I like Dragon's Pz.III based kits for their accuracy and crisp details and this one is up to that too. It's going together really fast at this stage and no hardships to report thus far. Cheers! Kristjan
- 39 replies
-
- 13
-

-
- Panzer III
- Dragon
- (and 1 more)
-
It my first building in this GB. I began a bit to cut a model. It was in 2013.
-
I have been building the MiniArt Grant Mk I, which has a lot of small tool/stowage handles made of photo etch that is liable to break or get lost (lost 2, broke 1 so far). These kinds of handles are very common in my experience, so I was wondering if there were alternatives out there in 1:35 scale (or scratch building tips). Apologies if this has been answered and I just don't know the name of the thing properly...
-
I apply Rule #3. In the year one I began to make this model. The old model of Dragon requires realization of repair.
- 9 replies
-
- 3
-
-
- 1:35
- Scratcbuild
- (and 1 more)
-
Hi all! My first "Ready for Inspection" after a lengthy but enjoyable process. For the nitty gritty details see the in-progress thread: As usual with these things, it turns out my grandpa was more of a driver and worked primarily with a light AA regiment! Regardless, this was a fun build with lots of detail and only a few pain points. The BL 7.2" howitzer was used from ~1942 until the early 1960s. Based on rebored WWI 8" guns, their most (in)famous gunner was Spike Milligan. His war memoirs brought this kit to life. The Scammell Pioneer was used as a tank transporter (with trailer), recovery vehicle, and artillery tractor both pre- and post-WW2. My build is a bit of a mash up, because although Thunder Model boxed the kit in a desert scheme, neither the gun or tractor come with decals for one. Your best bet is to go for a 1944/45 heavy regiment. So here I just used the markings from a vehicle used in Italy, 1943. There are a number of ancillary parts for the gun that can be seen in the in-progress thread. Not sure what to do with them as of now. I'm very happy with the figure (first one with eyes!) and of course he's hidden away in the cab. I am also happy with the dust effect on the windscreen, first time trying that. Biggest mess is the rear cloth canopy which got rather mangled and I did a rough job filling it. Criticisms and suggestions for improvements are welcome. I hope to eventually 1) replace the rear cloth 2) add a tarp covering the back half of the gun to cover up the optics, which should be stowed when in motion, and because most photos I've seen show such an arrangement. Looking out the window: It's a rather lengthy result: And the mangled rear end: More images on the Scalemates albums here: https://www.scalemates.com/profiles/mate.php?id=123123&p=albums&album=109445 https://www.scalemates.com/profiles/mate.php?id=123123&p=albums&album=110528
- 6 replies
-
- 23
-
-
- Thunder Model
- 1:35
- (and 1 more)
-
 Hello all Tamiya Hetzer with numerous self-printed details, such as tracks, MG, tool clamps, etc. Figures from Alpine, bridge from Styro. Water effects with wood glue, lamp post made from barbecue spit with self-designed signs. Painting and weathering was the most fun and felt like it took months 🤪 I hope you like it! MD Cheers!
- 16 replies
-
- 38
-
-

-
I needed to call into a local model and kit shop to pick up a couple of paints for an ongoing (forever pausing) build and during my wander around the store i came across this boxed set from Italeri. The store owner said he was selling them on for a customer that simply wasn’t going to build it and for a measly £3 they were mine. I don’t need another kit to build, I’ve more than enough either in my stash or being built to keep me going but for the bargain price of £3 (labelled as £25 from the same store!) I thought it would make for a good side project and diorama. I’ve not built anything like this before and so for I’m liking the scale and detail. Let’s see if I can do it justice!
-
 My finished Dingo Mk III, 1:35 by MiniArt. Kit: this is MiniArt’s Mk II kit built as a Mk III. The Mk III is very difficult to get hold of, but the Mk II contains all the parts needed to build a Mk III except for the canvas roof. Vehicle: A D squadron, 11th Hussars Dingo photographed in Tonning, Germany in 1945. It lacks the armoured roof so is either a Mk III or a Mk II converted to a Mk III. Reference photo at the bottom. The Build: The kit is pretty good out of the box but for this one I wanted to match my reference photo as much as possible, include detail I've discovered while researching, and expand my scratch-building skills. The Vickers K Gun is a spare from the Dragon SAS ETO jeep, the spare magazine drums come from Tamiya’s old desert SAS jeep, and the British Gerry cans, RAC helmets, and some stowage come from MiniArt kits. The wheels are Def Model weighted wheels, which freed up a wheel for the spare at the back. There is considerable scratch building as well. I'm pleased with the way this one is coming out but may build something larger next to let my eyes recover! Muddy footprints on the front from the crew climbing in and out. I drilled out the lightening holes in the brackets for the sand channel just below the front storage box as they are solid in the kit. The fatter roll is from a stowage set, the thinner one is the rolled up canvas roof which I scratch built and is often mounted higher, but from my reference photo I think on this vehicle it was lower. Quite a bit of chipping round the engine deck. It's a single metal cover and the examples I have seen are quite battered from being taken on and off all the time. Hidden now but I added the brake and electrical cables behind each wheel. There is no light on the rear mudguard as that seems to have been a post war feature. There is little mud or dust of the Dingo's wheels in my reference photo, I suspect it spent the last few days running along roads rather than cross-country. I replaced the protective ring round the base of the antennae with one from my stash box as the one provided is very thick. It is not quite square but I left it at a slight angle to represent wear and tear on the vehicle. Some interior shots. The war has just ended so my crew have got a camera out to take some snaps. The map is a WW2 British military map. I added the tan rectangles on the cabin lip which are the padding used to cushion the armoured roof if it was carried. Mk IIIs still had them in case it was decided to re-fit the roof later on. I have no clear photos of the mounting for a single Vickers K Gun so simply used the one from the Dragon jeep kit. I think in reality the mounting was thinner and simpler, but for practical model building this one works fine. The canvas cover for the rifle breech is scratch built, as are the brackets holding it in place at either end - MiniArt provide the rifle but nothing to secure it in place. You can just make out the scratch built gear pre-selector through the steering wheel on the right. I don’t have a clear photo of the interior of this Dingo so had to use some creative thought on where spare magazines would be kept. Some Dingos were equipped with twin Vickers K Guns and had racks holding half a dozen magazines on the cabin exteriors, but for mine with a single gun I have just stashed them in likely places in the cabin. It is almost impossible to access the interior of the cabin after it has been closed up so you need to plan painting and weathering (such as the colour of muddy footprints) in advance so it matches the exterior. A 1:35 Dingo is a small model! My Dingo collection - this Mk III on the left, a Mk II of the Inns of Court Regiment in the centre, and a Mk Ib from the 1st Armoured Division HQ on the right. My reference photo - Tonning, May 1945
 -
Hello folks Preview of my next project: Hetzer of the 272nd Volks-Grenadier-Division in the battle for Kesternich. See you soon! MD
-
Hello all! The Hetzer project is coming to an end and so it's time for something new on the workbench. 1914-2024 is a year that symbolises the beginning of the primeval catastrophe of mankind and therefore reason enough for me to dedicate myself to this topic: the great war I had been planning to build an MK IV for some time and bought the female version on ebay for a lot of money (the 2 in 1 kit was not available at the time). Knowing that the tracks are a punishment for any modeller, I ordered AM from Masterclub. So far I can say that the casting quality is good and there are hardly any offsets or skins on the parts. Given the manageable number of parts and the simple construction of the tank, you would think that this could be a weekend project. If it wasn't for the very dodgy assembly instructions - although they are error-free, they are more than illogically structured and the steps are nonsensical in places. Anyone who has ever built an Churchill from AFV will be familiar with the fiddly assembly of the 2 drive sides. Although Takom uses fewer parts for this, it seems to have relied more on the modeller's intuition when it comes to assembly. Here one wishes for Tamiya's cleverness, which is almost unbeatable when designing a kit. But enough bitching 🤭 I really like the kit itself, even if the rule should be applied here: think twice before gluing. Beginners in particular should be careful, as models with lots of bolts and rivets don't like being messed up with glue. MD PS: more on the correct reproduction of the original in the course of the build. Judging by the look of the box, the item had been on the shelf for a long time. The content is straightforward. Only masochists should let off steam on these tracks. Masterclub offers salvation. The construction plan and a correction sheet. Takom starts with the centre section in their plan, to which the left and right drive sides are then to be glued. However, I recommend making these assemblies first and then attaching the centre section. I will show this in the next post. The frame structure shown consists of several panels, which have a groove for orientation, but have to be glued together at an angle at the ends. A dry fit is essential here to prevent air gaps. Here you can see the grooves. The funniest part comes at the end: once the rollers have been fitted, Takom's idea is to simply put the outer frame segment on. However, nobody thought about the fact that you have to put all the rollers, wheels and the frame segment into all the holes and grooves at the same time! So first test the frame parts without the rollers for accuracy of fit and only then insert the rollers and fix everything in place. These are all my clamps. Everything holds without glue and you can still push and press until everything fits. Then put the glue on, open the beer and switch off the light 😋 See you!
- 17 replies
-
- 19
-
-
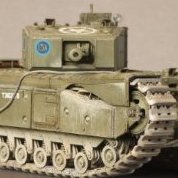
 With my captured Panzer coming to a very satisfactory conclusion, time to consider the next project. I picked this one up last year at the local model expo for good knock down price, without knowing what was inside. Looking around I found this spectacular example: Despite the clear warnings from @Nenad Ilijic I think I’m keen to have a go. A review of the BEF version with good sprue shots can be found here: http://www.missing-lynx.com/reviews/britain/vulcan56008reviewab_1.html This kit has the addition of extra photoetch: There is also some extra styrene: Instructions are somewhat daunting: I’m going to do Anglesey as I gather the other markings are incorrect.
- 72 replies
-
- 10
-
-
- Vickers Light Tank
- 1:35
- (and 1 more)
-
Usually it doesn't happen to me, that I continue with a model someone else has started, but this one is a bit of an exception here. One of my fellow modelers started this project but was unable to finish it so I took it over and hopefully will get it over the finish line. The model itself is L.Z. Models conversion based on Trumpeter's S-65 tractor kit but has almost none of the Trumpeter plastic remaining. When I got it the building phase was almost complete, but the model had resin chassis frame heavily warped over time it sat nearly ten years I got it somewhat straight again bathing it in hot water and also replaced exhaust and air stacks. Also some fuel lines, wiring and linkage has been added by me. First, here are some photos before it got to my hand. And here it is on my bench with my enhancements and assembly completely done: Cheers! Kristjan
- 11 replies
-
- 17
-
-
Hi! Got over the finish line with this one. Build log is here: https://www.britmodeller.com/forums/index.php?/topic/235131913-kettenkrad/ Here are the photos: Cheers! Kristjan
- 13 replies
-
- 34
-
-
-
- Kettenkrad
- Dragon
- (and 1 more)
-
Hello all 🥳 After a long absence, 2 hospitalisations and 4 stents later, I'm back on track. Today I am pleased to present to you a perhaps old acquaintance of mine in a new look. I used the time of healing to rework the M12 vignette, i.e. figures, weathering, snow effects etc. were edited or added. What started here as a GB developed into one of my longest projects. I hope you like it - comments are always welcome! MD See you!
-
A fantastic kit so far. Definitely a new concept for me building an ambulance, but the Gecko kits are hard to resist-they're really good.
-
This is the new old one on my bench - Dragon 6128 Kettenkrad. I started the thing actually more than 10 years ago and it seemed a great kit at the time. It found its way to shelf of doom though because I found out Dragon got the sprocket totally wrong and I hadn't any means to fix the issue then. Well, T-Rex Studio released a correct sprocket lately, so I decided to get it going again. Tamiya of course has released a much better Kettenkrad a few years back, but oh well, as I've already put some effort in this one, I'll be a gentleman and get it to the decent end. Much of the work has been done with the engine and the transmission so far. Also the handrails has been replaced. To add to the kit I also have the Eduard PE set and the T-Rex Studio 3D-printed front fork, and some decals too by Passion Models. Here's the little bugger: Cheers! Kristjan
- 42 replies
-
- 21
-
-
Hello, after a long hiatus, I came back to modelling and chose the KV-2 from Trumpeter being the beast of choice to tackle. Over the course of years, I have bought some aftermarket stuff (with varying levels of usability, to be honest). Here is the lineup of the accessories - well DEFINITELY NOT all of them were really of any value. And I am speaking speaking specifically about YOU -> FC Model Trend! And here is the current status - still before the final small stuff to be added. Also, I am pretty sure that the next "surfacer-phase" will bring some new challenges (i.e. consequences of my two-left-hands) to tackle :-) I added acetylene-torch marks on all major armor-plates, both on hull as well as the turret. Although the kit brings some nice and subtle welds, they were missing at the aft curved armour. There I made use of my old stock of the Archer dry transfers to replicate the weld beads. The tracks in the kit were hammered with ejector pin-marks, which I wasn't really willing to sand, so opted for the Friulmodel ATL-10 link-to-link tracks instead. IMHO they really look better than the Trumpeter-tracks, but they also add the "extra heft" to the model (which for some reason I like 😉 ) The gun barrel from ABER 35L-44 is in my opinion a "must-have". It is perfectly turned, but also has that "hidden detail" of barrel thread, which, considering the size of the 152 mm howitzer, is really visible on the model. I opted for the FC Model Trend screens and exhausts. Honestly speaking - only the screens were so-so usable. The exhaust stacks were marred by crude print-marks and I am not sure, they added any value over the kit exhausts... The large Eduard 35825 PE sheet contains some useful details, but overall the detail of kit is really remarkable. For example - I did opt for kit´s real deflector, since the kit part IMHO represents the structure of the part better than PE replacement. Still, the Eduard set contains a lot of details for further KV-1 tanks, so they will find use at future projects. I added also some cabling behind the horn and light, based on pictures from surviving museum exhibits. There is still some work to be done - like MGs, towing-cable holders, etc. Next step would be to spray the kit with Surfacer 1200 and repair a plethora of issues I expect to find. Wish me luck!
-
Very straightforward build, I used Value Gears' kit-specific stowage plus other 'stuff' scrounged from the spares box. Tamiya lacquer paints mixed & lightened by eye. One of my fave WWII vehicles and a huge step-up from the old Academy kit (which did sacrifice some bits & pieces to make this one). Please feel free to make any comments, ask any questions or criticisms. Belated HNY all from the other side of the planet. Cheers from a very sunny and warm New Plymouth. Ian.
-
Last one for the year, a quick build of the Airfix Ferret. Brush painted with Tamiya Acrylics, somewhat over-weathered with Vallejo Model Washes. No additions other than a couple of aerials from copper wire. Completed as vehicle in UN colours in Cyprus, 1974. The instructions say 5th Parachute Brigade, but a search online actually indicates it’s a vehicle belonging to 5 Troop, Parachute Squadron RAC. Thanks for looking and a Happy New Year to all.
- 16 replies
-
- 34
-
-
Managed to get my hands the Airfix Ferret very soon after it arrived at my local hobby shop. While I finish off my Whippet and Sherman I thought this might be a nice quick build. First the sprues, which are nice and clearly marked: Neatly printed decal sheet: Im going to finish mine as a UN painted vehicle in Cyprus. My mother was a QA nurse there in the mid-60s while Dad was serving in Aden. Started with the interior and main hull. Went together very quickly. Just a little bit of dirty wash before sealing up - not going to be able to see much inside. Everything slots together really easily. Just a bit of blu-tak with some fishing weights to add a bit of “heft”, before I sealed the engine compartment up as well. Made a start on painting the wheels using Tamiya XF61 Dark Green and Vallejo Dark Rubber. That’s it for the next few days - festivities await! Merry Christmas.
-
Hi, This is a 1:35 model of the Sherman M4A1, an American medium tank. This is Italeri KIT no. 0225. I made it as a traditionally movable model, of course. The additional parts are - the Friulmodel tracks, couple of small accessories like towing cables, jerry cans, helmets, bags, supply and ammo boxes. The model wasn't very detailed but I tried to add some details by myself. I hope you see it and like it. Models finished in 2021/2022 - "Sturmgeschutz III ausf G (1:35 vintage Tamiya)", "Matilda MK II (1:35 vintage Tamiya)" I invite you to see the rest of works on my site "about me"
- 12 replies
-
- 37
-
-
-
I am in the process of scratchbuilding the fire-fighting section for a Land Rover TACR1, using the Revell 1:35 kit as a basis. I have the main details for the side and rear, with the help from Mick Bell plans, but I am having difficulty working out how the top looks. I've done searches on dozens of images but they are mainly quarter-angled side views. Does anyone have top down photos and details of how the roof area looks please? cheers, Mike
-
As I mentioned in the chat thread a long time ago, this is my oldest kit in the stash No dates anywhere on box or instructions, but scalemates as being the 1980 boxing which fits in with my fading memory https://www.scalemates.com/kits/italeri-221-opel-maultier--1096348/timeline @JOCKNEY, perhaps influenced the our great leader @Enzo the Magnificent desire to see 'em built has adjudged it less than 25% complete I'm starting to think a more pertinent question will be, is the parts count 25% complete? Decals already look beyond resuscitation, and the instructions are wonderfully faded and the paper crisply dry; perhaps it should all be in the Atrophy GB? But can you smell the nostalgia? Forgotten just how much I loved those instructions with their little pictures of what it's meant to look like!!
-
Hi, guys! I'm happy to finally call this done. Here's the Sd.Kfz.252 ammo carrier of the second batterie of StuG.Abt.185. Build log can be found here: https://www.britmodeller.com/forums/index.php?/topic/235122916-sdkfz252-ammunition-carrier/ Here are the pics: And some with the StuG: Cheers! Kristjan
- 33 replies
-
- 59
-
-
-
As I just said in the chat thread, I have decided to give this GB a try. My idea is to build a vignette showing some everyday stuff, like bicycles and household appliances, that have been left outside to slowly decay away. Maybe against a background of an ill maintained wall. And with weeds all around. We'll see how well I'll succeed. Anyway, here are some inspirational photos: So far, I have acquired some kits to get me started. I will not be using the figures, just their bikes. 🙂 I got he soldiers, although I did not need them, since I could not locate any other bike kits in a suitable scale. Now I shall just muster courage enough to actually get going.
- 81 replies
-
- 14
-


(250x229).thumb.jpg.48a57772b41ed148fdc8d15e3c202763.jpg)