Search the Community
Showing results for tags '1/20'.
-
Once again I'm delving into the depths of the future to suit my weird modelling purposes. During WW2 the RAF had the 'Tilly'. Short for Utility vehicle. Mostly built by Austin, they were a small multi purpose pickup or Ute. Why wouldn't they have a similar vehicle in the kreiger universe? No, Not an Austin. But ideal for my porpoises. From King Kits Salvage yard, part started, for about 7 quid. Painted Humbrol Brass (The tin was in the box) and missing some trivial bits. It was meant to be motorised. I needed a modified floorpan and found this red one. Out with the razor saw. Lots of chopping and changing later I had this bodged up rear axle on airbags (Actually large rubber grommets, Perfick! Much measuring and trepidation later I had this. The brown oblong will be the bed. It's actually a 1/35th truck part. Some 'good enough' 1/35th Truck wheels and chunky tyres added for that Military look. And here's the hole. I've since made a cab rear and now the bed almost fits too. There will be sides and a tailgate. The body has been sanded rather than stripped. (A) I didn't have the chemicals, and (B) A rough Military finish should suit. I'm going for the' unknown possibly electric motor under the Bonnet' idea here. No need for technical bits. It's only going to sit on display in the manshed with the Falkes anyway. But I want it to look half decent at least At the moment (After fixing the shed roof over the past two days) I'm sorting out the truckbed and will need to make internal wheelarches. Any ideas, suggestions, likes, loves and whatever else @Mike may have added recently are always welcome. Bring your own biscuits or Cookies and a tea bag. Her indoors bought us a new kettle. A cup or mug could be a good idea too. Many thanks for looking, Pete
- 21 replies
-
- 16
-

-

-
- Maschinen Kreiger
- 1/20
- (and 1 more)
-
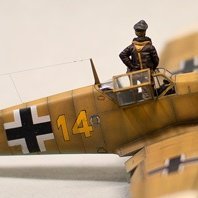
This is a Maschinen Krieger scratchbuild of the Falke Anti gravity fighter, My third in this scale. The 9LM designation is because the basic centre piece is a Jaguar 9LM racing car. The Booms are from a 1/32nd P-38 Lightning. Lots of pictures, so lets get on with it Helmut came a long to help and show some sense of the size of this beastie. I forgot to remove the red masking tape here. Doh! The gun is a converted toy plus add ons. Loads of stickers! Took me nearly all morning. There are lots of ex Phantom warning labels but they don't show up well here. U.S. Marine Corp pilots wear Camouflaged Bone domes, so this guy does too. The rubber seal for the lid is thin black plastic card. The engine is part 1/32nd Me262 and plenty of greeblies with some copper wire. The cockpit lid is part of a plastic spoon BTW. Filler, greeblies and plastic card in abundance on this build. Underneath, three dark sea grey anti gravity units (Table tennis balls!) and a plethora of spares box greeblies. The mucky end. Even bits of motorbike engine and Jaguar cam covers under here. Hellmut again. The footstep next to him is a bit chunky, but it is ex large scale motorbike. Thanks Alex. Not the normal Falke intakes but I think they work here. Another view of the engine. Fuselage paints were Tamiya Acrylic and ancient Humbrol enamel. Weathering by Acrylic pastels. The 'flappy things' on the original Falke were made from 1/32nd Dauntless flaps. Here I used Stealth Bomber Bomb bay doors. A close up of the gun systems. I'd removed the red masking tape by this stage of the photo session! It's big, blue and mean, with it! The black and yellow stripes go with the wasp cartoon on the main body. I'd meant to do them as on Operation Musketeer. Suez 1956. But my memory got the order wrong. They should be yellow, black, yellow. black, yellow. Doh! Looks like I forgot to add the glass in the searchlight underneath too. Tut! That's what you get for hurrying. Here's a link to the WIP Many thanks for looking and your comments are always welcome. Cheers, Pete
- 10 replies
-
- 16
-
-
Here is my first ever Ebbro build. Have to say this really nice kit to build. Only problem that can be mentioned is that the front and engine covers do not fit very well. Tried my best to work out with that problem. Added some details like fire extinguisher that was not in the kit and of course lot of wires and hoses.
- 19 replies
-
- 28
-
-

-
Seeing as someone said the other week that we don't get enough F1 builds here, I thought I'd pull one out of the stash for my next project. Tyrrell Yamaha 023 from the 1995 season. Can't remember seeing one of these built before, so I guess it'll be a learning curve as I go along. No progress as yet as I've had a clean and tidy of the mancave after my last build. So I thought I'd add my placemarker 😀
-
LUM-168 Camel Luna Tactical Reconnaissance Machine Hasegawa 1/20 This was my first and, as yet, only Maschinen Krieger kit, built back in March for an Airfix Model World article, but never published. A very nice kit but a right pain to build as it's so big and the articulated legs can't really hold it's weight. I'm not that happy with the splinter camo scheme as it's a bit too dark. It went through two earlier schemes and was stripped back to plastic both times as I couldn't decide what direction to go with it. All in all, I was glad to get it done and off the bench. The cockpit detail is effectively obscured when it's in place so here's a few shots from the build Thanks for looking Andy
- 25 replies
-
- 32
-
-
- Maschinen Krieger
- LUM-168 Camel
- (and 2 more)
-
 In my ongoing Senna car builds, this Tamiya Lotus Honda 99t in the distinctive Camel logo fits this GB quite nicely. It was first released in 1987 by Tamiya and is Honda powered. Ive got the camel yellow paint in stock and a Studio 27 PE set in the post as we speak 😀 Looking forward to making a start once I've finished the Honda RA272 that's nearing completion on the bench. It should add a nice splash of colour to the GB to brighten the long winter nights if nothing else 😀
- 53 replies
-
- 16
-
-
As it's early in the GB and all I've got to do for the Lotus 99t is sort out a display base. I thought I'd throw my hat in the ring with another classic F1 build. Although this is a later rebox of the original kit, the original kit was first released in 1977. This time it will be James Hunts McClaren M23, built oob except for tobaccco decals as they're not included. Made a start Friday evening and got a couple of sub asemblies built and into primer yesterday, then managed to get some colour on them today. Not much to see as yet, but as with most F1 kits, there seems to be endless painting of small pieces before assembly into larger sub assemblies. Picked up a Haynes manual at the right price as well to help me along the way.
- 21 replies
-
- 10
-
-
Currently doing an M23 as part of the Japan GB Just thought I'd put a progress report up here as well in case anyone is interested. Tamiyas M23 first came out in 1977, but it's still an enjoyable kit, but the differences between this and modern F1 is huge Paint and decals on, clearcoat in a couple of days
-
Had to finish this off to clear my bench before the classic Japanese build starts Saturday. Built oob, body painted in Tamiya LP39 racing white and tamiya acrylics for the rest. Enjoyable build and something different in the cabinet.
-
Throwing my hat in the ring with this as a placemarker. I'm not going to make a start until after next weekend though as I'm doing a dual group build with another group which starts 1st October (Road and track in scale) plus I'm busy all next weekend as a volunteer on the GCR at our autumn gala, so Monday 3rd will be my start date. It will be Kimi's car with the Marlboro barcode logos which were soon banned as an attempt to get around the tobacco advertising ban as they apparently looked like the Marlboro logo at speed. Tamiya kit, zero 2 part paint and aftermarket decals.
-
First time at the bench for a few weeks Monday after all the hot weather etc. Made a start weeks ago and primed and painted bits, finally managed to assemble a few bits and get the engine looking something like. Will probably add some wiring and pipes for detail once the engine is mated to the chassis and get a bit of weathering done.
-
Jordan J199 1/20 Modeler's multimedia
modelbautony posted a topic in Ready For Inspection - Vehicles
I enjoy all vehicle and motorsport subjects. I aim not to do the usual. No matter how much I might determine to do a quick and 'out of the box' model every now and again I get involved with research and then find a decal isn't the correct size or is not quite the right typeface or the shaping for a particular race hasn't been taken in to account... a year later and I'm still 'adjusting'. I must be the least prolific model maker, it's not like the end result is perfect by any means but there is considerable satisfaction in having 'struggled' with a tiny element of a model that may not even be visible on completion.- 25 replies
-
- 18
-
-
This is the 2021 boxing of the S.A.F.S. Type R "Raccoon" from Wave. This is one of my favorite Ma.K designs and I was really looking forward to doing it, however, I was never quite satisfied with my chosen base colors but instead of binning it or stripping and repainting, I just pushed through. I started to make a scenic base for it but since I wasn't really happy with the direction the suit was going, I decided to save it for another project. This was finished a little over a week ago and looking back at it now, I'm a little more happy with how it turned out. Comments and criticism welcomed as always!
-
I've finished my second model of 2022, Wave's P.K.A. Ausf.N1 "Nixe," which was released for the first time in plastic back in 2018. I'm a big fan of any of the Ma.K suits that have windows to see the pilots, and this is no exception! I started building this kit on January 15 and finished on January 22; one full week from start to finish! I added the weld beads with Tamiya epoxy putty, cast texture with Mr Surfacer 500, and replaced the polycap material hoses with metal coil springs. It's painted mainly with Tamiya paints and weathered with primarily oils, with a few enamels here and there. The base is a wood block with bits and bobs I added to approximate an urban environment. Comments and criticism welcomed as always!
-
I'm going to throw my hat into the ring with this one if I may I started it sometime in the summer, but work and other stuff got in the way and it has sat there in primer for months and I need to clear the bench ready for the Matchbox STGB in January, I thought this GB would push me on to the end Today I have dusted all the bits down and applied various blacks and silvers ready for clear coats then assembly Cheers Ian
-
Recently, I was asked by Lincoln Wright to contribute to an upcoming English-language series of books based on the Maschinen Krieger property. The first book, due out soon, is based around the MK44 series of heavy suits. The second book is based around the space-type designs, which is where this Luna Gans will fit in. The forthcoming book will have a complete step-by-step of the building and painting of this kit. In the meantime, comments and criticism welcomed as always!
- 5 replies
-
- 15
-
-
- Maschinen Kreiger
- 1/20
- (and 1 more)
-
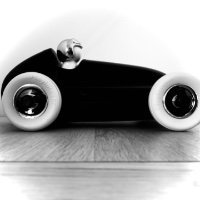
Hello!. This is the first car model that I ever build. Throughout my very interrupted 30+ years of scale modelling, I never thought to build a car. But like with anything else one day I got inspired by the amazing work of a fellow modeller. I loved what I saw and immediately thought that maybe I could try and give it a go. Probably the most intimidating thing about modelling cars is the super gloss and slick finishes, which is completely different to what I usually do, and with almost no weathering at all! (except a bit in their engines). Also, I was always put off by the endless amount of aftermarket details that make car modelling quite expensive and difficult to research. So I decided to start with something relatively "simple". To me, the sixties racing has the most beautiful cars of all eras so I pick up this Tamiya kit of the winner of the Mexican Grand Prix of 1965. The kit is quite old and it shows its age but is a strong base to add extra detail. I've added all hoses and connectors in the engines as well as some extra scratch detail at the nose area, wheels and windscreen. The build went so smoothly and was such enjoyable that I will more likely do other models, So I hope you guys like it!. 😀 cheers, and thanks for looking Jorge
- 16 replies
-
- 28
-
-
-
hello everyone, this is my first WIP here. I started building this kit weeks ago, i work very slowly only in short time at night. Never built an F1 bebore, and i can say that is a bit difficult, too many pieces that you don't know if paint bebore or after.. Anyway this is the job done till now:
-
 My first Ma.K. model. I’m not much into SciFi but as soon as I learned a bit about Maschinen Krieger I was absolutely captivated by the looks and aesthetic of the whole genre. To me is the perfect blend of SciFi and military history…a perfect “what if” sort of thing and especially the German WWII references were a total hook. The coolest thing was how smoothly everything flowed with this build. My approach was of total freedom and to use it for testing techniques I don't usually get to try while doing my aircrafts and battleships. I had the greatest time assembling it and especially during the painting and weathering process. I absolutely loved this model!…so much that I will be surely doing more armour models (and other SciFi) for now on, cause they really give you the chance to explore and try lots of weathering techniques. I know there is plenty of room for improving and polishing some of the techniques, especially the chipping that turned out to be just ok. Please any comments, criticism and tips are welcome! cheers, Jorge
 -
 Greetings this is my first post in this forum. Thanks for watching.
 -
Hi, I've recently started a new project: the Ferrari 312F1 1967 from Model Factory Hiro, 1/20. This is one of the greatest kits I've worked on. Here are few pics: First, test fit. No glue on the parts... nice fit :wink: 14 first engine parts: few parts of the gearbox: some of the cockpit parts: assembly of oil tank by welding: preparing front cooler for welding: Small progress on engine, some of the parts glued together... Few holes and...few rivets: Resin rivets: Backside view : I set about installing mirrors on the body ... not so easy! I noted the dimensions depending pictures of the car and decorating instructions for positioning. Drilled two holes to be able to insert copper wire in each mirror, and drilled the upper body including one hole slightly larger on the front for adjustment. I let a bit length for inserting two bolts on the inside face of the bodywork part. Few things were done on the engine and you can see the comparison with his little brother from 1969... Wheels painted gold: Onc again 67 & 69: Time to test the "Surface Primer" from GRAVITY COLORS. the good point is that it works upon resin, metal and plastic. First of all some parts need to be prepared or finished before painting process. ... And holes need to be done once again! But it seems I like rivets :roll: 1st, drilling the PE: In position: holes drilled in the resin tub : another test fitting next to the 1969 little sister. Mirrors details: Time to play with the gun Mr Sparmax Flat Pattern & the Primer from GRAVITY COLORS Pics with and without the camera flash: Surprising 1st almost transparent coat, then miracle and a real pleasure to work with! The nose Still little work to do on the nose Top results: Slight problem on the nose and upper body part due to Staedtler permanent ink marker: still visible after primer... Wet sanding and putty Mori Mori Next step of the painting process. A light color coat is done over the grey primer. That will be the Giallo Modena for a great and bright Rosso Corsa! Sanding and primer... ... Yellow: Rosso: prepared and primed: ZP Black Here are the "wrongdoers"... :twisted: GRAVITY paints are AWESOME!! Easy to work with, extremly thin coats can already give a beautiful result and a strong deep satin finish. They also dry very quickly: perfect!! Next step is the finnish coat that will be given by the Clear. So let's go for the Gravity Colors clear coat test! New gloves, stirrer and cup for the mix. 3 components: clear, activator and thinner with a 3:1:1 mix ratio. I always let the mix at rest for about 5 to 10 minutes in order to let allow to the chemical mix to degas. You can add more thinner if necessary. Then, one mist coat and, 5 to 10 mn later, a wet coat (or more): that's all! Parts drying in the "magic box": To sum up: Great and pleasant product. The gloss is... SHINNING!! Deep gloss even if thin. Only 6ml of clear 2ml of activator and 2 of additive thinner were used... Alclad gold on the center of the wheels. The ones shown before were the 1968 312 F1 The tub is drilled and equiped with 0.5 stainless steel rivets. Then the tub parts are assembled (welded) with low temp solder (70°C). Same thing for the front tub part with Calibre 35 0.7resin rivets this time. The frontwhite metal bulkhead and his PE part are drilled, but I didn't used the PE part... I just used it as a template for, I think, a more realistic result. Once again, Calbre 35 0.7 resin rivets were used. The steering column is cut and the external part of the steering rack is replaced by stainless steel 1.2mm syringe needle cut at the right size. 0.7 resin rivets once again. Pedals won't be visible at the end... http://i21.servimg.com/u/f21/12/38/43/52/dsc07214.jpg[/ Front face of the dashboard installed in the tub: Aft: Close up: Gauges are covered with a "glass" made of Rodhoid cut with a Waldron Punch & Die but it's not really visible on the pics :? ... Cavallino ! Radiator is ... empty! I've tried to make it a bit more realistic or, if not, just more pleasant for me :mrgreen: Brass 0.8 and Alu scotch "aircraft" type: Nice and still bright... Fwd and aft mesh: Primer GC: Dampers are great: made of machined aluminium. Just a detail added from F1 Specialties. I wonder if I haven't already seen the same detail added somewhere... Not perfect, but not bad Black ...is black: Almost invisible once the engine is assembled to the body, but I couldn't resist :twisted: Teflon mask and Orange FRAM from Gravity Colors. Oil filter done :wink: Hope you'll like it... Thanks for reading. KR, Pascal FORZA!
-
Hi everyone, It's been a while since my last post and it's about time I get back on here. Today I'm sharing a build that just finished up a couple weeks ago. It's Fujimi's 1/20 Ferrari F92A (reboot of an old Modeler's kit). The Ferrari F92A was Ferrari's challenger for the 1992 F1 season. And it was one hell of a challenge. Equipped with an ill-designed active suspension and experimental aerodynamics, the car proved to be an absolute handful. The drivers were Ivan Capelli, an up-and-coming young driver, and Jean Alesi, a man no-one in the paddock could argue lacked talent. Both drivers struggled mightily, to the point that it derailed Capelli's career. Both drivers would later say it was the worst car they every drove. Alesi took 2 podiums to Capelli's none, and Ferrari limped to a distant 4th in the championship. The kit is a nice, basic affair that yearns for more detail. I started with carbon fiber decals from Scale Motorsports covering the floors and wings. I also added cigarette decals from Tabu and used the kit decals for the rest of the car. Wing wires in the front and rear driveshafts were made from metal rod. I added some detail to the cockpit with a set of Eduard's pre-colored photoetch. It's a lovely product and I will use this much more often. The exhausts were lacking in detail and the airbox was lacking in existence, so both were covered by 3D printed parts from Shapeways. They were nice to work with. A little sanding and Tamiya primer and they were good to go. Extensive wiring and plumbing was done with solder and various sizes of fishing wire. Body paint is TS8 from Tamiya, while the rest of the car is finished with Vallejo acrylics. Thanks for looking! Jake
-
 As you may have seen in my WIP, I have been building this Model T fire truck for a good friend of mine, to add to his collection of model and real fire engines. It is the relatively rare Gabriel/Hublot diecast and injection moulded kit and I have to say, it's great. A bit toy like in places with visible screw heads from the construction but the detail is brilliant for such an old kit and the fit of parts is superb. Anyway, here's the pictures and I hope you enjoy......
 -
Been a while since I posted a WIP but yet again it's an emergency vehicle, a 1914 Ford Model T Chemical Hose Truck to be exact. I am building this for a friend of mine and it is the 1/20 scale Gabriel kit from 1978, a brand previously unknown to me but I'm kind of hoping someone else has built one of their kits? The kit itself is a mixture of diecast metal and injection moulded styrene with white rubber tyres, some acetate clear parts and some string for the hose thrown in for good measure. It also has a small self adhesive sheet of markings for a truck based with the Lancaster Fire Dept in Pennsylvania. I have to admit, I have never tackled diecast before and I'm quite surprised by the huge amounts of flash on the metal parts. If anyone has any hints or tips on how to deal with parts like this it would be gratefully accepted! Here are the obligatory box and contents pics....... I'm hoping to make a start cleaning up the metal parts tomorrow so wish me luck!
-
Hi everyone, Here's a build I finished a while back but neglected to upload photos of. I built Tamiya's wonderful 1/20 Lotus Coventry-Climax 25. I finished it in the livery Jim Clark (in my opinion the greatest racer of all time) won the 1963 South African Grand Prix with. Clark led every single lap, won by over a minute, and lapped every car except Dan Gurney. It was his seventh win of the season - out of nine races. I used Tamiya Racing Green for the body and a combination of Alclad and Vallejo acrylics for everything else. The kit was a joy to build. The only problem is the engine cover doesn't quite fit right, but I'll display with it off anyway. I used IndyCals for much of the build, they were great as always. I'll be checking eBay and my local hobby shop for another one of these, it was a wonderful kit. As always, comments and critiques are appreciated. Thanks for looking, Jake