
danbuoy
-
Posts
765 -
Joined
-
Last visited
Content Type
Events
Profiles
Forums
Media Demo
Everything posted by danbuoy
-

Sailor Swift and the Brown Water Navy: Revell 1/72 US Navy PCF Swift boat
danbuoy replied to danbuoy's topic in Vietnam GB
Managed to squeeze in a quick bit of modelling last night, despite the heat. Fitted the windows to the cabin and bridge sides, and also attached the upper bunk on the port side of the cabin. Then had a go at fitting the side pieces to the hull. This was a bit of a fiddle to get them lined up with the front of the bridge which I'd already fitted, and still needs a bit of fettling. Decided to stop last night, as it was getting late, and I feared I'd end up making it worse. I'll have another go at it next time. So, here's how it's looking at the moment; -
Sailor Swift and the Brown Water Navy: Revell 1/72 US Navy PCF Swift boat
danbuoy replied to danbuoy's topic in Vietnam GB
Thanks, I really love the detail on this kit. Looking forward to getting the rest of the cabin structure on. -
Sailor Swift and the Brown Water Navy: Revell 1/72 US Navy PCF Swift boat
danbuoy replied to danbuoy's topic in Vietnam GB
Windows fitted to the front of the bridge; This section then had the instrument panel and wheel attached before it was fitted to the hull; Also fitted the radar screen to the side of the seat. The instructions say to just paint the whole thing grey, but as the actual circular screen is moulded, I decided to paint this green; Painted the tiny fire extinguishers, and installed them in the cabin, though they will be all but invisible once the sides and top are fitted. That will be the next step. -
Sailor Swift and the Brown Water Navy: Revell 1/72 US Navy PCF Swift boat
danbuoy replied to danbuoy's topic in Vietnam GB
Finally finished painting the deck, and got this attached to the hull. Also fitted the bridge interior, the galley and one of the bunks; Next step is the fire extinguishers, then fitting the windows. Once they are fitted, I can fit the whole bridge and cabin structure. -
That will be a massive help, especially now that all the airbrushing is out of the way, things are starting to come together with my Swift boat.
-
Sailor Swift and the Brown Water Navy: Revell 1/72 US Navy PCF Swift boat
danbuoy replied to danbuoy's topic in Vietnam GB
Thanks, I will try that. Swift boats were based on work boats used with oil rigs in the Gulf of Mexico, so they are based on a civilian design. I always thought the silver framed windows in the cabin sides are very reminiscent of some kind of river cruiser. -
Sailor Swift and the Brown Water Navy: Revell 1/72 US Navy PCF Swift boat
danbuoy replied to danbuoy's topic in Vietnam GB
Thanks! Got the masking tape off last night and pretty pleased with how it's looking, especially as the stern isn't exactly a smooth surface. Gave the cabin floor a couple of coats but it will need another. Started on the instrument panel, and painted the window frames, mostly black, but silver for the cabin sides. Thank goodness for paint pens! -
Sailor Swift and the Brown Water Navy: Revell 1/72 US Navy PCF Swift boat
danbuoy replied to danbuoy's topic in Vietnam GB
Got the second coat of red on the hull last night, plus almost finished the deck. Was nice to get around to glueing some bits together. Here is the start of the bridge; -
Sailor Swift and the Brown Water Navy: Revell 1/72 US Navy PCF Swift boat
danbuoy replied to danbuoy's topic in Vietnam GB
Got the first coat of red on the hull bottom last night. Then realised I never actually used any thinner with the Tamiya paint but it seems to have come out OK. It was XF7 Flat Red with a dash of XF9 Hull Red to darken it slightly. -
Sailor Swift and the Brown Water Navy: Revell 1/72 US Navy PCF Swift boat
danbuoy replied to danbuoy's topic in Vietnam GB
I can recommend this, it's a nice kit. -
Sailor Swift and the Brown Water Navy: Revell 1/72 US Navy PCF Swift boat
danbuoy replied to danbuoy's topic in Vietnam GB
Finally got some time at the creation station last night, so was able to get a bit more done on my Swift boat. Just hardly seem to have had any time for modelling lately. I have been doing bits here and there, and prior to last night, I had airbrushed the main colour onto the hull and other parts; Last night, I masked up the hull ready for the red; Also started to paint up some parts on the sprue, and gave the deck its first coat; -
Hopefully by the time you are back, I will have managed to post an update on my Swift boat. I have started it, but don't seem to have had much time for modelling of late, due to a holiday and general life admin! Enjoy your holiday!
-
Sailor Swift and the Brown Water Navy: Revell 1/72 US Navy PCF Swift boat
danbuoy replied to danbuoy's topic in Vietnam GB
Yes, the kit literally includes everything AND the kitchen sink!! I never managed to pick up the 1/48 version, but this is a much more detailed kit anyway I think. Just wish someone other than Mach 2 would do a 1/72 PBR. -
I'd like to enter with this please; The riverine war in Vietnam often gets overlooked in comparison to the air war and the fighting in the jungles, but was probably one of the most successful aspects of the US involvement in South East Asia. Operations Market Time and Game Warden both had a significant effect on North Vietnamese and Viet Cong supply routes into South Vietnam. Along with the air war, it is also the part of the Vietnam war that interests me the most. Although the PBR is by far the most well known craft used by the Mobile Riverine Force (or the Brown Water Navy as they became known), the Swift boat was also used in large numbers, and would also be used for coastal patrol. These were all aluminium 50 foot boats modified from an existing oil rig support vessel used in the Gulf of Mexico. They were fitted with twin .50 calibre Brownings above the pilot house, and a combination Browning and 81mm mortar on the stern. With a top speed of 28 knots they were no slouch either. After the end of the war in 1975, a fair number of Swift boats were taken over by the Vietnam People's Navy, some remaining in service to this day. The kit was released by Revell in 2021, following their earlier 1/48 version. The sprues, plus sheet of acetate for the windows; A sample of the very clear instructions; Three options to choose from. Going to go for PCF-65, as I prefer the look of the light grey. Nice set of decals; Plus some research/reading matter; Spent most of last night giving the sprues a wash in warm, soapy water, and working out Humbrol and Tamiya alternatives for the Revell paints listed in the instructions. Given how the boat goes together, I think the airbrush will need to come out sooner than I was expecting, so time to tidy the shed!
- 19 replies
-
- 11
-

-
Wow, great shot, plus the control tower and a hangar as well!
-
I must add, I didn't actually go in the hangars, just got external photos, but that's just what I wanted. Didn't see a single Apache the whole time I was there, they were obviously all tucked up in their shelters.
-
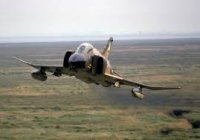
Just caught up with this thread. What an impressive build! As others have said, those photos with the 1/48 Phantom look almost real. Amazing what can be achieved with a load of bamboo skewers and some card. Incidentally, I visited Wattisham back in September. As it was a former Eighth Air Force airfield, it was one I'd wanted to visit for a long time, but of course thats not too easy with it being an army base now. Luckily, the museum was open on the weekend when I was over in Norfolk and Suffolk, so I booked myself in. Had a great visit, including sitting in the Phantom. At the museum, I'd got talking to one of the staff, who, realising my interest in airfield buildings, offered to take me on a detour on the way back to the museum from their HAS, so I could photograph not only the control tower, but also the 4 C type hangars. Being a Saturday, there was no activity at all. I was really pleased about this, as my other plan had been to try and photograph them from the crash gate opposite the memorial. I also managed to visit the Anglia Radar site, which, although not related to the post war RAF Wattisham, was built on top of some of the wartime dispersals. Met the site owner, who gave me a full tour.
-
Go on then!!
-
Very tempted by this, even though I've already expressed an interest in 5 group builds for next year! If I join, it will be with either an Academy 1/72 Dodge ambulance, or an Airfix 1/72 HH-53 Super Jolly Green Giant. Head says ambulance, but heart says the chopper!!
-
I'm interested! Thinking of doing my Matchbox 17 pounder anti-tank gun with Morris gun tractor and Willys Jeep, as well as the all important diorama base!
-
Up for this with either a Revell F-89 Scorpion or an Italeri B-66 Destroyer.
-
I take it an SH-2F Seasprite would be OK? I have Airfix and Matchbox varieties.
-
Possibly in with my Revell Neptune, though not sure I'll get it done within the time frame.
-
For whom the Bells toil. anything rotary winged by Bell...
danbuoy replied to heloman1's topic in Groupbuild Proposals 2026
Count me in. I've got a Revell Super Cobra that's been in my stash a bit too long. -
A few from me, from various previous group builds. Esci AC-47 Spooky gunship from The Italian Job GB Airfix Cessna 0-1 Bird Dog from the Reconnaissance and Scouting GB Hasegawa Cessna A-37 Dragonfly from a KUTA GB Looking forward to this group build starting!