

Tzulscha
-
Posts
644 -
Joined
-
Last visited
Content Type
Events
Profiles
Forums
Media Demo
Everything posted by Tzulscha
-

Wreck of BlueChip Three Zero
Tzulscha replied to Tzulscha's topic in Ready For Inspection - Dioramas
Crap, site used to allow it. That's why I used it. Oh well, will try again in a bit. -
Wreck of BlueChip Three Zero
Tzulscha replied to Tzulscha's topic in Ready For Inspection - Dioramas
The base was made from blueboard, textured with a lighter. Base colours were laid down then smeared with carpenters glue. Static grass was used for the fairway grass and ground foam for the putting green. I use a variety of materials for ground cover, including interesting colours of sand and dirt. After being arranged they way I like, the whole surface is soaked with Woodland Scenic Cement. The burnt grass was airbrushed black with a border of yellowed grass and an occasional streak of white for ashes. A silver pencil was rubbed along the dents and wrinkles on the wing tip to simulate chipped paint. Completed Wreck Dio. Blue Chip Three Zero was the call sign of a pilot who flew COIN missions during the Vietnam war. Following a very successful mission, BlueChip30 was returning with severe A/C damage, having taken hits which disabled the left aileron and right elevator. A cannon round had exploded in the right wheelwell setting the tire on fire. AA had also hit the engine, propeller, disabled the hydraulics and most of the electrical system. Carefully nursing the vibrating, smoking wreckage of his plane home, BlueChip 30 finally sighted his home field and lined up on 12000 feet of smooth concrete. Turning final he hit the flaps switch which promptly exploded in a shower of sparks. The landing gear lever came apart in his hand. As he made his approach, a red flare arced over the field telling him not to land on the runway. A short time before, the base C.O. had given orders that damaged aircraft must find alternates rather that risk closing 'his' airfield. BlueChip30 had to land. Now. Looking for a clear space he spotted a smooth grassy area nearby. As gently as possible he bellied the plane in, leaving a trail of burning fuel and debris in his wake. Gradually the plane slewed to a halt, on the first green of the Generals private golf course.... After I was done with the Dio a friend suggested one final touch...- 15 replies
-
- 25
-

-

-
Wreck of BlueChip Three Zero. This model was commissioned by the son of the pilot A dremel was used to thin panels where damage was to be depicted. A bit of strip plastic was used to depict some interior structure where panels were damaged. An X-acto knife was used to punch holes and tear the 'metal'. More bullet damage to the wing. The right wing had dragged first and bent the wingtip. This was simulated by heat bending the glued wing, and then carving wrinkles with a micro chisel.
-
Welcome to the Future! The Amtronic
Tzulscha replied to Tzulscha's topic in Work In Progress - Vehicles
I did say I'd keep the wheels right? They are just so..so.. shiny The tyres are surprisingly well detailed as well. I suppose it is because Goodyear had a hand in this kit as well. If my pictures were a little better you could read the engraving. Okay, that is about enough of that. Assembly, paint and greeblies lie ahead. This thing is pretty hollow in spite of the twin jet engines and lift fans so I expect I'll have to make up some thingummies to fill the voids. With all the clear bits and computer screens I am thinking of lighting it as well. No headlamps however, does this thing use radar at night? -
Welcome to the Future! The Amtronic
Tzulscha replied to Tzulscha's topic in Work In Progress - Vehicles
The "trailer" bits. More tuck and roll upholstery but still no seatbelts. Somebody is going to have to ride backwards as well but at least we have onboard television screens!. This whole thing seems to be less roomy than the average minivan. Where does the luggage go?! Let's not even talk about legroom. 'Mom! she's touching me! Am not! Are too!' Oh wait, mom and dad are in the front cabin which is no doubt sound proofed. Time for strippers!! Not that kind you filthy minded buggers! This kind. Commercial floor stripper in point of facr. Works wonders on old paint, washes off in water and will even take wax off your floor! Caution! May dissolve soda bottles! (ask me how i know this..) Et Voila! From shiny silver to...umm... olivey green? Must have used whatever was laying around I guess. May have to work a bit harder to get the under varnish off but that's what toothbrushes are for right? Onwards! -
Welcome to the Future! The Amtronic
Tzulscha replied to Tzulscha's topic in Work In Progress - Vehicles
Oooh! Shiny bits! Too bad I'll probably strip 'em all down. Don't need chrome handlebars or shiny computer panels with this much glass. Might keep the rims though... Some more futuristic gubbins. Love the tuck and roll on the seats. Look a bit thinly padded for a car supposed to do 300 mph though. No seat belts either. Must be an optional extra Some bits of bodyshell and the guiderails. Carrying monocoque construction to an extreme, there seems to be no frame with all parts mounted directly to the shell. Should be strong enough. Right! On to the next page! -
The future ain't what it used to be... Back in about 1970 or so the year 2000 loomed ahead like a great big looming thing. Flying cars, space travel, computers, robotic sex sla... Ahem, I digress. Anyway, everyone was predicting what glories the future held. They were all wrong. This thing was AMTs stab at the future and while it flies (sort of) and has a spacey sci-fi look about it, it also has four (sometimes six) wheels so I am going to call it an automobile. This is the most recent re=release of the kit, so it has all the original bits as well as a few more as we shall see. First the instructions, printed using that futuristic computer punch card font that looks so dated now. You can practically see the shoulder length hair, paisley shirts and wide ties of the guys who laid this out. You wonder; "What were these guys smoking and where can I get some?" The clear bits. Originally the kit was released with the green tinted parts. Clear parts were used in the millennium release. I'm thinking some kind of combination. I'm also thinking that the cabin in this thing must have been greenhouse hot, since apparently none of the windows open. Hmm seems we only get 3 images on a page. Of course I'm probably doing something wrong... Oh well. Next!
-
Sci fi mining vehicle 1:32
Tzulscha replied to matiwashere's topic in Work In Progress - SF & RealSpace
The drill rig certainly looks the part. The transport thingy is too shiny, needs weathering.... -
Wallace and Gromit Anti Pesto Van
Tzulscha replied to Brundledonk's topic in Work In Progress - Vehicles
I read this entire thread in one go sitting on the bog. I can't feel my legs!!!! Entirely worth it though. -
I spend a fair amount of time thinking of models that would be cool to build. What the hey, it's cheaper and easier than the real thing. Usually the paint comes out perfectly too. I thought of this one a while back and thought you guys would be the perfect forum to bounce it off... Imagine if you will; The Tower Bridge in London. The lifts start to rise as a racing green Bentley, containing two well dressed young men, emblazoned with a Union jack on its roof and with the sheriff in hot pursuit, roars up the ramp and leaps the opening gap... Cue music.... Dukes of York! Please don't hurt me...
- 1 reply
-
- 1
-
-
Blower Bentley, Airfix 1:12th scale
Tzulscha replied to Brandy's topic in Work In Progress - Vehicles
I have the wreckage of one of these I built as a kid (many many moons ago), as well as one I picked up about 10 years ago but I have put off building it because I wanted to lace the wheels. Your work on the wheels is inspirational I must say. Now I have to squeeze out some time for my own projects. In the mean time a little conceptual modeling is taking place in my tiny squalid little brain... It helps me sleep at night. -
54mm Scratchbuilt Hansom Cab - buckling down to it
Tzulscha replied to perdu's topic in Work In Progress - Vehicles
Nice subject. Not something one sees everyday certainly. (well, not 'round these parts!) I almost understood the commentary too! Just an ignorant yank here... Good show sir! -
I will certainly do a WIP. In fact I'll take some pix when I get off work and start a thread on it. The kit was a concept model developed by AMT back in the '70s . This is what we'll be driving in the distant future year 2000! I can hardly wait!
-
Any of you lot ever built or know someone who has built the old AMT Amtronic kit? I picked up a couple cheap and was thinking of having a go. Just looking for tricks and tips.
-
Hobby Boss - F-105D - 1/48 - Censored Nose Art
Tzulscha replied to Tsar Bomba's topic in Ready for Inspection - Aircraft
Cherry Girl! The one I saw had the refueling door between her legs. Right in the 'sweet spot' in fact. Which was the joke of course. Fun for the boomer. That's the paint job I wanna do. If ever I get 'round to doing my thud... -
That's a brushed paint job? Very impressive! If I can be nosey, how did you do your panel lines?
-
I am torn. I want you to work faster so that I can read more about this brilliant build but then you'd be done and there would no more to read. I demand a follow up project! Here is a lump of ore that I want you to turn into a ...er...um... something amazing! Sorry, got worked up there. Please, do continue. Q
-
Luftwaffe '46 " Propaganda-flugzeug"
Tzulscha replied to Erwin's topic in Ready for Inspection - Aircraft
Hah! That's cool. It does look very Geman doesn't it? -
Another build for the guy that flew the bird. This is the old Testors pushmipullyu. I did this as a pretty much straight OOB build a few years back and I recall doing a lot of filling and sanding to get things to fit properly. Still seeing a few seams i missed... Panel lines were done with a sharp pencil and the rivets were highlighted by a light sanding over the paint. One good thing about all those raised lines I suppose.. The base is a chunk of insulating foam cut with a hotwire. The concrete pad is sheet styrene scribed into panels, painted a tasteful cement grey, scrubbed with pastels and caulked with a syringe filled with thick black paint. Grass is railroad static grass applied over a nice muddy brown base colour. I cheated the extra windows using the kit decals at least partly because I didn't have time to do a full blown interior for the model and I am lazy. 3 inch cables were used to tie the plane down because, well it's windy around here. This is an ANG bird so it shouldn't have weapons onboard but the customer wanted them so there you go. Quick and dirty, cheap and cheerful, customer was happy, I got paid, and as they say, Robert is your fathers brother!. Right, go ahead and start the poo flinging! Q
- 6 replies
-
- 17
-
-
Thank you gentlemen, you are entirely too kind. No really, I mean that. I am reviewing the pictures again this morning and seeing all the flaws, errors and simplifications. Personally, compared to what I have seen some of you guys post, I would call it barely competant. On the other hand it IS finished and I think the guy I built it for was chuffed to have it so there's that. The good thing about building for someone else is that it forces me to not obsess with details, so that I actually finish a project. The bad thing of course is that I can't obsess with details.... Anyway, Cheers!
-
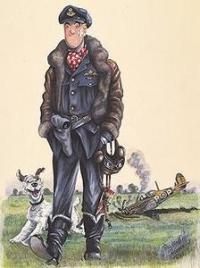
Call this an experimental post to see if I can figure out how pix are supposed to work... The old Matchbox kit, built for a chap who learnt to fly on these things. The Man himself Brave fellow I must say.
- 7 replies
-
- 16
-
-
Mr Codger, Sir. I am a codger myself but am working my way towards curmudgeonhood. (Shaking fist at kids on lawn) *Ahem* I've been following this thread as an anonymous lurker since the beginning and I find myself compelled to sign up on the forums just to express my admiration for your efforts. I've been building for over fifty years myself, a lot of it scratch building and you are showing me new wrinkles even now. I inherited a Pocher 540K as a wreck but was offered too much money to sell it before I gave myself ulcers trying to rebuild it. I find myself regretting that decision after watching this thread progress. (Well, maybe not, it WAS great flipping wodgers of cash.) You sir, are nuts and I mean that in the best way possible. I shall continue to follow this epic thread to it final conclusion. Avidly!