

Reilly
-
Posts
189 -
Joined
-
Last visited
Recent Profile Visitors
1,094 profile views


Reilly's Achievements
")
New Member (2/9)
282
Reputation
-
 Valid point. Given that in the second half of 1944 617 Squadron is involved in the attempts and eventual sinking of Tirpitz providing a grand slam might have been appropriate. After reading the comments on decals for 617 Sqn I had a look and indeed in my case there is a pachyderm in the box. Nothing for 617. Strangely enough we checked over all the parts for damage, nobody thought of looking at the decal sheet. I was planning to paint mine anyway rather than using the decals supplied. I do need to find out what size they were as that seems to have been whatever the squadron painted at the time. That brings me to the research needed for this kit. Fortunately it has all the options included but the hard part I have found is finding what was fitted to a particular aircraft at a set time. I'm going for 1943 which was a changeover for many radios, antennas, nose blisters, bomb sites, etc etc.. Research can be fun as well.
- 1,020 replies
-
- 1
-

-
- Wingnut Wings
- Lancaster
- (and 1 more)
-
I've been reading some of the comments on this thread with interest. I also see there's somebody on one of the other parts of the forum that is undertaking a three Lanc build. I'll be following it with interest. I've been looking into the background of this model and the supplied instructions, issues with moulds, Border Models (BM) versus WingNut Wings (WNW) among other things. Let's start with my conclusion, this model was never finished by WingNut Wings, I'll elaborate on that and secondly I suspect that this is a one off unique opportunity for a kit with this level of detail (at least in my lifetime). Firstly WNW; we know that Sir Peter Jackson was planning a DamBusters remake and if he does it via a series I'll be one of the first to sign up for whichever service streams it. Secondly he is also trying to build his own airworthy Lancaster. There's a YouTube video somewhere which shows a New Zealand company which is collecting the necessary parts and they have quite a number stored in a couple of warehouses including engines. Given that it's hardly surprising that WNW decides to bring out a Lancaster model with the same level of detail and dedication that they have shown to their other kits. Unfortunately along comes Covid and New Zealand is closed down. Along with other stories of discord in the WNW management team the operation is closed down. The story, as far as I know, is that WNW was working with another Chinese mould company who after not having been paid by WNW sold on the moulds to Border Models. BorderModels then decides to make a go of it and launch the kit. There seems to be some legal wrangling in the background as to whether this is all above board or not but as that discussion has been going on for some time now and a kit has been released it would appear that something has to have been settled otherwise somebody in New Zealand (one of Sir Peter Jackson's other companies) would have been all over it and issued import embargoes. The Chinese may not respect intellectual property as we do in the west but a court in other parts the world could block import. Just for interest some of the WNW staff are planning a restart under a company called Kotare Models. It gets interesting when one starts looking at the instructions, that rather remind me of the old Japanese ones we used to see 40 odd years ago. They provide decals for three machines, Phantom of the Ruhr, Victorious Virgin and Guy Gibson's Lancaster. In the case of Gibson's Lancaster, no Upkeep bomb. There are different parts supplied for a wide range Lancasters over a number of years (turrets, nose cones, antennas, flare chutes, gear, engines, etc.). To me this suggests that WNW were planning a number of versions but they still hadn't finished them, the 617 Sqn Lanc being an example of this. BM don't seem to know which options are associated with which Lancaster, they just provide a question mark in the instructions leaving it as an exercise for the modeller. We've all heard about the issues with moulds and BM's work in improving various parts, perspex being a case in point. I suspect they bought the moulds but the tooling hadn't been completed. Chinese tooling shops are not the best with maybe one or two exceptions. Just making the mould is only half the work and it's a reason that a lot of European companies have an extensive tool room. BM has probably been behind the curve on completing the moulds so that they would function as required but now have something workable. In addition they don't have the R&D to complete the WNW work on say a DamBusters version of Gibson's Lancaster. I'm convinced that parts wise we're looking at WNW's work. The details is stunning and its this that is going to limit the volume of the release. That is unless BM has the skill to manufacture new moulds or have the original mould company make new moulds. Its for these reasons that I think we will only see a limited release of this kit. This is a one off chance to get something with this level of detail, get it early before BM decide to chance further runs with the moulds they now have. Apologies for the conspiracy theory type summary. It's just my opinion after putting some study into the kit and I could be wrong on a lot of things. I'm looking to make a version associated with our family hence the interest.
- 1,020 replies
-
- 3
-
-
- Wingnut Wings
- Lancaster
- (and 1 more)
-
Amusing Hobby 1/35th Centurion Mk5 build
Reilly replied to simmerit's topic in Work in Progress - Armour
Some of that LionMarc stuff doesn't seem to be easy to source. I had a look out of curiosity and best I could find was a website in Russia. -
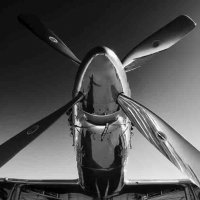
Been wanting to build one of these for a long time. I love the shape and the whole concept behind the bent wing bird. Just adds that bit extra. Last year I finally set to work as part of a Pacific build off with some others. Took longer than I expected. The Tamiya kit was excellent other than fitting the engine cowl around the engine. Spent a fair amount of time rebuilding the cockpit and adding more detail. I didn't want to weather this bird but rather have it in, shall we say, museum condition, all lovingly polished.
-
Thanks Crushkill. Hope I did them justice. They're looking good on the shelf. Sometime in the future I'll knock up some part of Baghdad for them.
-
Thanks for the comments. It took me a bit to get the enthusiasm going for the Tamiya version after I'd completed the Meng but at the end of the day it seems to have worked out. Its flying thingies next for a bit. I've a 1/32 Corsair on the bench but after that there's a Centurion needing some urban camouflage. Cheers John.
-
Nice version of the Merkava Llyod. Looks like the Meng version went together rather well. As to antislip I had a few experiments in that area. Eventually I used some Mr Surfacer 500. I painted on a thin layer and once it had set a little bit I used a rough brush to pickle the surface. Didn't look too bad when I was finished. In some of the other kits Meng provides an antislip surface and at 1:35 its quite fine so don't overdo the Mr Surfacer. Cheers John.
-
Ok, finally finished so here's some decent pictures of the end result. At the start of this thread I said I'd compare the two Bradley kits, Meng and Tamiya. Here they are together. Things were going well then this happened: It has since been repaired and returned to service on the display cabinet shelf. As to which kit was better; detail wise the Meng version wins hands down right down to the detail on the various tool clamps. No brass needed in the case of the Meng kit other than what was provided. Decals were of high quality compared to Tamiya which just fell apart in some places. That said some decals in the Meng kit were in places that are hidden from view and then when they would be in view they are missing, somebody made a few strange choices. The clear plastic provided for the optics on the Meng kit make it look a lot more realistic than the lack of in the case of Tamiya. More need to follow this route but it does mean that they have to be protected (or added later) when painting the main vehicle. Construction wise the Tamiya is childishly simple and it all fits together well without the hours of fettling that almost every part of the Meng kit required. Even my kak handed efforts with the Eduard PE on the Tamiya weren't too difficult although I didn't replace everything with PE. On the whole I'm pleased with the combined result and happy that I'm not going to be looking at another Bradley for some time. There's still one in the stash but its staying there for a few years. In both cases the track delivered with the model was used rather than after market. The Meng set will withstand close inspection, the Tamiya rubber bands maybe not so close but I'm happy with the results. That's all folks, thanks for looking in and the appreciated comments.
-
Turret paint job repaired and assembly complete. It really does have a two tone look. Try and reduce that later. Adding the decals was a pain. Maybe they were old but did have the tendency to fall apart. I'll have to paint over the missing parts. Some of them really were a bit of a joke. Tamiya seems to expect the decals to fit over the massive rivets on the armour plate so spent a lot of time lining things up and cutting holes in the decals only to have them then fall apart when applied, aargh!! Problem with pictures is that the parts I missed show up rather well, back to a bit of weathering.
-
Hi Gaz, Thanks for the link. There's some interesting stuff on that site and the flexible foil looks like a solution for a few things. Up to now I've been using the lead tops of wine bottles. Cheers John.
-
Some minor work but turret nearing completion. Need to find more time to work on this and push it to the finish. Turret bins completed. Time to put it all together and paint it up. Had hoped to complete the sighting mechanism on the front of the turret but had a minor paint explosion with the airbrush due to bad drills on my part. Need to sand down some of the paint job and start again. Shouldn't be too much and being a little rough it should add some patina to the overall effect.
-
Takom FV432 converted to a FV436 Command Post
Reilly replied to Dads203's topic in Work in Progress - Armour
Truly amazing attention to detail. I'm enjoying watching this taking shape.- 228 replies
-
- 1
-

-
- Clansman
- Conversion
- (and 1 more)
-
Time for the turret. Eduard provide about 50 grab handles which is just as well. I still haven't mastered creating four folds in a piece of metal that is roughly the size of the end of the tweezers. I'm convinced Eduard are secretly sadists. After perseverance I managed the requisite 12 grab handles with most of the rest being binned. Quite happy with the results, now hope I don't lose half of them when I use the airbrush. Next job is the bins for the ammunition cans.
-
All brass bits added to the hull and side skirts added. Didn't bother replacing the ladles on the sides. After looking at the Eduard effort decided that with a bit of paintwork the Tamiya ones looked better. Sometimes PE is a bit 2-dimensional.
-
Finally some progress o the Tamiya Bradley. Wheels and tracks fitted along with basic paint job on the hull. I used the rubber bands provided by Tamiya. Had to soften them up a bit as they were bent to the left. Fine if you want to go round corners but not much use on the model. As the tracks are covered by the skirts decided it wasn't worthwhile going for any of the aftermarket stuff.