Graham77 Posted April 28, 2012 Author Posted April 28, 2012 Well all of the pieces are coming together nicely (for a change), Firstly the air intakes and the rear wheel arches were added Then I mated the interior to the chassis and came up with this And finally added the wheels to virtually complete the chassis Just the turbochargers to add to the engine and some touch up painting and weathering then the chassis is complete. I had thought about adding some cables but its all got a bit tight in there, I am now even more impressed with those car modellers that can add the leads etc to the engines very fiddly and still a tad above my ability level (although I may have a go at it on the Cobra). The bodywork is also nearly finished with just the glazing to add although I think I will join the body to the chassis first then add the windows so they don't pop out during the twisting and stretching that I guess will be needed to make it fit. Hopefully in the next couple of days this may be making its way to the gallery Cheers for now Graham
Smiffy Posted April 28, 2012 Posted April 28, 2012 Hopefully in the next couple of days this may be making its way to the gallery Kewl. Look forward to it.
Graham77 Posted May 3, 2012 Author Posted May 3, 2012 All together now with the glazing test fitted it is nearly there With the windows on the interior is barely visible so I may trim one of them as if the window was down and has anyone ever used white glue on tinted windows (PVA) I know it dries clear but will that look bad amongst all the black. Could you mix it with black paint to get a black glue? I am not sure and would appreciate any advice anyone has. Finally where do I find a 1/24 Angelina Jolie to steal it...... Cheers Graham
Graham77 Posted May 17, 2012 Author Posted May 17, 2012 (edited) While pondering how to attach the windows the good old boys got dropped off by the postman, so its out with the Cobra (for now...bigger plans for that one) and in with a good old Dodge Charger that is way more appropriate for this build.... can't wait to get started on it. Keep up the good work lads just over a month to go now Graham Edited May 17, 2012 by Graham77
Graham77 Posted June 4, 2012 Author Posted June 4, 2012 Nearly finished but at the end of the GB this is how the 220 looks, glazing is in and opened one of the windows so the interior could be seen better There is a little bit of paint to touch up and a couple of decals to go on and the Charger and Cobra will be heading to the vehicle section soon Cheers for all the hints and tips along the way Graham
Graham77 Posted June 9, 2012 Author Posted June 9, 2012 Decals are on and the paint is touched up. I have caught the car bug again and hope to fly through the charger (although having just read AMW's review of the General Lee I have I am slightly scared) Here are the last pics of the 220. Will have a play with my wife's fancy camera to get a couple of pics for the gallery but for now this one is complete Cheers Graham
Graham77 Posted June 9, 2012 Author Posted June 9, 2012 So on with the charger and unfortunately the mag had a fairly accurate report, the fit doesn't seem great and there is a lot of flash and mould lines over most parts. Fortunately the weather was good this evening so it was a good night to sit outside sanding down the body, once i get some primer on i'll see if it has been thoroughly smoothed out. Despite all this I am looking forward to putting it together and sorting out the issues. Enough words here are some pictures First most of the kit parts, you can see the completed roll cage (we'll see how well it fits later) A close up of the nose and the bonnet (fit is poor but hopefully the magazine solution will be easyish to implement And finally the engine, looking forward to getting some paint and maybe some wiring onto this More later on in the week Keep building chaps I'll see yu at the finishing line Cheers Graham
marc Posted June 10, 2012 Posted June 10, 2012 looking good Graham, one of the nicest builds of the 220 I've seen. Off to a good start with the charger as looking forward to some more updates
Mike N Posted June 10, 2012 Posted June 10, 2012 Nice work on the 220 Graham And looking forward to seeing the General Lee coming together in record time! Mike
Graham77 Posted June 13, 2012 Author Posted June 13, 2012 Record time is order of the day and hence a very brief post. Firstly a bit of an overview in the spray booth (Or Boden box as my wife calls them) There is loads of flash etc on this kit however after a bit of tidying up the kit is fitting together quite well, with the exception of the bumpers and the roll cage which are going to be the main stumbling blocks The engine has a bit of colour to it now and has been test fitted to the chassis and the rear running gear to see how it looks Finally for now I am using the chrome of the chrome parts and here are the wheels with their first coat of black and also the headers that have had a coat of Matt varnish to try and take some of the shine off them Thanks for looking in, good luck to all of you taking advantage of Mish's generosity and having a blitz at the end of this build, keep up the good work when you get the time More later Graham P.S Since taking the piccies the bumpers have been dry fitted after some sanding and filling of the body work (pain in the butt but actually quite rewarding looking forward to sanding prepping and painting and seeing how it all looks).... the roll cage though is still a pain in the butt but I am going to sleep on that problem and see how it goes
Graham77 Posted June 21, 2012 Author Posted June 21, 2012 A little more progress the rear end has been cleaned up and primed ready for some paint as has the main body although that needs a little more sanding and some more primer before taking on the orange appearance And the wheels are ready to go on to the chassis Have a week on call now for work so hopefully stays quiet and should get to finish this one off Cheers Graham
Mike N Posted June 21, 2012 Posted June 21, 2012 Coming along nicely Graham, hope you get your quiet week to finish it off! Mike
Graham77 Posted June 27, 2012 Author Posted June 27, 2012 (edited) Little time to post but quite a bit of progress. The chassis and interior are as good as done now, although I think the wheels need altering once the body has gone on according to the article. The bodywork has been sprayed orange, albeit brighter than I expected and currently has halfords lacquer drying ( which has dulled the bright orange, is this normal?) A couple of pics to show the progress Now to sort out the rollcage, add the decals and trim and make it shiny again Cheers Graham Edited June 28, 2012 by Graham77
Graham77 Posted June 29, 2012 Author Posted June 29, 2012 Sadly time has defeated me for the charger. I got some more of it done today but the bits left are time consuming and really need time to allow paint (and quickshine) to dry before doing anymore. Hopefully though it should be finished early next week so I can start finishing off some other GB entries before the USAAF and the airliner GB kick off later in the year. It has been a battle this kit but one I have enjoyed. Here is the last pic for the GB a nice shiny bodyshell ready for the windscreens and the decals. Good luck to anyone who is going down to the wire to finish a model for tomorrow and hopefully soon I should have a poll up to see who gets to pick the prizes Cheers Graham
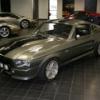
Graham77 Posted July 12, 2012 Author Posted July 12, 2012 (edited) Final update before it heads to the vehicle ready for inspection section Thamks for looking Graham Edited July 12, 2012 by Graham77
Mike N Posted July 13, 2012 Posted July 13, 2012 That looks great Graham, glad you got it finished and shared with us Mike
chrisrope Posted July 13, 2012 Posted July 13, 2012 Excellent, looks superb. I'll start my second one of these someday, the first one I built got trashed by my nephew Chris
Recommended Posts