Search the Community
Showing results for tags 'tank transporter'.
Found 7 results
-
Here are photos of HobbyBoss's Scammell Commander released about a year ago. I recently finished reviewing it for Finescale Modeler, a US model magazine. (https://finescale.com/product-info/kit-reviews/2023/11/workbench-review-hobbyboss-135-scale-scammell-commander-with-62-ton-crane-fruehauf-semi-trailer) This was the most ambitious and challenging kit I've completed in my 50+ years of building scale models. Per the review, the kit suffers from instructions with holes and engineering mistakes for PE parts. However, at the end of the day, I'm pleased with the result. For an excellent detailed walk-through of the build, I discovered Nigel's Modeling Bench on YouTube where he has a many-part video collection of his build. I highly recommend it if you're interested in building this kit. Thanks for looking and for your feedback! Sincerely, David
- 26 replies
-
- 49
-

-

-
- HobbyBoss
- Scammell Commander
- (and 1 more)
-
 Scammell Pioneer Tank Transporter with TRCU30 Trailer 1:72 IBG (72080) The Pioneer was designed in the 20s as a large tractor unit for unmade roads, which eventually caught the eye of the War Office as a potential candidate for tank transport, but it wasn't until later in the decade that it became a more serious tank transporter. Though lacking all wheel drive, it took full advantage of its terrain handling ability that was due in equal parts to its excellent suspension set-up and a powerful engine that was capable of delivering torque at low revs, making it ideal for unmade roads and rough terrain, even though only the rear wheels were driven by the 6-cylinder diesel engine. Its large cab size allows the crew and their equipment to travel inside, which endeared it to them immensely when the heavens opened.. Many unfortunate vehicles were destroyed or captured at Dunkirk, and having lost so many it was never available in the desired quantities, so often worked alongside other similar vehicles, with almost a thousand units built by the time they were discontinued. During wartime a career that long was unusual, so it must have been doing something right. The tank transporter was not originally taken on by the War department, but additional vehicles were purchased from 1937 onward. The cab of the transporter as lengthened to be able to carry the tanks crew in the cab. Coupled with a trailer the TRCU20 and TRCU30 were 20 tons and 30 tons respectively. Even though articulated this was not like modern trucks in that the two were essentially one unit. The trailer featured rear loading ramps and a PTO driver winch to pull any immobilised equipment on board. They were replaced in British service by American vehicles as the transporters proved to be too tall to carry Lend Lease supplied American tanks on British Road. Despite the failings of the trailers most of the cabs were retained and were often seen in general haulage and abnormal haulage post war. The Kit This is new tool for 2020 from IBG in a family of kits with the Heavy Breakdown tractor and R100 Artillery Tractor. There are 10 sprues of grey plastic, a sheet of PE and a small decal sheet in the box. The quality of the plastic parts are very good with some nice fine detail (care will be needed to remove some of the smaller parts from the spures). The windows are provided as a clear film rater than injection moulded parts. Construction begins with the cab. The front sub-frame for the steering axle is built up, this is followed by more sub assemblies for the cab; the fuel tanks, radiator, engine, wheels, equipment lockers, and the main winch. The main chassis is then your next target. The side rails are joined by the cross members and the rear springs go on. At the back of the chassis the sub-frame that makes up the trailer hitching system, and rear wheels is constructed. Now the parts made earlier can all be added onto/into the main chassis. Now the cab itself can be assembled. There are three seats up front with a bulkhead to separate the front and rear compartments. The front cab goes onto the chassis then the rear cab is assembled behind it. Net up we have to build the trailer. The first parts on the bench are the pair of rear loading ramps, these are then put to one side for later. Next the large single chassis frame have the side rails added along with the rear cross member, at the back above this go the mounting rails for the rear ramps. At the front of the trailer the wood effect decking boards are laid down. Under the decking boards a large equipment locker is built up and installed. The rear wheels are added. These do not have conventional axles but more of a double bogie each side of the trailer with two pairs of wheels each side. These are fitted to the trailer along with the plates which go above them. Once the ramps are fitted the trailer and cab can be matched up. Two cable one on each side run to the ramps. Decals The decal sheet provides markings for two transporters; 1. GHQ 8th Army, 372 Tank Transporter Co. Royal Army Service Corps, North Africa 1942 2. "Maitland", 6th South African Armoured Division, Italy 1944 Conclusion If you like your vehicles 1/72 then is for you. The quality of the very small plastic parts is very good though care will be need to remove them. The addition of the nice PE makes this a well rounded kit Highly recommended. Review sample courtesy of
 -
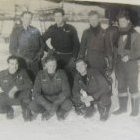
 Having returned to the hobby after a great many years and having a practice build on a few models, I decided it was time to embark on a project to model my Dad's British Army Diamond T tank transporter. He used to drive them during his time in the Army in the 1950's and my aim is to faithfully replicate "his" T. This means I'll be doing some minor modifications, including a little bit of scratch building and custom decals... neither of which are things I've ever attempted before. For the trailer I've purchased Accurate Armour's Dyson 50 Ton trailer - and working in resin is something I've not done either!https://accurate-armour.com/our-products/135th-kits/k168Just to add that I'm a very slow builder. I don't get huge amounts of time to devote to the hobby and I do tend to be away a lot with work. That said however, this is intended to be presented to my old man in a finished state whilst he still has all his marbles! This is him (on the left) with his No.2: And this picture is of one of the tractors in his company. Note the position of the mirrors and the gun hatch on top of the cab. Anyway, on with the kit. For the tractor I'm using Merit's 1/35 M19 kit. Having come from a 1970's Airfix background I'm finding the quality of the kit and packaging to be outstanding. Some of the parts are tiny... and my ageing eyes need extra magnification! Engine block goes together nicely. I've already spent a lot of time on my hands and knees searching for tiny bits of kit that have pinged out of my tweezers! These two parts are roughly 1mm across and fit onto the generator.I had to thin the belts in order to make everything fit. At first I thought it was a problem with the kit but I then realised I'd made a schoolboy error with the orientation. Luckily there is a spare belt because I broke one with a bit of over vigorous sanding. Tip: The longest side of the triangle should be in vertical. Clamping up to keep everything aligned whilst the glue sets... I'm thinking that I should prime and paint it before adding in the air and oil filters (which are different colours). I'm also considering whether I should add wiring looms, or whether that is a step too far for my skills. Work has also started on the chassis.
- 142 replies
-
- 19
-
-
- Tank Transporter
- Merit M19
- (and 1 more)
-
Takom have just released two highly detailed transporter model kits including a Russian MAZ-537G Tractor & CHMZAP-5247G Semi-trailer as well as a US M1070 & M1000 with M1A2 Abrams both in 1/72 Scale. https://www.wonderlandmodels.com/blog/article/two-new-takom-transporters-apr-2019/
-
 Ukrainian KrAZ-6446 Tractor with MAZ/ChMZAP-5247G Semi-Trailer AND Trumpeter T-62 Mod 1960 1:35 Hobby Boss The KrAZ-6446 tractor unit is a modern go-anywhere all-terrain military transporter that is intended to pull a semi-trailer amongst other things. It is built in the Ukraine by the AutoKraz company, and has 6 wheel drive and substantial ground clearance, which coupled with the YaMZ-238D turbo-diesel engine and gearbox lets it climb up to 60% gradients and pull 50 tonnes. The ChMZAP-5427G trailer is an older twin axle transporter for oversized loads, and in military service it is used primarily to transport tanks, with adjustable track guides and eight tyres spreading the load. The G variant is updated with a small well in the load area that is wider and longer than the original, able to carry more load, and is fitted with powered folding ramps at the rear. The Kit This is new tooling, but some of the parts have been seen before such as the trailer (from 2007), and one good thing that isn't made at all clear on the boxtop, in fact isn't mentioned at all other than in the pictures, is that there's a complete T-62 Mod 1960 kit in the box, complete with its own Trumpeter box, instructions etc. that I'll be reviewing separately so that this review doesn't become monolithic in proportion. So, you get tractor, trailer AND a great big tank to finish off the trio and Hobby Boss have really slipped up with their packaging, so be aware. If you're comparing prices between this kit and another manufacturer's kit, you're not comparing like for like. There's a bloomin' great big tank inside the box too! Ok, as long as I've made that clear, we'll move on. Here is the review of the T-62 in its Trumpeter boxing. Go away and read that if you like, then come back here and finish off this review. Or the other way round. Entirely up to you The box is split into three sections by a divider, with one apportioned to the aforementioned T-62 kit, and two to the tractor/trailer. The box contains the T-62 kit in its own box, eighteen sprues and the load bed in sand coloured styrene, two of clear styrene, seven large and nine smaller tyres in black flexible plastic, three sheets of Photo-Etch (PE) brass, a length of brass wire, a sheet of die-cut masking material, decals for the instrument panel, instruction booklet and separate colour painting and decaling diagram. With the T-62 out of the box there's a fair amount of room to spread out the sprues, which will come in handy. The first item for assembly is the big diesel lump up front, which is depicted in serious detail with two pages devoted to its construction and plenty of colour call-outs using Gunze Sangyo paint codes and their names. The radiator, gearbox and power-takeoff box are built up together and set aside for assembly within the ladder chassis, which needs its cross-braces and a few blocks removing first. With both sides fitted, it begins to look like the basics of a vehicle, which is improved further by the addition of the front bumper/fender with PE steps, the fifth-wheel base and horse-shoe, the exhaust system and the front axle with steering gear, struts and hubs/brakes parts. The power transfer box is built and installed under the takeoff box, with drive-shafts from the engine and to the rear axle, which sits on a single mighty set of leaf-springs and has a pivot on which the twin axles are then mounted with a substantial drive-shaft between them too. Fuel tanks, stowage, steps and cylinders are added down the length of the chassis rail, and a pair of twin axle fenders are fitted on brackets at the rear, with light-clusters sat on the rear of each one. The larger set of seven tyres are fitted to the four-part hubs of the main wheels, and the direction of the tread is important, so take care at this point. They push fit onto the axles, and will probably need to be glued to prevent losing any in the future. The cab is made up on the floor pan, with seats and driver controls applied, the front of the cab with window frames, dash board (with decal), pedals and steering wheel fixed to the front, then the front windows with wrap-around quarter-lights glued in from the outside, and masked up with the supplied masks. The back, doors and roof enclose the cab, with windows and door cards fitted to the insides of the doors before they are glued in. The roof has a number of small clear lights and a floodlight added, and then it is time to build up the bonnet/hood, beginning with the wheel arches that flank the engine compartment. The hood, with power-bulge and air box are fabricated, but installed later once the windscreen wipers and large wing mirrors have been fitted, and the cab installed on the chassis. The spare wheel is kept in a large frame that mounts transversely behind the cab, with the wheel to the right and a large box (possibly tools?) on the left, and that's the prime-mover done. Now comes the Goose-neck! The two giant curved beams are set either side of a tapering deck that has two bracing struts across the centre to hold everything square once the tabs and slots are all mated together. A pair of mudguard "ears" are fitted to the sites, and two triangular panels are installed at the inside bottom for additional rigidity. Wind-down legs and various fittings are added, and then the load-bed is made up, with only three parts (top, brace and bottom) making up the main bed, but lots of ancillary parts draped around the sides, some of which are made up from folding PE into tapered boxes. The rear fender and additional mudguards are glued to the back, and under the raised aft section of the deck the pairs of twin axles are mounted on large, triangular pivots, with the smaller wheels fitted to the two-part hubs with pins within them, allowing the wheels to rotate if you don't get glue on them. The spare wheel is later fitted to the top of the gooseneck with a T-shaped clamp. The inner guides on the bed are folded up from PE strips into a C-shape, with additional braces along their length. More smaller braces are fitted along the hump over the wheels, and it may be a good idea to solder these in place for a little extra resilience to handling and brumming tanks on and off when no-one is looking. If you don't have any solder paste already, it's quite useful for this sort of soldering. The loads drive up onto the load bed via a pair of ramps shaped like an old woman's shoe, that are made of four layers held abreast by tubes and capped with a ribbed treadplate for the vehicle to gain traction. The "soles" are blanked off with extra panels, with grab-handles, hinges and the manual handles that you can use to raise and lower them (glue permitting) finishing them off ready for gluing to the rear fender. A pair of stop-brackets are bent up from PE for the load bed and attached to slots in the floor, after which it's just a case of joining the two main assemblies together, grabbing your T-62 and making tank noises while you load it up for transport. Markings Unless you count the decal for the instrument panel, there aren't any, and just one scheme is provided on the glossy painting guide. It's green of course, but if you look around the web, there have been other schemes that are a bit more fun, and even some civilian schemes if you feel like a change. Conclusion Quite a good value package overall, with a tank thrown into the mix unexpectedly, and lots of detail. If you have a thing about tank transporter, or just like to the look of this one, it'll build up to an impressive finished model with a little care. Highly recommended. Currently on sale with a deep 35% discount at Creative at time of writing! Review sample courtesy of
 -
Hello, may I join the party? This GB seemed like an excellent excuse to start on this gem I picked up a few months ago at Hobby HQ in Melbourne: the M-19 tank transporter. I well remember a Matchbox (metal car) catalogue of around 1980, which had an image of a diorama featuring this tank transporter carrying an M3 Honey, and the LRDG set. It was probably a vital element in taking me from metal 'toy' cars into models. Although I'm a plane guy, I like to get around a bit, so let's get into this! Same old box top, the mud is pretty accurate for an M-19 in the Low Countries in 1944-5, or many other bits of Europe at other times. These must have been hell on the roads. Instructions that are easy to follow and all on one A2 size page. How is it that so many manufacturers can't meet this standard today? The parts are also more or less consecutively numbered on the sprues, so it's easy to find the parts. A three-colour kit. Look-shurry! Parts are only a little bit 'soft', but it's almost as good as vehicle kits today. The sprue gates are amazingly small. When I was a kid I usually just broke the parts off, or used a razor stolen from dad, removed from a disposable razor blade. Next time, we build!
- 12 replies
-
- 13
-
-
Hello fellow Members. With some trepidation I offer my completed Tank Transporter for ribald comment and derision. Elsewhere, I have posted photos to supplement comments within other peoples threads so I thought it wise to capture everything in my own. Firstly then, I offer you the T980 Tractor unit: The decals are 'home brewed' and are taken from photo of the real deal. The 'strongman symbol' is appropriate for the era. The windows have been greased and sand added to reduce the reflective area so as not to advertise the unit to enemy aircraft (in fact the area kept clear was usually smaller than my model depicts. The rear end contains a significant load of sand bags to improve traction in addition to Fuel and Water flimsies, a drum of lubricating oils and a captured 'jerry can' (probably 'liberated' from a rescued tank). Heavy duty chain, rope and restraining blocks make up the remainder of the load. The 'Caution Left Hand Drive' sign is a bit of a disappointment as I found it extraordinarily difficult to get my laser printer to match colour - this was the best I could manage. Mmmmm, my very clever mirrors have lost their 'mirrors' and I only spotted that this evening!! So what is visible is the 'blob of PVA' and the carbon fibre mirror arm. This cruelly enlarged photo shows the driver's mates 'bail out' gear hanging on the front of the load bed, the helmet looks ready for the scrap man!! Fortunately at normal viewing distance it looks OK. Come to that, the huge bits of crud in the paintwork disappear as well.
- 10 replies
-
- 2
-
-
- Tank transporter
- Diamond T980
- (and 2 more)